SAML Single Sign On (SSO) Into Crowd Using Bitium
Crowd SAML app gives the ability to enable SAML Single Sign-On for JIRA, Confluence, Bitbucket, Bamboo, Fisheye, and other connected applications from any SAML Identity Providers. Here we will go through a guide to configure SSO between Crowd and Identity Provider. By the end of this guide, your users will be able to SSO into Crowd.
Pre-requisites
To configure Bulk User Management for Crowd, you need the following items:
- Crowd should be installed and configured.
- Admin credentials are set up in Crowd.
To configure your Identity Provider integration with Crowd SAML SSO, you need the following items:
Pre-configurations to make SSO work
- Navigate to Applications->Crowd->Directory and Group and make sure user is allowed to authenticate (This is not needed in the premium plugin).
- Navigate to Application->Crowd->Remote address and make sure Crowd server's IP Address is configured here.
- If you are using Crowd Server/Datacenter version 4.3.0 and above, please navigate to Applications->Crowd->Options. Select Allow to generate user tokens option and Save it.
Download and Installation
- Log into your Crowd instance as an admin.
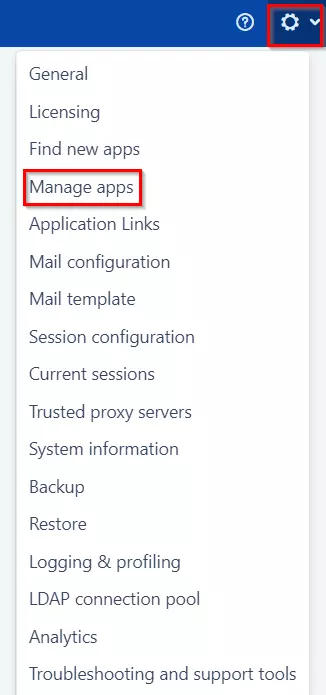
- Navigate to the Administration menu and Click Manage Apps.
- Click Find new apps or Find new add-ons from the left-hand side of the page.
- Locate SAML Single Sign-On for Crowd via search and click on install.
- Login to miniOrange Admin console.
- Navigate to License > Manage License > Release and Download .
- Download the jar file from the Download link.
- Now, click on the View License button to get the license key.
- Log in to the Crowd Admin console.
- Navigate to Administration > Manage Apps.
- Click on the Upload App and upload the jar file.
- Now, click on the Configure button. You will be asked to verify the miniOrange credential and license key.
Plugin Activation
C.a Plugin Activation with Online License- Navigate to Crowd Admin Console → Manage Apps.
- Click on the Configure button of the miniOrange Crowd SAML SSO plugin.
- Log in with your miniOrange account. Once authenticated, you will be prompted to enter the license key.
- Enter the license key and click on the verify button.
- You will be provided license for activation.
- Navigate to Crowd Admin Console → Manage Apps.
- Click on the Configure button of the miniOrange Crowd SAML SSO plugin.
- Click on Choose File button under the Upload your license File here section.
- Upload the license key and click on the Verify button.
Step 1: Set Up Azure B2C as Identity Provider
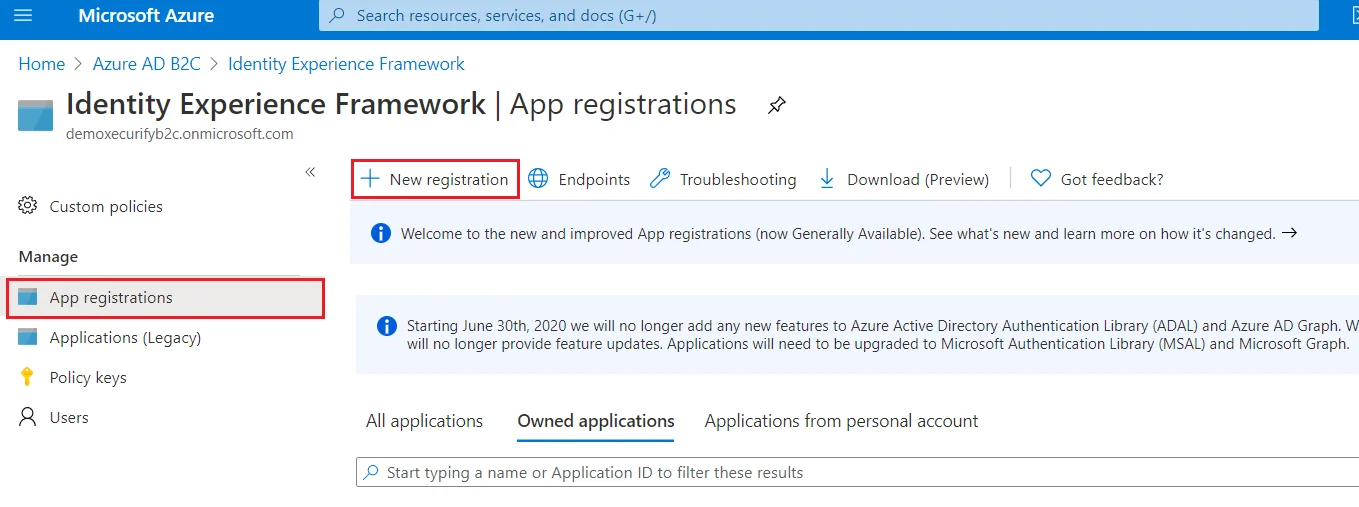
- From the Azure AD B2C tenant, select App registrations, and then select New registration.
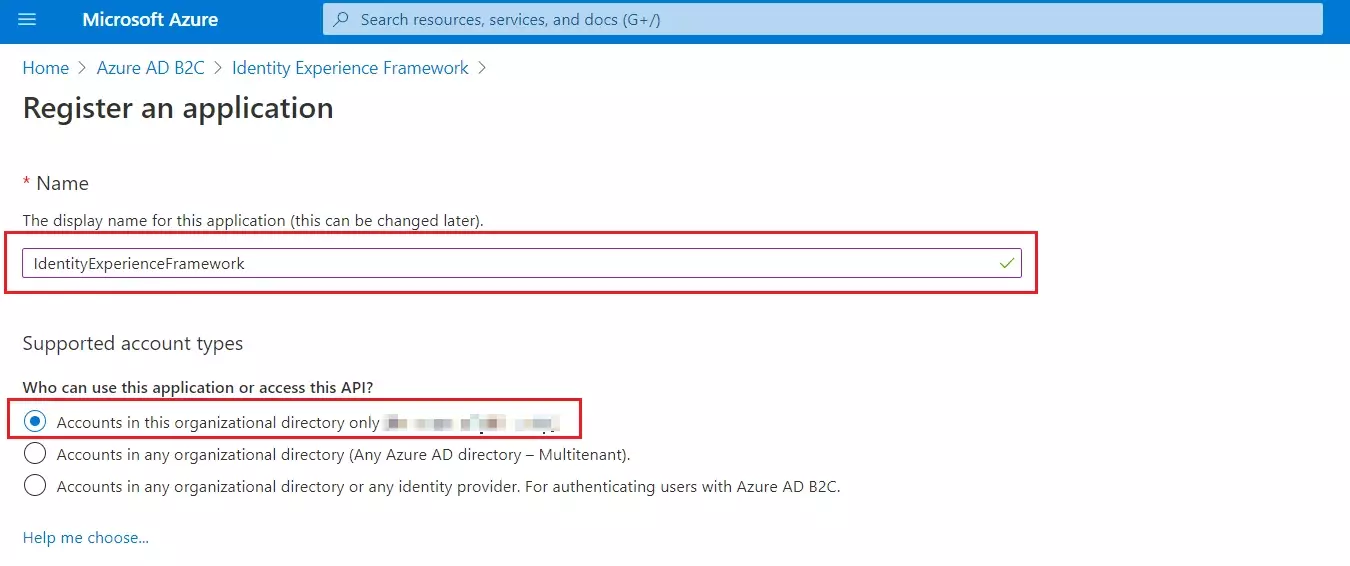
- For Name, enter IdentityExperienceFramework.
- Under Supported account types, select Accounts in this organizational directory only.
- Under Redirect URI, select Web, and then enter https://your-tenant-name.b2clogin.com/your-tenant-name.onmicrosoft.com where your-tenant-name is your Azure AD B2C tenant domain name.
- Under Permissions, select the Grant admin consent to openid and offline_access permissions check box. Now, Select Register.
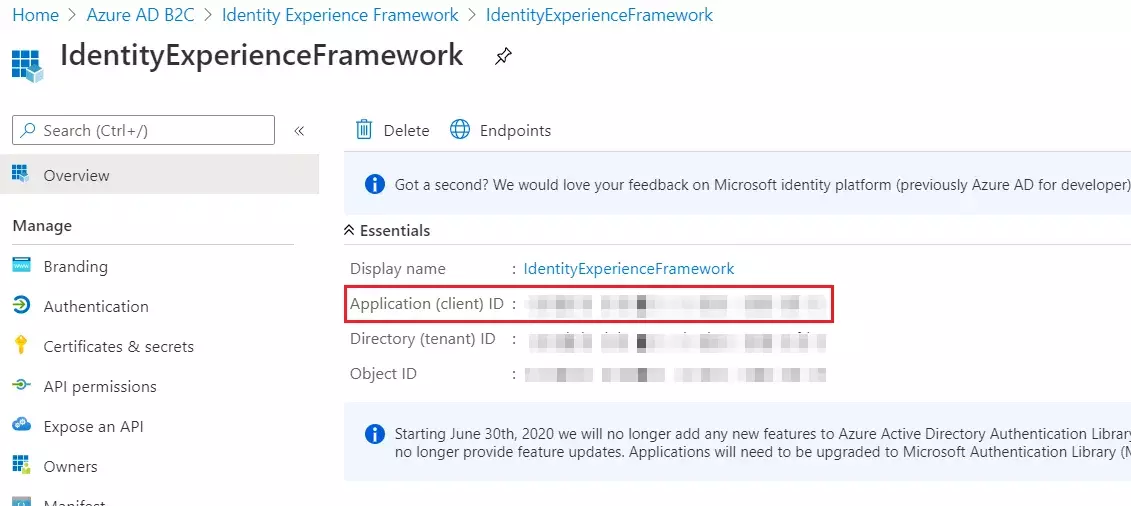
- Record the Application (client) ID for use in a later step.
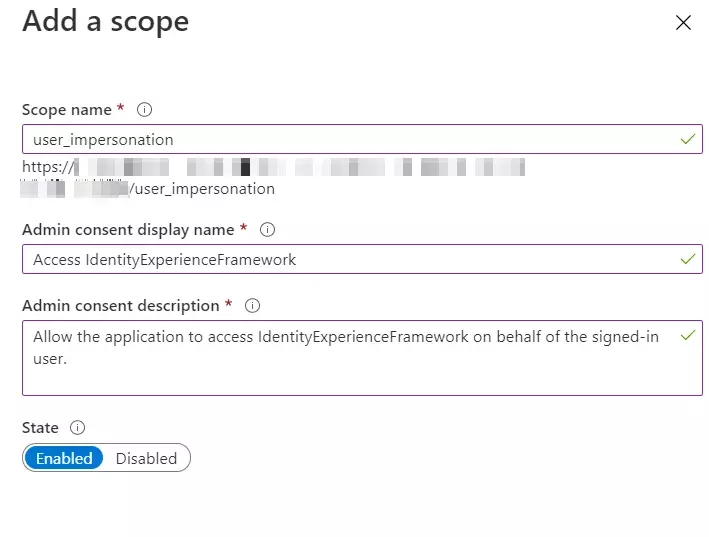
- To Expose the API add a scope under Manage, select Expose an API.
- Select Add a scope, then select Save and continue to accept the default application ID URI.
- Enter the following values to create a scope that allows custom policy execution in your Azure AD B2C tenant:
- Select Add scope and State:Enabled
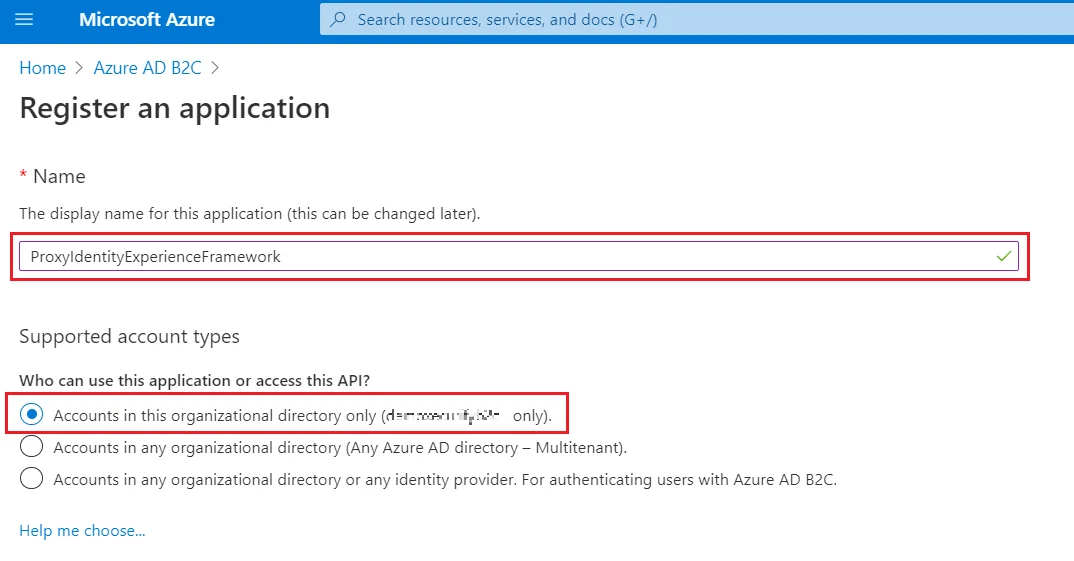
- Select App registrations, and then select New registration.
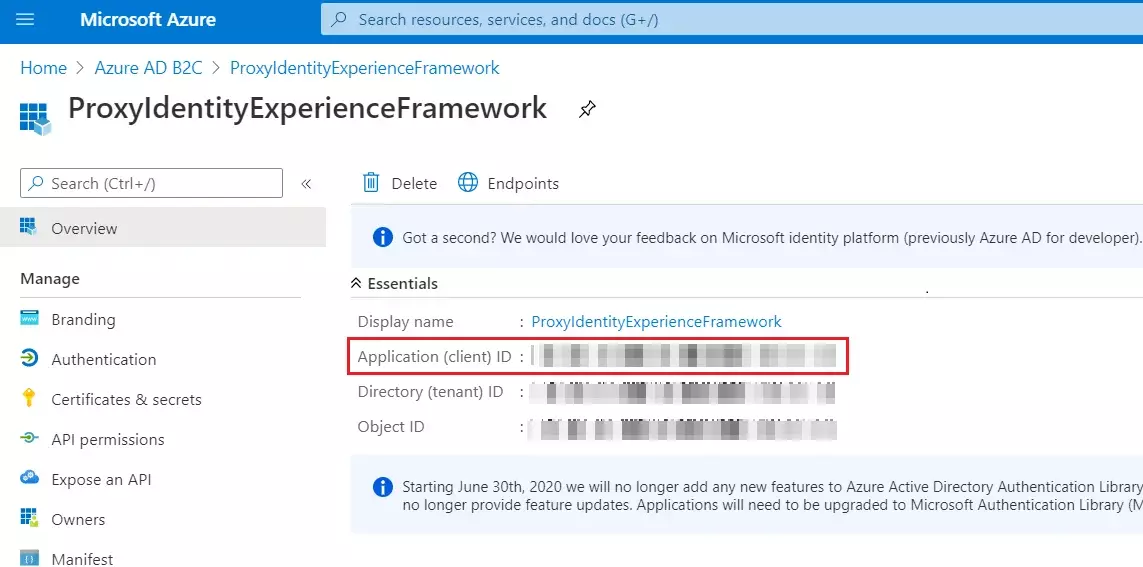
- For Name, enter ProxyIdentityExperienceFramework.
- Under Supported account types, select Accounts in this organizational directory only.
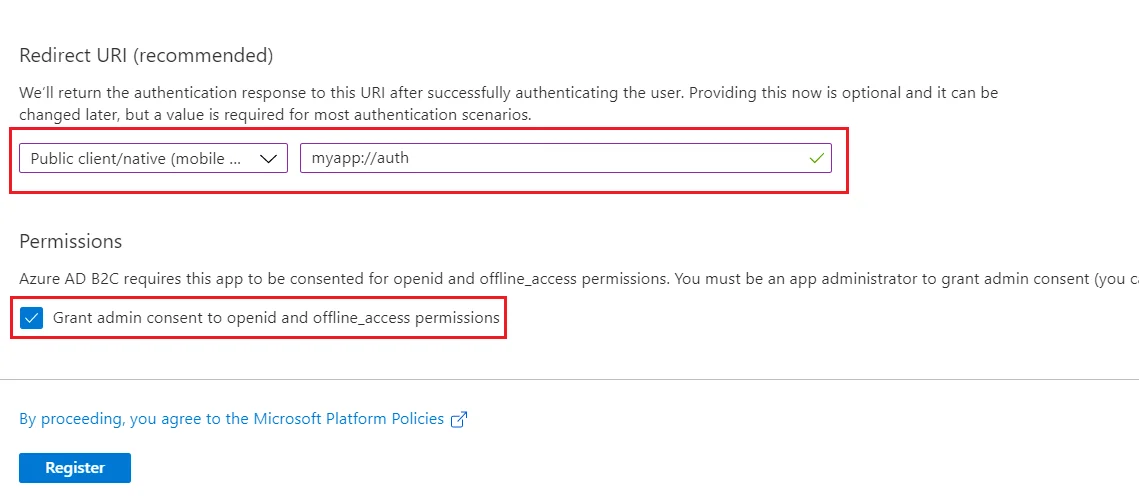
- Under Redirect URI, use the drop-down to select Public client/native (mobile & desktop).
- For Redirect URI, enter myapp://auth.
- Under Permissions, select the Grant admin consent to openid and offline_access permissions check box and select Register.
- Record the Application (client) ID for use in a later step.
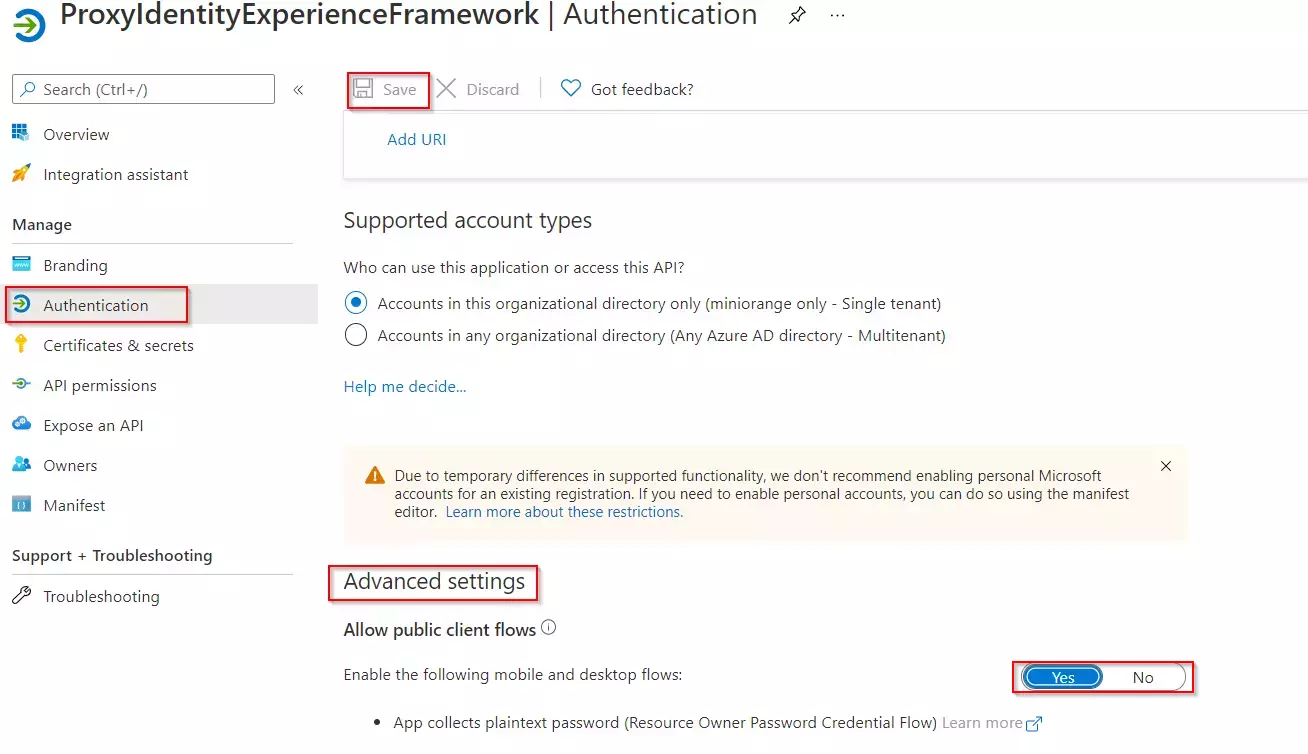
- Next, specify that the application should be treated as a public client. Under Manage, select Authentication.
- Under Advanced settings, enable Allow public client flows (select Yes).Select Save.
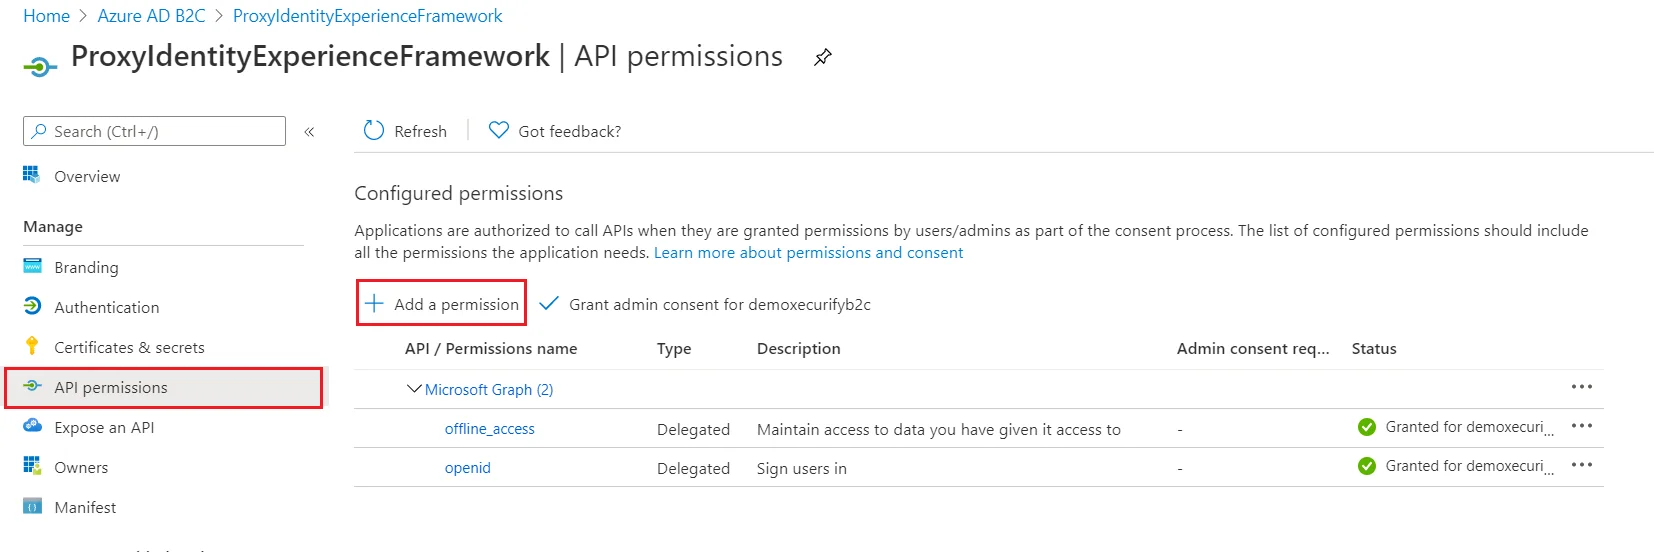
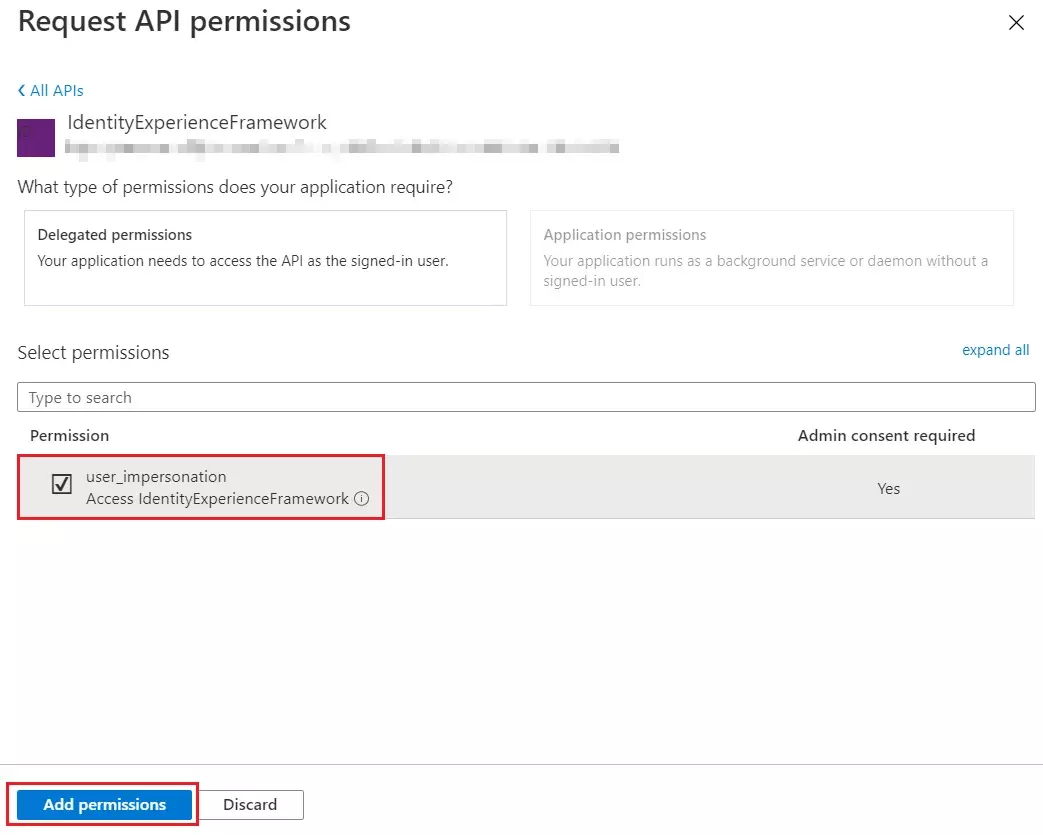
- Now, grant permissions to the API scope you exposed earlier in the IdentityExperienceFramework registration. Under Manage, select API permissions.
- Under Configured permissions, select Add a permission.
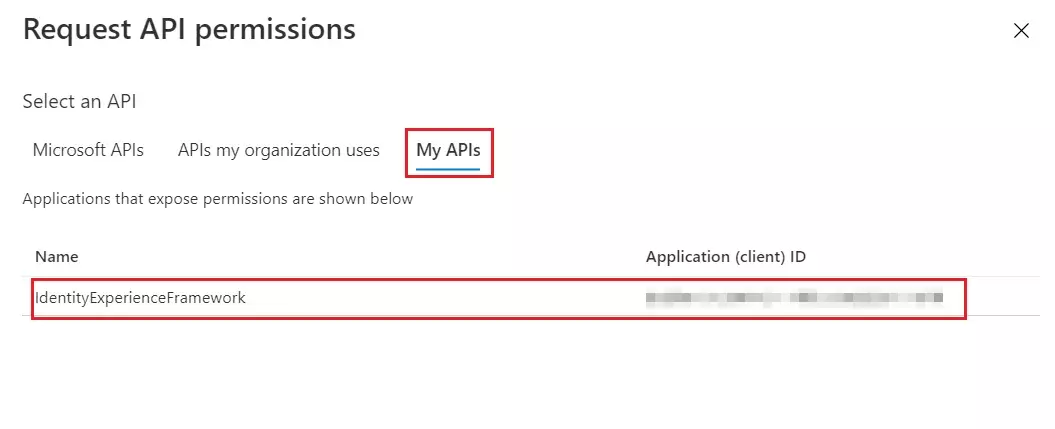
- Select the My APIs tab, then select the IdentityExperienceFramework application.
- Under Permission, select the user_impersonation scope that you defined earlier.
- Select Add permissions. As directed, wait a few minutes before proceeding to the next step.
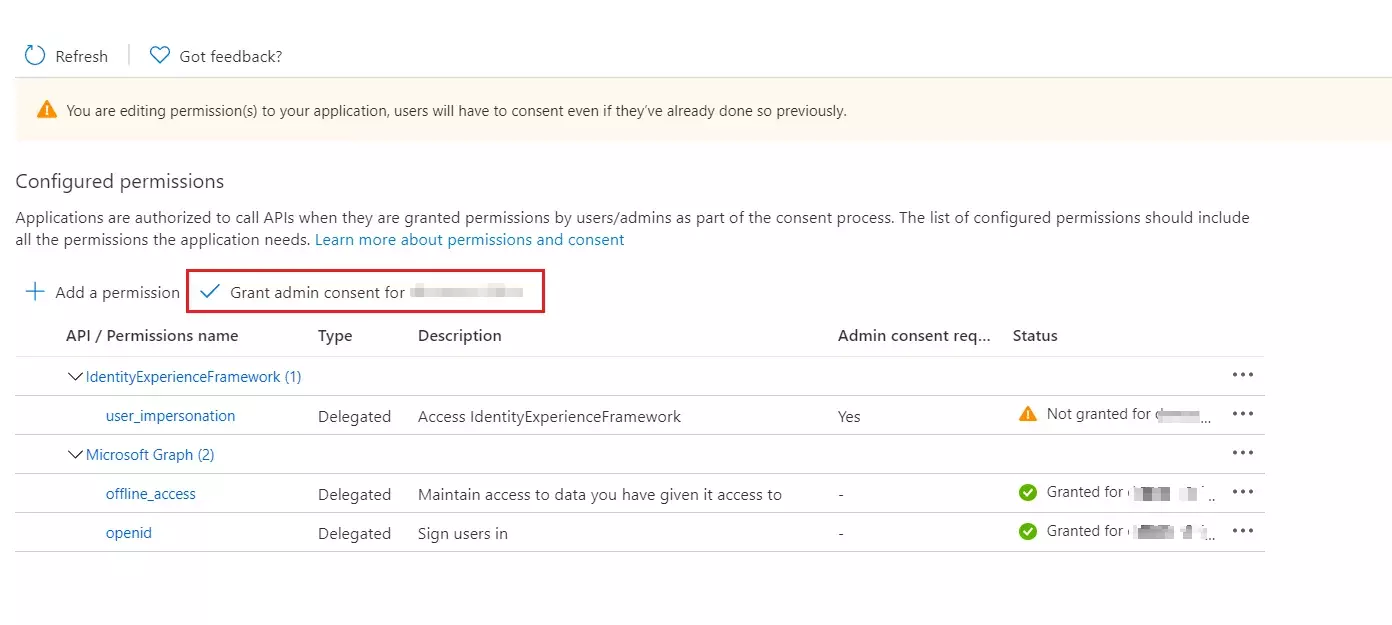
- Select Grant admin consent for (your tenant name).
- Select your currently signed-in administrator account, or sign in with an account in your Azure AD B2C tenant that's been assigned at least the Cloud application administrator role. Select Accept.
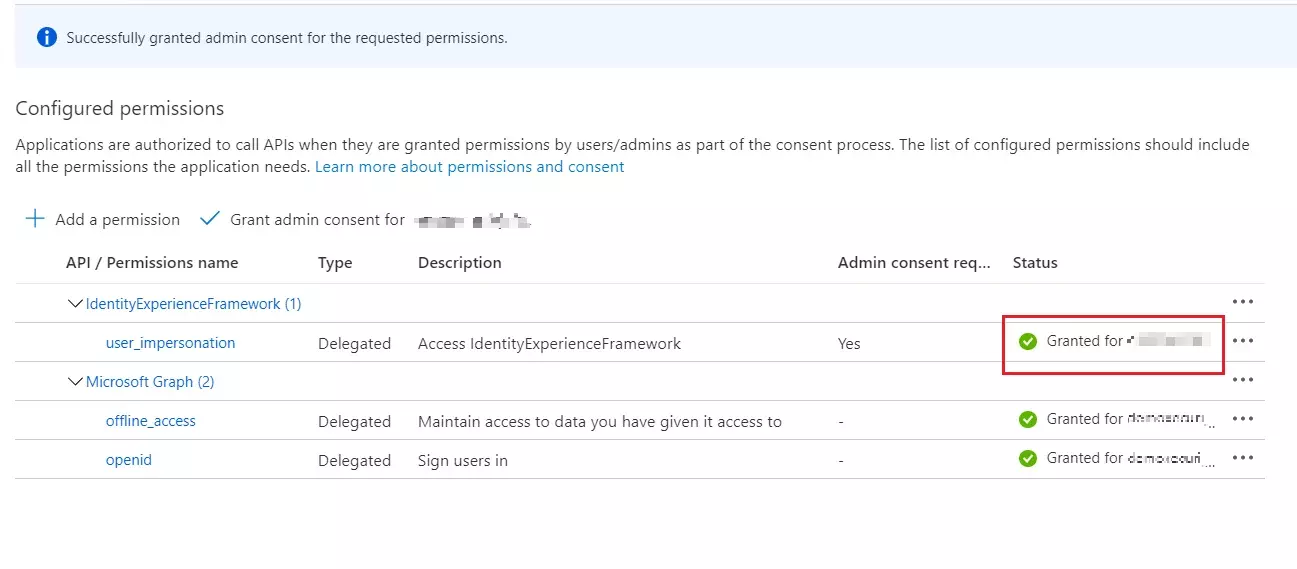
- Now Refresh, and then verify that "Granted for ..." appears under Status for the scopes: offline_access, openid and user_impersonation. It might take a few minutes for the permissions to propagate.
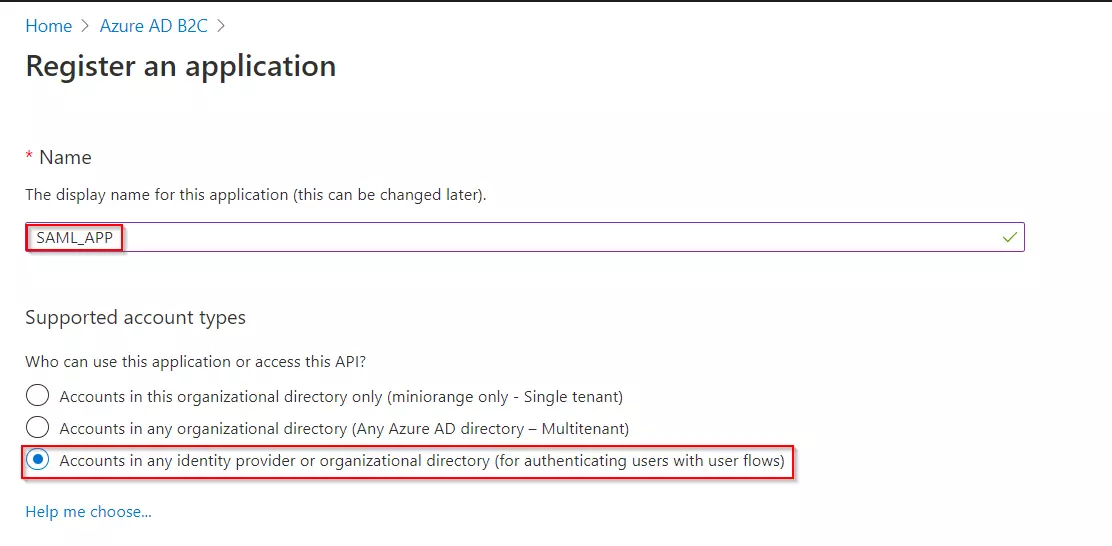
- Select App registrations, and then select New registration.
- Enter a Name for the application Eg:SAML_APP.
- Under Supported account types, select Accounts in any identity provider or organizational directory (for authenticating users with user flows).
- Under Redirect URI, select Web, and then enter the ACS URL as {application_base_url}/plugins/servlet/saml/auth from the Service Provider Information tab of the miniOrange SAML SSO plugin. Select Register.
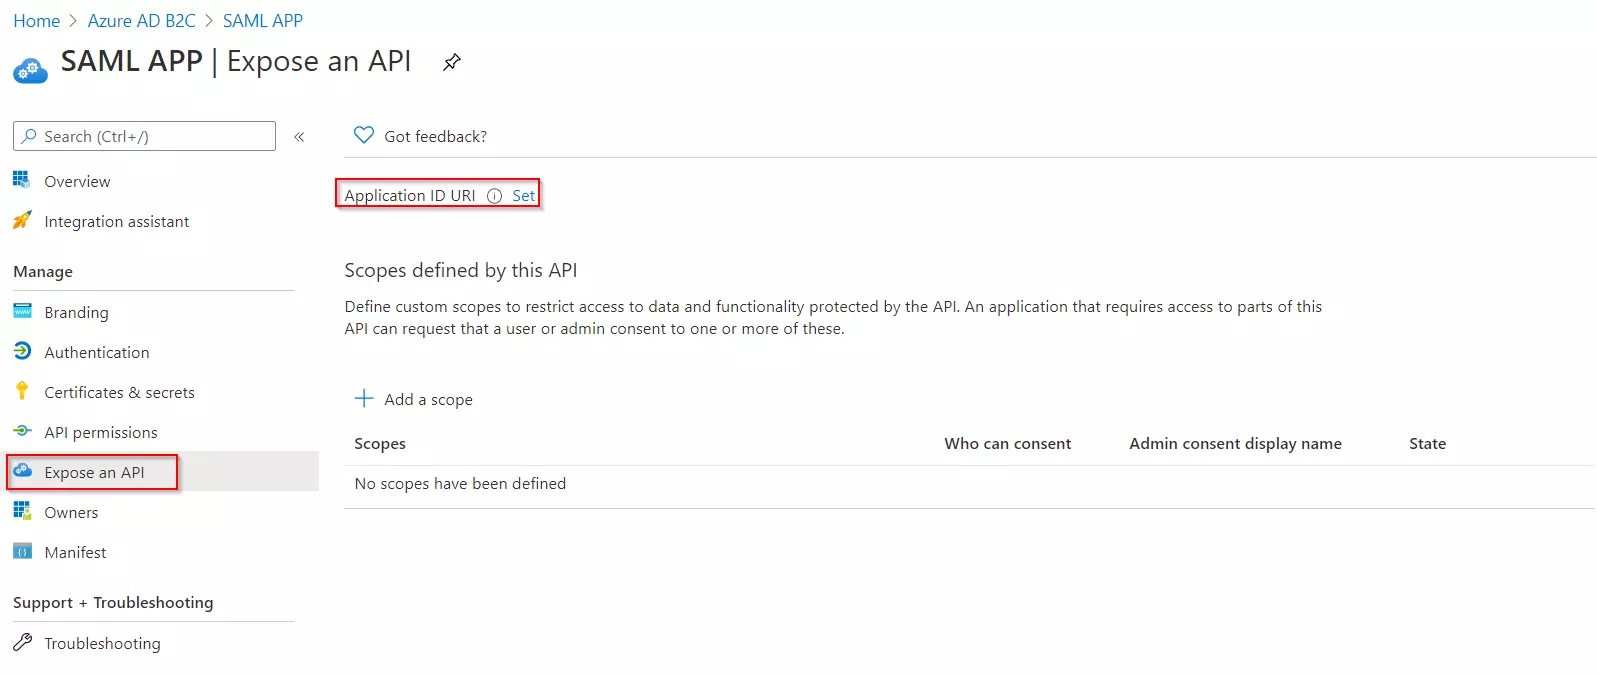
- Under Manage, click on Expose an API.
- Click on Set for the Application ID URI and then click on Save, accepting the default value.
- Once saved, copy the Application ID URI and navigate to the Service Provider Information tab of the plugin.Paste the copied value under the SP Entity ID field provided in this tab. Click on Save.
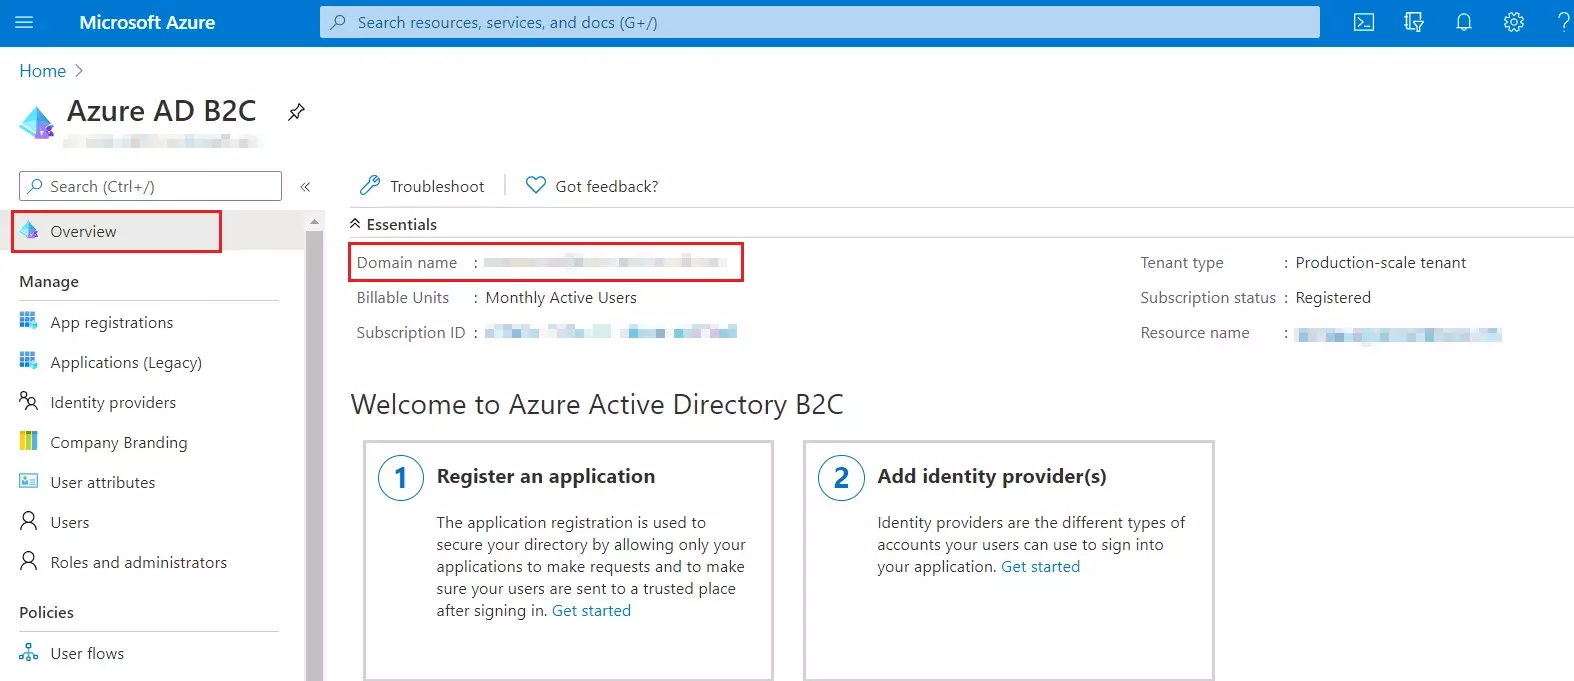
- From our Azure AD B2C portal, navigate to the Overview section of your B2C tenant and record
your tenant name.
NOTE: If your B2C domain is demo.onmicrosoft.com, then your tenant name is demo. - Enter your Azure B2C tenant name below, along with the application ID for IdentityExperienceFramework and ProxyIdentityExperienceFramework apps as registered in the above steps.
Follow the steps below to configure Azure AD B2C as an Identity Provider
 Register
the IdentityExperienceFramework application

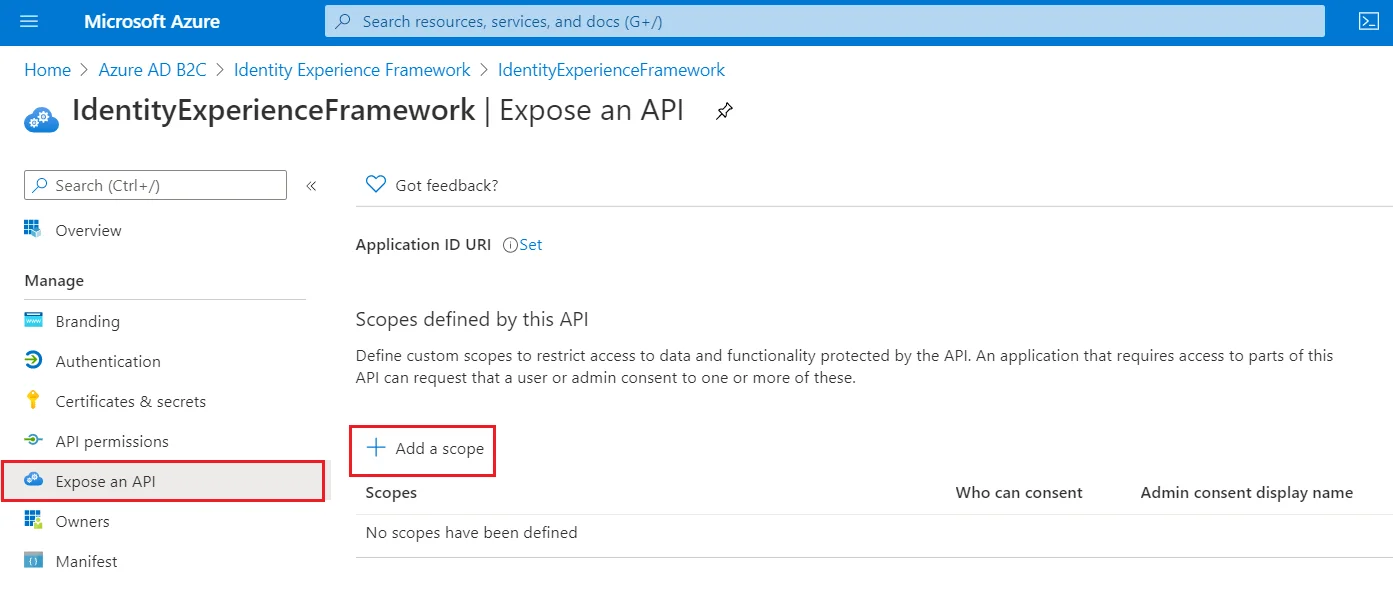
| Scope name | user_impersonation |
| Admin consent display name | Access IdentityExperienceFramework |
| Admin consent description | Allow the application to access IdentityExperienceFramework on behalf of the signed-in user |
 Register
the ProxyIdentityExperienceFramework application
 Register
the SAML Application


 Generate
SSO Policies
 Upload
the Certificate
- Sign in to the Azure portal and browse to your Azure AD B2C tenant.
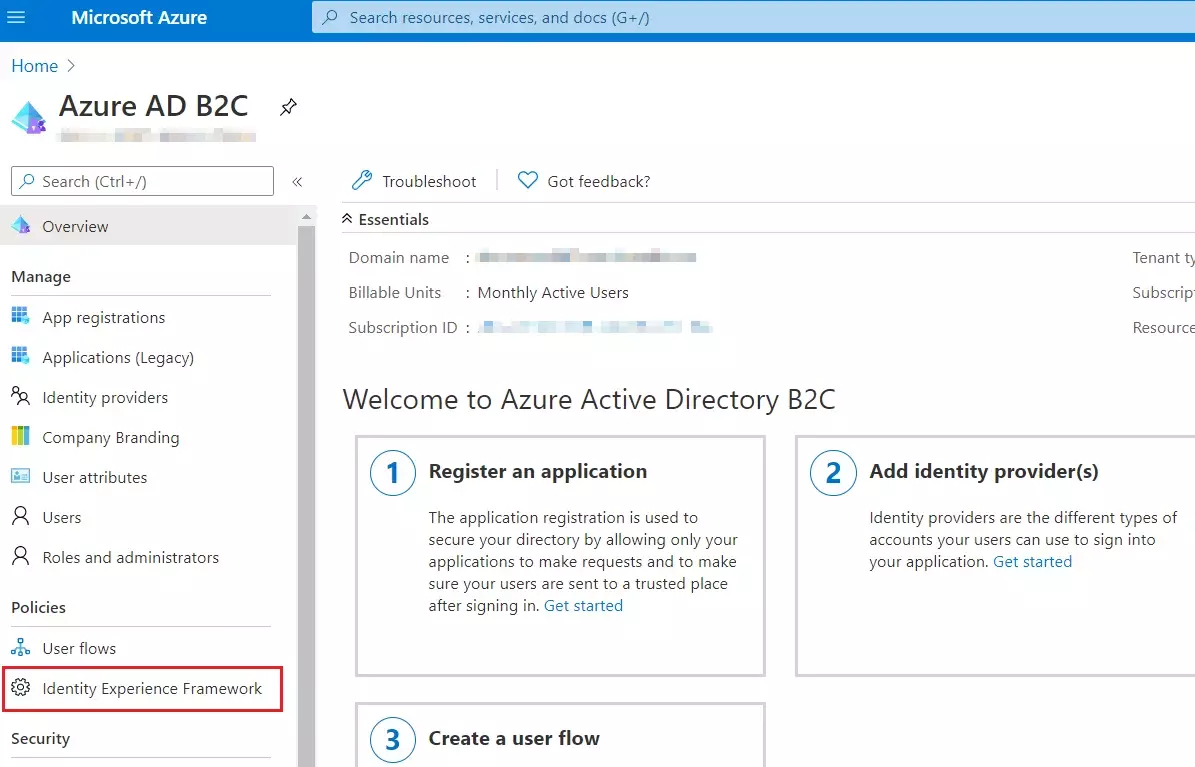
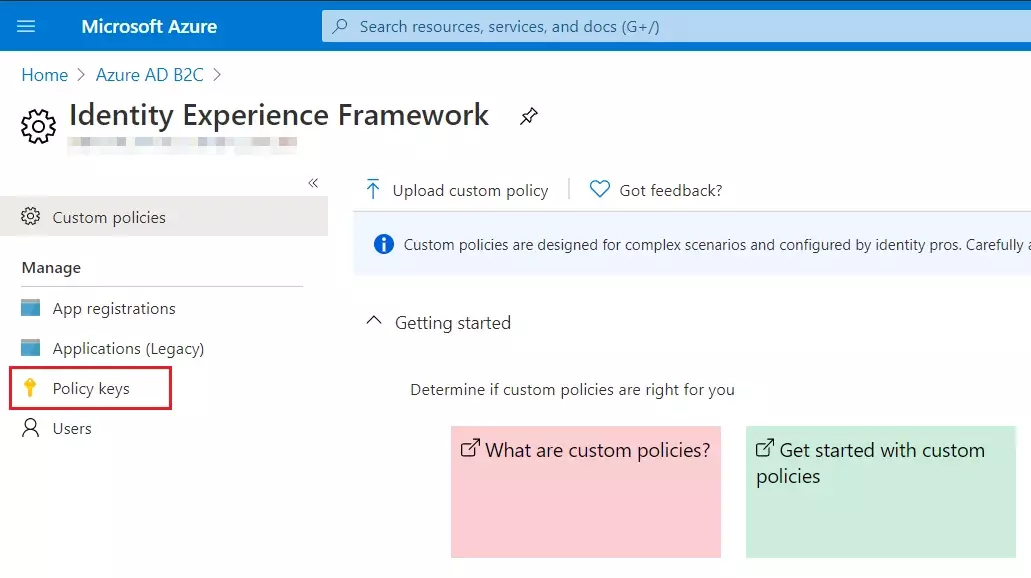
- Under Policies, select Identity Experience Framework and then Policy keys.
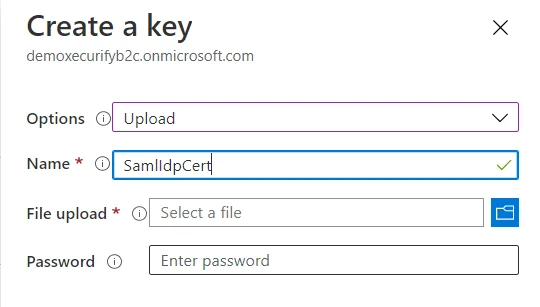
- Select Add, and then select Options > Upload
- Enter the Name as SamlIdpCert. The prefix B2C_1A_ is automatically added to the name of your key.
- Using the upload file control, upload your certificate that was generated in the above steps along with the SSO policies (tenantname-cert.pfx).
- Enter the certificate's password as your tenant name and click on Create.
For example, if your tenant name is demo.onmicrosoft.com, enter the password as demo. - You should be able to see a new policy key with the name B2C_1A_SamlIdpCert.
 Create
the signing key
- On the overview page of your Azure AD B2C tenant, under Policies, select Identity Experience Framework.
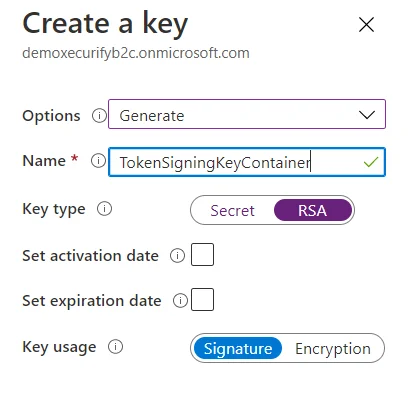
- Select Policy Keys and then select Add.
- For Options, choose Generate.
- In Name, enter TokenSigningKeyContainer. For Key type, select RSA.
- For Key usage, select Signature. Now, Select Create.
 Create
the encryption key
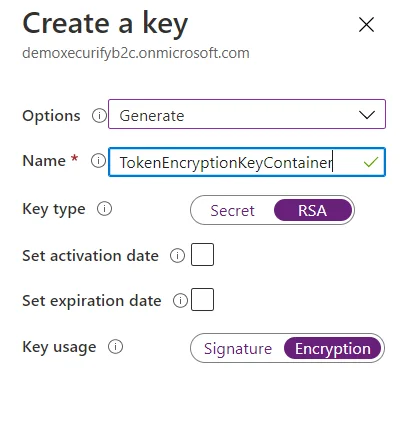
- Follow the first three steps, used to create signing key.
- For Name, enter TokenEncryptionKeyContainer. For Key type, select RSA.
- For Key usage, select Encryption. Now, Select Create.
 Upload
the Policies
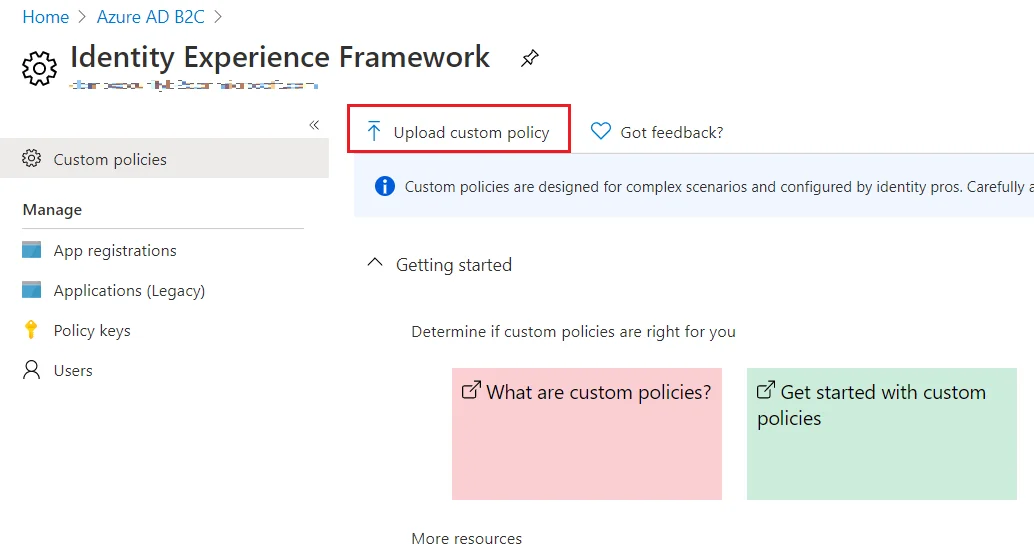
- Select the Identity Experience Framework menu item in your B2C tenant in the Azure portal.
- Select Upload custom policy.
- As per the following order, upload the policy files downloaded in the above steps:
- As you upload the files, Azure adds the prefix B2C_1A_ to each.

| 1 | TrustFrameworkBase.xml |
| 2 | TrustFrameworkExtensions.xml |
| 3 | SignUpOrSignin.xml |
| 4 | ProfileEdit.xml |
| 5 | PasswordReset.xml | 6 | SignUpOrSigninSAML.xml |
Note: For next step, Use IDP Metadata URL as:
https://tenant-name.b2clogin.com/tenant-name.onmicrosoft.com/B2C_1A_signup_signin_saml/Samlp/metadata.
Step 2: Set Up Crowd as Service Provider
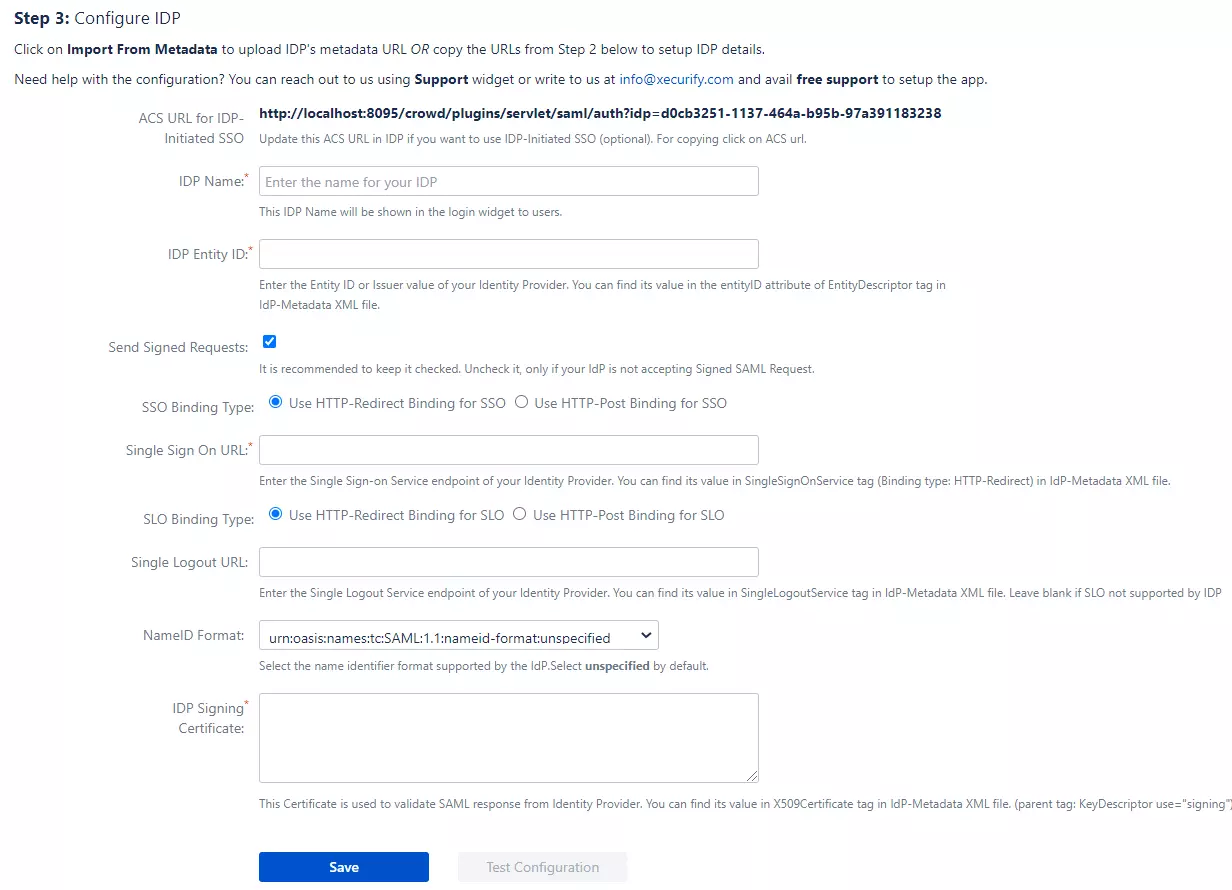
With the information you have been given by Your IDP team, you can configure IDP settings in 2 ways:
- By Metadata URL
- Manual Configuration
- Click on Import from Metadata in Configure IDP tab
- Give IDP Name that you want to.
- Enter IDP metadata URL: Enter your metadata URL
- Click Import

B. Manual Configuration
Go to Configure IDP tab and enter the following details
- IDP Entity ID
- Single Sign On URL
- Single Logout URL
- X.509 Certificate
If you already have one IDP & you are looking to add Second IDP then you can do it by performing the following steps.
- Navigate to Configure IDP tab.
- Click on Add new IDP.
- It will present a blank form & you can configure new IDP using steps from Single IdP Setup.

Configure multiple IDPs
If you have configured more than two IDPs then it will show you the list of IDP that you have configured with Crowd.
Click on Add new IdP button for adding new IDP on Crowd. The steps for adding new IDP will remain the same.

An operation that you can perform with List of IdPs page.
- Add / delete Identity Provider.
- Test Connection between Crowd & IdP by click on Test button for respective IDP.
- Edit the IdP configuration by clicking on the Edit button.
- You can allow an only specific set of users to access Crowd by using Domain Mapping.
Single Sign-On with Multiple Identity Provider(IDP)
Select your IdP from the list. It will redirect you to selected IdP login page.

Step 3: Setting up Crowd user profile attributes
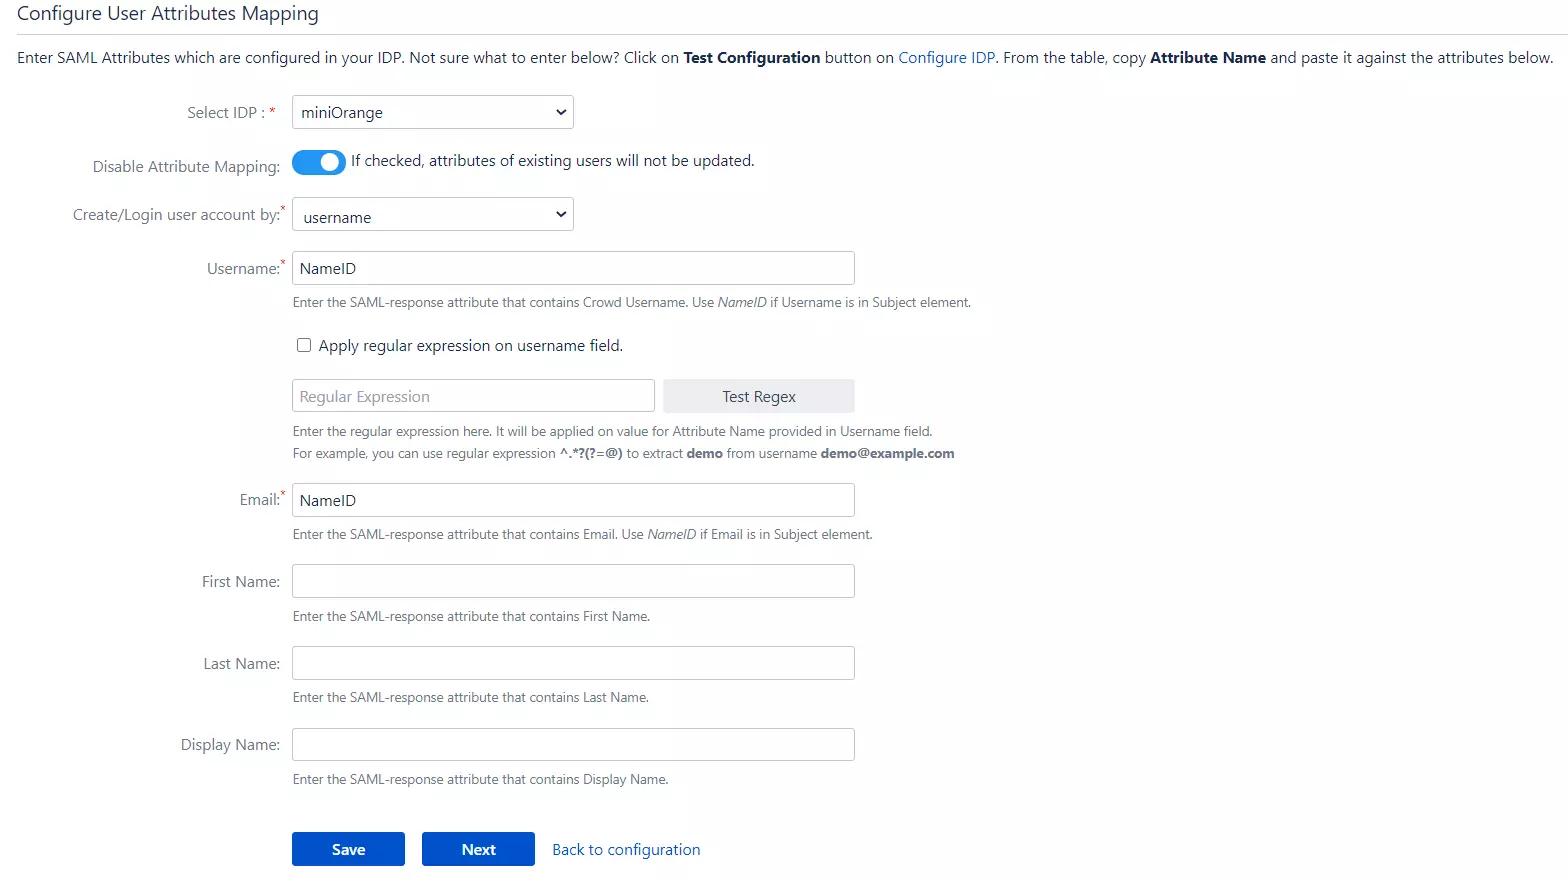
We will be setting up user profile attributes for Crowd. If your users are stored in a directory that is Read Only, please check Disable Attribute Mapping in User Profile tab and follow steps given in Matching a User.
a. Finding correct attributes
- Go to Configure IDP tab. Scroll down and click on Test Configuration.
- You will see all the values returned by your IDP to Crowd in a table. If you don't see value for First Name, Last Name, Email or Username, make the required settings in your IDP to return this information.
- Once you see all the values in Test Configuration, keep the window open and go to User Profile tab.
b. Setting profile attributes
- In this tab, fill the values by matching the name of the attribute. For instance, if the Attribute Name in the Test Configuration window is NameID, enter NameID against Username
- Setting up both Username and Email is required if you want to let users register. If you want existing users to only login, configure the attribute using which you will match the user in Crowd.
c. Matching a User
When the user logs into
Crowd, one of the user's data/attribute coming in from the IDP is used to search the user in Crowd. This is used to detect the user in Crowd and log in the user to the same account.
You can configure it using steps given below:
- Go to User Profile tab
- Select Username or Email for Login/Search Crowd user account by
- Enter the attribute name from IDP which corresponds to Username or Email using Finding Correct Attributes
Step 4: Assigning groups to users
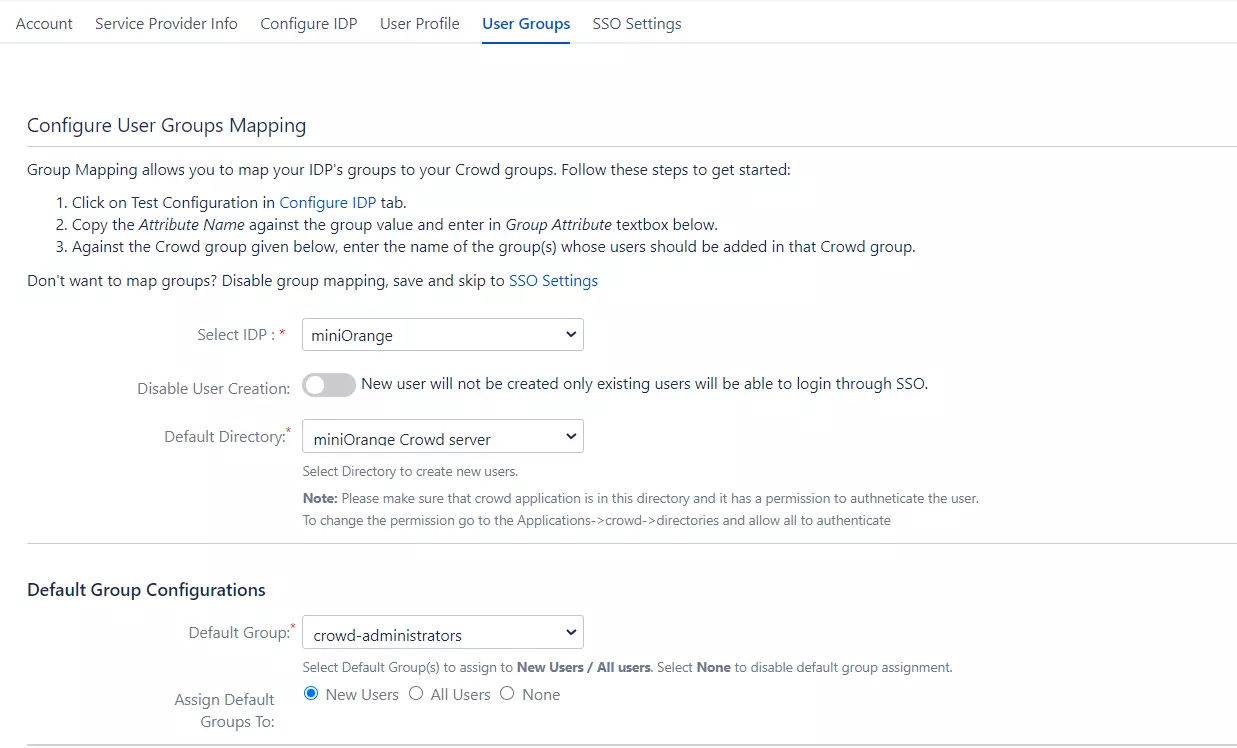
We will be setting up user group attributes for Crowd. If your users are stored in a directory that is Read Only, please check Disable Group Mapping in User Groups tab and skip to Setting default group.
a. Setting default group
- Select the users' Default Group in the tab User Groups. If no group is mapped, users are added by default to this group.
- You can enable default groups for All Users or New Users using the option. Select None if you don't want to assign any default group to SSO users, using the option Enable Default Groups for.
b. Finding Group Attribute
- Just like we found Attribute Name for User Profile attributes, we find group attribute.
- Go to Configure IDP tab. Scroll down and click on Test Configuration.
- You will see all the values returned by your IDP to Crowd in a table. If you don't see value with groups, make the required settings in your IDP to return group names.
- Once you see all the values in Test Configuration, keep the window open and go to User Groups tab.
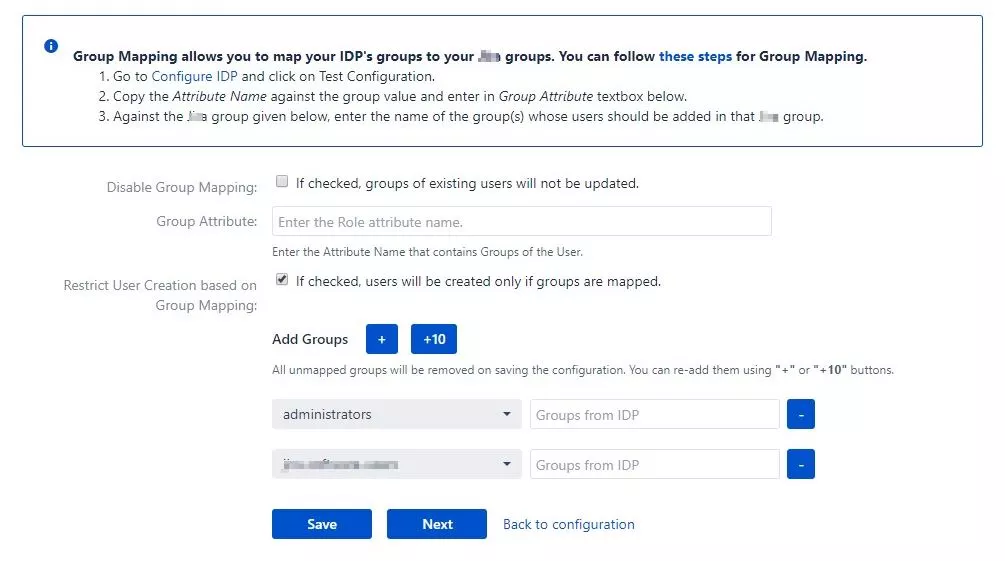
- Enter the Attribute Name of group against Group Attribute.
- Check Disable Group Mapping option if you don't want to update groups of existing users.
c. Group Mapping
Group Mapping can be done in following way:Manual group mapping: If the names of groups in Crowd are different than the corresponding groups in IDP, you should use Manual group mapping
- Check Restrict User Creation Based on Group Mapping option if you want new users to be created only if at least one of the user's IDP groups is mapped to a group in the application.
- For mapping, first select a Crowd group from the dropdown which lists all groups present in Crowd and then enter the name of the IDP group to be mapped in the textbox beside
- For example, if you want all users in 'dev' group in IDP to be added to app-user, you will need to select app-user from the dropdown and enter 'dev' against app-user.
- Use '+1' and '+10' buttons to add extra mapping fields.
- Use '-' button next to each mapping to delete that mapping.
Step 5: SSO Settings
The settings in SSO Settings tab define the user experience for Single Sign On.
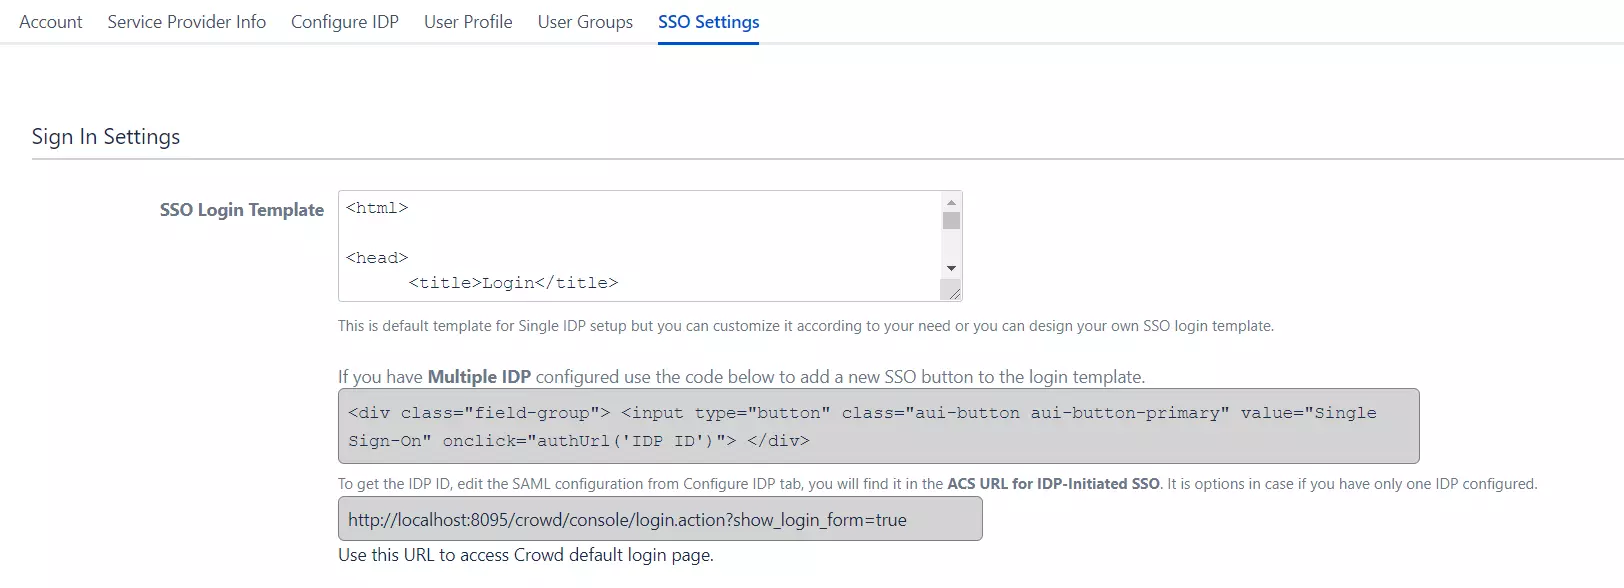
- Go to SSO Login Template. Design your own login template that will be used to initiate SSO.
- Set redirect URL after login using Relay State. Keep this empty for coming back to the same page user started from
- Enable Auto-redirect to IDP if you want to allow users to login only using IDP. Enable backdoor for emergency
Step 6: Crowd Connectors
The Crowd SSO connector expands the SAML SSO functionality from Crowd to its connected Atlassian applications where it allows users to login to their applications such as Jira, Confluence, Bitbucket, Bamboo, Fisheye while maintaining the users in Crowd.
Note: Click on the icons to view the SSO Connector guide for the application.
Crowd Troubleshooting
Additional Resources
Did this page help you?

 Try it for free


