- Home
- Crowd 2FA
- Crowd 2FA Documentation
- Two-factor Authentication

How to Set Up Two-Factor Authentication (2FA) for Crowd
Two Factor Authentication (2FA) for the Crowd app, gives the ability to enable 2FA for Crowd Software. Here we will go through a guide to configure 2FA between Crowd and Google Authenticator. By the end of this guide, Crowd users should be able to log in and register to Crowd Software with the second factor of Authentication.
 Try it for free
Video Setup Guide
Pre-requisites
- Crowd should be installed and configured (supported version Crowd Server 3.7.0 and above)
- Admin credentials are set up in Crowd.
- Valid license for Crowd 2FA addon. You may contact miniOrange to get the premium license.
To configure Two-Factor Authentication for Crowd, you need the following items:
Download and Installation
- Log into your Crowd instance as an admin.
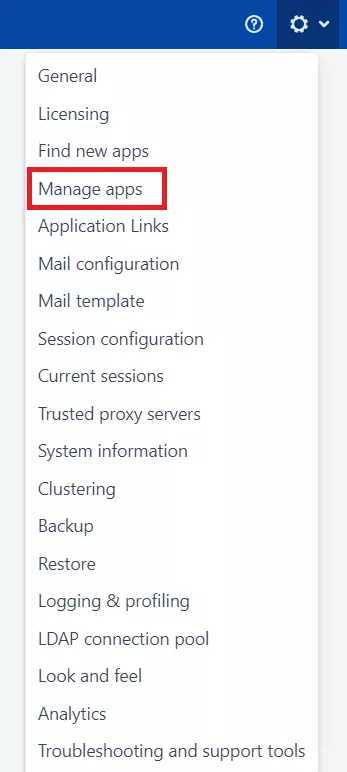
- Navigate to the settings menu and Click Manage Apps.
- Click Find new apps or Find new add-ons from the left-hand side of the page.
- Locate mO Crowd Two Factor Authentication (2FA) | Crowd 2FA via search.
- Click Configure to get into and configure the plugin.
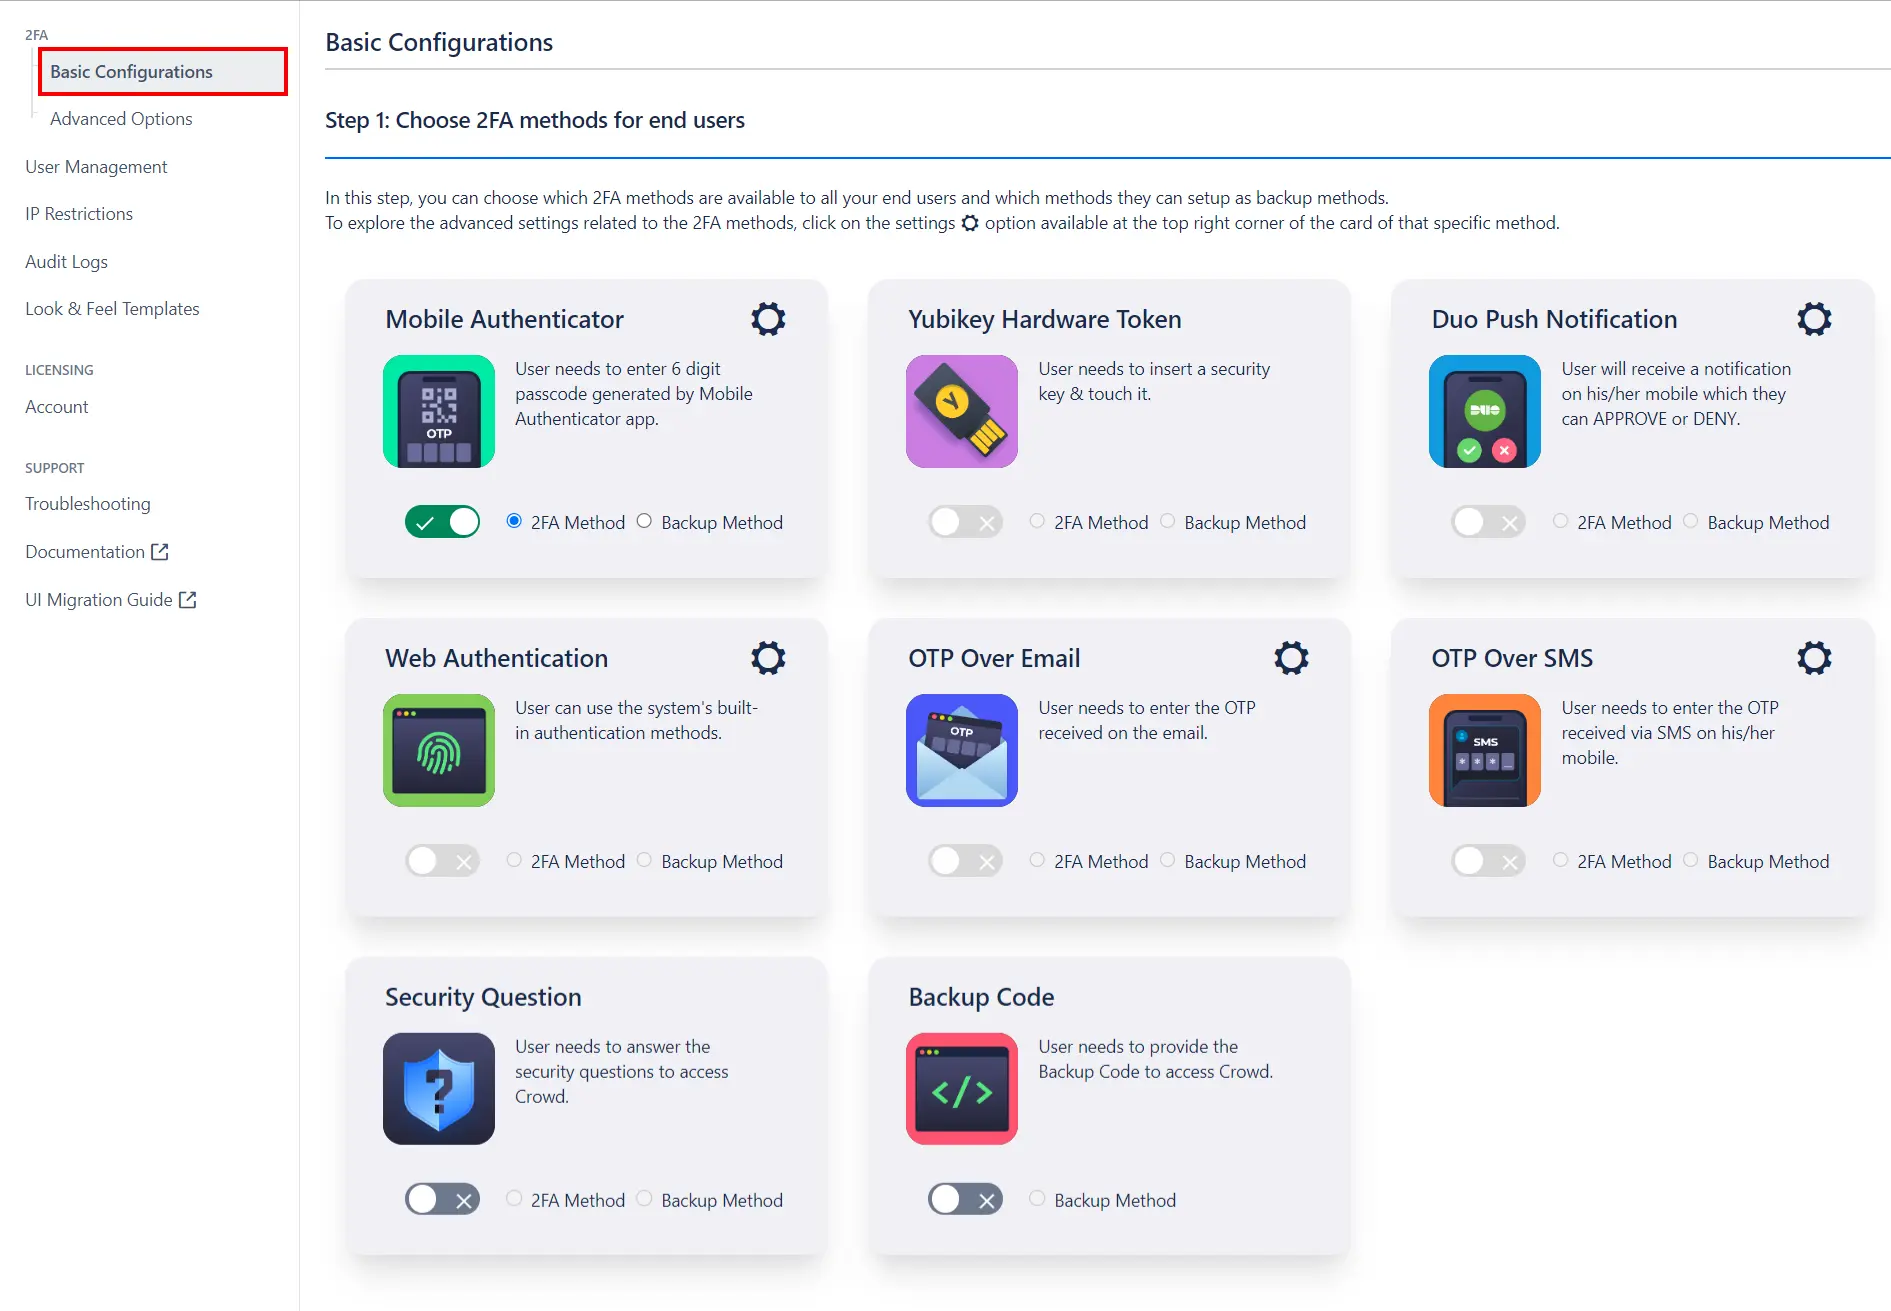
1: Configuring miniOrange 2FA
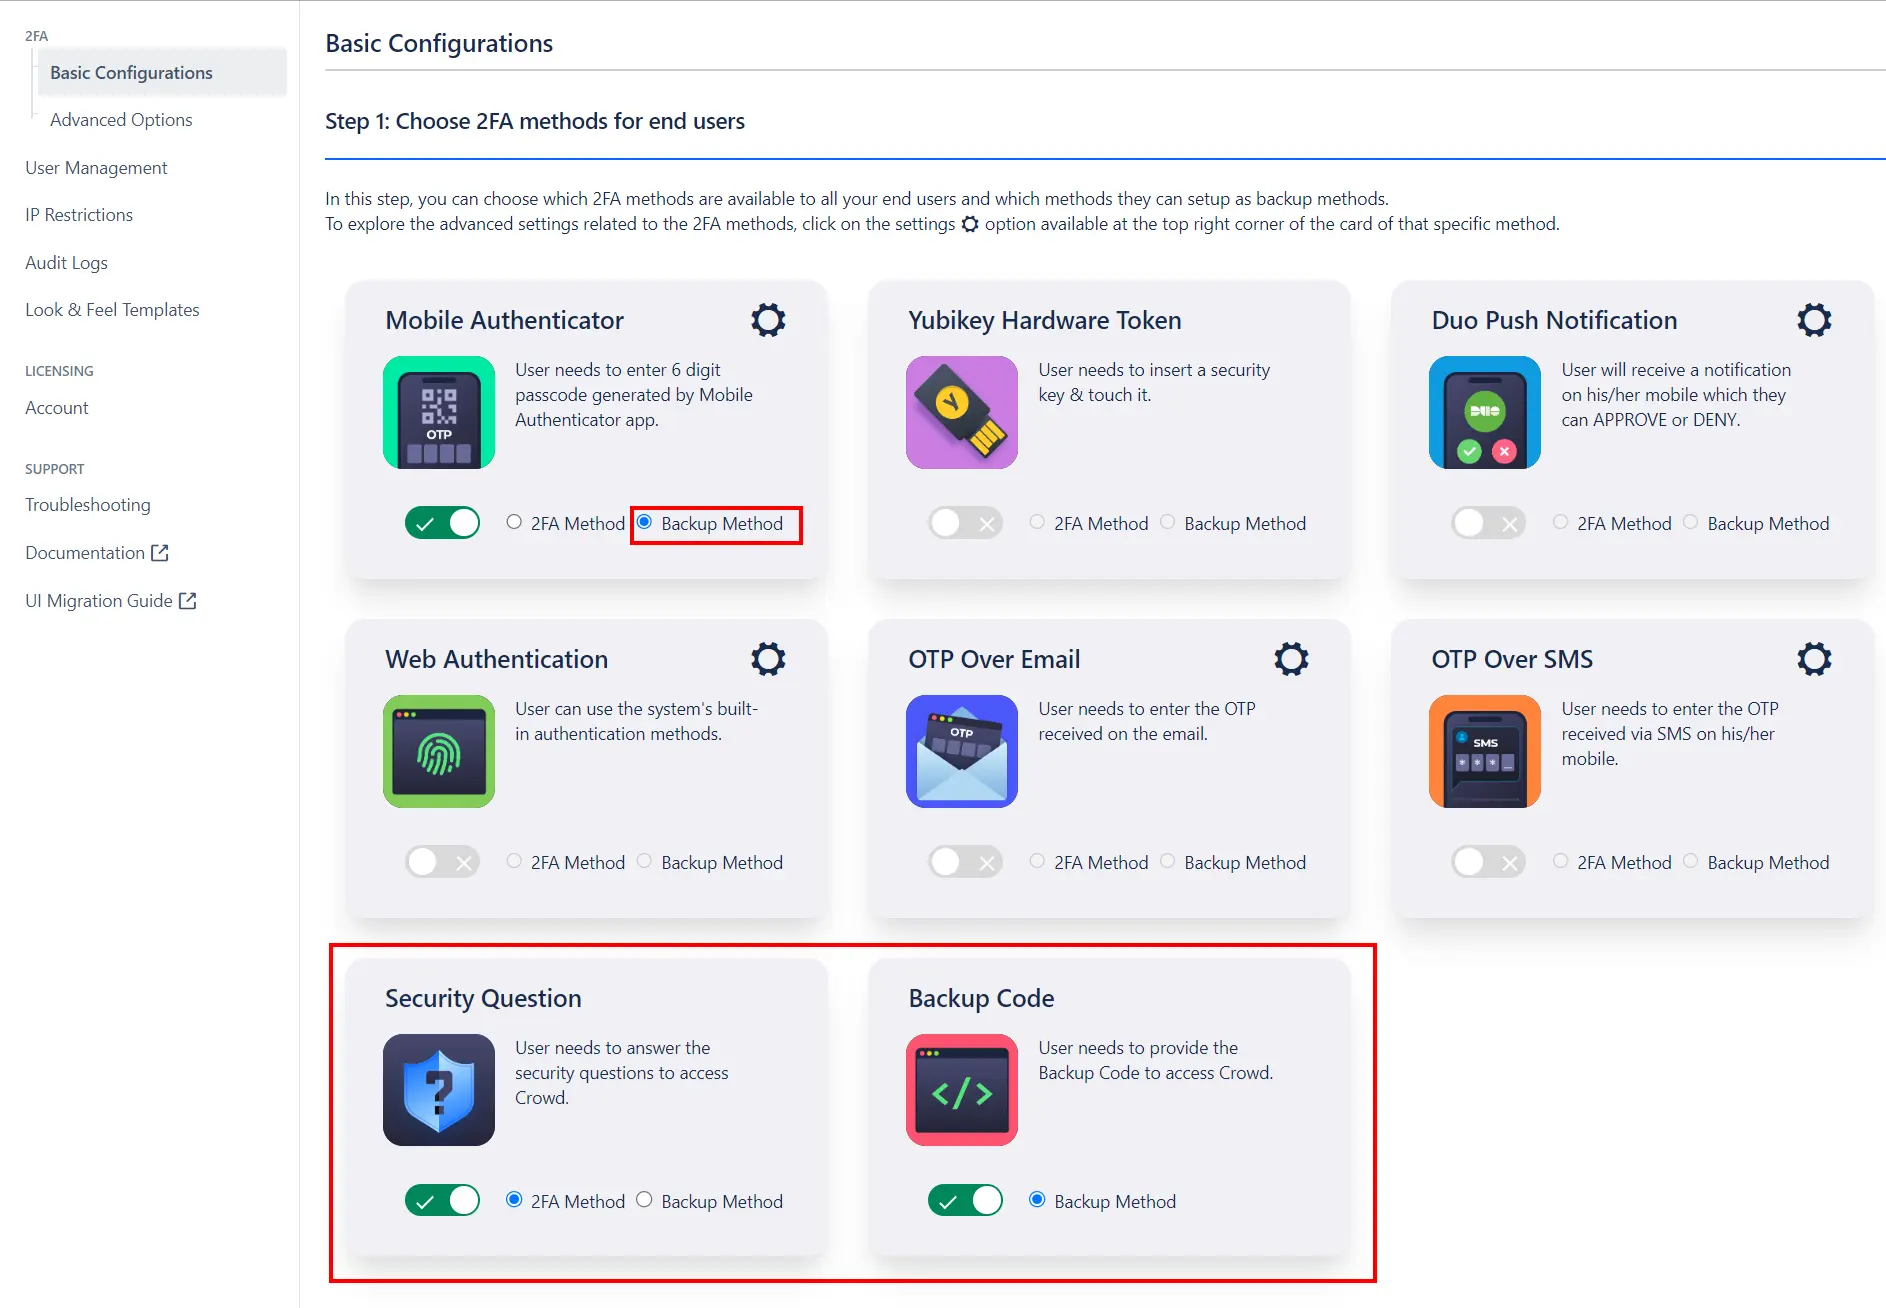
- The miniOrange 2FA addon offers a variety of 2FA methods. Choose the desired 2FA methods from the provided list and enable them for your users.
- Enable Backup Method:In case of emrgency login or when the user is not able to access their primary 2FA method, they can login using the Backup method. You may enable any 2FA method as your backup method.
-
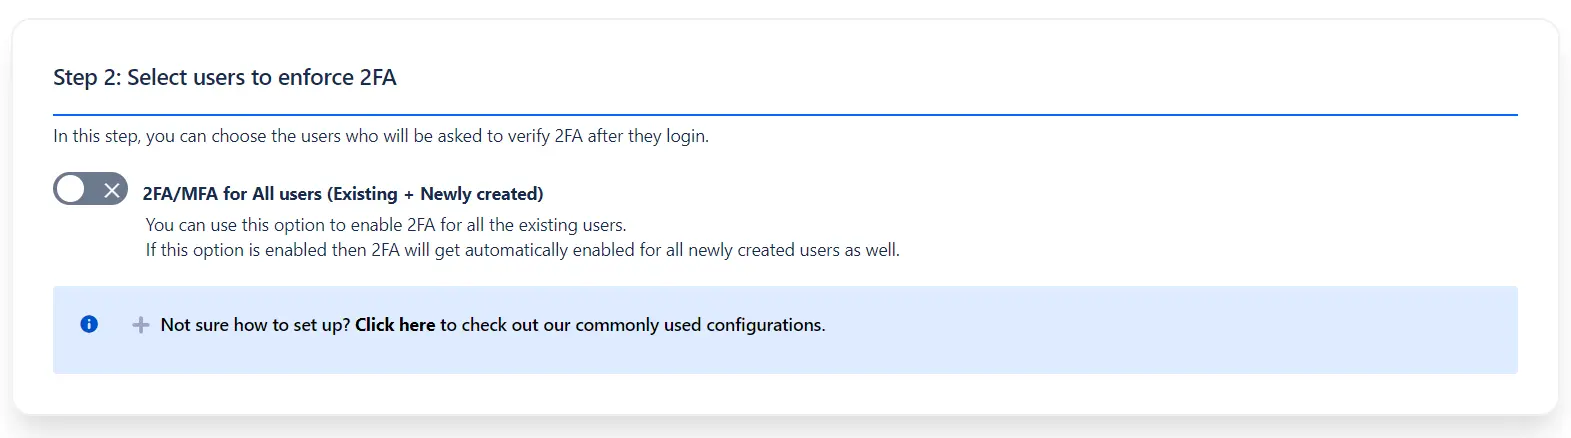
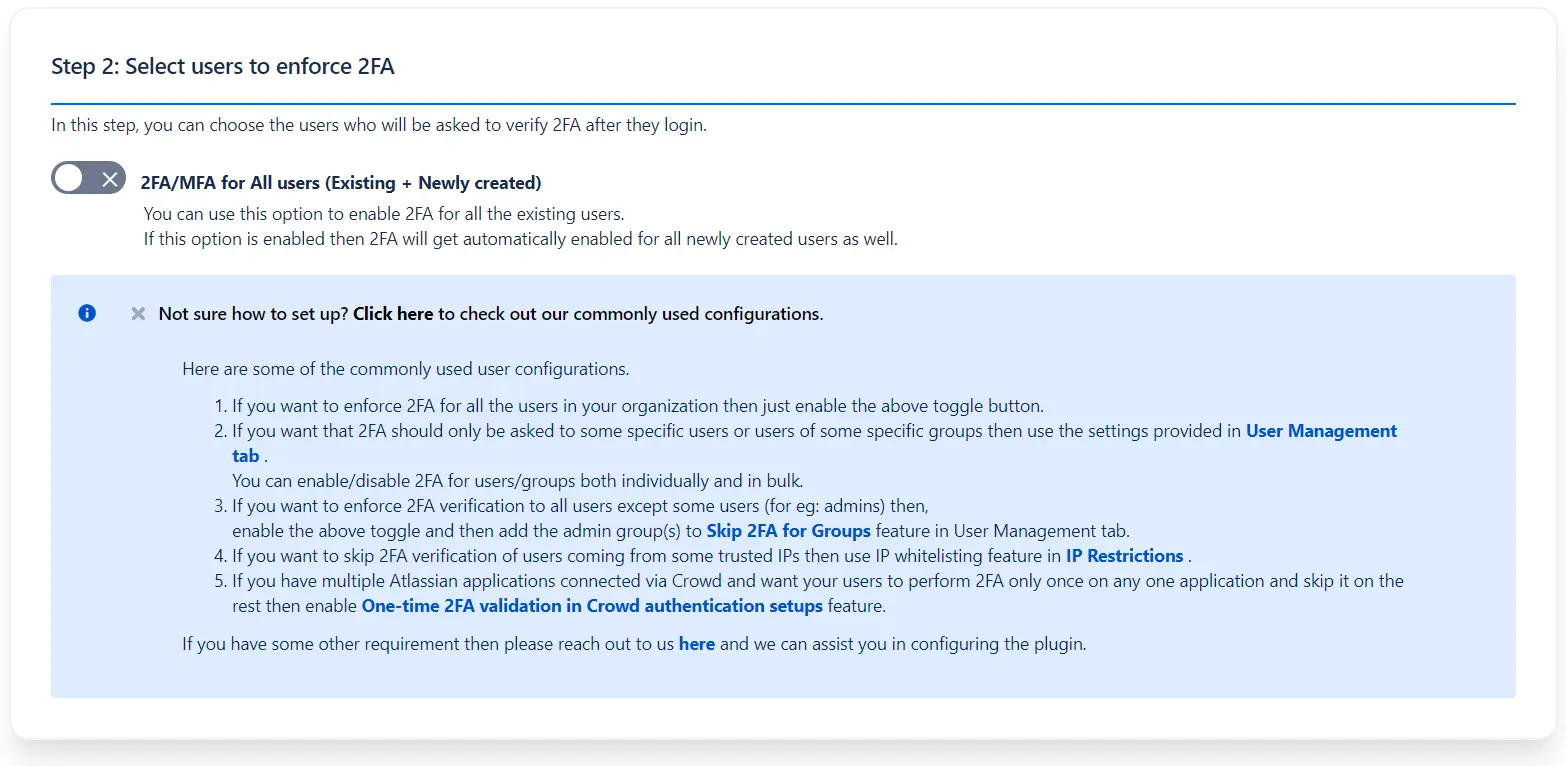
Select users to enforce 2FA: Once the required 2FA
methods are enabled, select the users on whom the 2FA is to be
enforced.
Enable 2FA/MFA for All users option to enable 2FA for all the existing users. This will also automatically enable 2FA for all newly created users as well.
To enable 2FA for users as per your use case, you can check the commonly used configuartions. Based on your requirements, you may enable/disable/skip 2FA for users/group individually/in bulk/based on their IP etc.
- Enable 2-Factor Authentication: Lastly, enable 2FA for Crowd Server.

2: How the user can Configure the 2FA
Authentication Methods


3: Advanced Security Features
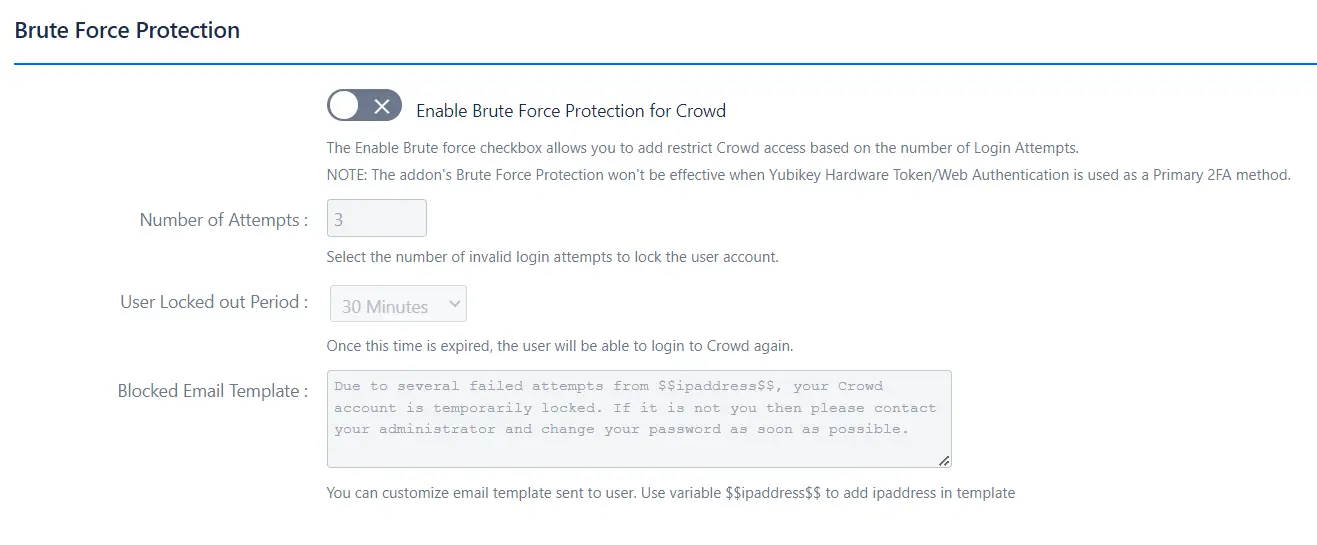
 3.1 Brute Force Configuration
- It is used for restricting the access to your Crowd Application based on the number of invalid 2FA login attempts for the specified period of time. For enabling Brute Force Configuration, click on the 'Enable Brute Force Protection for Crowd' checkbox, then select the number of invalid login attempts after which user will lock, and the time for which the user will be in a locked state and won't get access to Crowd application
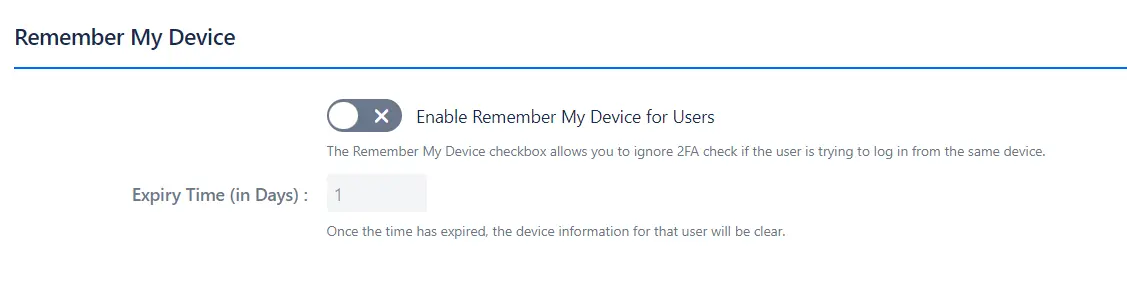
3.2 Remember My Device
- It allows the user to ignore the 2FA check when trying to log in from the same device. Enable the checkbox for 'Remember My Device' feature, and in 'Expiry Time (in Days)' section enter the number of days for which the remember my device settings will be saved.
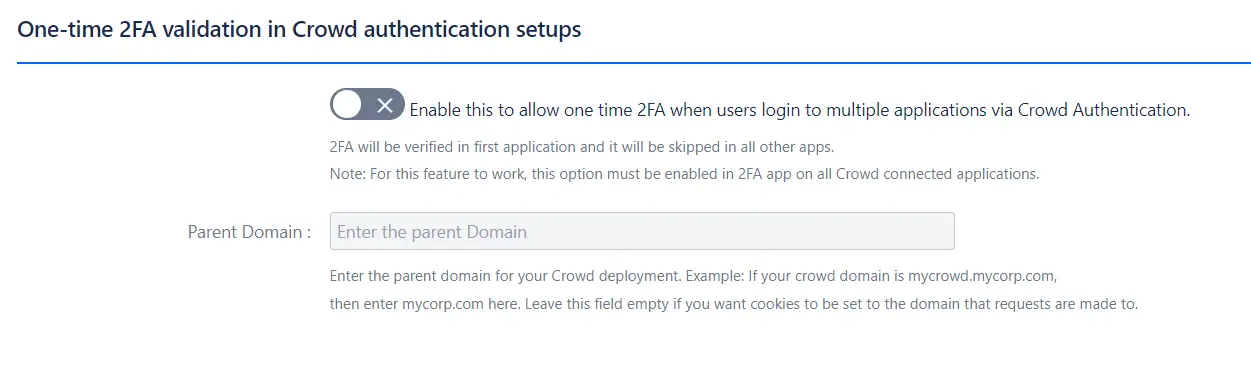
3.3 One-Time 2FA Validation
- It allows users to skip 2FA in Crowd connected applications after successfully validating in any one application.(This feature should be enabled in any application in which you want to skip/bypass 2FA and for the first application users needs to validate 2FA after which 2FA will be skipped in other applications)
Note: This feature can only be enabled if authentication is done
via Crowd.
3.4 Skip 2FA on SSO
- It allows users to skip 2FA if they login via SSO. Admin has to add Single Sign on URL in case of SAML and Callback URL in case of OAuth/OpenID from the SSO Provider.

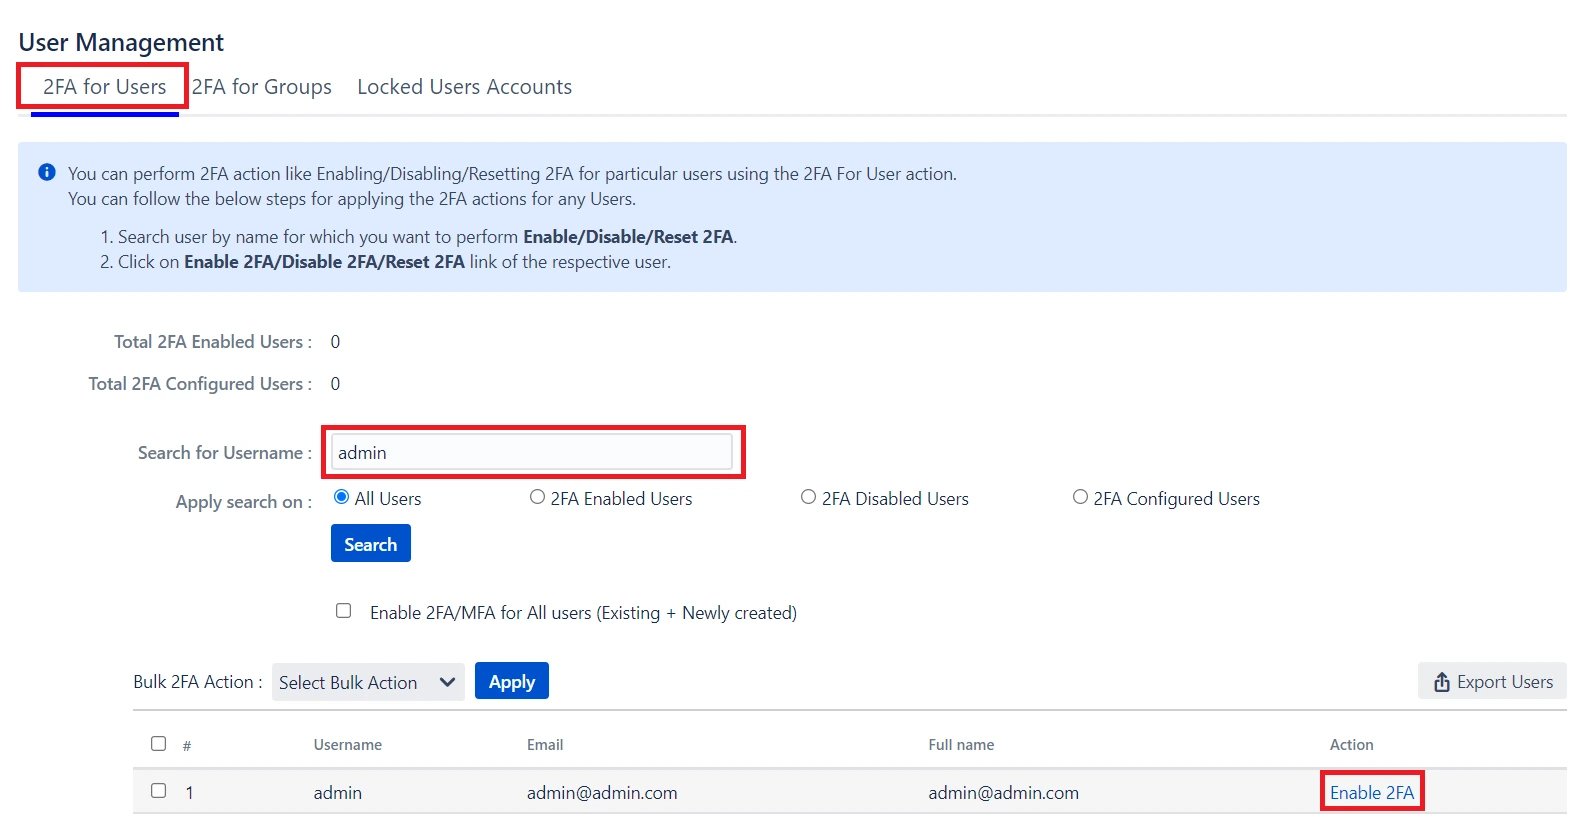
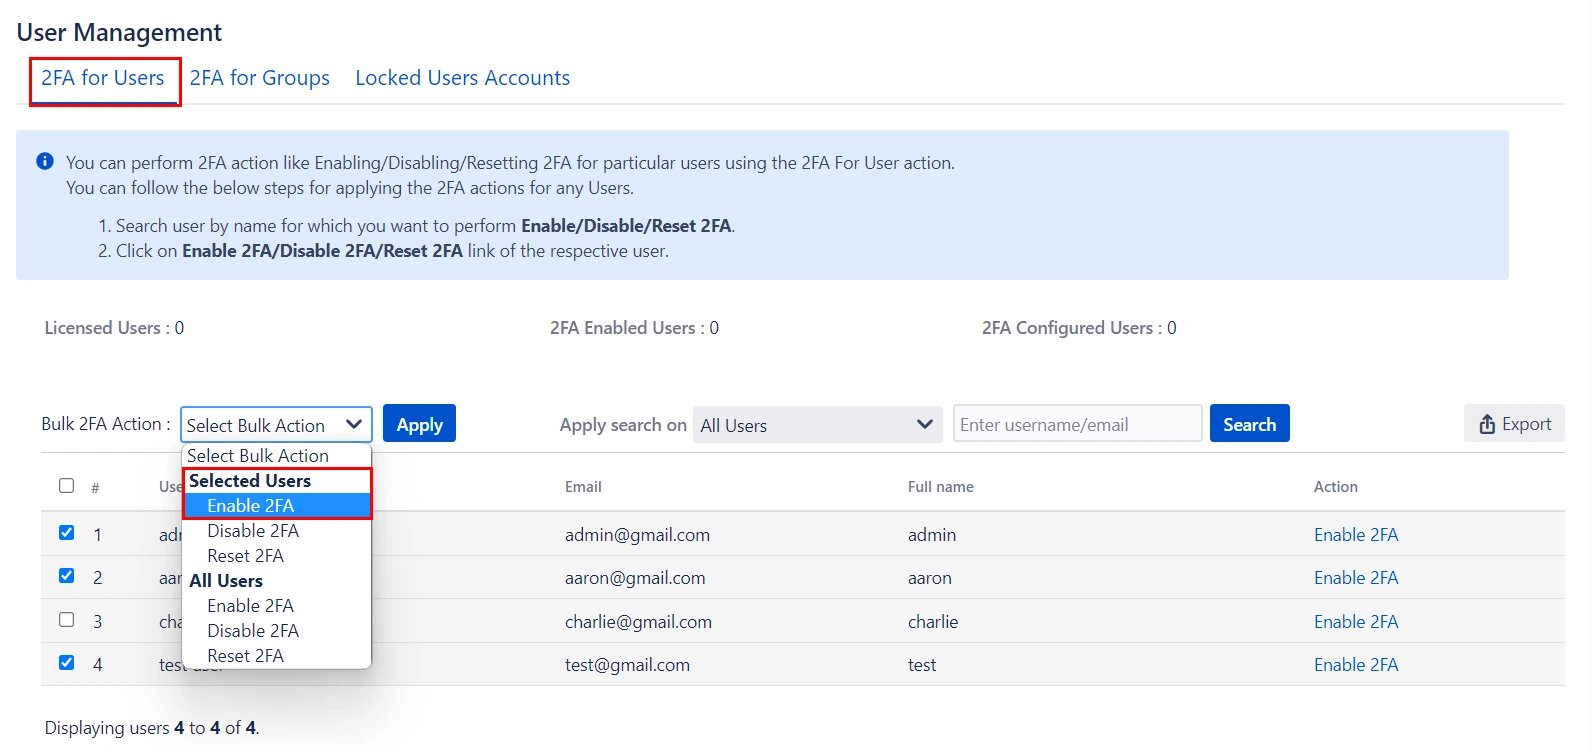
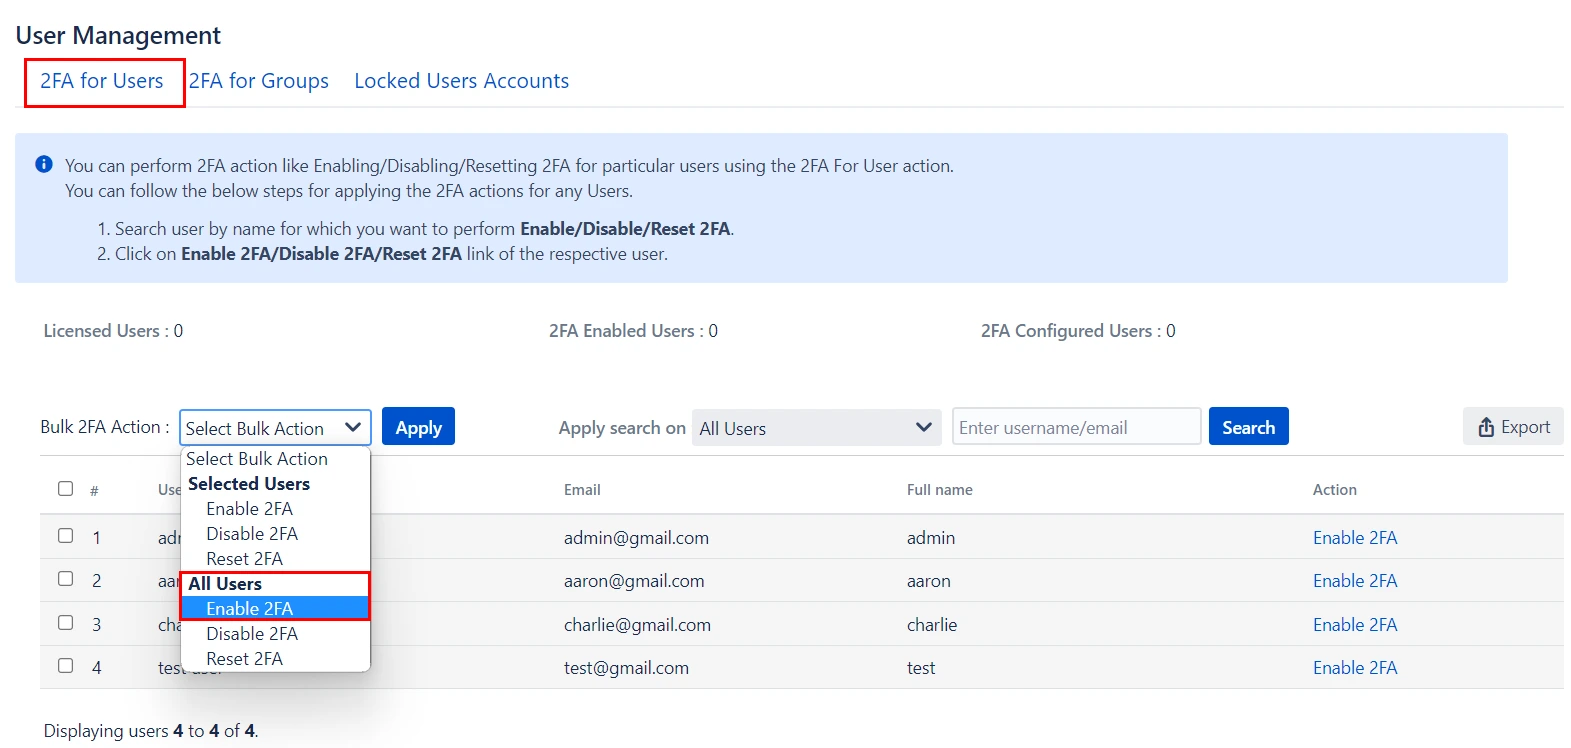
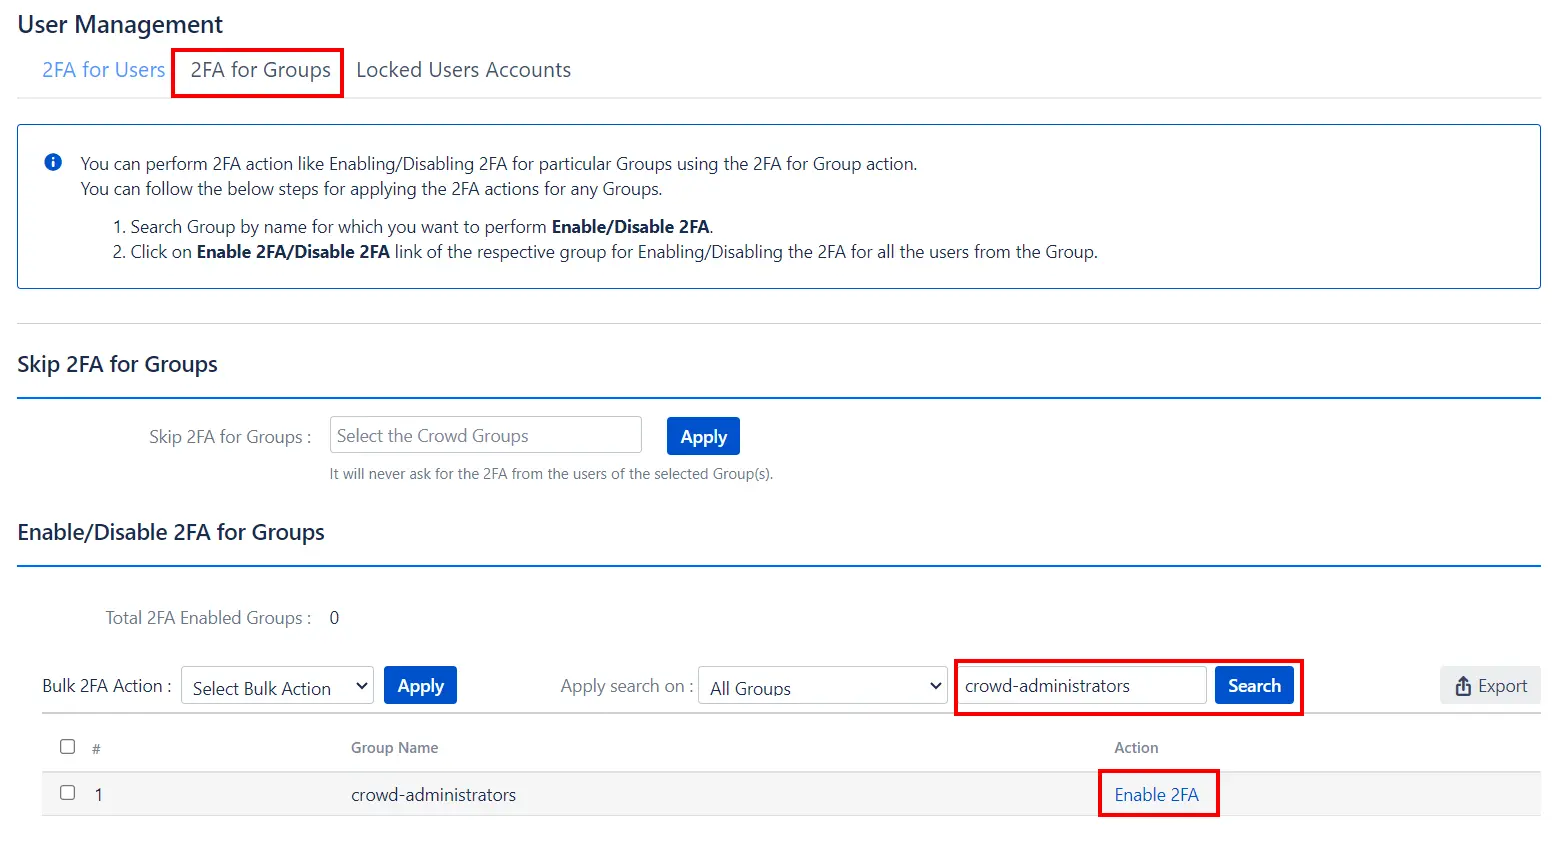
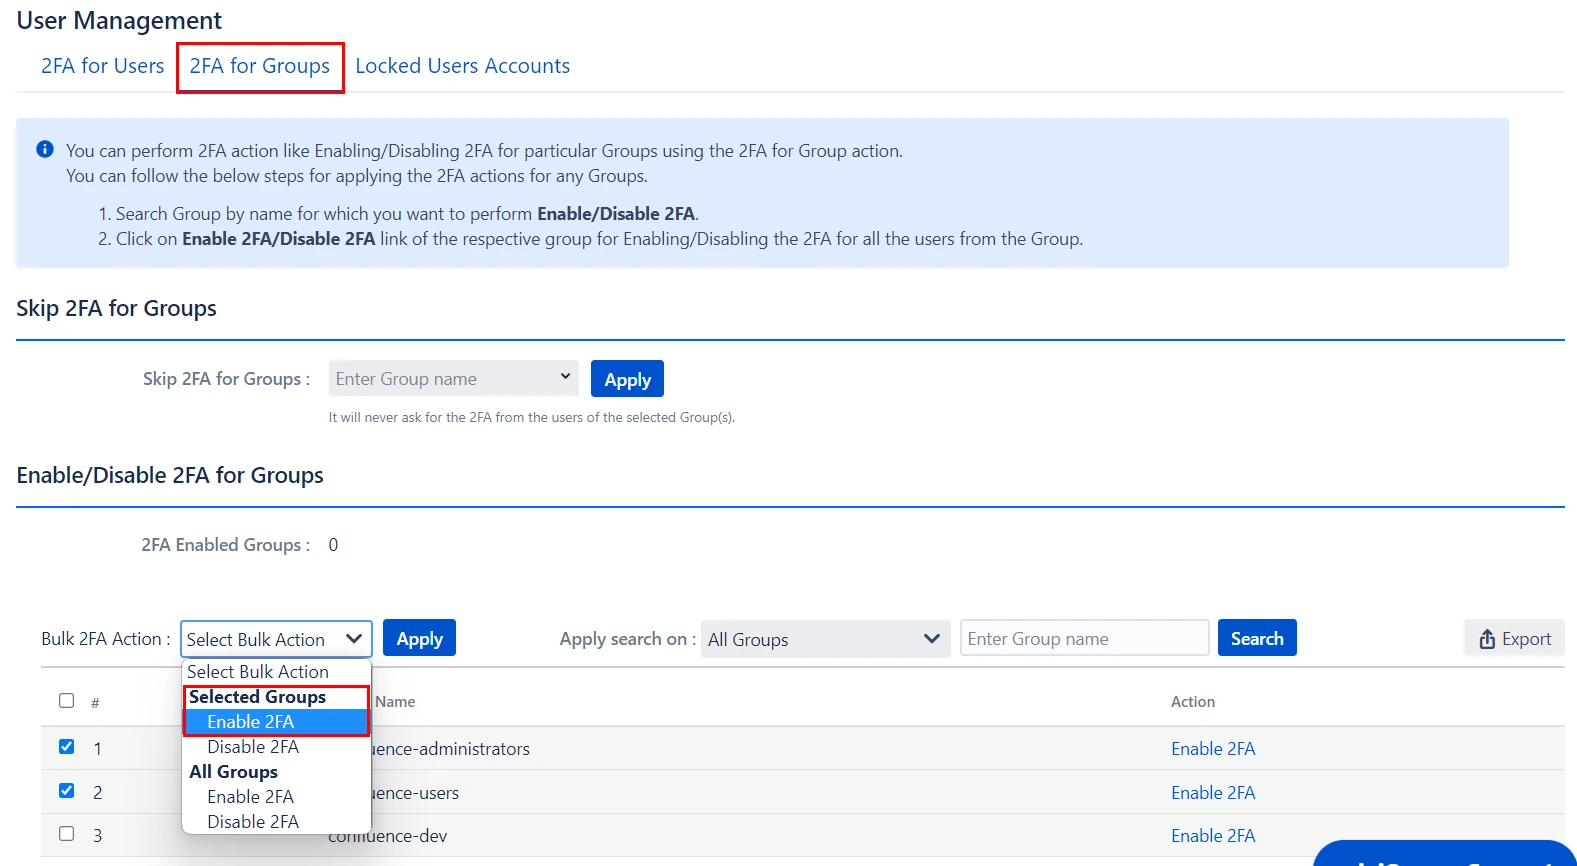
4: User Management
- 2FA for Single User: Enter the name of the user in the Search Bar for whom you want to perform the operation and hit the search button, the user with that name will appear. And then in the Action column, select the required Action.
- 2FA for Multiple Users: Select the users, in the Bulk 2FA Action drop-down list select the action you want to perform. And then hit Apply Button.
- 2FA for All Users: In Bulk 2FA Action Dropdown list under All users Section select necessary Action and hit Apply Button.
- 2FA for Single Group: Enter the name of the group in the Search Bar for which you want to perform the operation and hit the search button, the group with that name will appear. And then in the Action column, select the required Action.
- 2FA for Multiple Groups: Select the Groups, in the Bulk 2FA Action drop-down list select the action you want to perform. And then hit Apply Button.
- 2FA for All Groups: In Bulk 2FA Action Dropdown list under All groups Section select necessary Action and hit Apply Button.

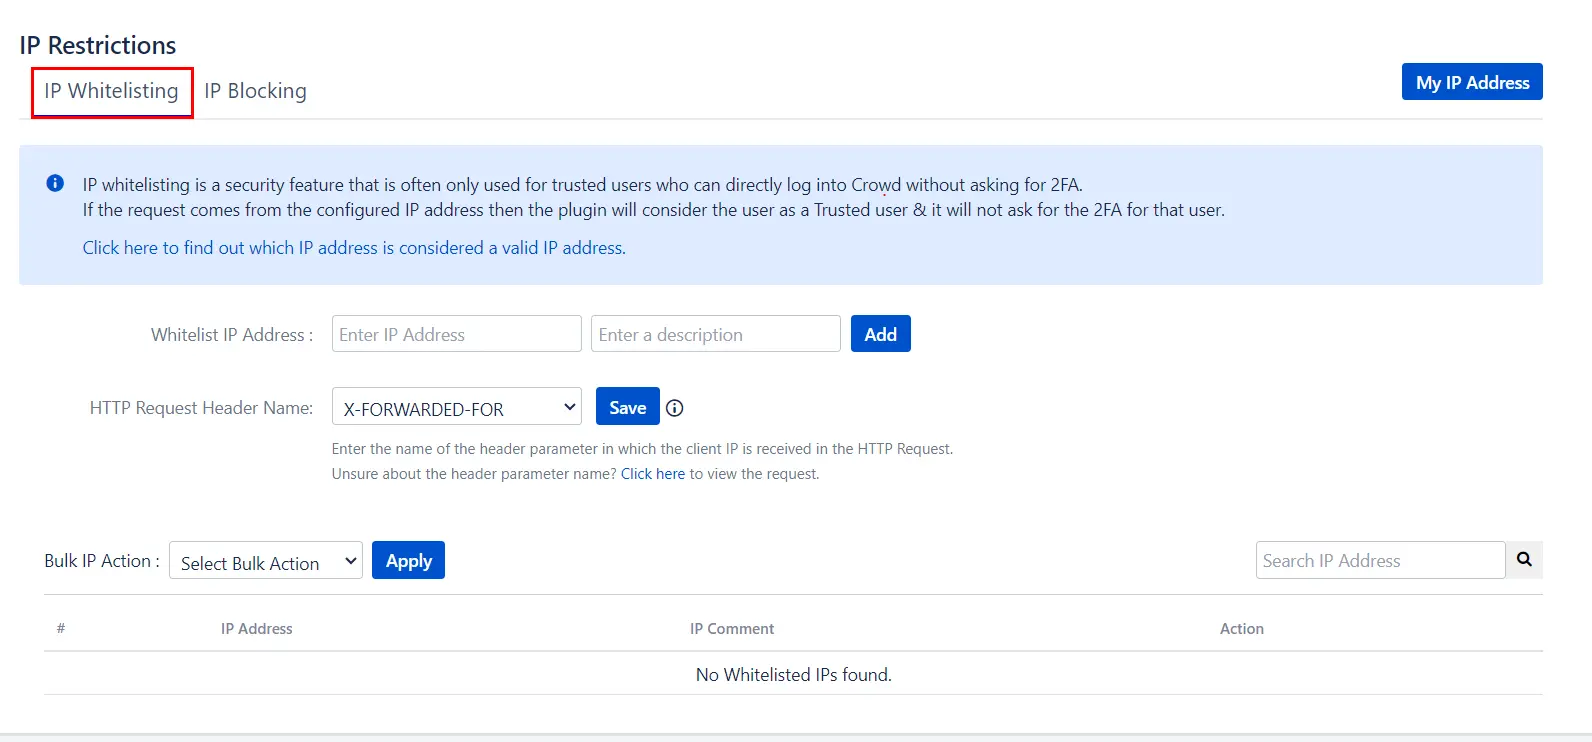
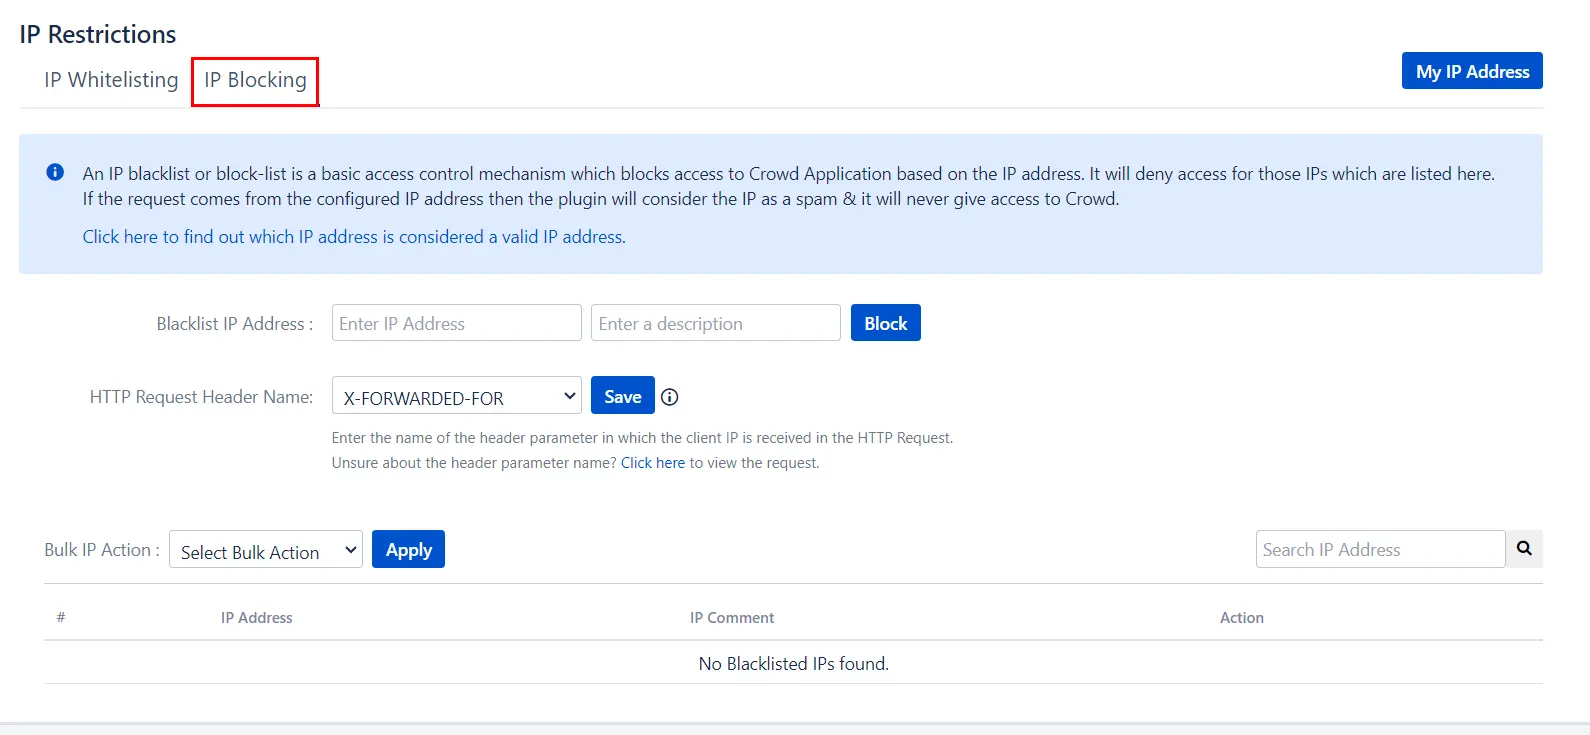
5: IP Restrictions
- IP Whitelisting: It is a security feature that is often used for trusted users who can directly log into Crowd without asking for 2FA. Enter the IP address and click save for enabling the IP whitelisting
- IP Blocking: It is a basic access control mechanism that blocks access to Crowd Application based on the IP address. It will deny access for those IPs which are listed here. Enter the IP address in the text box for IP blocking. The message for this blocked users can be customized, enter the message in the 'Blocked User Message' text box and click on save button.
6: Reconfigure 2FA
- Reconfigure 2FA: For reconfiguring 2FA for end-user, navigate to User Profile click on Two-factor Authentication, you can see the Configure Two Factor(2FA) window, now click on Reset button to Reconfigure the Authenticator or Backup method.

Additional Resources
Did this page help you?

×
![]()