Two Factor Authentication (2FA)
Which Authenticator mobile apps are supported by the 2FA plugin?
The 2FA app works on the widely adopted TOTP algorithm.
The 2FA app supports All mobile apps which work on the TOTP algorithm.
Here are a few popular mobile apps which are supported:
- Google Authenticator
- Authy
- Duo
- freeOTP
- Microsoft Authenticator
- Symantec VIP
How does any user reconfigure 2FA on its own?
If 2FA is enabled for the user then he can reconfigure his existing 2FA configuration by using the following steps:
- Click on Profile icon from the right corner
- Select Two Factor Configuration from the list.
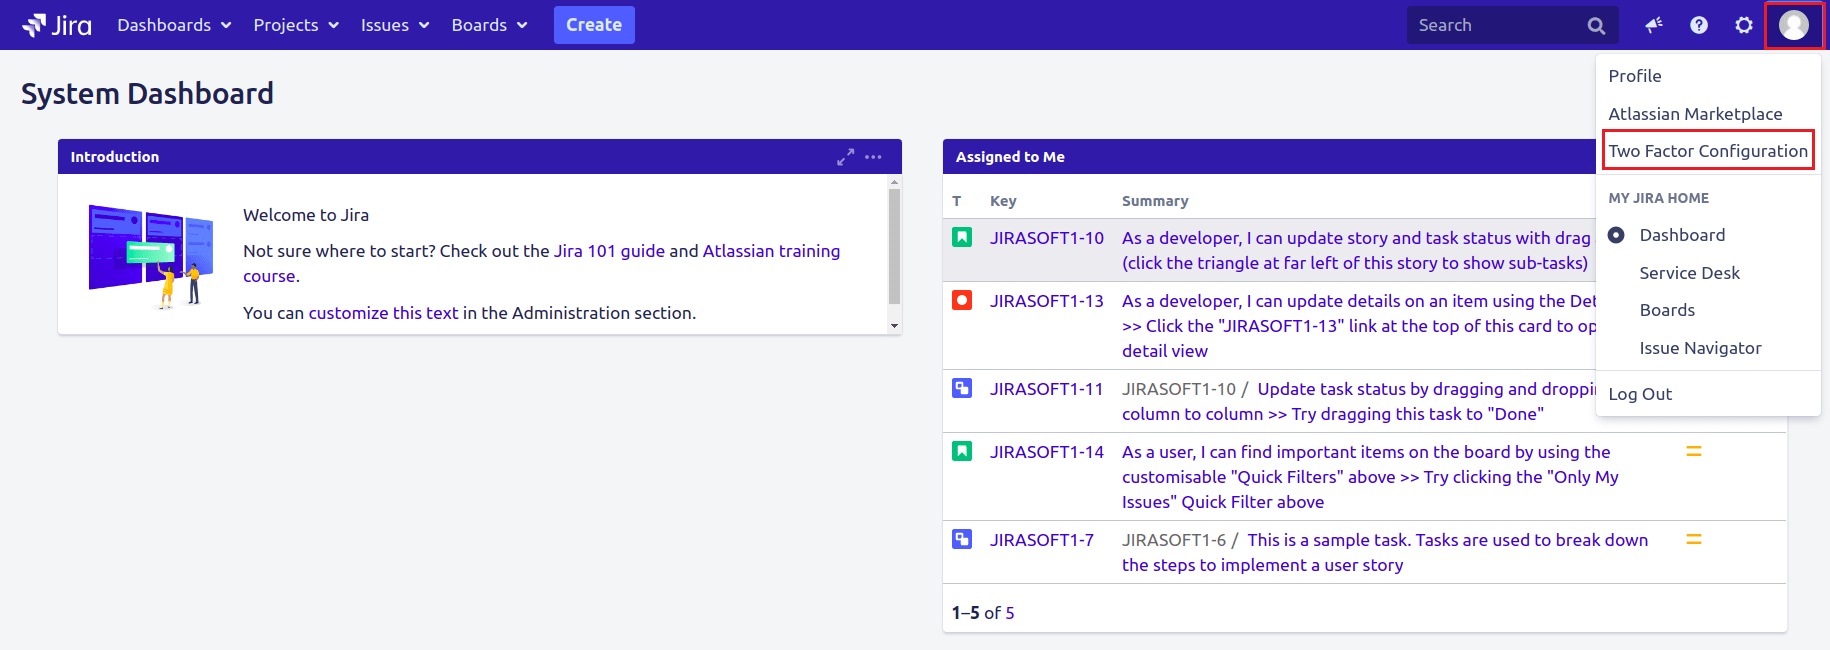
- The user should be able to see the below screen with the list of all available 2FA methods.
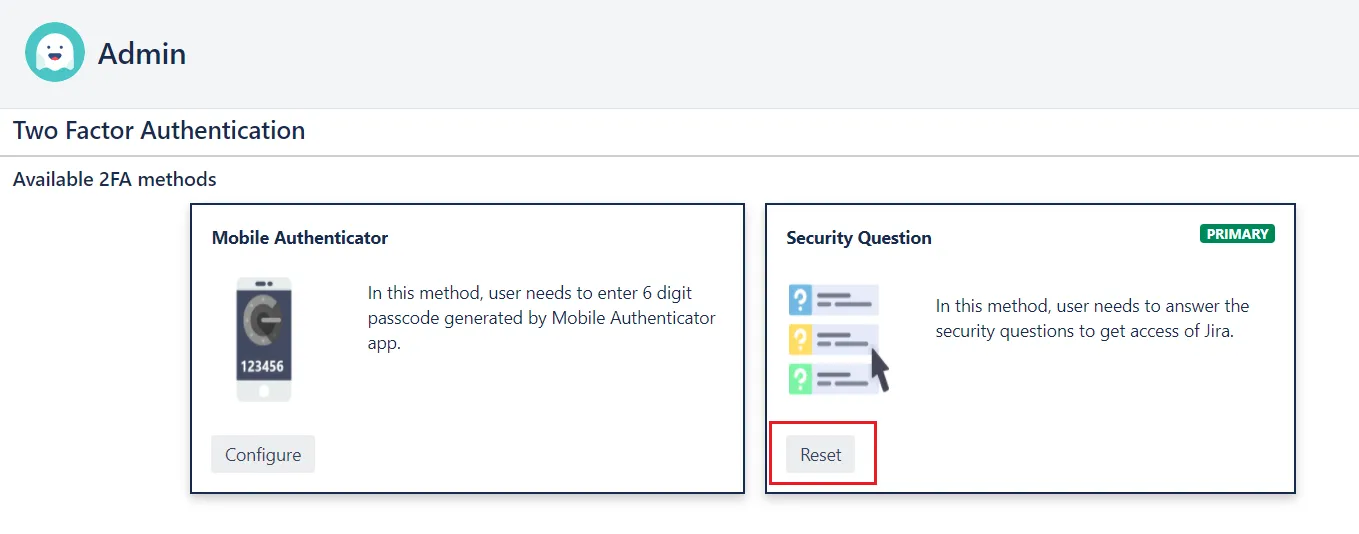
- The user needs to click on the Reset button against the 2FA method which he wants to reconfigure.
- The user will be prompted to click on the Configure button for configuring a new configuration.This is how the users can reconfigure their 2FA on their own.
How can I Activate/Enable 2FA for users?
There are many ways by which you can enable 2FA for users.
- Enable 2FA for the individual user
- Enable 2FA for multiple users
- Enable 2FA for all users in a group.
A. Enable 2FA for the individual user
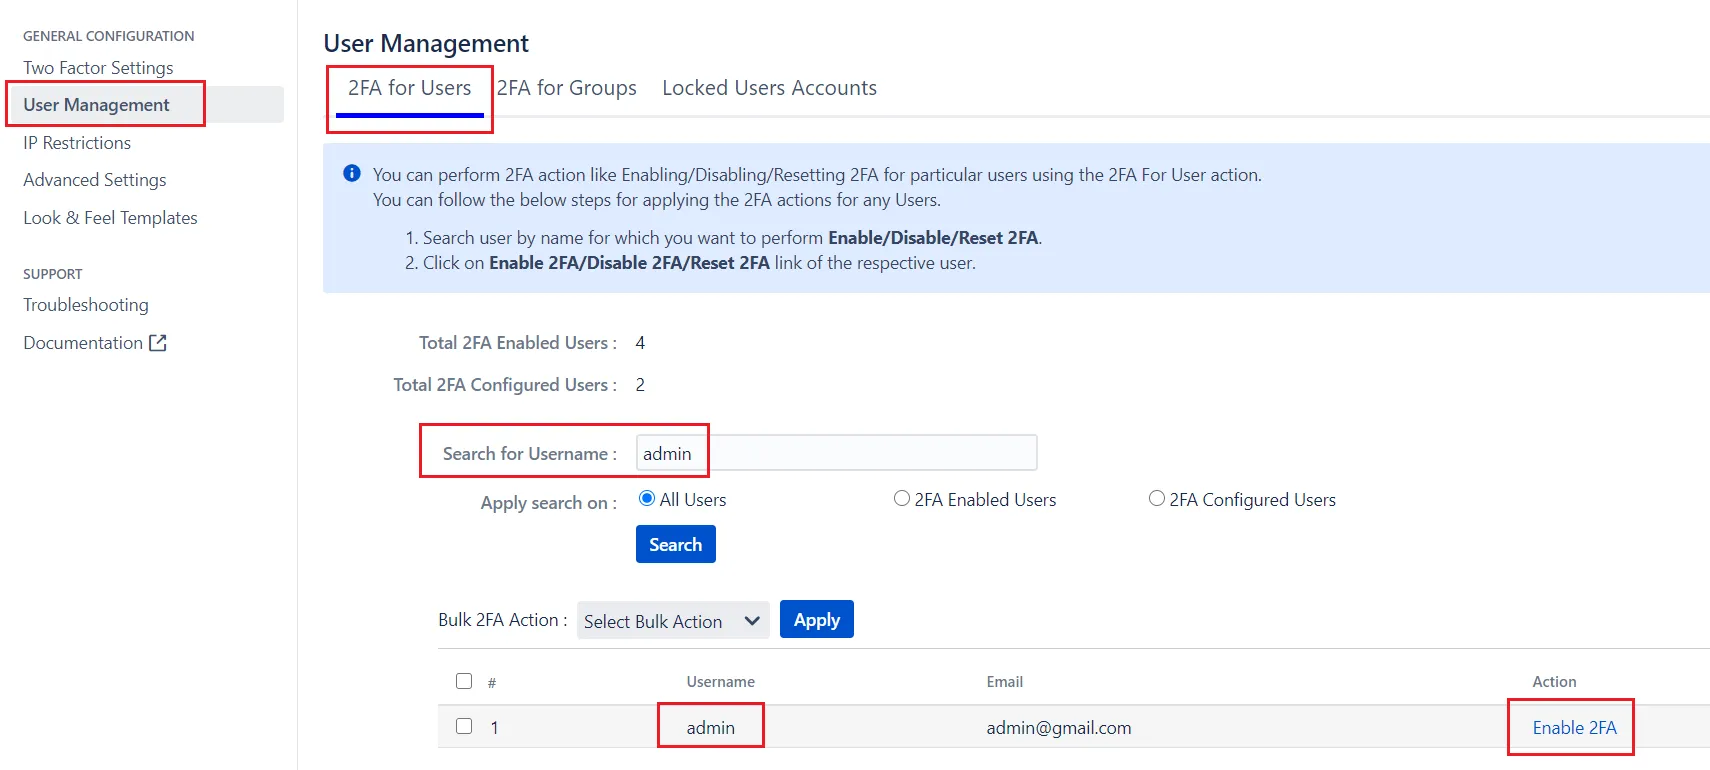
- Navigate to User Management tab in the 2FA app settings
- Select 2FA for Users tab.
- Search for the user by using the username
- Click on Enable 2FA action against that user.
B. Enable 2FA for multiple users
- Navigate to User Management tab in the 2FA app settings.
- Select 2FA for Users tab.
- Choose Enable 2FA for Selected users in the Bulk 2FA Action dropdown.
- Select the checkboxes for the users for whom you want to enable 2FA
- Click on Apply button.

C. Enable 2FA for all users in the group
- Navigate to User Management tab in the 2FA app settings
- Select 2FA for Groups tab.
- Search for the group name
- Click on Enable 2FA link for that group
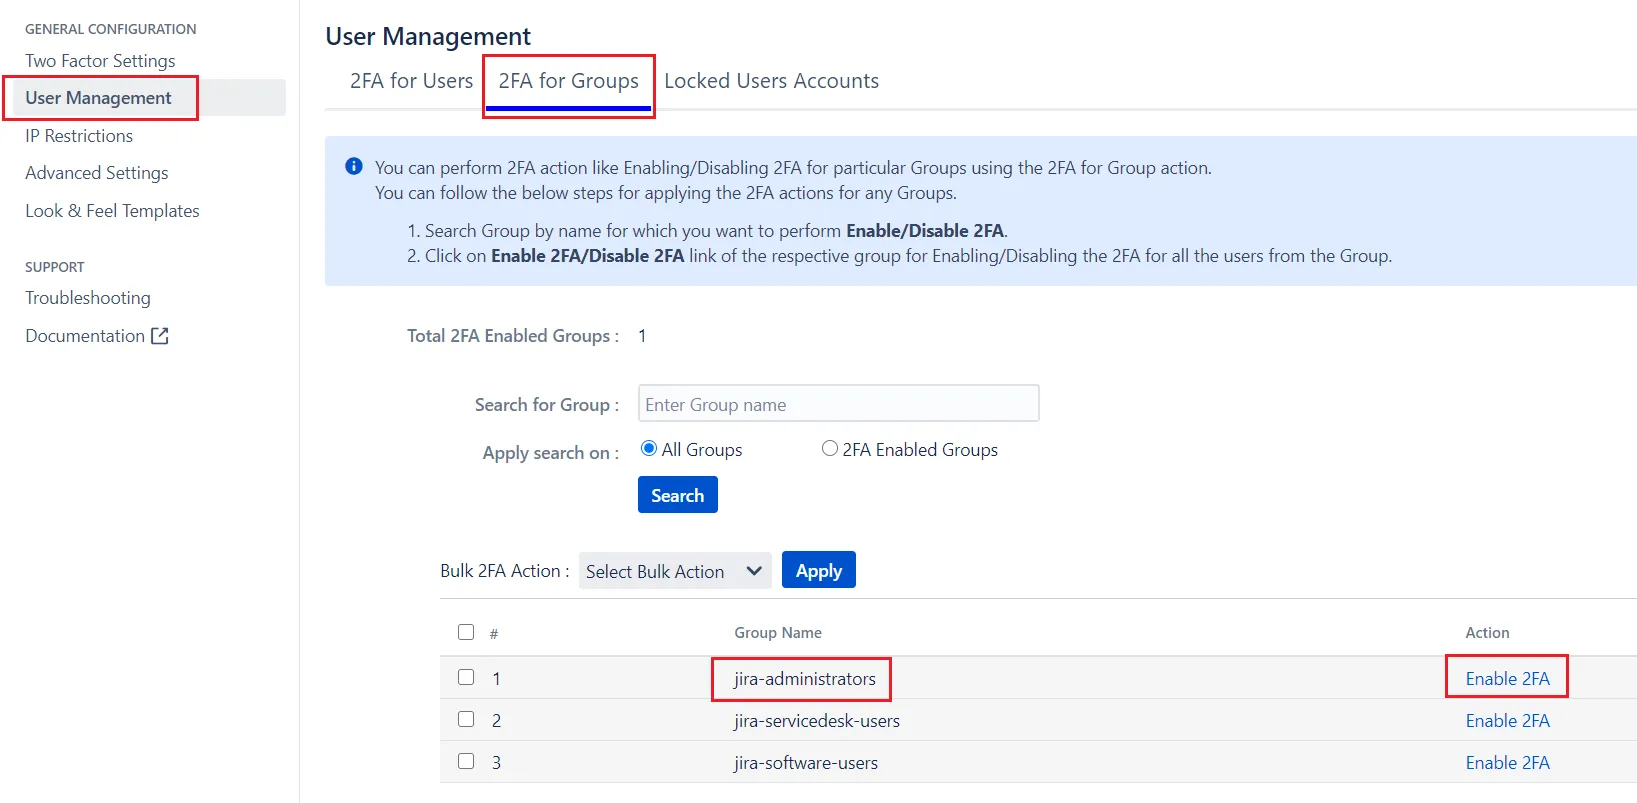
It will activate 2FA for all users in that group.
If 2FA is enabled for any group & the new user is created under this group, the plugin will automatically enable 2FA for that user.
This is how you can enable 2FA for your users.
How to enable 2FA only for Jira Software Users(Internal Users)?
The 2FA app provides ways to enable 2FA for a particular set of users and a group of users.
Consider if you want to allow 2FA only for users belonging to the jira-software-users group, then you can do this using the steps below:
- Navigate to User Management tab
- Select 2FA for Groups section
- Search for the “jira-software-users” group
- Click on Enable 2FA link against jira-software-users group.
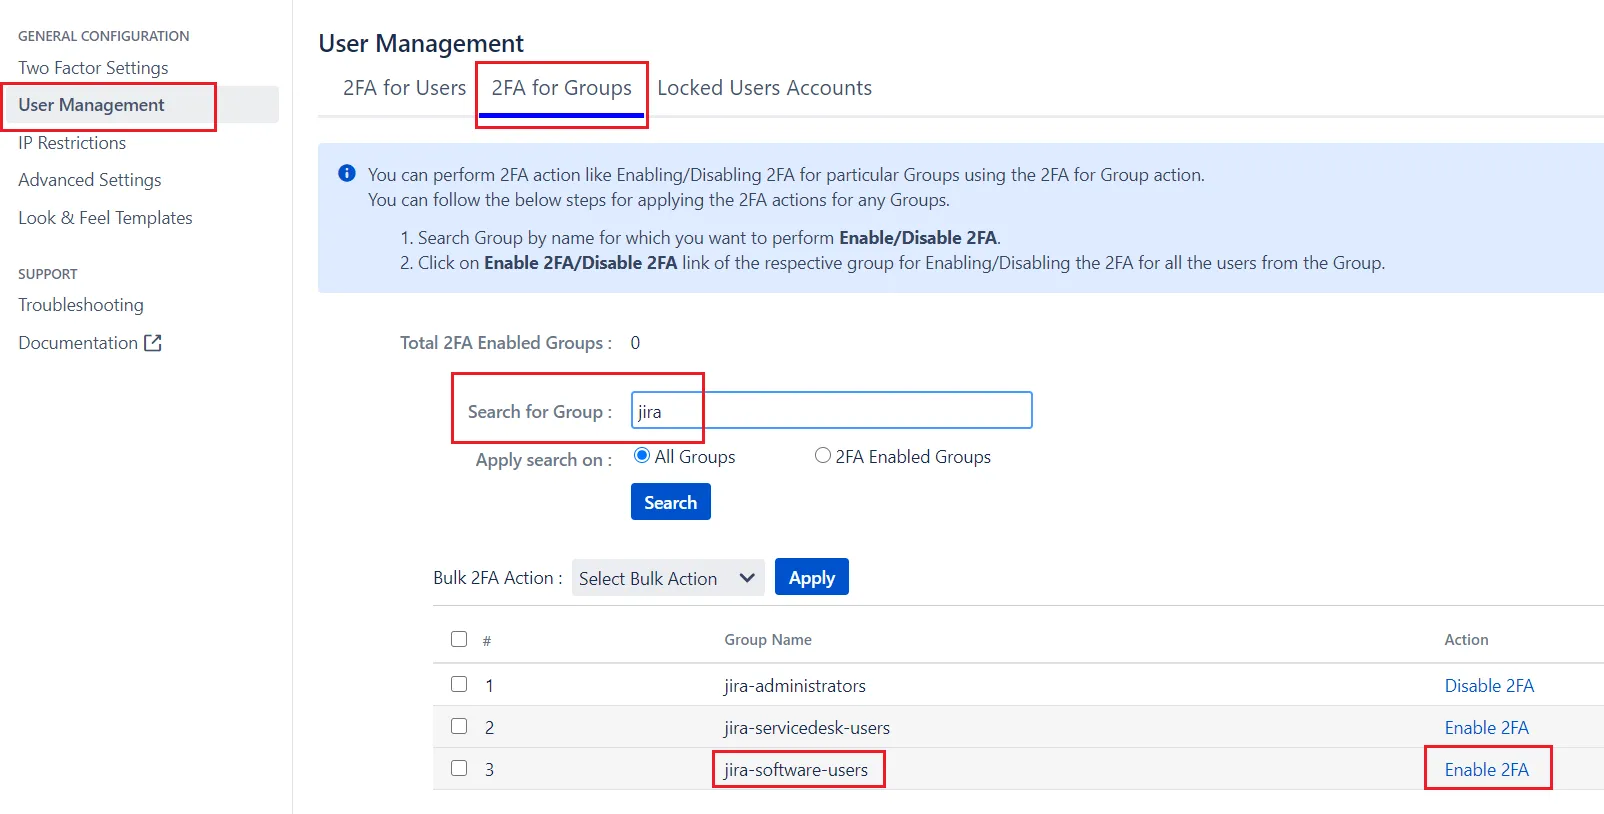
Now, 2FA is enabled for all users who belong to jira-software-users group.
Note:- Once you have enabled 2FA for jira-software users group, the app will turn on 2FA for existing users belonging to this group as well as newly created users who get added to this group.
My phone is lost or not accessible, What should I do now?
There are two ways of logging into your account if you cannot use your current 2FA method:
- Backup method
- Admin can reset the 2FA
A. Backup method
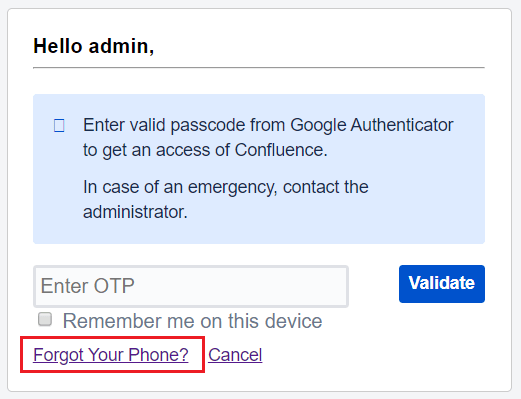
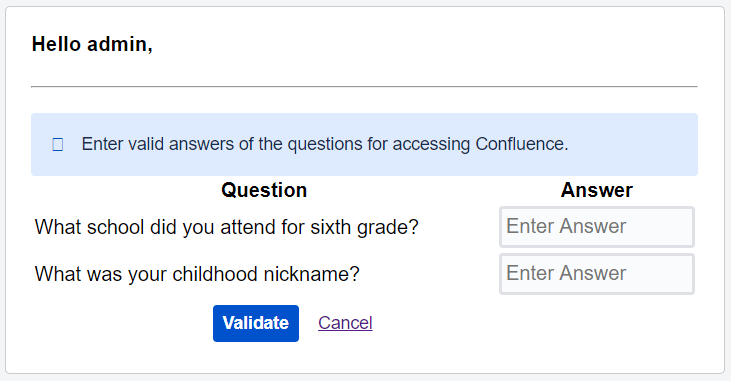
- At the time of 2FA validation, click on ‘Forgot your phone’ link. Here you will be asked to answer the security question.
- Answer the security questions and click on the ‘Validate’ button to get access to your Atlassian application.
B. Admin can reset the 2FA
- Navigate to the User Management tab in the 2FA app settings.
- Click on the ‘2FA for User’ tab. Type the name of the user in the search bar and hit ‘Enter’.
- You can see the details of the user. Click the ‘Reset 2FA’ link under action. This resets 2FA for that user.
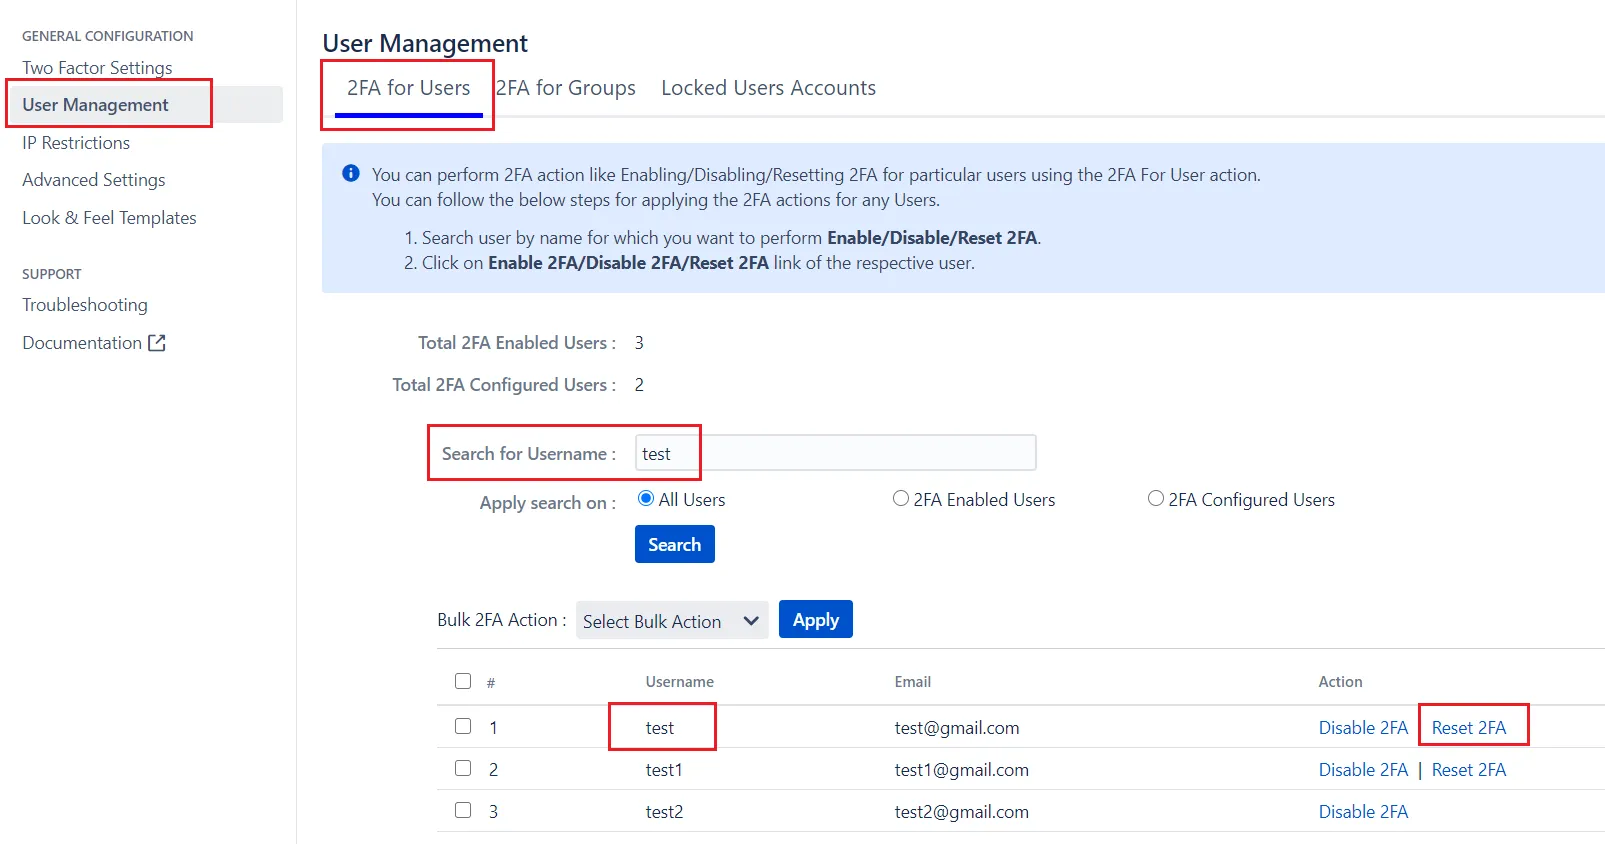
After the reset is performed, the user can configure 2FA again using inline registration.
I have enabled ‘remember my device’ feature even then plugin is asking me for 2FA validation.
Yes, you can skip 2FA for a specific set of IPs. For that, you need to add those IP addresses under Whitelist IP addresses.
Please follow the below steps for adding IP as Whitelist IP.
- Navigate to the IP Restrictions tab.
- Select IP Whitelisting section
- Enter the IP against IP Address text box
- Save changes.‘Remember My Device’ feature has an expiration time after which devices are forgotten. The time for remembering devices can be increased. Here are the steps to change the expiration time:
- Go to Advanced Settings Tab.
- Navigate to Remember My device section. In the Expiry Time textbox increase the expiry time by the number of days you want to remember the device.

Now it will not ask for 2FA validation if the user tries to perform login from the whitelisted IP addresses.
Is it possible to skip Two Factor Authentication 2FA for specific IPs?
Yes, you can skip 2FA for a specific set of IPs. For that, you need to add those IP addresses under Whitelist IP addresses.
Please follow the below steps for adding IP as Whitelist IP.
- Navigate to the IP Restrictions tab.
- Select IP Whitelisting section
- Enter the IP against IP Address text box
- Save changes.
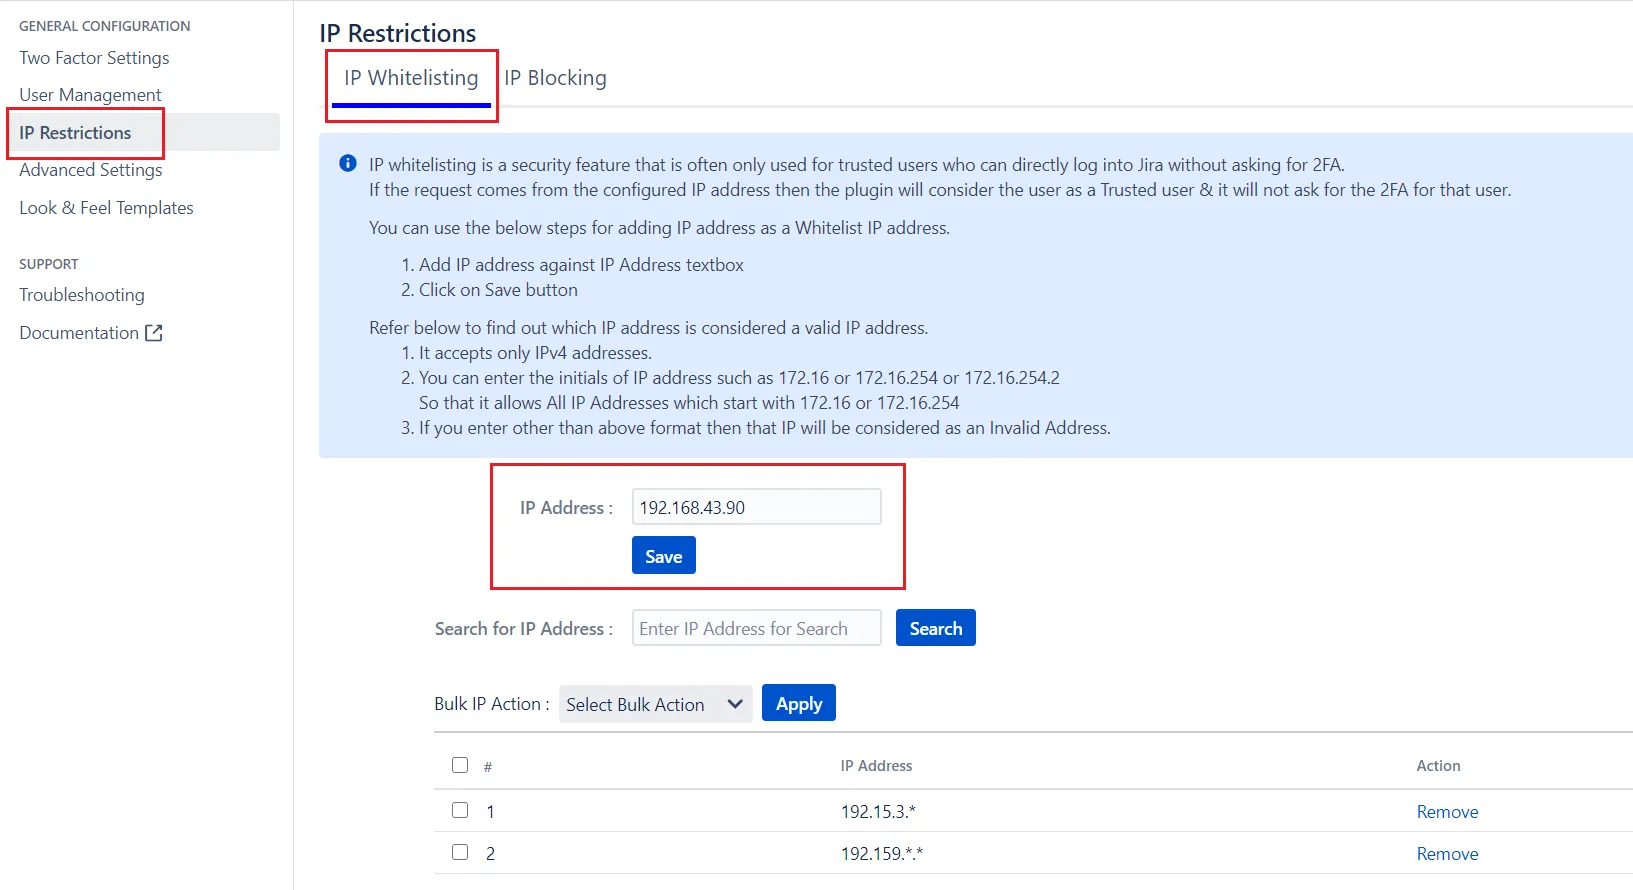
Now it will not ask for 2FA validation if the user tries to perform login from the whitelisted IP addresses.
What happens if an IP is blacklisted but it is also present in the whitelisted IP range?
IP whitelisting is used to bypass 2FA for those particular IPs & Blacklisting is used to prevent access to the application from that IP.
In the plugin we have provided a feature that you can also configure a range of IPs. For example if you configure 12.1.35.* then all the IPs from 12.1.35.0 to 12.1.35.255 will get whitelisted.
So now one scenario can happen where you have blacklisted a IP (12.1.35.10) but it is already in the range of the whitelisted IPs(12.1.35.0 to 12.1.35.255). In this case, IP blacklisting will be given more preference over whitelisting. So now plugin will block the access of the Atlassian application if any requests come from this particular IP (12.1.35.10).
How to limit the number of invalid 2FA attempts?
The plugin provides an option using which the admin can restrict the number of invalid 2FA attempts.
This feature is named Brute force protection where admin can set the limit the number of invalid 2FA attempt counts & duration of the locking period.
If the count of invalid attempts is exceeded the user will be locked out for the specific duration.
Within this period users will not be able to perform login again.
Please perform below steps for enabling Brute Force Protection
- Navigate to Advanced Settings tab of the plugin
- Select Enable Brute Force Protection for Jira
- Set Number of Attempts & User Locked out Period
- Save settings
Now, Brute force protection is enabled for the system.
Note:- This brute force feature can consider only invalid attempts of 2FA & not invalid attempts of Jira login.
How to unlock a valid user if the user is locked because of the number of invalid login attempts?
If several incorrect 2FA attempts are made by users then their account will be locked for a specified amount of time.
Admin can set this locking period so that the user will not be able to attempt login that period of time.
The plugin provides an additional feature to admin using which he can Unlock the locked users.
To Unlock the user please perform the below steps:
- Navigate to the User Management tab in 2FA app settings
- Select the Locked User Accounts section.
- Search for the user to Unlock it.
- Click on the Unlock link.
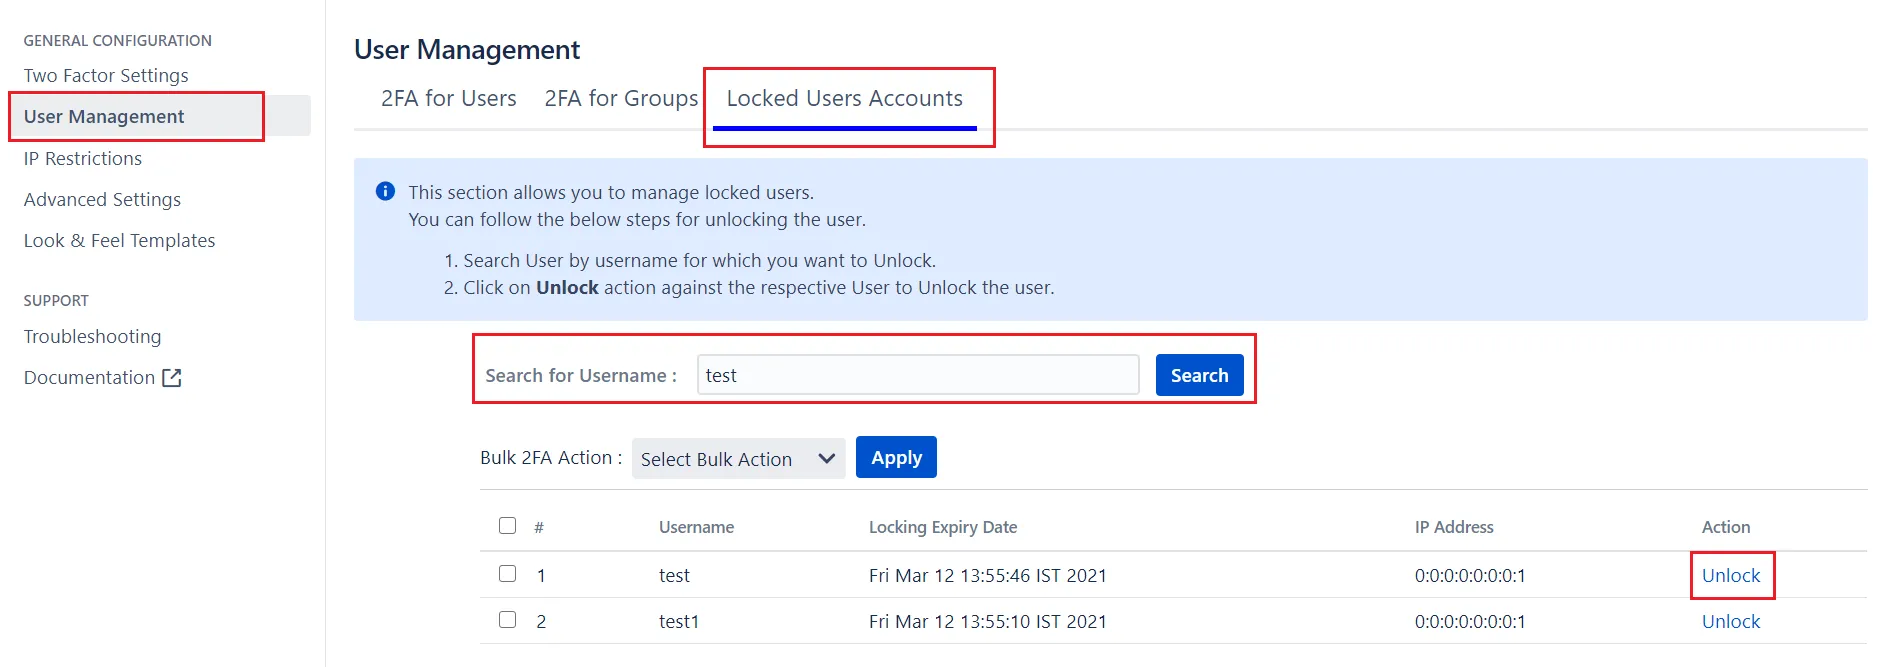
Now your user is Unlocked & he can attempt to login again.
Enable 2FA only for Jira Service Desk(JSD).
With the help of a miniOrange 2FA plugin, you can forcefully enable 2FA only for Jira Service Desk users.
Admin needs to perform the steps given below for enabling 2FA only for Jira Service Desk(JSD).
- Navigate to Two Factor Settings tab
- Select Enable 2 Factor Authentication for Jira and then select Enable 2FA for Jira Service Desk.
- Save the changes

Once you have enabled 2FA for Jira Service Desk you need to enable 2FA also for Users so that only those will be asked for 2FA.
To enable 2FA for specific users please navigate to the User Management tab.
Our users have to validate the 2FA multiples times a day. How to avoid the frequent 2FA verification?
The 2FA plugin asks for 2FA validation to the users whenever the user logs into Atlassian applications.
Jira’s session expires after 5 hours by default. So after this session timeout, user has to login to Jira again and hence will be asked for 2FA verification as well.
If you have enabled remember me for Jira then new session will automatically start after the timeout. But user will be still asked for 2FA as a new session has started.
So to avoid these frequent 2FA verifications, you can use one of the following two solutions.
- Navigate to Advanced Settings tab
- Select Enable Remember My Device for Users option
- Enter the Expiry time as needed
- Now at the time of login, when 2FA verification screen appears, select the Remember me option

Now the user will not asked for 2FA validation frequently.
Jira: Inactive user session will last for Jira’s default session timeout of 5 hours. To extend Jira’s default session timeout,
Confluence: Inactive user session will last for Confluence’s default session timeout of 1 hours. To extend Confluence’s default session timeout,
Can I enable Two-Factor Authentication (2FA) for all the users except some set of users?
The 2FA app provides ways to enable 2FA for all the users and skip 2FA for particular set of users(based on Groups).
Consider if you want to allow 2FA for all the users and skip it only for users belonging to the jira-servicedesk-users and jira-servicedesk-users-1 groups, then you can do this using the steps below:
Step 1. Enable for All
- Navigate to User Management tab
- Select 2FA for Users section
- Choose Enable 2FA for All users in the Bulk 2FA Action dropdown.
- Click on Apply button.

Step 2. Skip 2FA for specific group
- Navigate to User Management tab
- Select 2FA for Groups section
- Scroll down to the Skip 2FA for Groups section.
- Choose the groups for whom you want to Skip the 2FA and click on Save.

Now, all the users will be asked for 2FA except the users who belong to either jira-servicedesk-users or jira-servicedesk-users-1 groups.
Note: This behavior will be applied to both newly created users which are added to these groups as well as all the existing users which are either already present in these groups or added later.
I am able to scan the QR code successfully but it says invalid OTP. What should I do?
In the mobile authenticator 2FA method, user scans a QR code using any mobile authenticator application and based on the scanned QR code the mobile authenticator app provides a time based OTP. Then the user has to enter the OTP in Jira within the allowed time. Otherwise the OTP expires.
The invalid OTP error occurs if the server time doesn’t match with the time of the device on which the OTP is received.
In this case as the server and device times are not synced, whenever you enter OTP on the server, it considers it as already expired.
So, to solve this issue you need to sync the timings of Server and your mobile device.
Enable 2FA only for Agents and not for customers on Jira Service Desk (JSD/JSM)
The 2FA app provides ways to enable 2FA for a the Agents on Jira Service Management (or Jira Service Desk).
Consider if you have assigned the agent access to the users belonging to the group jira-servicedesk-users group and you want allow 2FA for those those agents only. Follow the steps given below to achieve this.
Step 1: Enable 2FA for Service Desk
- Navigate to Two Factor Settings tab
- Select Enable 2 Factor Authentication for Jira and then select Enable 2FA for Jira Service Desk.
- Save the changes

Step 2: Enable 2FA for specific group
- Now navigate to User Management tab
- Select 2FA for Groups section
- Search for the “jira-servicedesk-users” group
- Click on Enable 2FA link against jira-servicedesk-users group

Still can't find what you're looking for? Raise a ticket or email us at atlassiansupport@xecurify.com for more information and help.
