Single Sign On (SSO)
What are the steps to install the Atlassian plugin?
- Open your Atlassian application and log in.
- Navigate to the administration section. You may need to log in again (we’re super secure).
- Choose “Add-Ons”, then navigate to “Manage Add-Ons” (the “Install” section in older versions).
- Click the “Upload Add-On” link and upload the jar file.
- Navigate to the “Manage Add-Ons” page of your instance (the “Install” section in older versions).
- Locate your installed add-on in the list.
- Click the add-on entry and copy and paste the license key into the license box for your add-on.
I don’t want Single Sign On to be used for allowing admin access. How can I disable it?
Go to Sign in Settings tab and select Login administrator with user permissions in Secure Admin Session Options. This will disable SSO for Admin authentication and administrator privileges will be provided using their credentials.
I don’t have access to server file system. How can I get logs?
Access to server filesystem is not required. You can get logs using these steps:
You can follow these steps to configure logs:
On JIRA/Confluence, go to System -> Logging and Profiling.
Click on Configure in Default Loggers section.
Enter com.miniorange.sso.saml in package field and select Debug in logging level. Click on add.
After these steps, perform single sign-on again. This time logs will be recorded. Then Download Support zip using these steps:
Go to System -> Troubleshooting and support tools.
Proceed to create support zip.
Keep only Jira Application Logs option selected.
Click on Create zip and then Download zip.
How to enable Backdoor Login for Atlassian application using APIs?
Backdoor login is used by Administrators to log into their local Atlassian account. After disabling the backdoor, you won’t be able to log in with Atlassian application credentials.
Steps to enable Backdoor /Emergency login using the REST API call:
- Install Postman. You can refer to this link: https://www.postman.com/downloads/
- Click on the + sign at the top.
- The request will be created
- Keep request method POST add <server -base -url>/plugins/servlet/enablebackdoorurl as a request URL.
- In header tab add Content-Type : application/json.

- Go to the Authorization tab and select Basic Auth as a type of authorization.
- Add admin username and password.
- Hit Send.

- In the response, you will see the Backdoor URL for login.
- Use this URL to login into the Atlassian application.
How do I make them login to their existing account with the same email address without creating new users?
The new accounts are created for users because the IDP plugin is not able to map users coming in from IDP to the user already registered in Atlassian.
You will need to map the IDP’s attribute which has the email address to the Email field given in the User Profile tab.
Here are the steps to map the email attribute and make sure the user’s email address is matched:
- Click on the Test Configuration button in Configure IDP tab to see the attributes coming in from IDP
- Copy the Attribute Name against which you see email address and paste it into the Email textbox in the User Profile tab
- For the option Login/Create Jira user account by, choose email
- Save Settings
When using multiple IDPs(SAMLs Only), How do users choose IDP(Okta or Azure AD)?
There are two ways to choose IDP:
1. Once the multiple IDPs are configured in the plugin. The drop-down list appears on the login page at the time of SSO. This list contains name of all the configured IDPs. You can select your IdP from the list and enter credentials for the same to perform login.
2. When more than one IDPs are configured in the plugin, Domain Mapping option enables. Using this option you can set domain of the IDP you want to perform Signle Sign-On with. At the same time you can configure more than one IDP domain also. It will redirect to the IDP based on the domain name you entered for the login.
Suppose you configured okta and azure domains in the domain mapping fields.
Domain mapping : okta.com
Domain Mapping : azure.com
On SSO it will ask to enter the username. If your username contains okta(okta.com) domain it will redirect to okta idp and you need to add username and password for the same IDP to perform sso.
Unable to use miniOrange JIRA SAML SSO on mobile.
The JIRA mobile interface has been designed to display an optimized view of the JIRA Server in a mobile browser. The Custom fields(or files for example javascript loaded by the miniOrange plugin) that have their own custom field renderer will be ignored by the JIRA Mobile interface.
To resolve it, you need to switch to the desktop interface to view these fields and enabled miniOrange SSO. You can do that by either switching to the desktop mode from the option given in the mobile browser or you can disable JIRA mobile system add-on in the JIRA servers so that all the users will only be able to access the desktop view of JIRA on their mobile device.
How to install miniOrange SAML SSO plugin on Atlassian Crowd?
Please follow the following steps to install miniOrange SAML SSO plugin on Atlassian Crowd.
- Download the SAML SSO plugin’s jar from Atlassian Marketplace.
- Put the jar into the plugins directory, a sub-directory of your shared Crowd home directory (or the main Crowd directory in versions prior to Crowd 3.0).
- Restart the Crowd Sever.
Is it possible to combine SAML authentication(miniOrange SAML)and OAuth(miniOrange OAuth) authentication?
It is possible to use both SAML and OAuth plugin. You might need to combine both the plugins in the following scenario:
Your Identities are stored on two servers, one of which supports SAML while the other supports OAuth
In this case, you can configure the IDPs in their respective plugins and change the name of buttons in both the plugins so that it’s easy for them to understand which one to use. In case of multiple SAML IDPs, a dropdown is shown instead of buttons which display the list of IDP names you configure in SAML plugin.
SSO was working fine for the past few months and it stopped working suddenly. I fixed it by uploading metadata again. How do I fix it permanently??
This issue comes up because your IDP changes the X.509 certificates of your applications. This is also called a certificate rollover. This causes the Single Sign-On to break because the certificates need to be updated in the applications to match the new certificates which the IDP has changed.
There is a functionality in the plugin to take care of this change called Refresh Metadata. This feature fetches and updates the information in the plugin in certain time intervals based on the latest metadata offered by the Identity Provider in the IDP’s metadata URL.
Here are the steps to enable this setting:
1. Go to Configure IDP tab and click on Upload Metadata sub-tab.
2. Select your IDP from the list of IDPs or select Import from URL.
3. Enter the metadata URL of your IDP.
4. Select the Refresh Metadata periodically? checkbox.
5. Select a time interval in which you want the add-on to update the metadata.
Users are not being assigned the default group configured in Read Only with Local groups user directory after SSO. How should I resolve this?
To resolve this issue, configure the default group for all the users. Follow these steps to do this:
1. Go to the User Groups tab of the plugin
2. In the Default Groups field, select the group you configured in the directory.
3. In Assign Default Groups to field, select All Users option.
4. Click on Save button.
Now all users will be assigned the default group after SSO and they won’t face any issue with access.
Why is user created with random values when Azure AD contains Email Address in response?
To resolve this issue, configure NameID Format in the plugin (provided under Configure IDP tab). By default, it is set to unspecified which returns random values in NameID attribute in the response.
Change it to the email address to receive an email address in the NameID parameter. Now, the user will get created with an email address on SSO and not with any random string.
How to create new accounts with a part of email as username when my IDP only sends email as an value?
You can add a regular expression to the attribute name(email) to extract the username for the user.
Follow the below steps to add a regular expression to the username.
- Navigate to User profile tab in the plugin.
- Select Apply regular expression on the username field.
- Add a regular expression (eg: ^.*?(?=@) ) in the Regular expression text field.
- Save settings.
For example, you can use regular expression ^.*?(?=@) to extract demo from username demo@example.com
During SSO user gets an error message “Not Permittted”. How can this be resolved?
- JIRA – jira-software-user, jira-developer
- Confluence – confluence-user, confluence-developer
- Bitbucket – stash-user
- Manually add the user to required groups in the service provider User settings, then in the User groups tab uncheck the option Keep Existing User Groups and add the required groups to the Exclude Groups field.
- Give Global Permissions to at-least one of the groups coming from identity provider by going to General Settings > Global Permissions in the service provider.
Note: To check which groups have Global Permissions or to give the permissions to your own groups, go to the General Settings > Global Permissions.
I cannot find my attribute in the drop-down for configuring attributes in the Configure IDP tab.
This issue could be faced because the required attribute has not been received in the SAML response. The attributes in the drop-down are added from the SAML response received from the IDP after Test Configuration is performed in the Configure IDP tab. To make sure that the required attribute is received in the SAML response, the attributes being sent from the IDP have to be configured. This can only be done from the admin console of the IDP being used.
If any assistance is needed for the configuration, please contact us at info@xecurify.com.
How can I assign groups to the user?
There are two methods you can use to fix the issue.
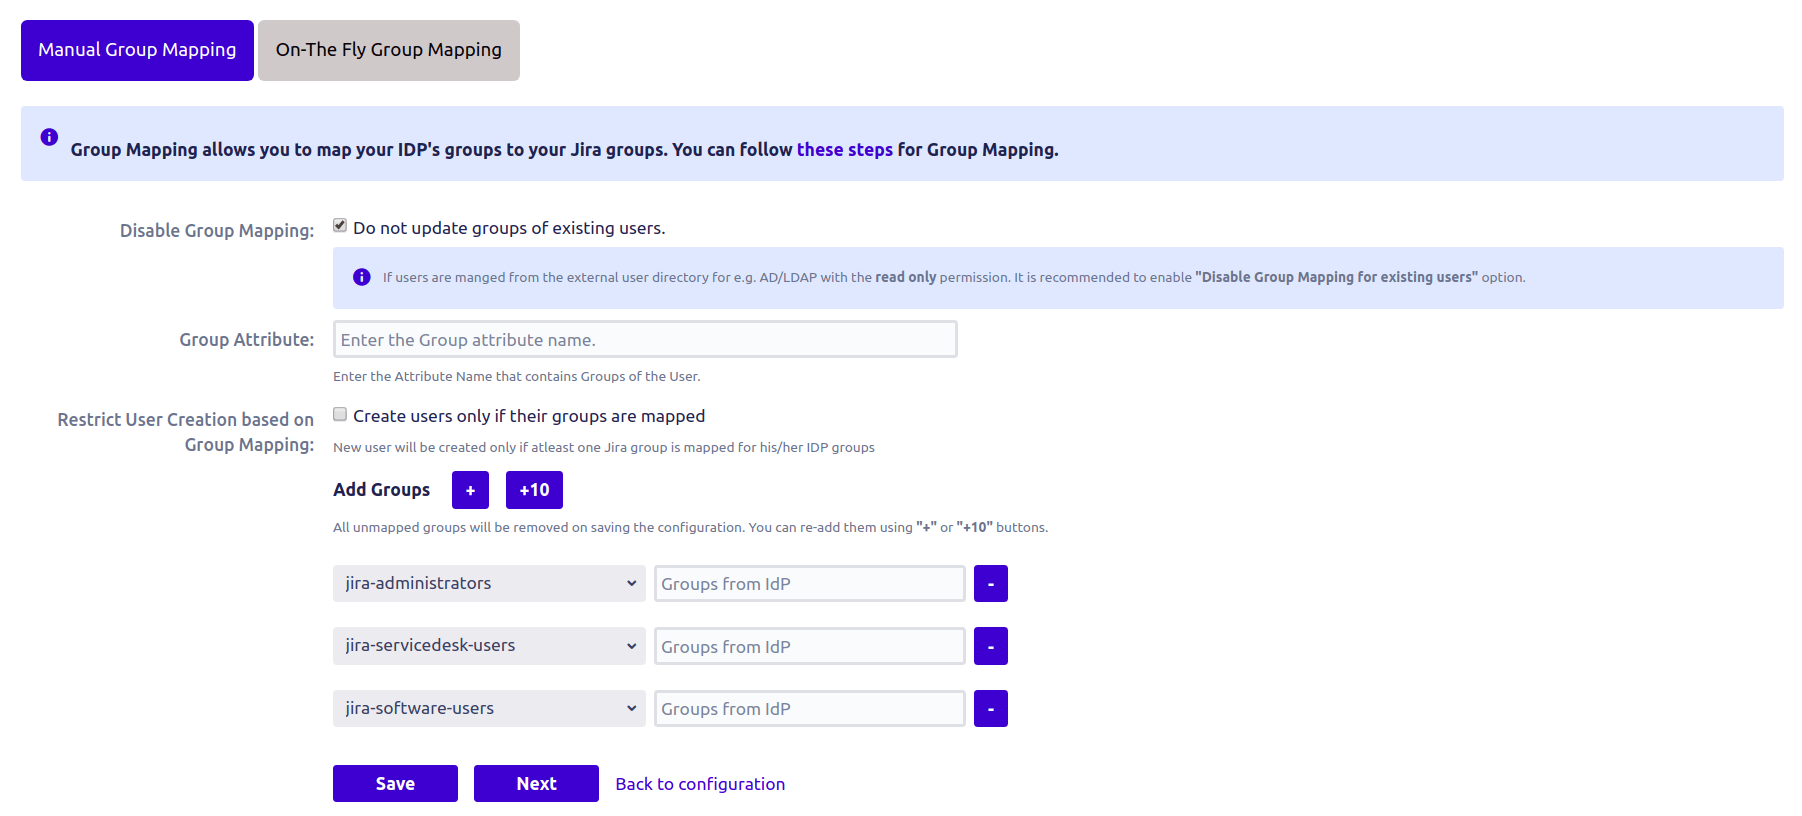
- Manual Group Mapping
- On the Fly Group mapping
To do this, navigate the tab User Groups. Consider, IDP groups are discovered against the attribute name of the IDP-Group.
Do you not understand the name of the group attribute? Please use the measures below to obtain it.
- Navigate to Configure IDP tab.
- Click on Test Configuration button
- Check the group attribute name
1. Manual Group Mapping:-
Here you have to map the group that comes in response with a real Jira group manually.
2. On the Fly Group mapping:-
Here you just need to enter the group attribute name & rest of the thing is managed by the plugin itself.

How do I assign customers to the same group name as IDP (a group may be new or pre-existing)?
Use On the Fly Group mapping function supplied by the plugin to fix this problem.
Here you just need to enter the group attribute name & the rest of the thing is managed by the plugin itself.
There is also an option called Create New Groups that allows you to generate new groups in the Jira Server if the group does not exist in Jira.
Consider this option activated and in the response, there is the group with name jira-user and this group is not present on the server, in this scenario it will generate a fresh group with name jira-user and assign it to the corresponding user.
If the choice Create new groups is disabled, a fresh group will not be created in Jira & only current Jira Server groups will be considered by the plugin.
When should I use on-the-fly group mapping and when should I use manual group configuration?
- Manual Mapping:- Here you have to map the group that comes in response with a real Jira group manually.
- On the Fly Group mapping:- Here you just need to enter the group attribute name & the rest of the thing is managed by the plugin itself.
- The groups name from IDP & groups name in Jira are same
- If the group is not in Jira and you want to generate and assign a fresh group to the user
- IDP’s group name & in Jira’s group name is not the same.
How can I generate a certificate for the SAML app?
Given below are instructions to generate new SHA256 public and private keys via OpenSSL:
- Open a terminal and navigate to the bin directory of OpenSSL. If you don’t have OpenSSL installed, download it first.
- Run the command given below to generate SHA256 Keypair.
openssl req -x509 -sha256 -nodes -days 365 -newkey rsa:2048 -keyout privateKey.key -out certificate.crt
-
You will find the Public Key in certificate.crt and Private key in privateKey.key file in the bin directory.
- Open both files in notepad and copy the public and private key in the Custom Certificate tab of the plugin.
- Configure the updated certificate in IDP.
How can I ensure that new users created through SSO can login only through IDP even if they can see login page?
Users can access the application through their credentials if they are allowed. We can restrict them from resetting their password for Jira. We have a feature, Allow User to Change Password in the app which allows the admin to decide whether or not you want to provide a Password Change function to Jira User.
Disable this option to restrict the user from changing their password. The user will be forced to perform SSO to log in.
Please follow the below steps to disable Allow Users to Change Password
- Navigate to the SSO Settings tab
- Disable Allow Users to Change Password
- Save changes.
Is it possible to surpass the SSO redirect for local accounts and how to configure it?
During SSO user gets an error message “You Don’t have access to this page. Please contact your administrator with this message.” How can this be resolved?
- Go to settings > Applications.
- Select Versions & licenses to view license details for your installed JIRA applications.
- Locate the license you want to update, and click on the edit icon to update the license.
- Replace the existing license key with your new license key.
- Click the ‘Update License’ button to update the JIRA application with the new license.
I’m getting Test Successful message while performing test configurations, but face an error while performing Single Sign-On. How to troubleshoot this?
There could be multiple reasons for Single Sign On getting failed even after Test Configuration is successful.
AD / LDAP permissions
If your users are stored in the LDAP user directory in JIRA/Confluence then the plugin faces an error while updating their attributes.
Go to User Profile tab and check Disable Attribute Mapping checkbox. Similarly, go to the User Group tab and check the Disable Group Mapping checkbox.
If this doesn’t resolve the issue then please send us the logs and we’ll help you troubleshoot this issue.
I’ve multiple atlassian apps on same server but when I switch from one app to another, I’m signed out from the previous app. How to avoid this?
This happens when you’re using multiple apps with same server url but only different ports; e.g. when base url of JIRA is https://local.server.com:8080 and base url for confluence is https://local.server.com:8090. To avoid this situation, you need to set context path of the applications to make them unique. The steps to change context path of JIRA are provided on this link. You can follow same steps for other Atlassian apps too.
I am getting a ‘Not App Assigned’ error during Test configuration for Okta
For a user to perform Single Sign-On into your SSO application in Okta, you first need to assign that application to the user. When a user is not assigned the application and the user attempts to perform SSO in the application, then the user will get the ‘Not App Assigned’ error.
To solve this issue, you need to assign the user to the SSO application, once the successful app creation done in the Okta. This can be done in one of the 2 ways. Here are the steps:
1. From the application page
- Go to Applications
- Click on application’s name
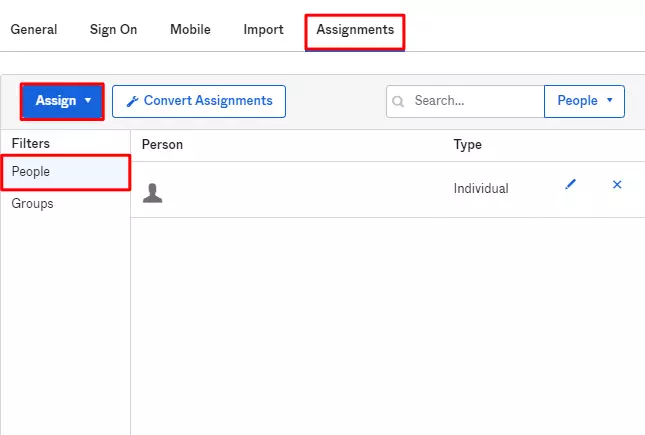
- Select the Assignments tab
- Click Assign and then select either Assign to People or Assign to Groups
- If you want to assign the application to multiple users at the same time then select Assign to Groups [If an app is assigned to a group then, the app will be assigned to all the people in that group]
- Enter the appropriate people and groups that you want to Single Sign-On into your application, and then click Assign for each
- For anyone that you add, verify the user-specific attributes, and then select Save and Go Back
2. From the user page
- Go to Directory > People
- Click an end user’s name
- Select the Applications tab
- Click Assign Applications
- You can select applications from the list of available applications or use the Search box to search for applications by name. Once you have located the application you want to assign, click Assign App
- Enter sign-in information such as the username. Note that this is not the user’s Okta sign-in username, but the username the person uses to sign in to the application individually
- Enter the application data options as needed. The required data depends on the application and may include information such as parameters that define the user to the application, profiles, or roles. You may also have to provide credential security options
- Click Save and Go Back
I am getting org.apache.xml.security.encryption.XMLEncryptionException: Illegal key size exception at the time of SSO. What should I do?
Java Cryptography Extension (JCE) Unlimited Strength Jurisdiction Policy Files missing in the JRE environment causes the above issue.
On a default JDK installation, AES is limited to 128-bit key size. In order to perform 256-bit or higher AES encryption, you will need to download and install Java Cryptography Extension (JCE) Unlimited Strength Jurisdiction Policy Files.
Here are the steps to fix java.security.InvalidKeyException: Illegal key size exception :
- Click here to go to Oracle’s website and search for ‘Java Cryptography Extension (JCE) Unlimited Strength Jurisdiction Policy Files’.
- Depending upon the Java version installed on your machine, download the zip file and extract it on your drive.
- From the extracted folder, copy local_policy.jar and US_export_policy.jar files.
- Go to <java_installation_directory>/jre/lib/security and paste the copied files. These files will already be there, you just need to copy and replace.
- Go to <server_installation_directory>/jre/lib/security and paste the copied files here.
- Restart your Atlassian Server.
How can I update the default X.509 certificate of the miniOrange plugin?
To generate follow below steps:
- Click the Generate new certificate button.
- Give all organization details to sign a Certificate.
- Now download the newly generated certificate and update it in the IDP.
Configure your own certificate:
- Enter the RSA X.509 Public Certificate (.cer, .crt) format in the Public X.509 Certificate text field.
- Enter the unencrypted RSA X.509 Private Certificate (.key, .pem) format in the Private X.509 Certificate text field.
- Now, click on the Save button to update the certificate.
After Certificate Update:
- Download the public certificate from the Service Provider info tab of the plugin and update it on your IDP.
How to update SAML Certificate of miniOrange Plugin?
Migration of Service Provider X.509 Certificate
The X.509 certificate is saved with the Identity Provider. So, the certificate needs to be migrated in the SSO app as well as the Identity Provider at the same time.
- Schedule downtime.
- Verify functioning SSO.
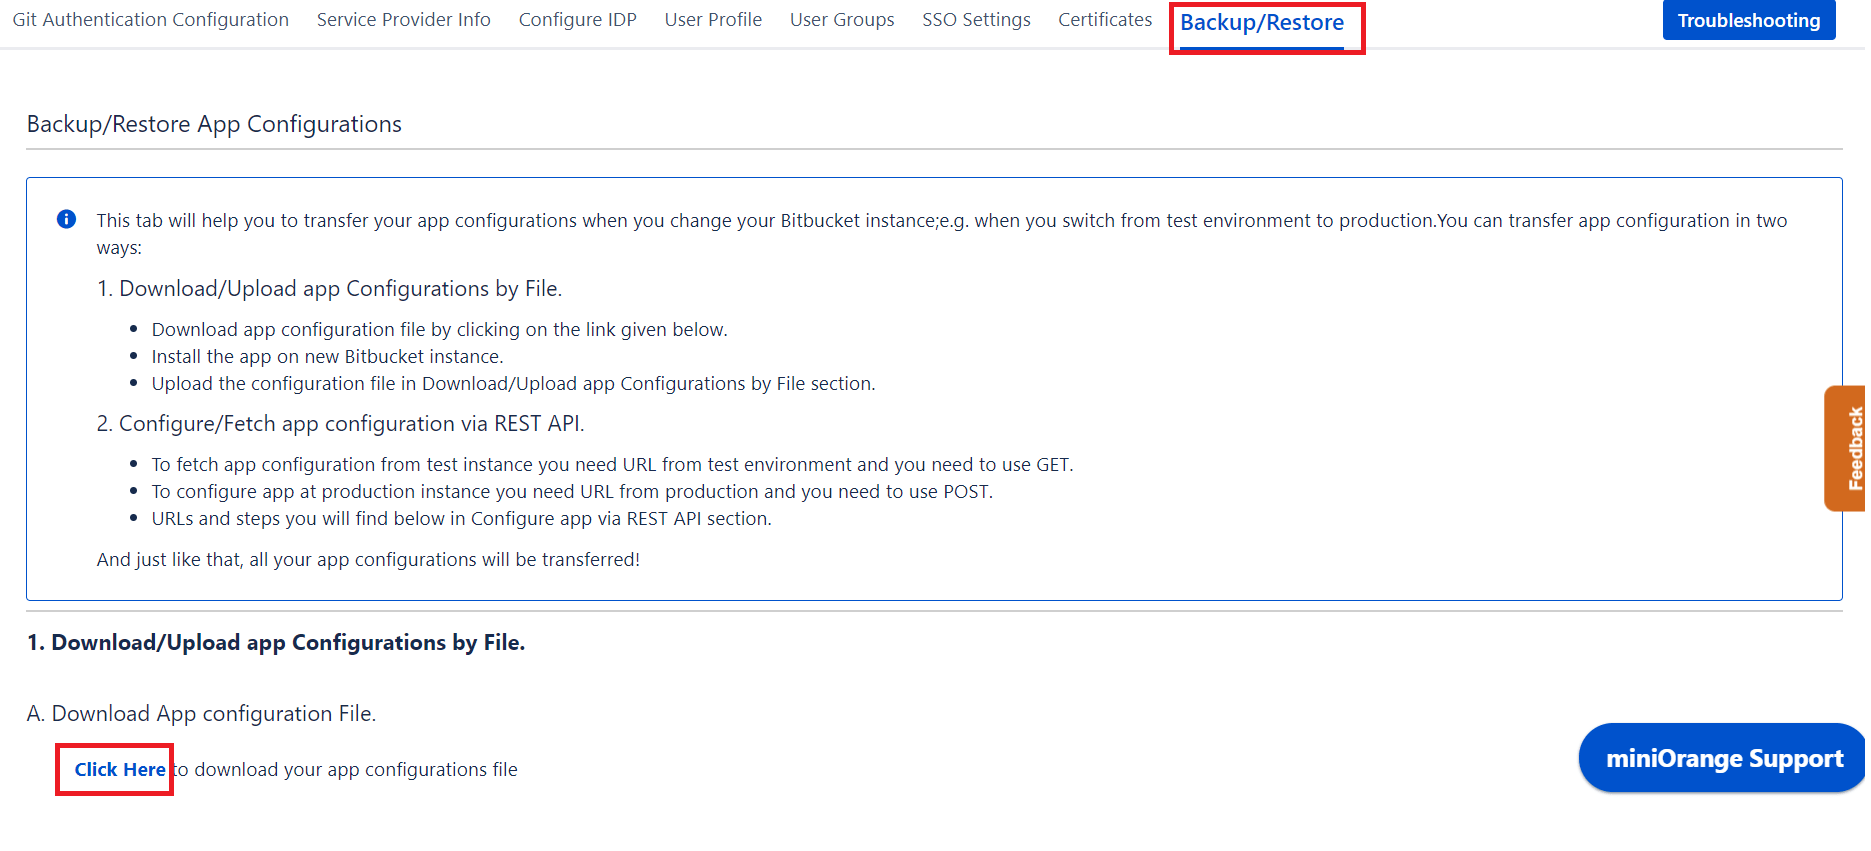
- Go to Backup/Restore Configurations tab and download the App configuration file for backup.
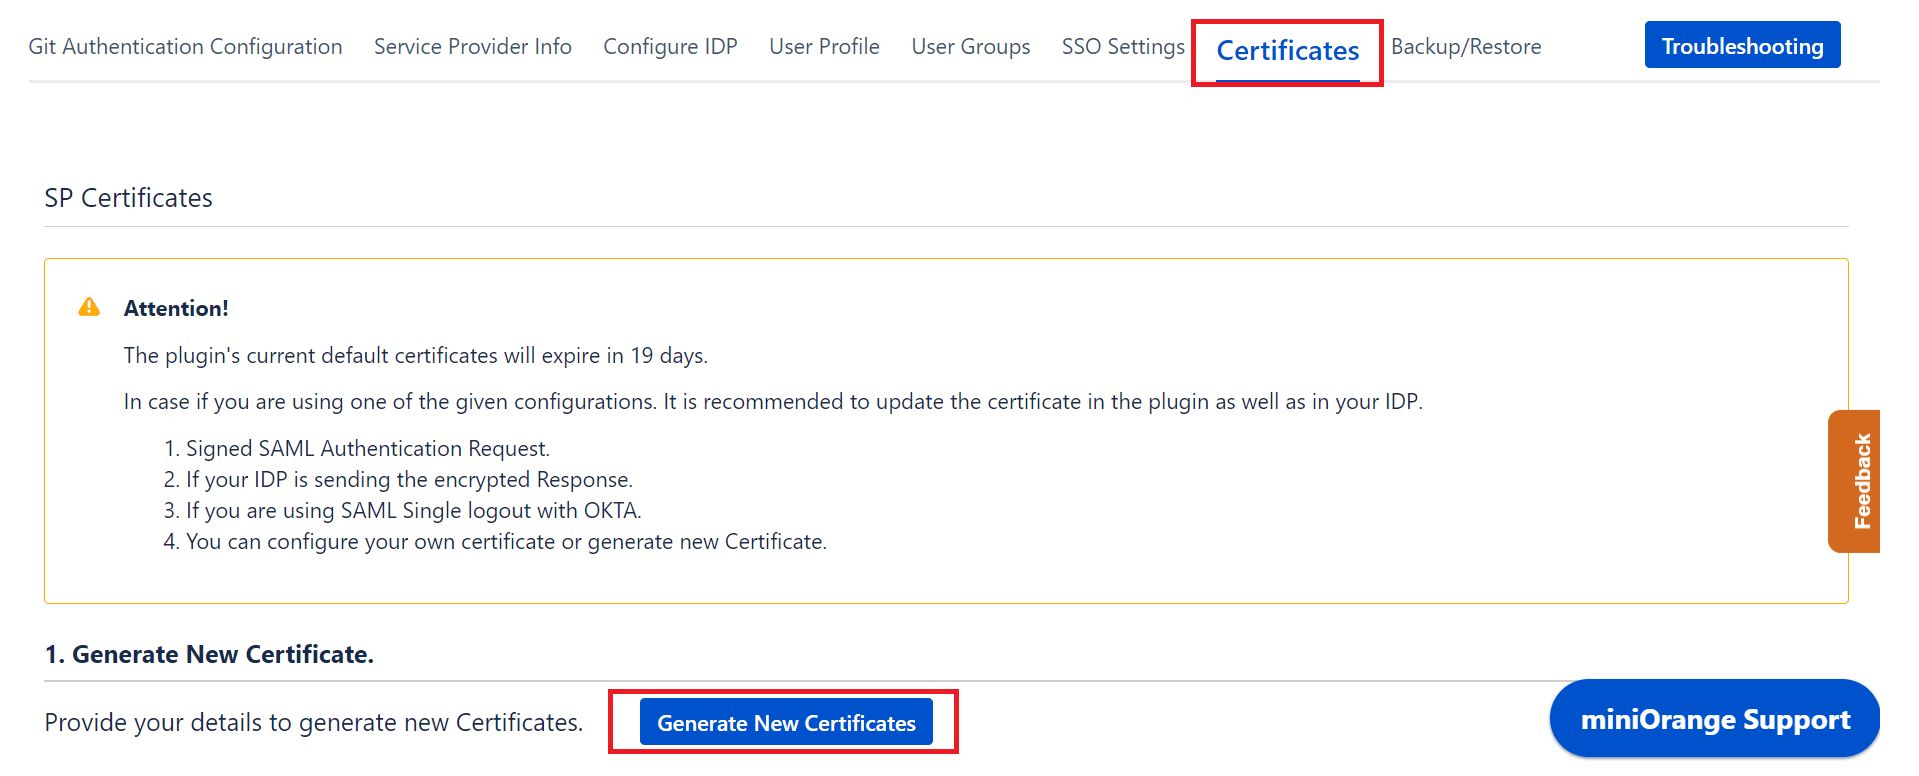
- Go to the Certificates tab and click on Generate New Certificates. Enter relevant details and generate new certificates.
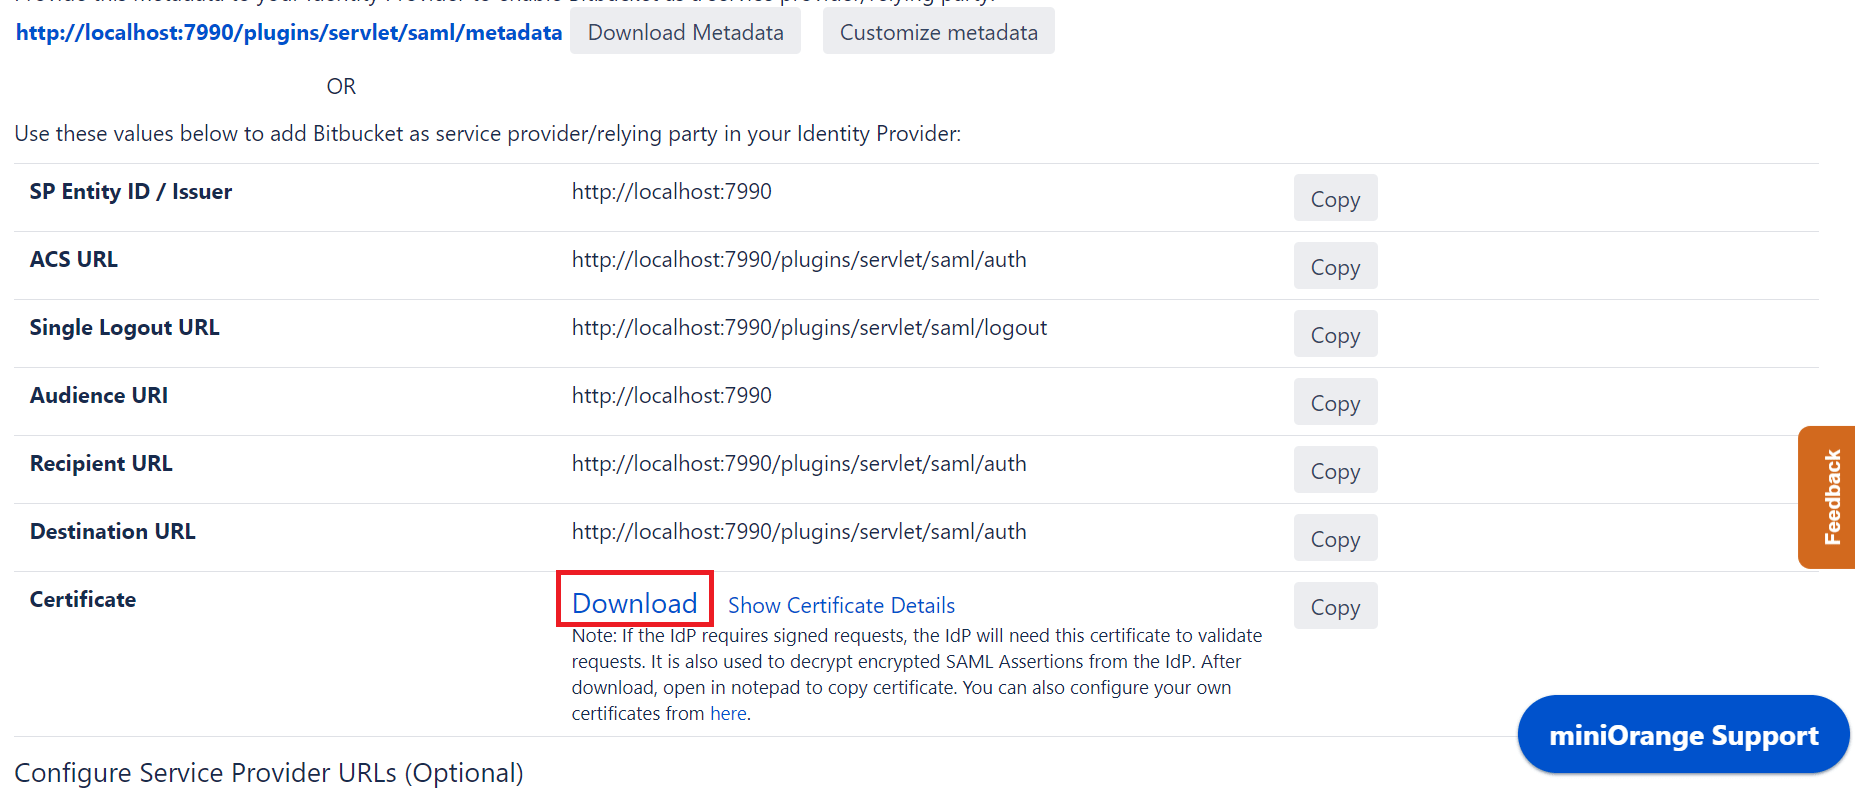
- Go to Service Provider Info and from the table, against Certificate click on the Download button.
- Configure this certificate in the Identity Provider.
- Confirm correct certificate migration using Test Configuration (Configure IDP tab, next to Save). You should see a success message. If you get a certificate mismatch error, follow steps 4 to 6 again.
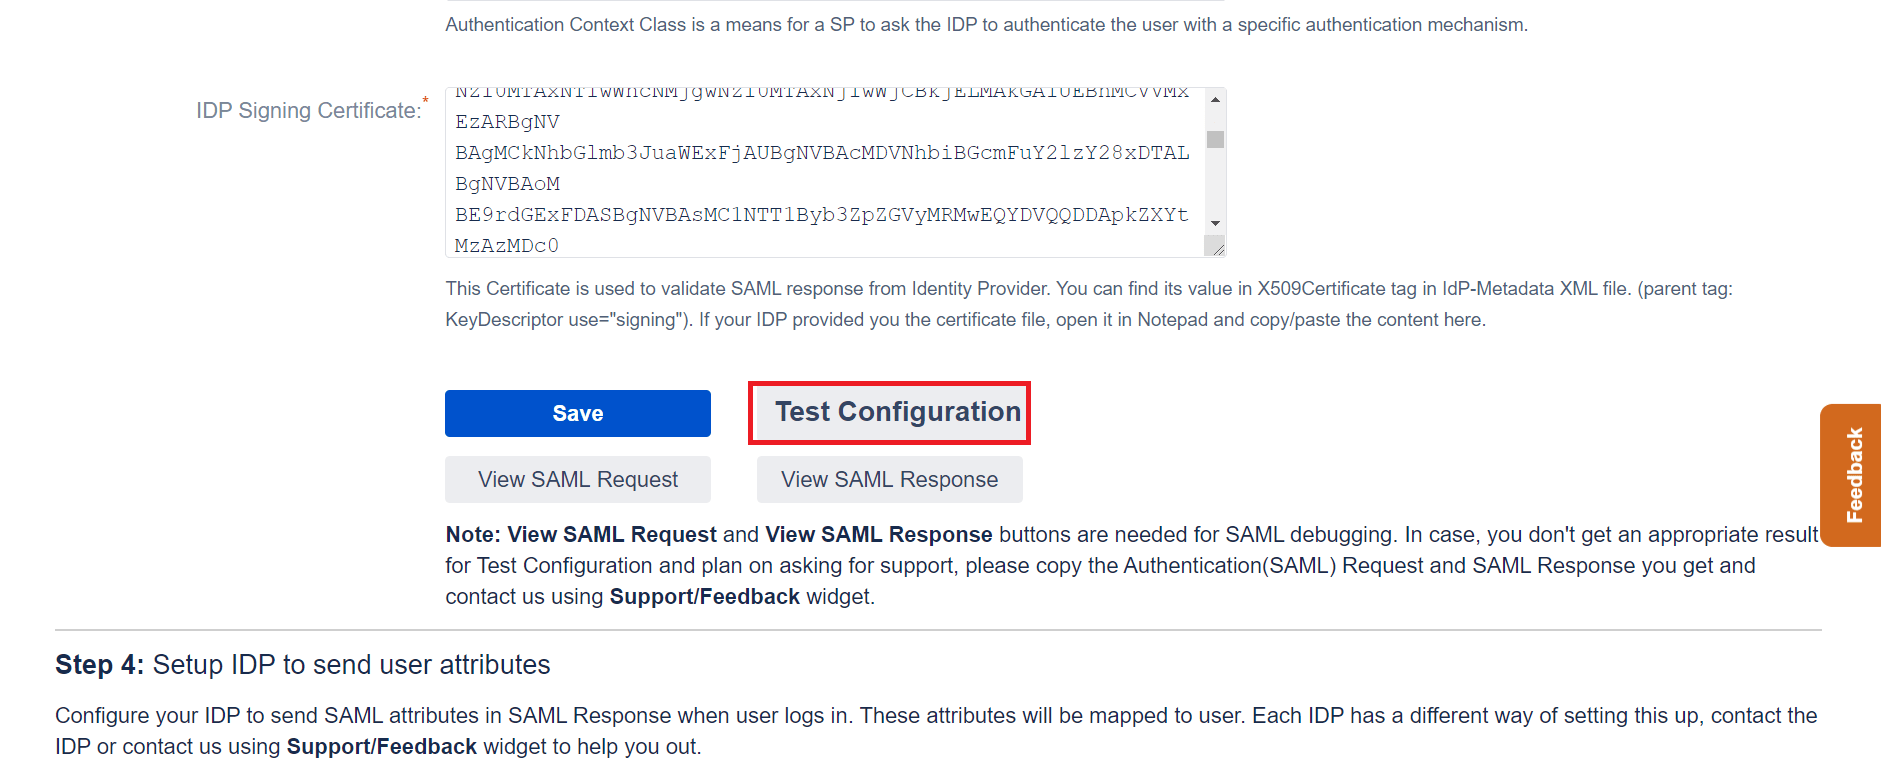
- Open a new browser to test SSO.
I’ve Increased session timeout in the plugin but the users are still getting signed out again and again.
Default session timeout for JIRA user session 5 hours and for Confluence is 30 minutes. The session timeout in the plugin should be less than or equal to default session timeout.
You can follow the below steps to extend default session timeout:
For JIRA:
Open /atlassian-jira/WEB-INF/web.xml and search for a block similar to the below – this is the default configuration.
<!-- session config -->
    <session-config>
        <session-timeout>300</session-timeout>
    </session-config>
For CONFLUENCE:
Edit /conf/web.xml and search for a block similar to the below – this is the default configuration.
<!-- session config -->
    <session-config>
        <session-timeout>30</session-timeout>
    </session-config>
Set value of session-timeout tag in minutes. By default its 300(5 hours). You can set it to 0 for unlimited session time.
I’ve multiple atlassian apps on same server but when I switch from one app to another, I’m signed out from the previous app. How to avoid this?
All my new users are getting assigned to one group, how can I prevent that?
All the new users are getting assigned to the default groups when group mapping in the plugin is not configured.
To resolve it, you have to configure the group mapping in the plugin, it allows you to map your IdP’s groups to your Atlassian application’s groups. After that, the user will be assigned to the mapped groups at the time of SSO.
For example: if the user belongs to the groups okta-user in Okta (let’s assume Okta is configured as an IdP) and okta-user is mapped with jira-users in Group Mapping tab of the plugin then that users will be assigned to the jira-users groups at the time of SSO.
Unable to install your add-on after setting up external database. Please assist.
Not able to fetch Groups from Azure AD provider ?
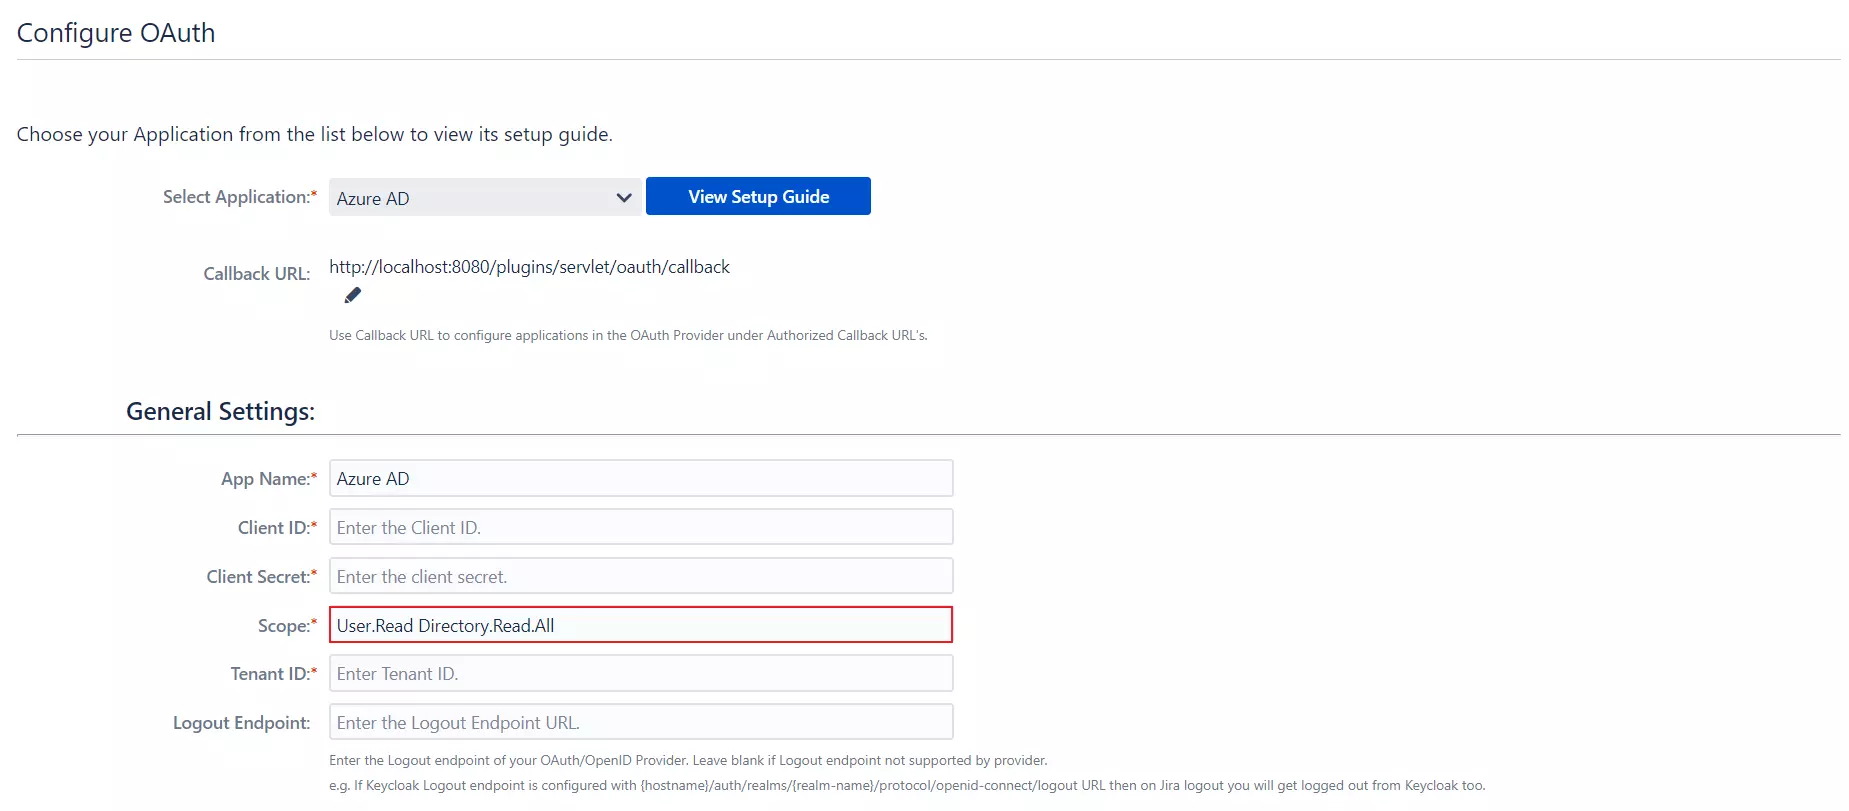
Logout endpoint for keycloak ?
- Go to Configure OAuth tab
- enter http://{domain-name}/auth/realms/{realm-name}/protocol/openid-connect/logout?redirect_uri=encodedRedirectUri as Logout Endpoint.
- Once the user is successfully logged in into Jira/Confluence/Bitbucket/Bamboo with sso, if he tries to logout, the user will get logged out from Keycloak too.
Test Configuration works, SSO failed ?
There could be multiple reasons for this:
- User does not exist and new user creation is disabled : Go to User Groups tab, uncheck Disable User Creation.
- Plugin License expired: Update plugin license and try login again.
- Wrong Domain Mapped : Go to Sign In Settings tab, check what is configured against Allow Domains, if the user domain is missing in the settings, please update it. You can add multiple domains separated by semicolon (;).
- Group permissions are not assigned to logged in user: Check User Group permissions under User Management. Assign one of the default group to user under User Groups tab.
- Email address not found in the Provider response: Check Test Configurations under Configure OAuth tab, if email not found in the response then verify your Provider settings and send email attribute in the OAuth/OIDC response.
Login with existing users without creating new users ?
-
- You need to Disable new user creation for login with existing users.
- Go to User Groups tab, select Disable User Creation. Also, you need to map at least one parameter either Email or Username in order to make sure the log in is done with the intended user.
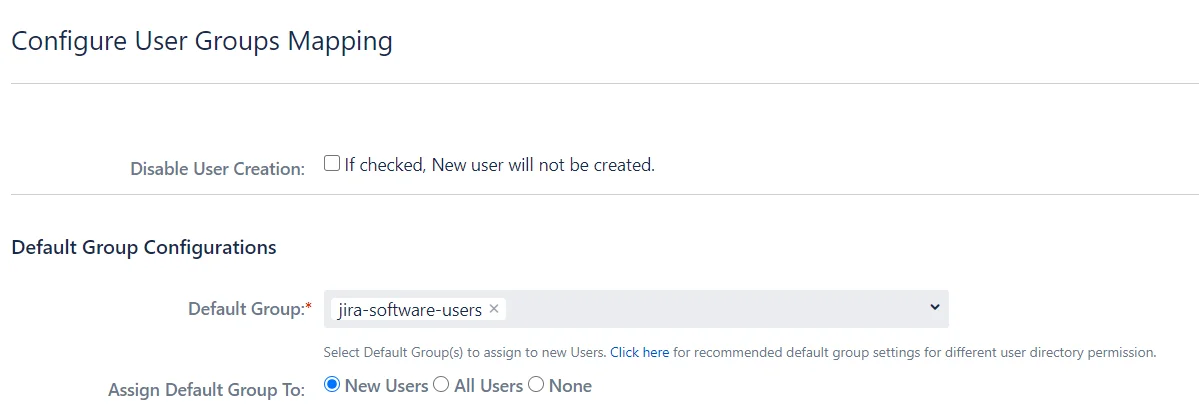
-
- Check test configurations (Configure OAuth tab) and map Email and Username accordingly.
- You can perform this mapping under the User Profile tab.

How to get Jira OAuth Client plugin logs ?
Steps to capture plugin logs.
- Go to System -> Logging and Profiling.
- Click on Configure in Default Loggers section.
- Enter
com.miniorange.oauthin package field and select Debug in Logging Level. Click on add.
After these steps, perform single sign-on again to record logs. Then download support zip using these steps,
- Go to System -> Troubleshooting and support tools.
- Proceed to Create support zip.
- Click on Customize Zip, keep only Jira Application Logs option selected and Save settings.
- Click on Create zip and then Download zip.
Users are not being assigned the default group configured in Read Only with Local groups user directory after SSO. How should I resolve this?
To resolve this issue, configure the default group for all the users. Follow these steps to do this:
1. Go to the User Groups tab of the plugin.
2. In the Default Groups field, select the group you configured in the directory.
3. In Assign Default Groups to field, select All Users option.
4. Click on Save button.
Now all users will be assigned the default group after SSO and they won’t face any issue with access.
How is Logout Endpoint URL different from Custom Logout Template/URL and how to configure it?
The Logout Endpoint URL sends a logout request to OAuth provider to logout from the provider while logging out the user from the application. It is required that the OAuth provider supports logout requests. In contrast, the custom logout Template/URL will redirect you to configured template or URL irrespective of whether the OAuth provider supports the logout request.
Here are the detailed explanations of both features:
Logout Endpoint URL:- When the user tries to logout, if the Logout Endpoint URL is configured then the logout request is sent to OAuth provider to logout the user from OAuth provider as well as the application (eg. JIRA). Logout Endpoint URL should be configured only if the OAuth provider supports it. All OAuth providers do not support Logout Endpoint URL.
Configuration Steps:
- Go to the Configure OAuth Tab.
- Enter the Logout URL.
For example:
AWS Cognito Logout URL : https://{domainName}/logout?client_id={ClientID}&logout_uri={Sign out URL}
Okta Logout URL : https://{baseUrl}/logout?post_logout_redirect_uri=${post_logout_redirect_uri} - This endpoint will log you out from the OAuth provider when you logout from the application.
Custom Logout Template/URL:-
The Custom Logout Template simply redirects the user to the defined URLs. This works with all OAuth providers configured.
Custom Logout URL:- If you already have a predefined logout page you can define the URL in Custom Logout URL and the user will be redirected to it after logging out.
Configuration Steps:
- Go to the Sign In Settings tab
- Enter the Logout URL.
- When the user logs out the application he will be redirected to this page.
Custom Logout Template:- Here you can define your own Logout Template where the user will get redirected. When the user performs a logout, the template will be shown to the user. The Base URL link can be provided here so the user can log in again.
Configuration Steps:
- Go to the Sign In Settings tab.
- Enable the Custom Logout Template.
- Define your Logout page and save the settings.
- When the user logs out of the application he will be redirected to this page.
Note: Custom Logout URL/Template will not work if Logout Endpoint is set for the respective application.
I am getting an error “We couldn’t sign you in. Please contact your Administrator.” while login. How do I resolve this ?
This issue can generally come up because of a configuration issue. To find out exactly why this issue is coming up, enable and check the log files.
Some of the possible reasons are:
- Mapped Domain is not allowed – Check Allowed Domains in the Sign In Settings tab. The email address domain with which you are attempting to SSO may not be included in mapped domains.
- OAuth Provider is not configured correctly – Verify OAuth configurations in the Configure OAuth tab
- License is not installed – The add-on does not have a valid license installed. An evaluation license is necessary to perform SSO using the add-on. You can get a license from My Atlassian Licenses.
- User creation is not allowed – The user you are trying to login with does not exist and the Disable User Creation option is checked. You can uncheck the Disable User Creation checkbox in the User Groups tab. You can also verify your user’s username and email mapping to make sure the correct value is being used to verify if the user exists.
If you are still not able to resolve the issue, please contact us on atlassiansupport@xecurify.com.
Get the OAuth Plugin logs using the following links:
How to create new accounts with a part of email as username when my IDP only sends email as an value?
You can add a regular expression to the attribute name(email) to extract the username for the user.
Follow the below steps to add a regular expression to the username.
- Navigate to User profile tab in the plugin.
- Select Apply regular expression on the username field.
- Add a regular expression (eg: ^.*?(?=@) ) in the Regular expression text field.
- Save settings.
For example, you can use regular expression ^.*?(?=@) to extract demo from username demo@example.com
How to get Jira OAuth Client add-on logs?
Steps to capture plugin logs.
- Go to System -> Logging and Profiling.
- Click on Configure in Default Loggers section.
- Enter
com.miniorange.oauthin package field and select Debug in Logging Level. Click on add.
After these steps, perform single sign-on again to record logs. Then download support zip using these steps,
- Go to System -> Troubleshooting and support tools.
- Proceed to Create support zip.
- Click on Customize Zip, keep only Jira Application Logs option selected and Save settings.
- Click on Create zip and then Download zip.
How to get Bamboo OAuth Client addOn logs?
1) Log File :Follow these steps to download logs,
1. Go to System-> Log Settings.
2. Enter com.miniorange.oauth in class path field and select Debug in type.Click on add.
After these steps, perform single sign-on again to record logs. Then download support zip using these steps,
1. Go to System -> Troubleshooting and support tools.
2. Proceed to create support zip.
3. Keep only Logs files option selected.
4. Click on Create zip and then Download zip.
2) SAML Tracer Log File : Click HERE to get steps to capture Tracer logs.
Send us a message, query or feedback using the customer portal (requires Internet) and we will get back to you. Have a lot to say? You can also reach us at atlassiansupport@xecurify.com
How to get Bitbucket OAuth Client addOn logs?
1) Log File :Follow these steps to download logs,
1. Go to ADMINISTRATION -> Logging and Profiling.
2. Enable Debug logging and Profiling.
After these steps, install the additional plugin Advanced Logging for Bitbucket for managing advance logging.
1. Go to ADMINISTRATION -> Advance Logging.
2. Enter com.miniorange.oauth in package field under Add New Entry .
3. Select Debug in dropdown list and Click on Add.
After these steps, perform single sign-on again to record logs, then send us atlassian-bitbucket.log file to us on the below contact us details.
2) SAML Tracer Log File : Click HERE to get steps to capture Tracer logs.
Send us query/feedback with log file using the customer portal (requires Internet) and we will get back to you.
Have a lot to say? You can also reach us at atlassiansupport@xecurify.com
How to get Confluence OAuth Client addOn logs?
1) Log File :Follow these steps to download logs,
1. Go to ADMINISTRATION -> Logging and Profiling.
2. Enter com.miniorange.oauth in package field under add new entry.
3. Select Debug in logging level and Click on add.
After these steps, perform single sign-on again to record logs. Then download support zip using these steps,
1. Go to ADMINISTRATION -> Troubleshooting and support tools.
2. Proceed to create support zip.
3. Click on Customize Zip, keep only Confluence application logs option selected and Save settings.
4. Click on Create zip and then Download zip.
2) SAML Tracer Log File : Click HERE to get steps to capture Tracer logs.
Send us a message, query or feedback using the customer portal (requires Internet) and we will get back to you. Have a lot to say? You can also reach us at atlassiansupport@xecurify.com
Fix “An error occurred.” issue in User Groups tab
This issue generally comes up if the internal JIRA/Confluence default groups are not set. Our plugin tries to read default groups and set it accordingly in the plugin. If the default group does not found then it throws an error.
We have handled this behavior in our JIRA OAuth/OpenID v1.1.21 and Confluence OAuth/OpenID v1.1.6, this will work even if you haven’t specified the default groups in JIRA/Confluence.
You can follow the below steps to check your internal JIRA default Groups:
- Choose > Applications.
- Select Application access in the left-hand menu. The Application access page displays all your applications and their associated groups, including their default groups.
- Check the box in the Default groups column for the group you want to assign as a default group. Note you must have at least one default group at any time. If you want to change the default group, you must first assign a second default group before you can un-check the box for the current group.
Here are the steps to solve this problem:
- Before plugin upgrade.
- Go to the Download App Configuration tab in the plugin.
- Under Export app Configurations, find a link to download the plugin configuration file.
- Upgrade your plugin to the version JIRA v1.1.21 and Confluence v1.1.6 or above.
- After plugin upgrade.
- Go to the Download App Configuration tab in the plugin.
- Insert the plugin configuration file using Import app Configurations.
- Browse to User Groups tab to verify if you could save group settings.
- If you still get an “An error occurred” message, then please open your plugin configuration file.
- Check the Group Mapping section, modify below settings provided below and save your file.
"DEFAULT_GROUPS": [],

"GROUP_REGEX_PATTERN": "jira/confluence", (you can change it as per required)

"ROLE_MAPPING": {}- Insert the updated plugin configuration file again and go to the User Groups tab to check if the issue resolved.
This will help you to fix an error shown in the User Groups tab, and you can save your group configurations successfully.
Reach out to us at atlassiansupport@xecurify.com if you still face the same issue or have any queries regarding this.
I only want users with my application domain to log in, not others. What should I do?
- Go to Sign In Settings tab and enter the domain name against Allowed Domains which should be allowed for login.
- Save configurations.
Can I transfer app settings from one staging to production?
- Download the app configuration file by clicking on the link given below.
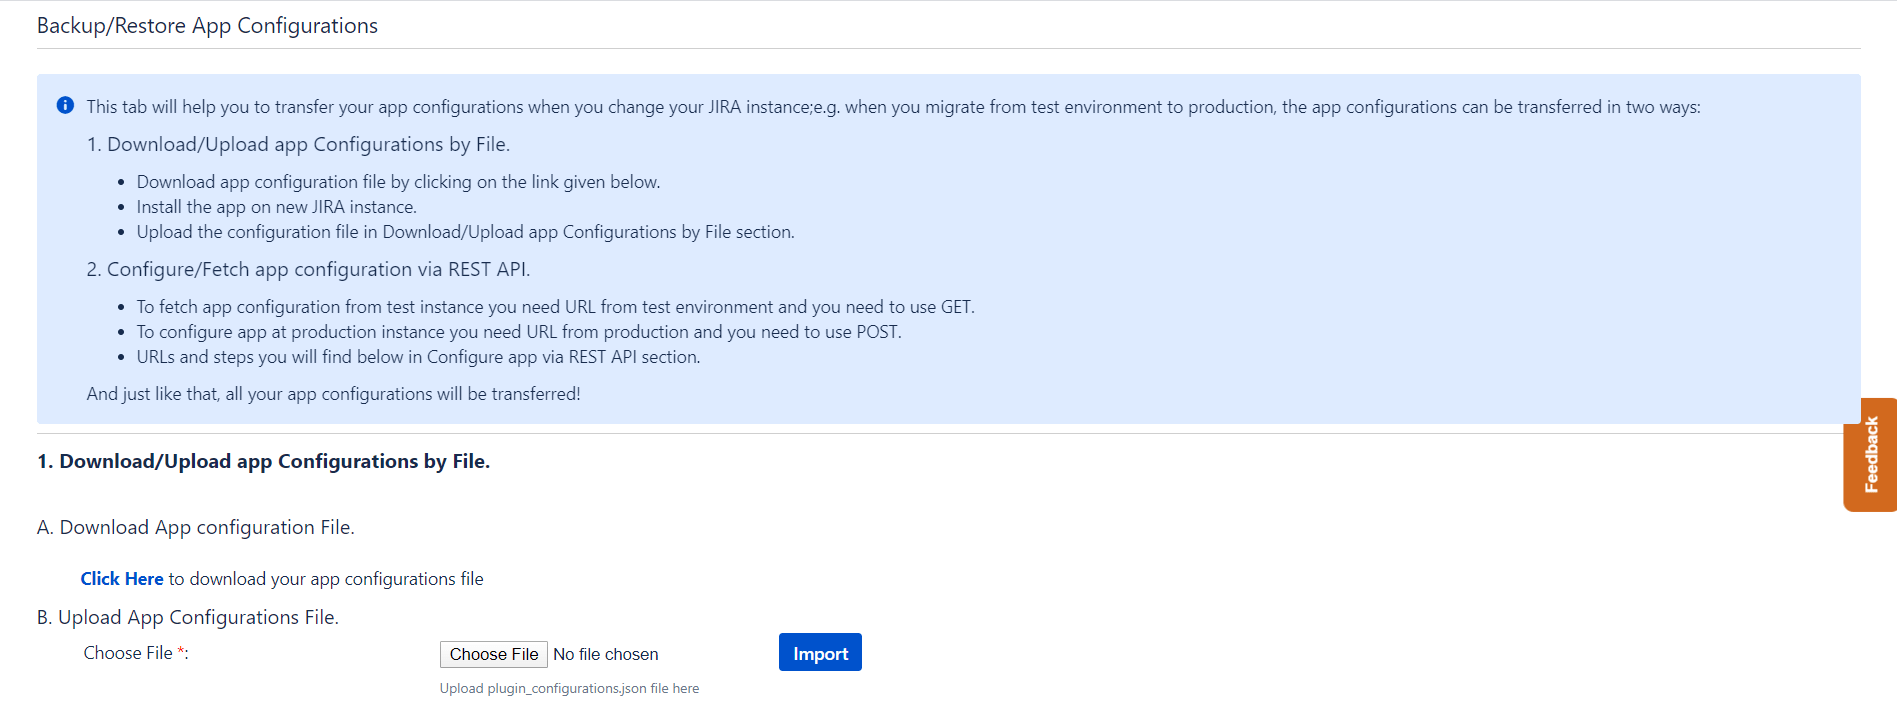
- Install the app on another instance.
- Upload the configuration file in the Import App Configurations section.
I’m getting Test Successful message while performing test configurations, but face an error while performing Single Sign-On. How to troubleshoot this?
There could be multiple reasons for Single Sign On getting failed even after Test Configuration is successful.
AD / LDAP permissions
If your users are stored in the LDAP user directory in JIRA/Confluence then the plugin faces an error while updating their attributes.
Go to User Profile tab and check Disable Attribute Mapping checkbox. Similarly, go to the User Group tab and check the Disable Group Mapping checkbox.
If you are still not able to resolve the issue, please contact us on atlassiansupport@xecurify.com
Get the OAuth Plugin logs using following links:
I am getting a ‘Not App Assigned’ error during Test configuration for Okta
For a user to perform Single Sign-On into your SSO application in Okta, you first need to assign that application to the user. When a user is not assigned the application and the user attempts to perform SSO in the application, then the user will get the ‘Not App Assigned’ error.
To solve this issue, you need to assign the user to the SSO application, once the successful app creation done in the Okta. This can be done in one of the 2 ways. Here are the steps:
1. From the application page
- Go to Applications
- Click on application’s name
- Select the Assignments tab
- Click Assign and then select either Assign to People or Assign to Groups
- If you want to assign the application to multiple users at the same time then select Assign to Groups [If an app is assigned to a group then, the app will be assigned to all the people in that group]
- Enter the appropriate people and groups that you want to Single Sign-On into your application, and then click Assign for each
- For anyone that you add, verify the user-specific attributes, and then select Save and Go Back
2. From the user page
-
- Go to Directory > People
- Click an end user’s name
- Select the Applications tab
- Click Assign Applications
- You can select applications from the list of available applications or use the Search box to search for applications by name. Once you have located the application you want to assign, click Assign App
- Enter sign-in information such as the username. Note that this is not the user’s Okta sign-in username, but the username the person uses to sign in to the application individually
- Enter the application data options as needed. The required data depends on the application and may include information such as parameters that define the user to the application, profiles, or roles. You may also have to provide credential security options
- Click Save and Go Back
Should the IP Address of the Active Directory server be entered in the Domain Controller (DC) Host Name/IP Address field?
Every Domain Controller (DC) implements two main domain services. One is the Key Distribution Center (KDC) and the other is the Active Directory(AD).
The KDC is essentially a network service that supplies session tickets and temporary session keys to users and computers within a domain, and it uses the Domain Controller’s Active Directory service as an accounts database. The IP Address that needs to be entered in the Domain Controller (DC) Host Name/IP Address field is the address of the KDC.
This can be done by using this command in your ADs command prompt:
nslookup DOMAIN_NAME
Here, replace DOMAIN_NAME with the complete domain name of your Domain Controller.
After completing the configuration process, server fails to restart.
This problem can be faced if a connection with the required Key Distribution Center could not be established. This can be solved by reverting one of the configurations added to your server’s web.xml file. In the third step of the configurations, a filter is added to the web.xml file located in the conf folder of your server installation location. Please remove the filter added and then try to restart the server. In case this does not solve the issue please click here to contact us.
How to record debug logs for Git Authentication?
You can follow below steps to enable DEBUG logs,
- Go to Administration >> SUPPORT >> Logging and profiling.
- Enable debug logging and profiling.
After these steps, install the additional plugin Advanced Logging for Bitbucket for managing advanced logging. Once the plugin is installed –
-
- Go to Administration >> SUPPORT >> Advanced Logging.
- Enter com.miniorange.git.authentication in package field under Add New Entry.
- Select Debug in the dropdown list and Click on Add.

- After all these steps, try to reproduce the issue with Git Authentication add-on to record the logs.
You can locate the atlassian-bitbucket.log file in /log folder and send it to us for further troubleshooting.
Test Connection is successful, but getting an error during git login
This could be because
- User does not has repository access.
- User has a different username in Bitbucket and IDP.
The Test Configuration screen only verifies if the plugin configuration is correct and checks connection with the configured provider.
It does not check your access rights over any of the repositories and whether the user is present in the local Bitbucket directory.
How to reset credentials entered for Git Authentication in the local machine?
Windows:
-
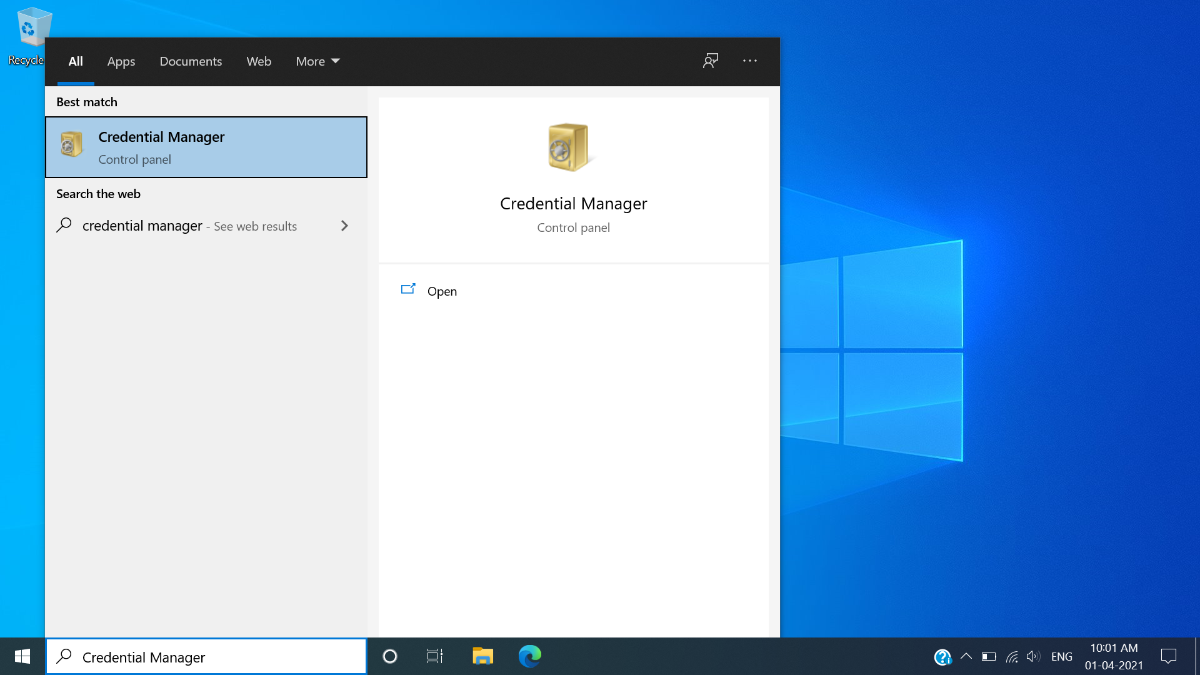
- Press Window button and search for Credential Manager and open it.
-
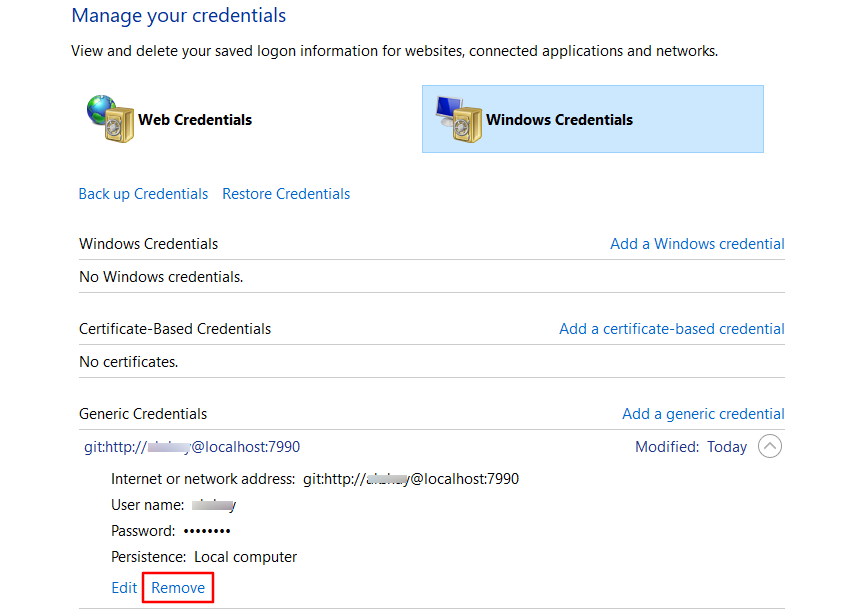
- You’ll see two tabs – Web credentials and Window Credential, select Window Credentials.
- Under generic credentials section, identify your git credentials, it will be in format as git:@
- Expand the section and click on remove.
-
- Now try to perform Git Login. It will prompt you for username and password.
Mac OS:
-
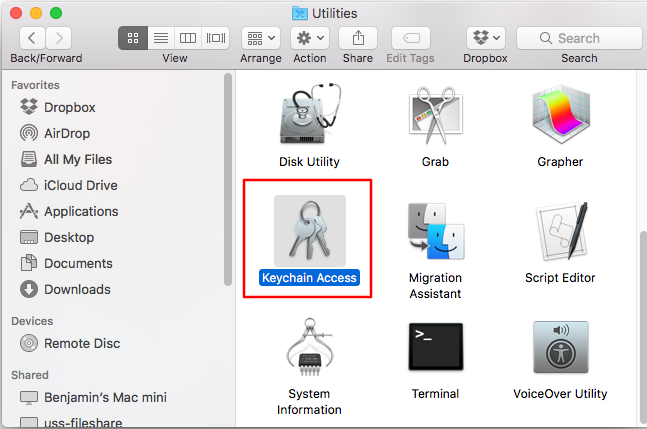
- Find and open the Utilities folder located in the Application folder.
- Open the Keychain Access tool.
-
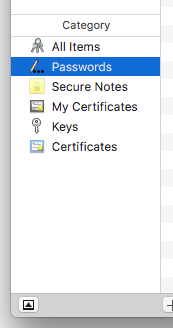
- On the bottom-left-hand side of the Keychain Access tool window, select the Passwords tab.
-
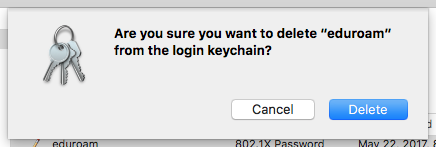
- Right-click on the desired entry from the list of saved credentials and select Delete “[Name]”.
- Your Mac will ask you to confirm if you want to delete the selected item from Keychain Access. Click Delete.
Still can't find what you're looking for? Raise a ticket or email us at atlassiansupport@xecurify.com for more information and help.
