- Home
- OAuth SSO
- OAuth SSO Documentation
- OAuth SSO into Bitbucket using Oracle as OAuth Provider

OAuth/OpenID Single Sign On (SSO) into Bitbucket using Oracle
Bitbucket OAuth app gives the ability to enable OAuth Single Sign On for Bitbucket Software. Bitbucket OAuth app is compatible with all OAuth/OIDC providers. Here we will go through a guide to configure SSO between Bitbucket and your OAuth/OIDC providers. By the end of this guide, users from your OAuth/OIDC providers should be able to login and register to Bitbucket Software.
 Try it for free
Pre-requisites
To integrate your OAuth/OIDC providers with Bitbucket, you need the following items:
- Bitbucket should be installed and configured.
- Bitbucket Server is https enabled (optional).
- Admin credentials are set up in Bitbucket.
- Valid Bitbucket Server or Data center Licence.
Download and Installation
- Log into your Bitbucket instance as an admin.
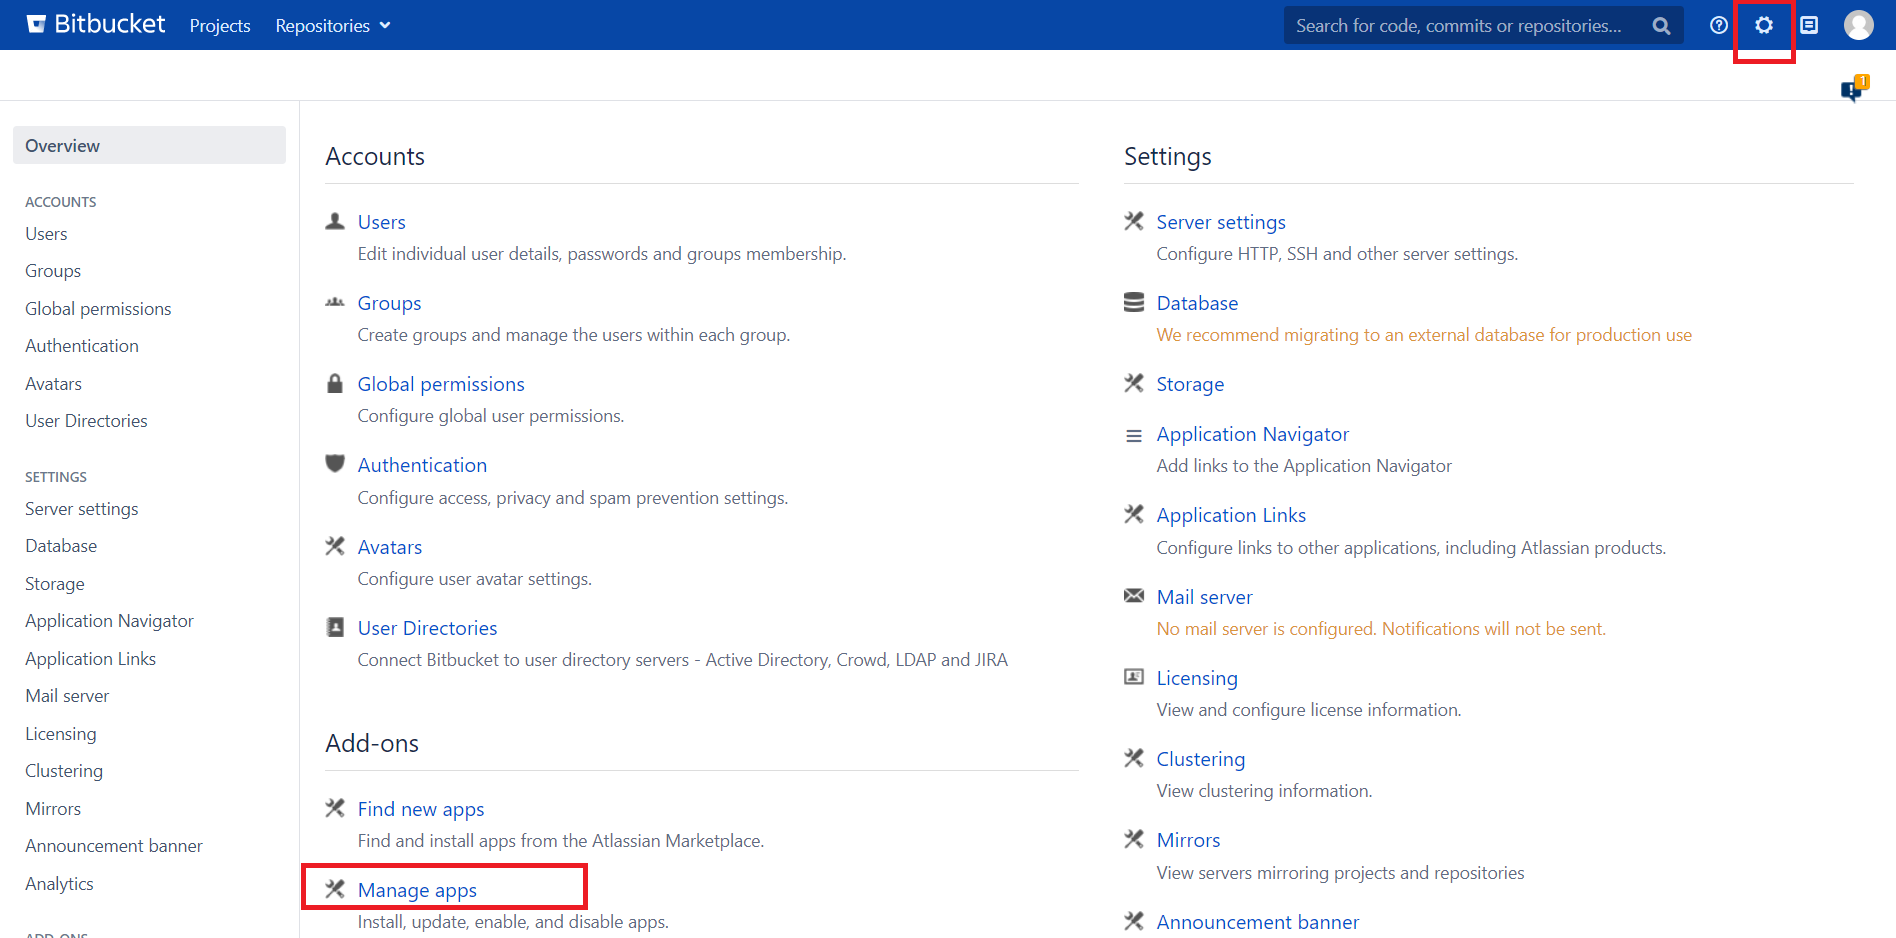
- Navigate to the settings menu and Click Manage Apps.
- Click Find new apps or Find new add-ons from the left-hand side of the page.
- Locate mO OAuth/OpenID Connect (OIDC) for Bitbucket SSO via search.
- Click Try free to begin a new trial or Buy now to purchase a license for mO OAuth/OpenID Connect (OIDC) for Bitbucket SSO.
- Enter your information and click Generate license when redirected to MyAtlassian.
- Click Apply licence.
Step 1: Set Up Oracle Cloud as OAuth Provider
Follow the steps below to configure Oracle Identity Cloud Service (IDCS) as an OAuth Provider.
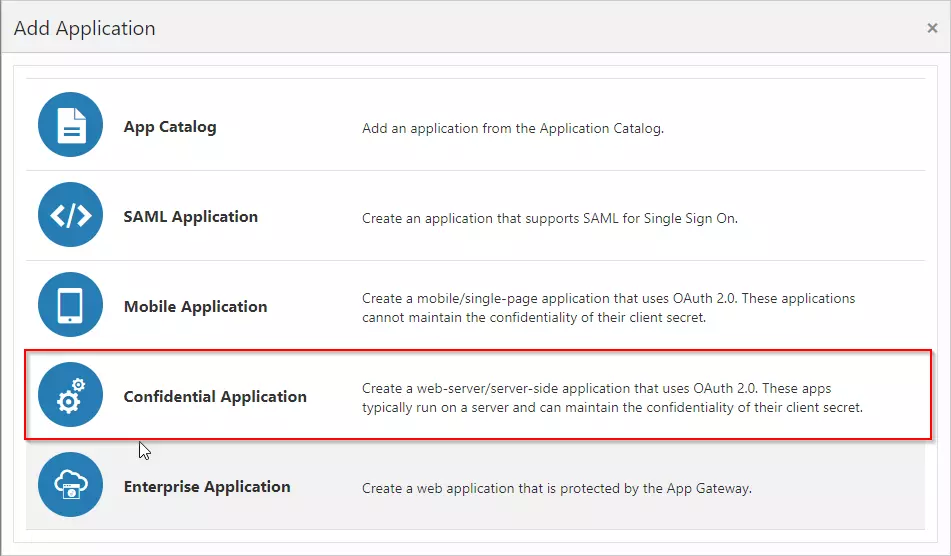
- Access the Oracle Identity Cloud Service administration console, select Applications, and then click Add.
- Click on Confidential Application.
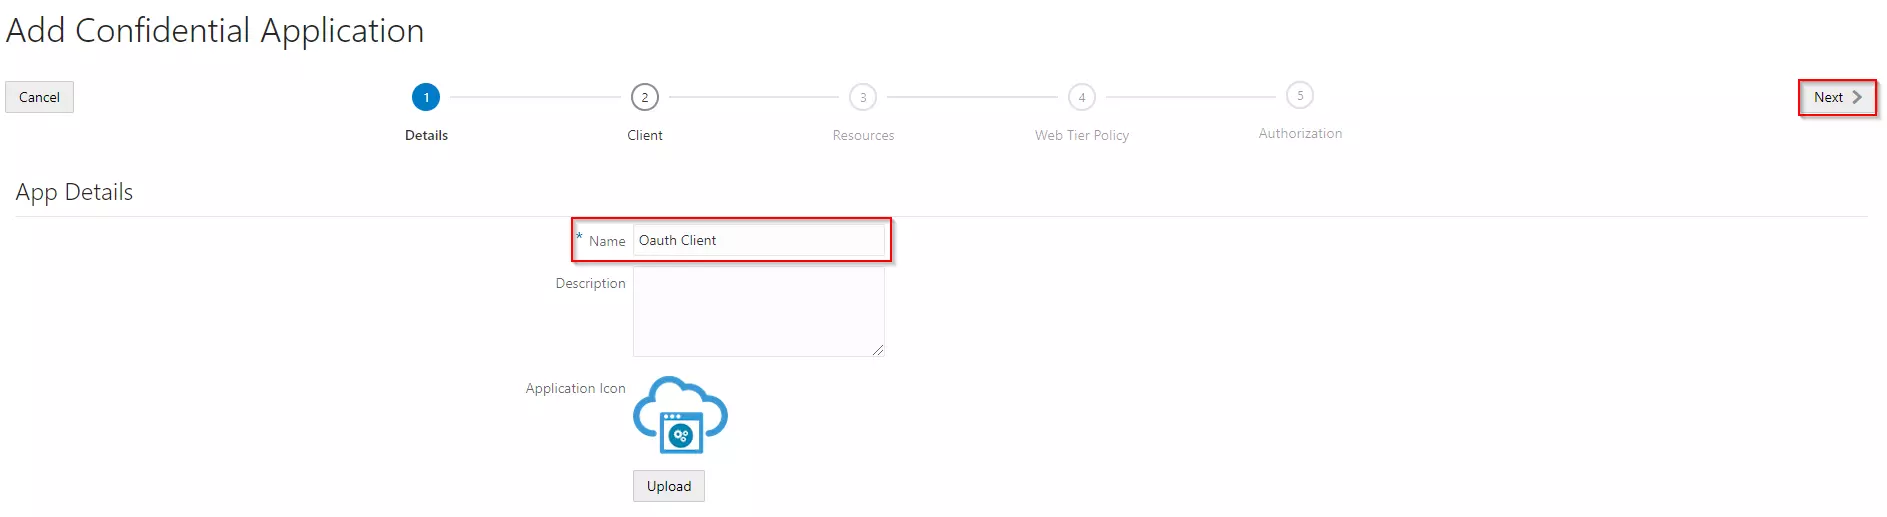
- Enter the name of your Application and select Display in My Apps option under Display Settings section. And then click on the Next button.
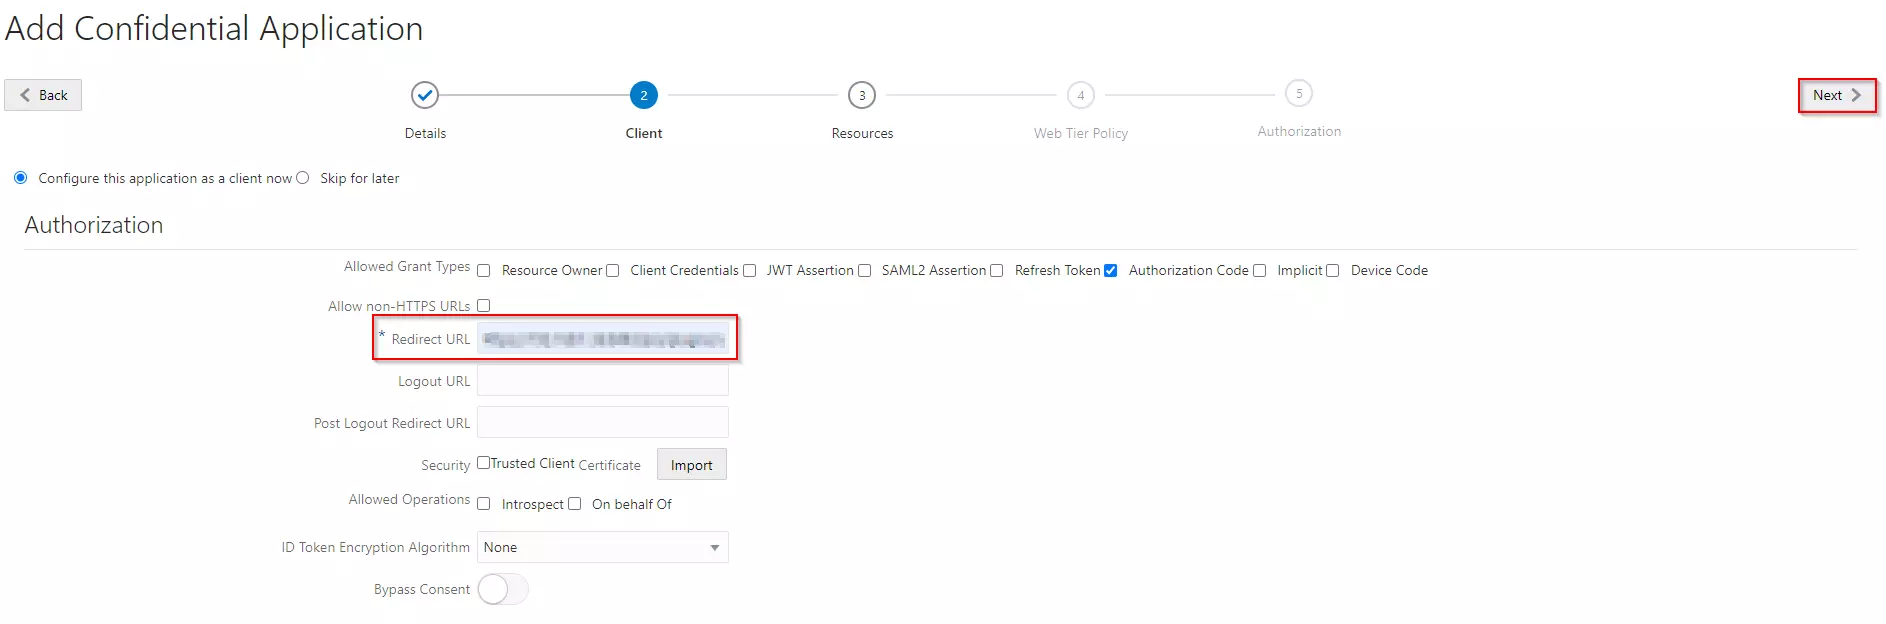
- Enable Configure this application as a Oauth Client now. Select Authorization Code and as your Allowed Grant type.
- In the Redirect URL enter the Callback URL from the plugin.
- You can select scope as per your requirement and click on Next button.
- Under Expose APIs to Other Applications section, enable skip for later option and click on the Next button.
- Under Web Tier Policy section, enable skip for later option and click on the Next button.
- Enable Enforce Grants as Authorization checkbox, if you want only users to the access application which you granted acccess to it and click on the Finish button.
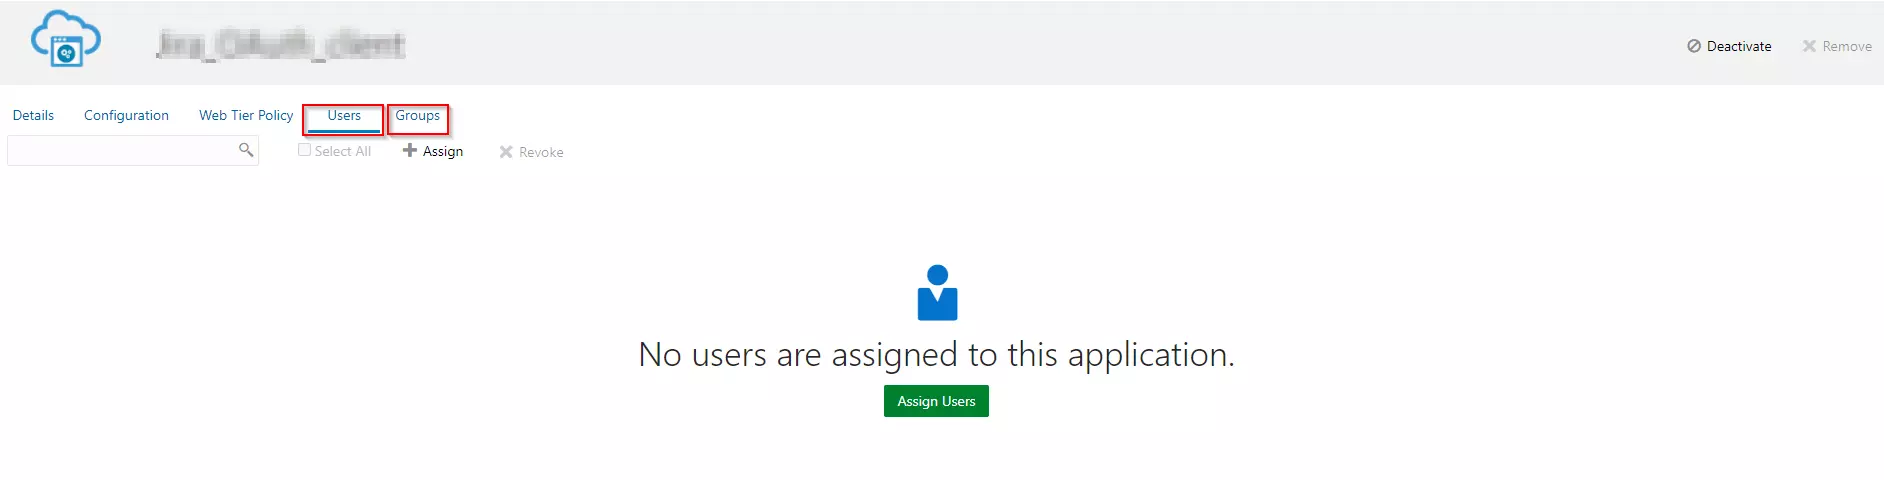
- Assign the users/groups to your application by clicking on the Users / Groups tab respectively.
- Activate the application, once it gets created.


Step 2: Set Up Bibucket as OAuth Client
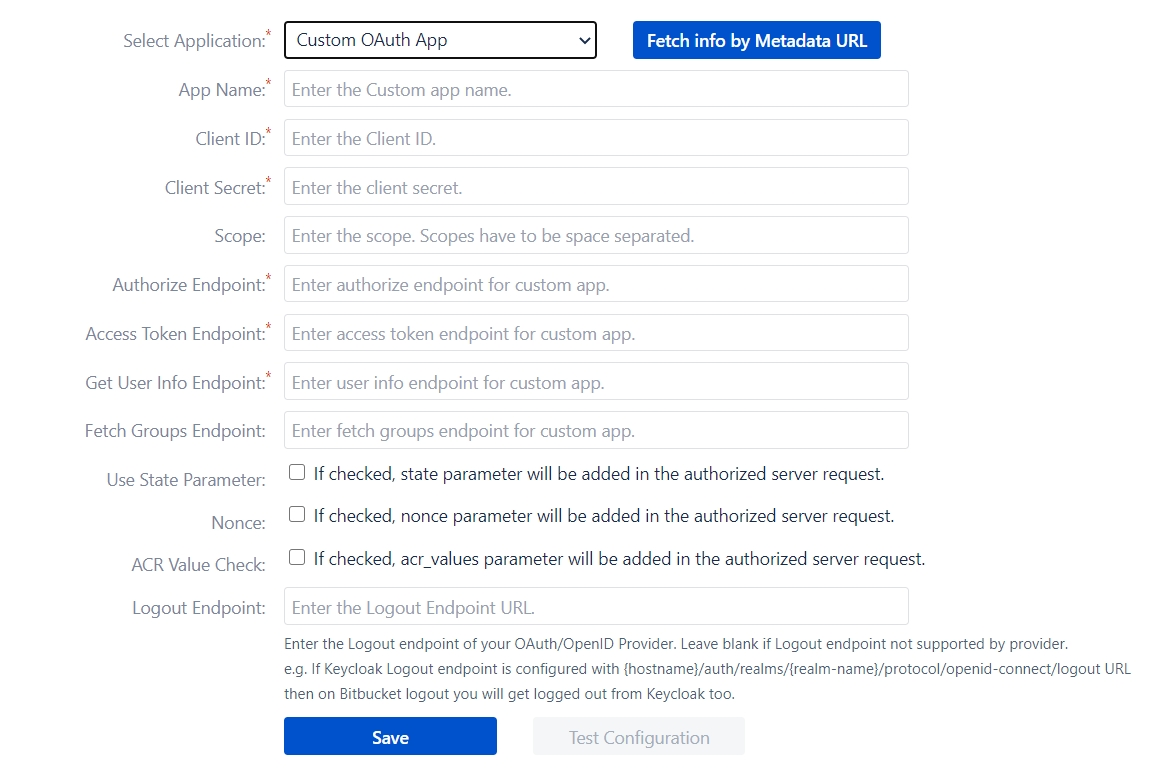
- Go to Configure OAuth tab and select Custom OAuth App from the dropdown list.
- Enter the App Name, Client ID, Client Secret, and Scope as profile email openid groups.
- Configure the following:
Authorize Endpoint: Your_Oracle_Domain/oauth2/v1/authorize Access Token Endpoint: Your_Oracle_Domain/oauth2/v1/token Get User Info Endpoint Your_Oracle_Domain/oauth2/v1/userinfo - Click on Test Configuration.
Step 3: User Profile Mapping
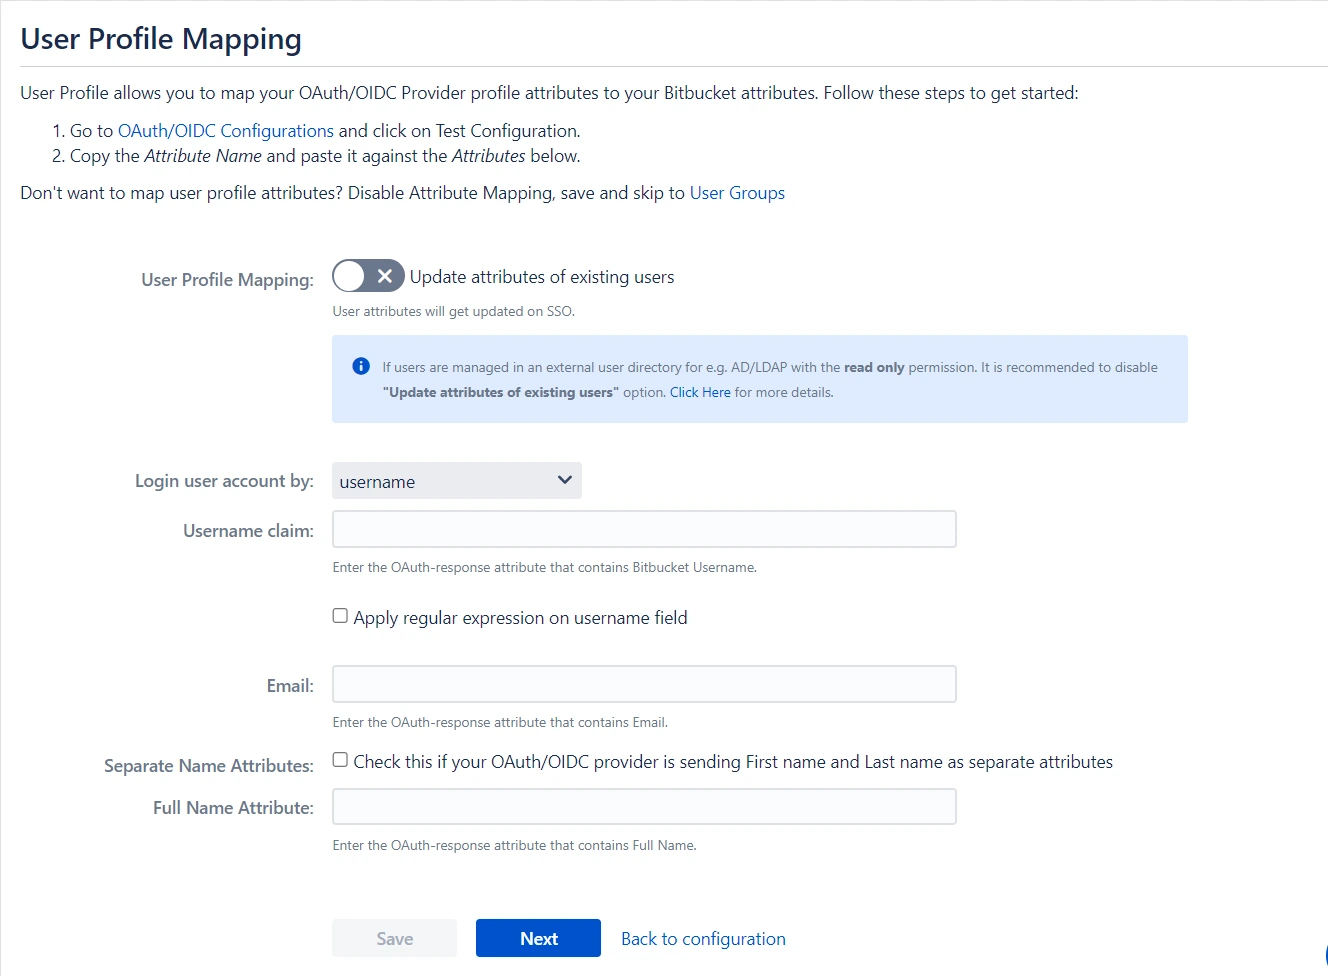
- Click on User Profile from the left sidebar. We will be setting up user profile attributes for Bitbucket. If your users are stored in a directory that is Read Only, please disable the option User Profile Mapping in the User Profile tab and skip to the step, Matching a User.
 3.1 Finding correct attributes
- Go to the SSO Endpoints tab. Scroll down and click on Test Configuration.
- You will see all the values returned by your OAuth/OpenID Provider to Bitbucket in a table. If you don't see a value for First Name, Last Name, Email or Username, make the required settings in your OAuth/OpenID Provider to return this information.
- Once you see all the values in Test Configuration, keep the window open and go to the User Profile tab.
3.2 Setting profile attributes
- In this User Profile tab, fill the values by matching the name of the attribute. For instance, if the Attribute Name in the Test Configuration window is NameID, enter NameID against Username.
- Setting up both Username and Email is required if you want to let users register. You can allow only existing users to log in, by unchecking the Allow User Creation attribute in the Advance SSO Options tab.
3.3 Matching a User
When the user logs into Bitbucket, one of the user's data/ attributes coming in from the OAuth/OpenID Provider is used to search the user in Bitbucket. This is used to detect the user in Bitbucket and log in the user to the same account.
- Go to the User Profile tab.
- Select Username or Email for Login Bitbucket user account by.
- Enter the attribute name from OAuth/OpenID Provider which corresponds to Username or Email using Finding Correct Attributes.
Step 4: User Group Mapping
We will be setting up user group attributes for Bitbucket. If you want to enable group mapping then you will need to select please check Enable Group Mapping in the User Groups tab else you can skip to Setting default group.
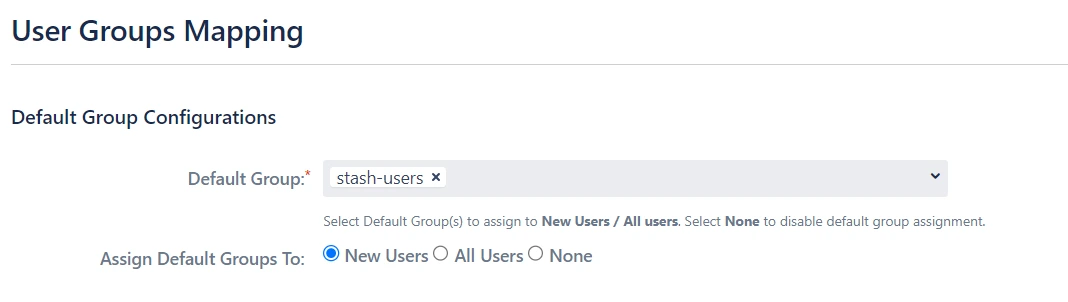
4.1 Setting default group
- Select the users' Default Group in the tab User Groups. If no group is mapped, users are added by default to this group.
- You can enable default groups for All Users or New Users using the option Assign Default Group To. Select None if you don't want to assign any default group to SSO users.
4.2 Finding Group Attribute
- Just like we found Attribute Name for User Profile attributes, we can find group attributes. Go to the Configure OAuth tab and click on Test Configuration.
- You will see all the values returned by your OAuth/OpenID Provider to Bitbucket in a table. If you don't see value with groups, make the required settings in your OAuth Provider to return group names.
- Once you see all the values in Test Configuration, keep the window open and go to the User Groups tab.
- Enter the Attribute Name of the group against Group Attribute.
- Check Disable Group Mapping option if you don't want to update groups of existing users.
4.3 Group Mapping
Group mapping can be done manually or on the fly:
- Manual group mapping: If the names of groups in Bitbucket are different from the corresponding groups in OAuth/OpenID Provider, then you should use Manual group mapping.
- On-The-Fly group mapping: If the names of groups in Bitbucket and OAuth/OpenID Provider are the same, you should use On-The-Fly group mapping.
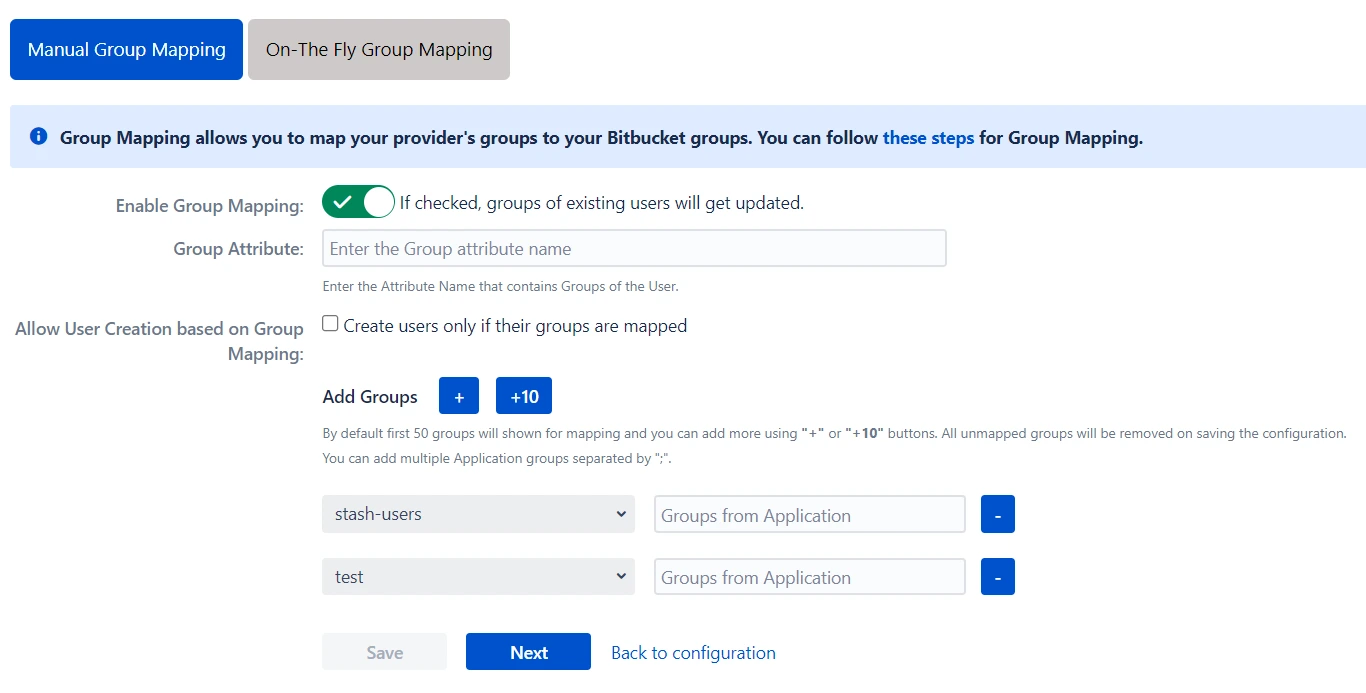
I. Manual Group Mapping
- Check Allow User Creation based on Group Mapping option if you want new users to be created only if at least one of the user's OAuth/OpenID Provider groups is mapped to a group in the application.
- For mapping, first select a Bitbucket group from the dropdown which lists all groups present in Bitbucket and then enter the name of the OAuth/OpenID Provider group to be mapped in the textbox Groups from Application.
- For example, if you want all users in 'dev' group of OAuth/OpenID Provider to be added to Bitbucket-software-users, you will need to select Bitbucket-software-users from the dropdown and enter 'dev' against Bitbucket-software-users.
- Use ' +' and ' +10' buttons to add extra mapping fields. Use the '-' button next to each mapping to delete that mapping.
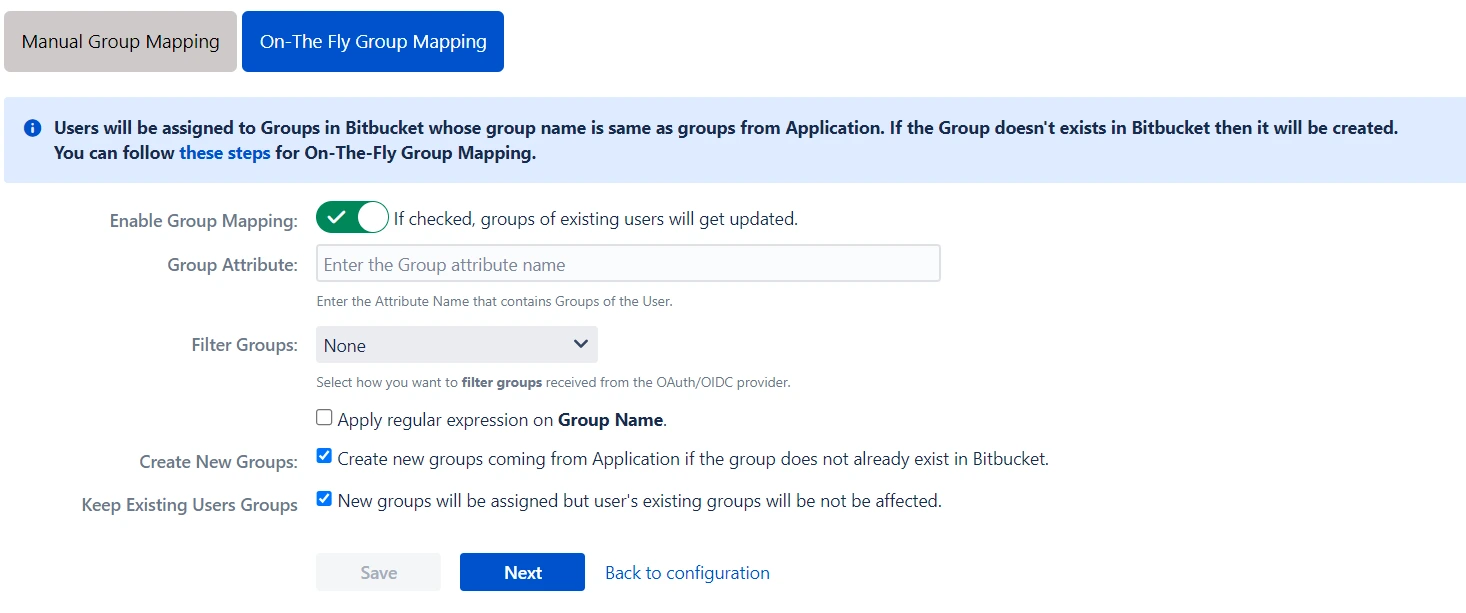
II. On-The Fly Group Mapping
- Check Create New Groups option if you want new groups from OAuth/OpenID Provider to be created if not found in Bitbucket.
- You can preserve existing user groups by selecting the Keep Existing User Groups option. Unticking this option will result in the user being removed from a group in Bitbucket if that group is not present in the OAuth/OpenID response returned by the OAuth/OpenID provider.
- If you don't want On-The-Fly group mapping to affect Bitbucket groups which are managed locally, then deselect the option Keep Existing User Groups and add those groups in the Exclude Groups field.
Step 5: SSO Setting
The settings in the SSO Settings tab define the user experience for Single Sign On.
5.1 Sign In Settings
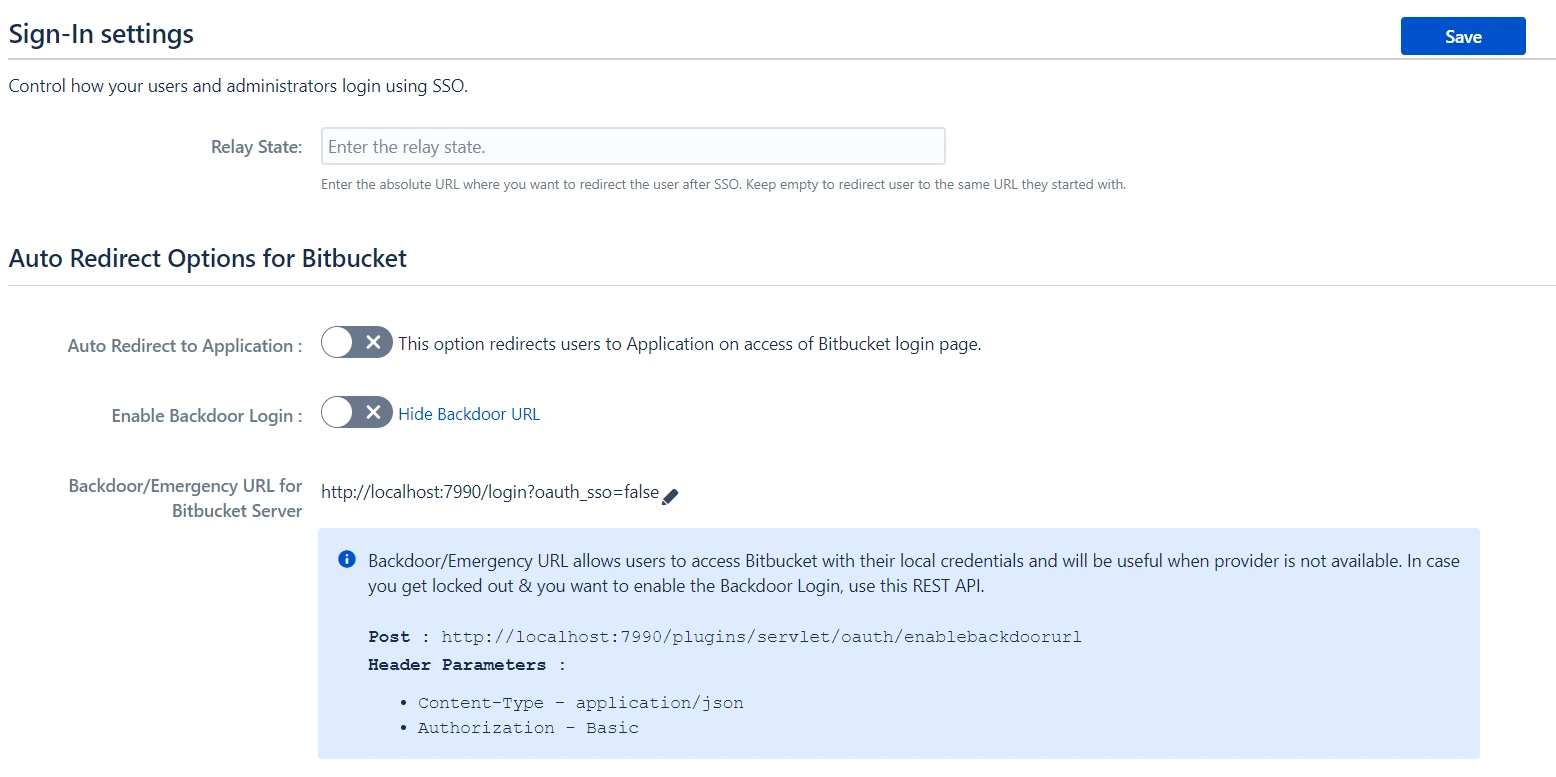
- Enable Auto Redirect to Application feature to redirect users to an OAuth/OIDC provider when the Bitbucket login page is accessed. You can even set the delay before redirecting to the provider.
- Enable Backdoor Login will allow you to use a backdoor URL in case of an emergency. You can even restrict access to backdoor URL for specific groups using Restrict Backdoor URL Access feature.
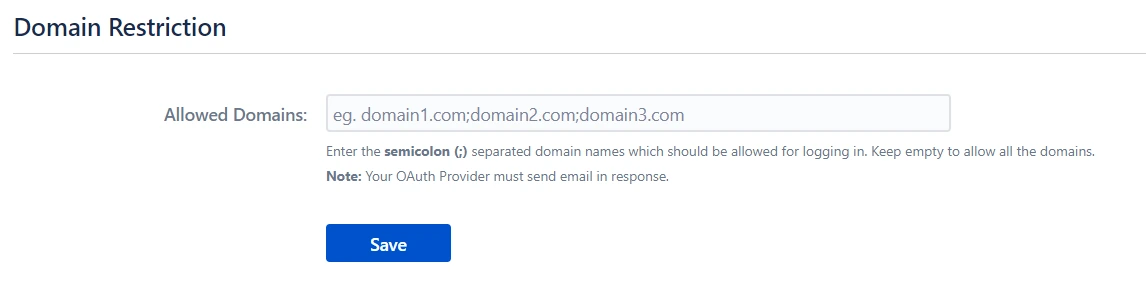
- For example, if only 'miniorange.com' and 'gmail.com' domains are allowed then, the user test@miniorange.com and test@gmail.com will be able to log in and user test@yahoo.com will not be able to log in.
- Use Domain Restriction to allow login to only a specific set of users. You can configure multiple domains (semicolon-separated).
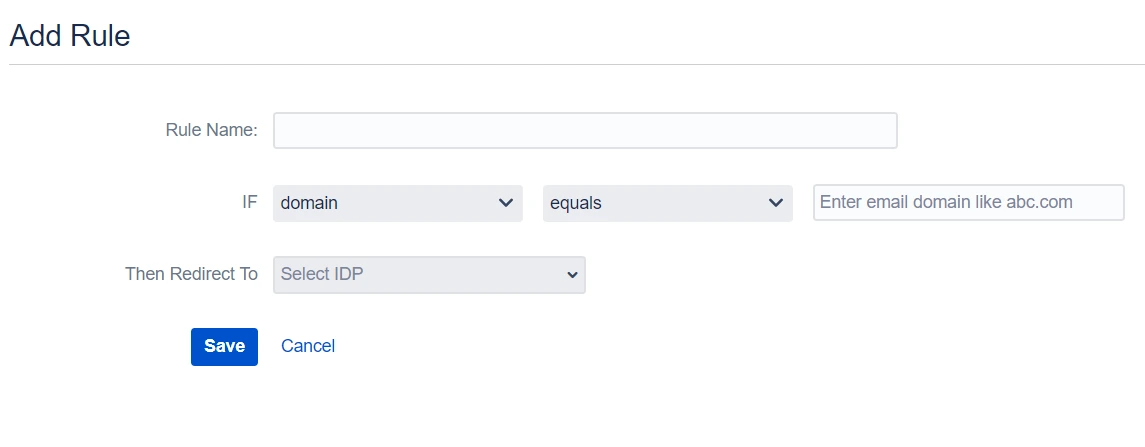
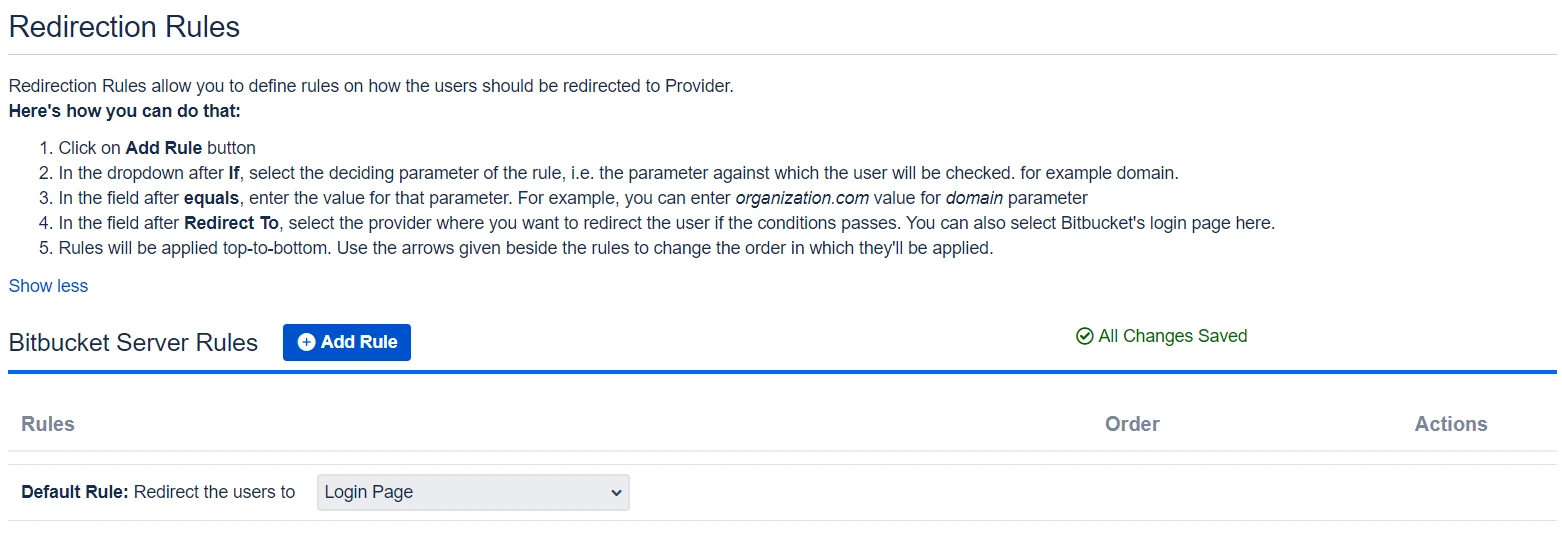
5.2 Redirection Rules
- This section lets you set rules to redirect users to the login page/providers based on their email domains. This feature is more useful in case you have multiple providers configured. For example, You can set a rule of checking domain name while logging in and redirect users to different providers. You can add a rule by clicking on the Add Rule button.
- When a rule such as given above is configured example, a login form will be displayed to the users where they will have to input their Username/email address.
- Here you can set domain-based rules for redirecting users to the specific provider. Also, you can set the default rule that will execute if the condition of any other rule does not satisfy.
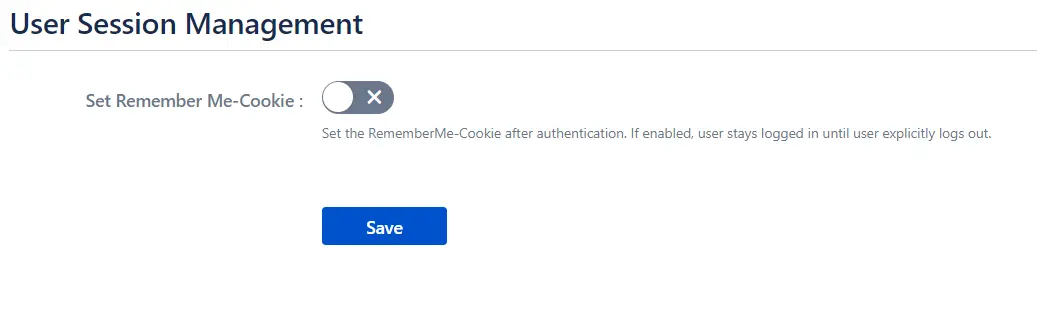
5.3 Seesion Management
- Enable User Session Management option to set Remember Me-Cookie to keep users logged in until they are explicitly logged out.
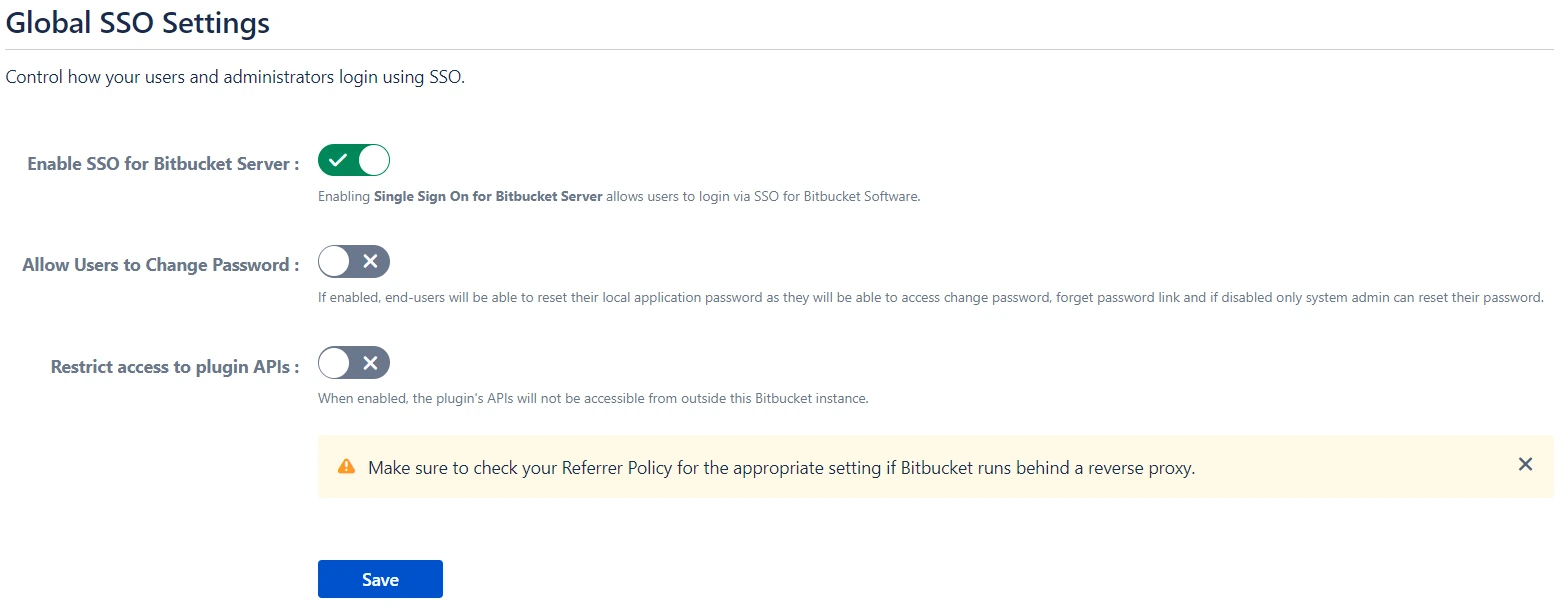
5.4 Global SSO Settings
- SSO can be enabled/disabled from the Global SSO Settings tab in the left sidebar. You can enable SSO for Bitbucket using option Enable SSO for Bitbucket Server .
- You can change additional settings such as allow users to Change Password and Restrict access to plugin APIs.
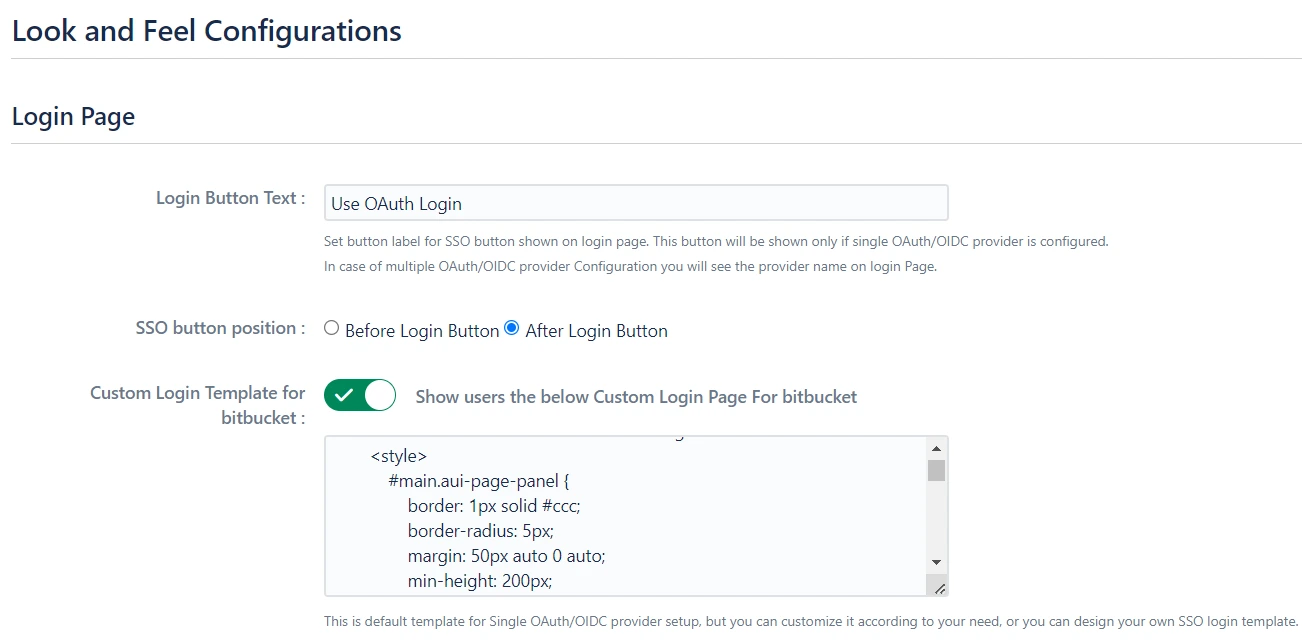
5.5 Look and Feel
These settings will allow you to change the look and feel of the login page and error message. To access these settings click on the Look and Feel tab from the left sidebar.
- You can customize the default login button text as well as you can completely design the login page using a customizable template.
- The SSO Error Message section allows you to modify how error messages will be displayed to your users.
- If you want to redirect users to an URL after they log out then you can use Custom Logout URL under Post Logout Configuration tab.
- Similar to the customizable login template, you can also design the Logout page to improve the user experience.
Additional Resources
Did this page help you?
