- Home
- REST API Authentication
- REST API Authentication Documentation
- Enhance REST API Access using OAuth tokens

Enhance REST API Access using OAuth tokens
Introducing the Enhance REST API Access using OAuth tokens – the essential middleware designed to simplify and secure API access to Atlassian Jira Cloud. Our application acts as an intermediary that authenticates tokens from your Identity Provider (IdP) and facilitates their use for accessing Jira’s API. This app empowers administrators to set up automation and scripts effortlessly, eliminating the need to share personal API tokens.
In the modern landscape of integrated applications, managing authentication efficiently and securely is crucial. With the "Enhance REST API Access using OAuth tokens" machine-to-machine integrations are easier and more secure.
 Try it for free
What this app does
Enhance REST API access using OAuth tokens, which lets scripts, services, and integrations call Jira Cloud REST APIs through a plugin endpoint. Callers send a token from their identity provider. The app validates that token, then calls Jira for them.
There is no longer a need to share a person's Jira API token. An administrator chooses how the call should run:
- Authenticate as Application — machine-to-machine. The app validates an OAuth client credentials token with the identity provider (introspection) and calls Jira as the app.
- Authenticate as User — user-delegated. The app validates a JWT with the provider's JWKS, maps the token identity to a Jira user, and calls Jira as that user.
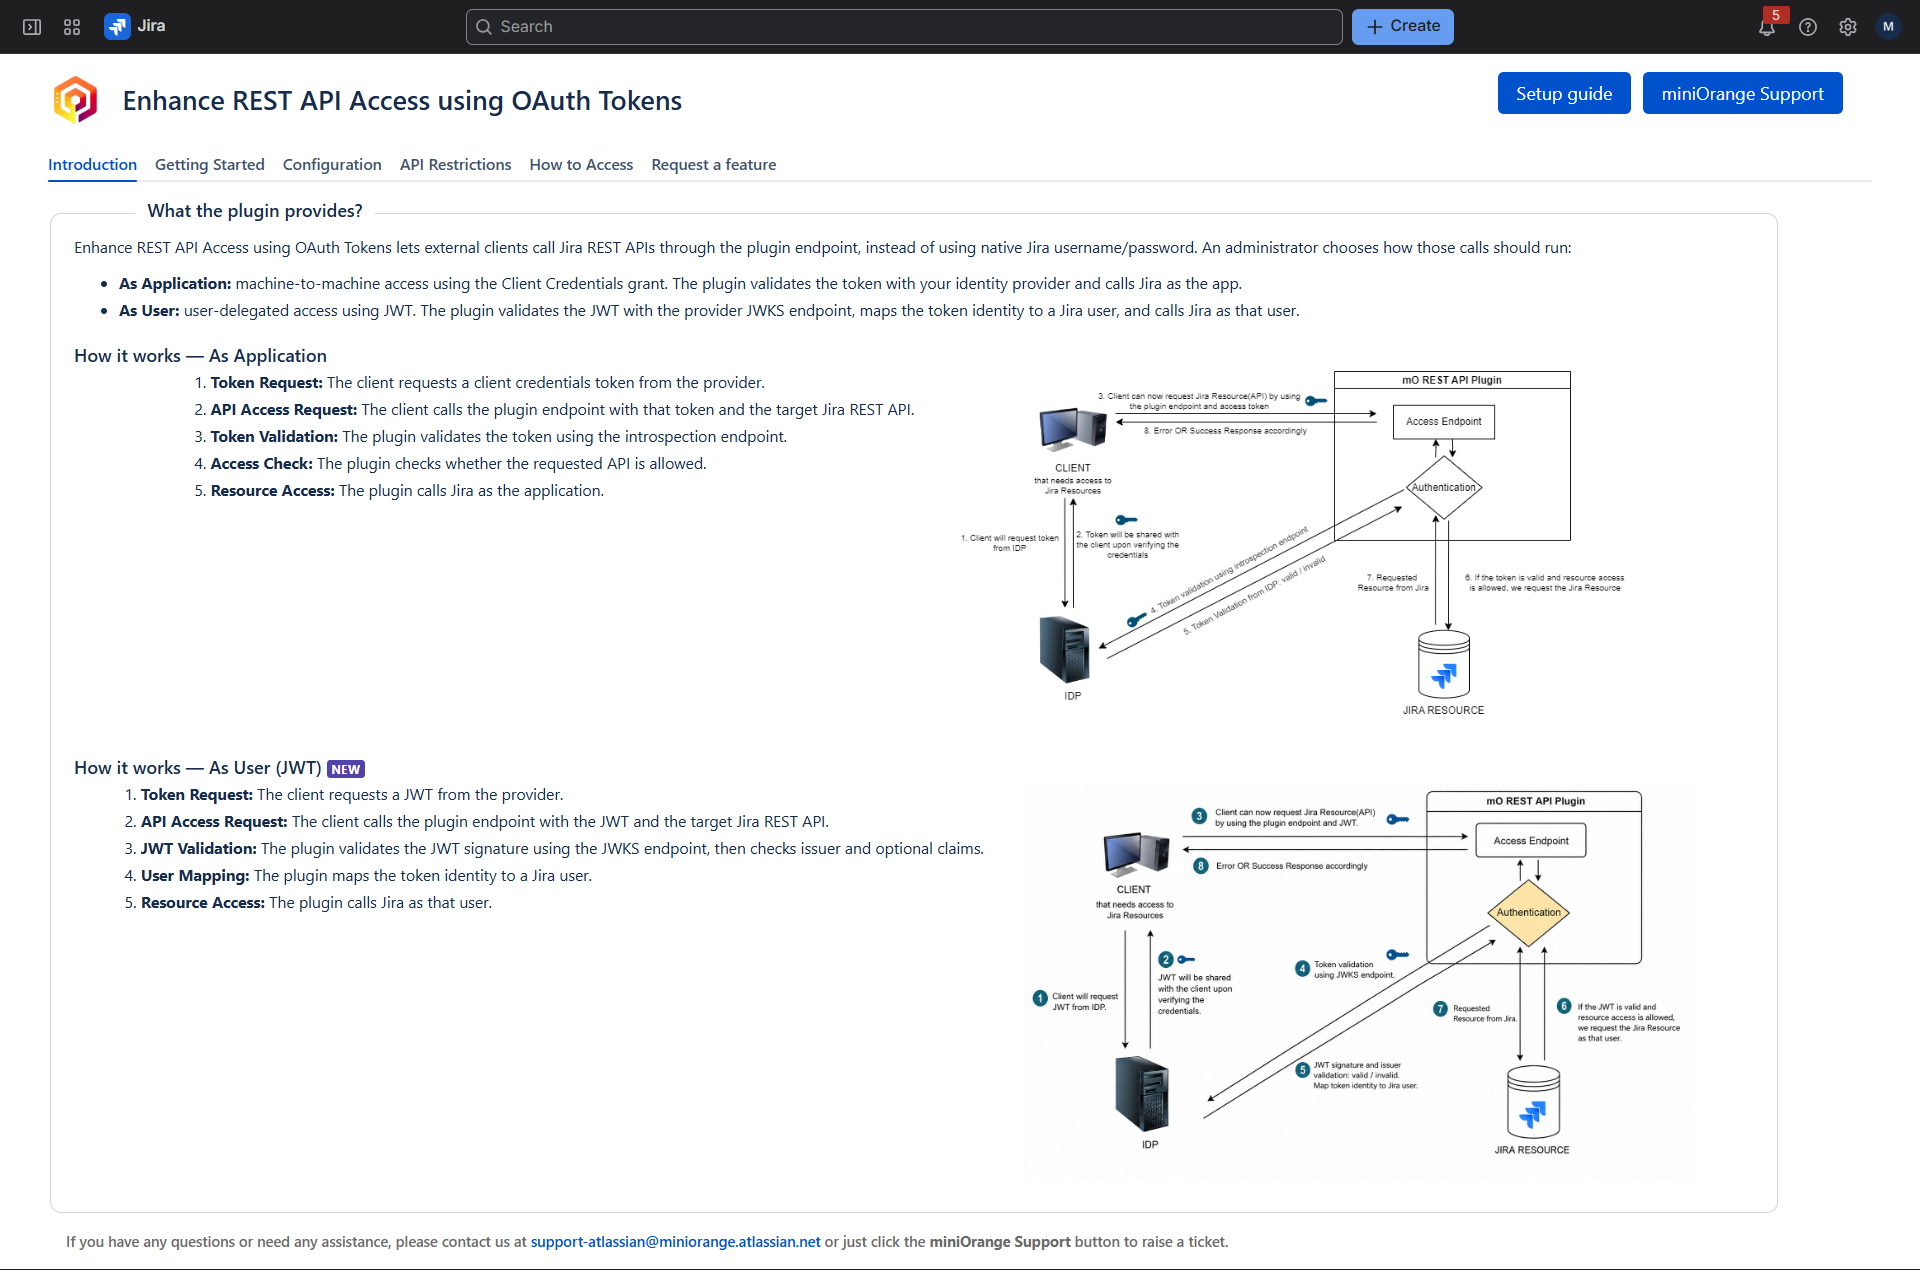
How it works
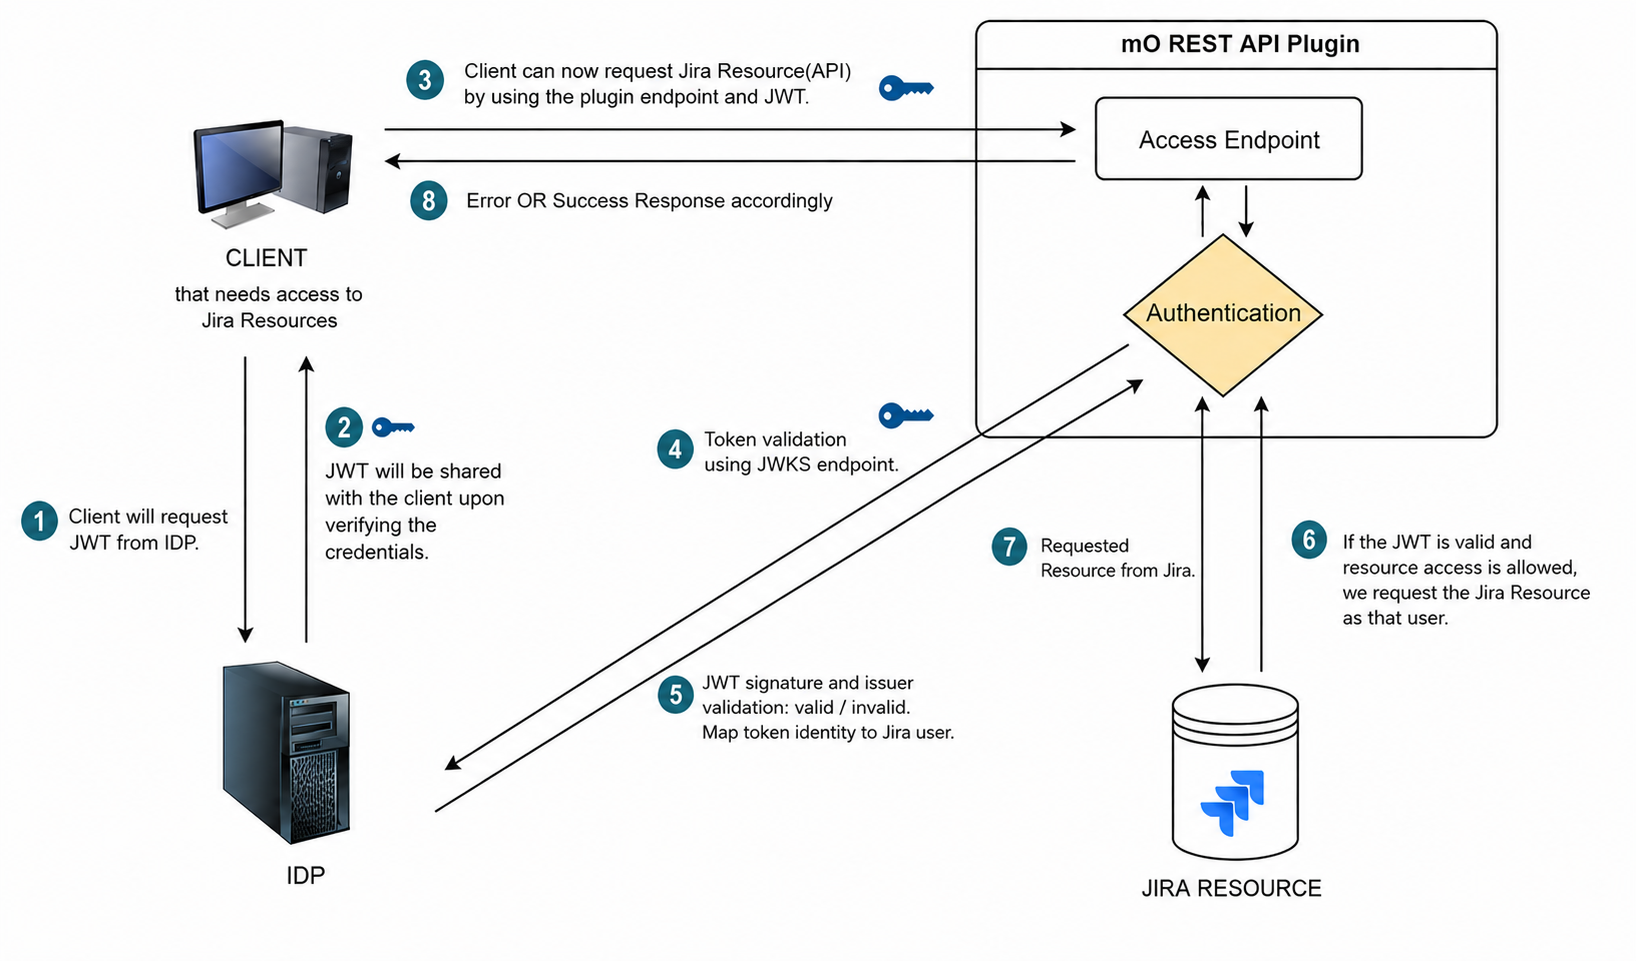
As User (JWT)
- The client requests a JWT from the identity provider (or your in-house issuer).
- The client calls the plugin Access Endpoint with that JWT and the target Jira REST API.
- The plugin validates the JWT signature using the JWKS endpoint, then checks the issuer and any extra claims you configured.
- The plugin reads the Username Attribute from the token and maps it to a Jira user.
- The plugin checks API restrictions (if configured).
- The plugin calls Jira as that user.
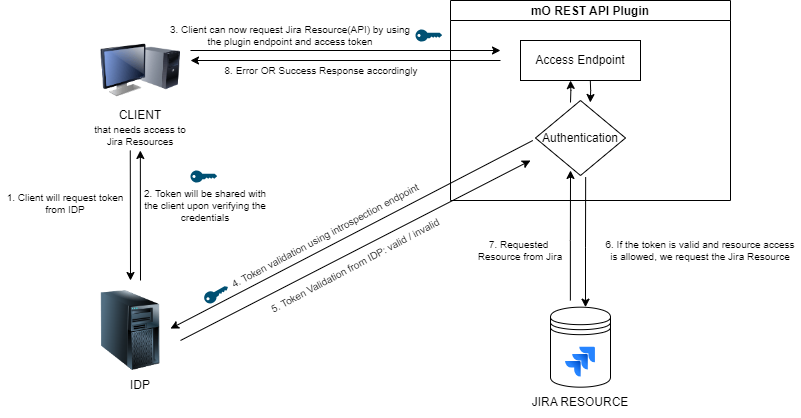
As Application (Client Credentials)
- The client requests a client credentials access token from the identity provider.
- The client calls the plugin Access Endpoint with that token and the target Jira REST API.
- The plugin validates the token at the provider introspection endpoint.
- The plugin checks API restrictions (if configured).
- The plugin calls Jira as the application.
Before you start
You will need:
- Jira Cloud administrator access
- A valid active / evaluation app license from the Atlassian Marketplace
- An identity provider (or JWT issuer) that can issue tokens
Pick a mode before you configure anything:
| If you need… | Use this mode |
|---|---|
| Scripts, bots, or services with no end-user | Authenticate as Application |
| The Jira call to run as a real user (permissions, audit) | Authenticate as User |
| Okta, Keycloak, or miniOrange as IdPs with an introspection endpoint | Authenticate as Application (or User if you prefer JWT) |
| Microsoft Entra ID (Azure AD) as IdP | Authenticate as User: Entra does not provide a standard introspection endpoint |
| Your own RS256 / RS384 / RS512 JWT | Authenticate as User |
Note: One mode at a time
You can save only one mode at a time. Saving User mode makes User
mode active; saving Application mode makes Application mode active.
Install the app
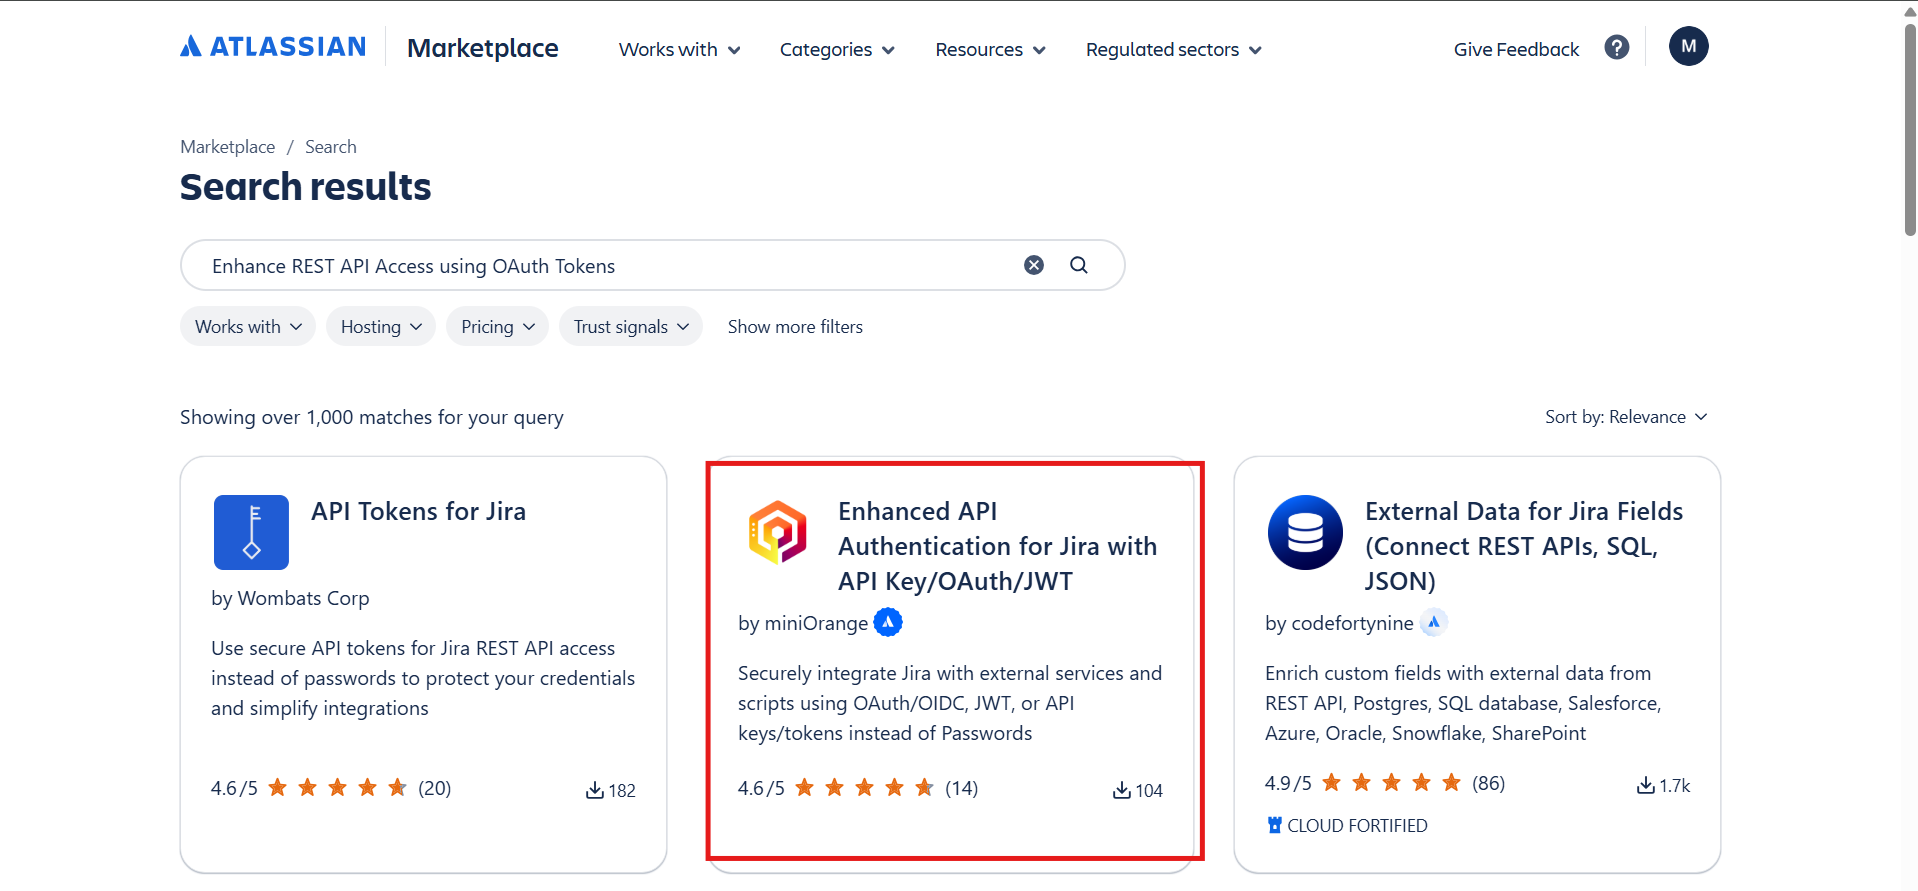
- Log in to Jira Cloud as an administrator.
- Go to Settings (⚙️) → Manage apps → Explore apps.
- Click Find new apps.
- Search for Enhance REST API Access using OAuth Tokens.
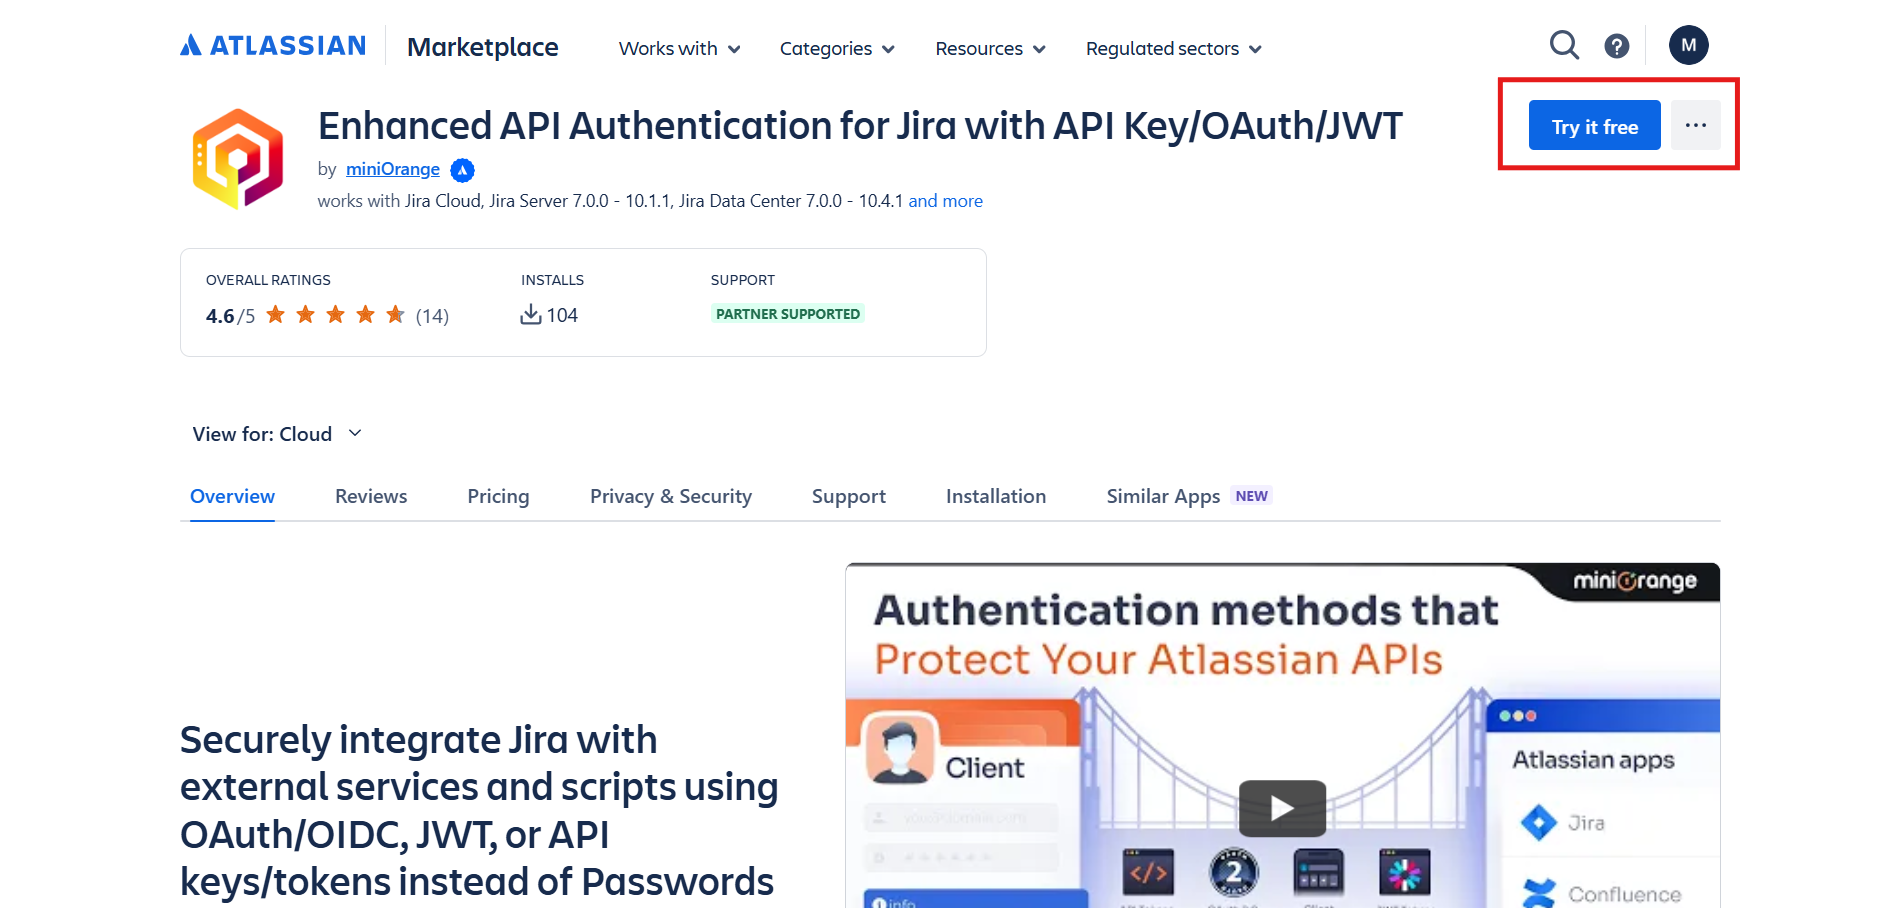
- Click Try it free or Buy now.
- Generate and apply the license when redirected to MyAtlassian.
1. Open the app
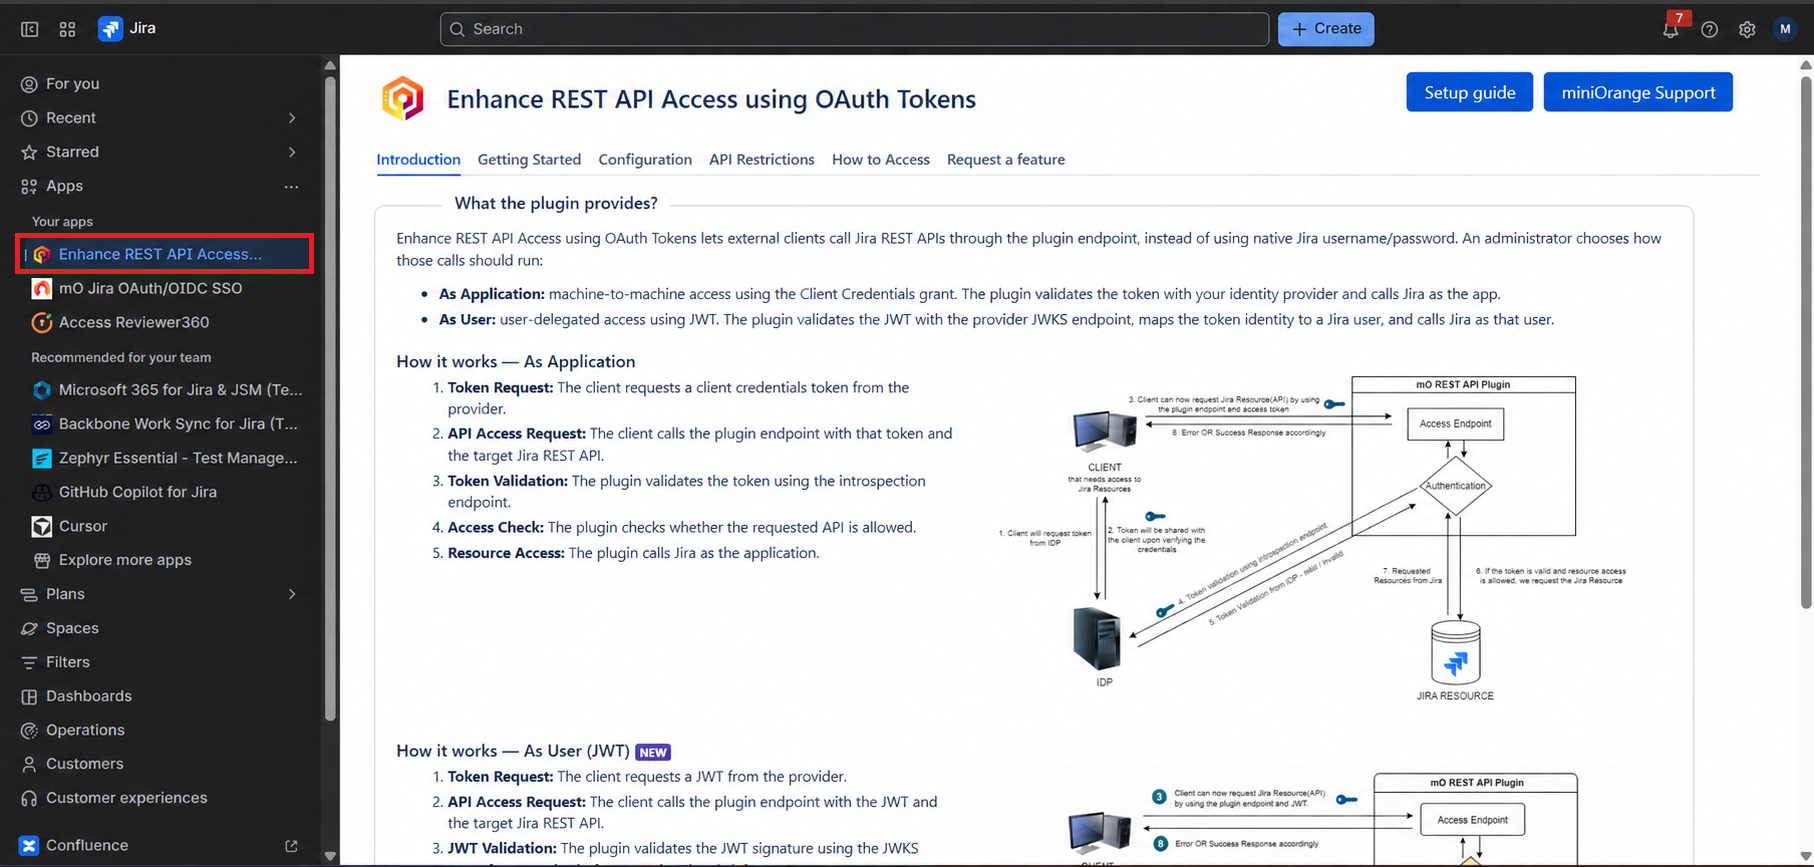
- In Jira, open Apps.
- Select Enhance REST API Access using OAuth Tokens.
- Confirm you see these tabs: Introduction, Getting Started, Configuration, API Restrictions, How to Access, Request a feature.
Only Jira administrators can open this page. If a license warning appears on Introduction, apply a valid Marketplace license before continuing.
2. Getting Started
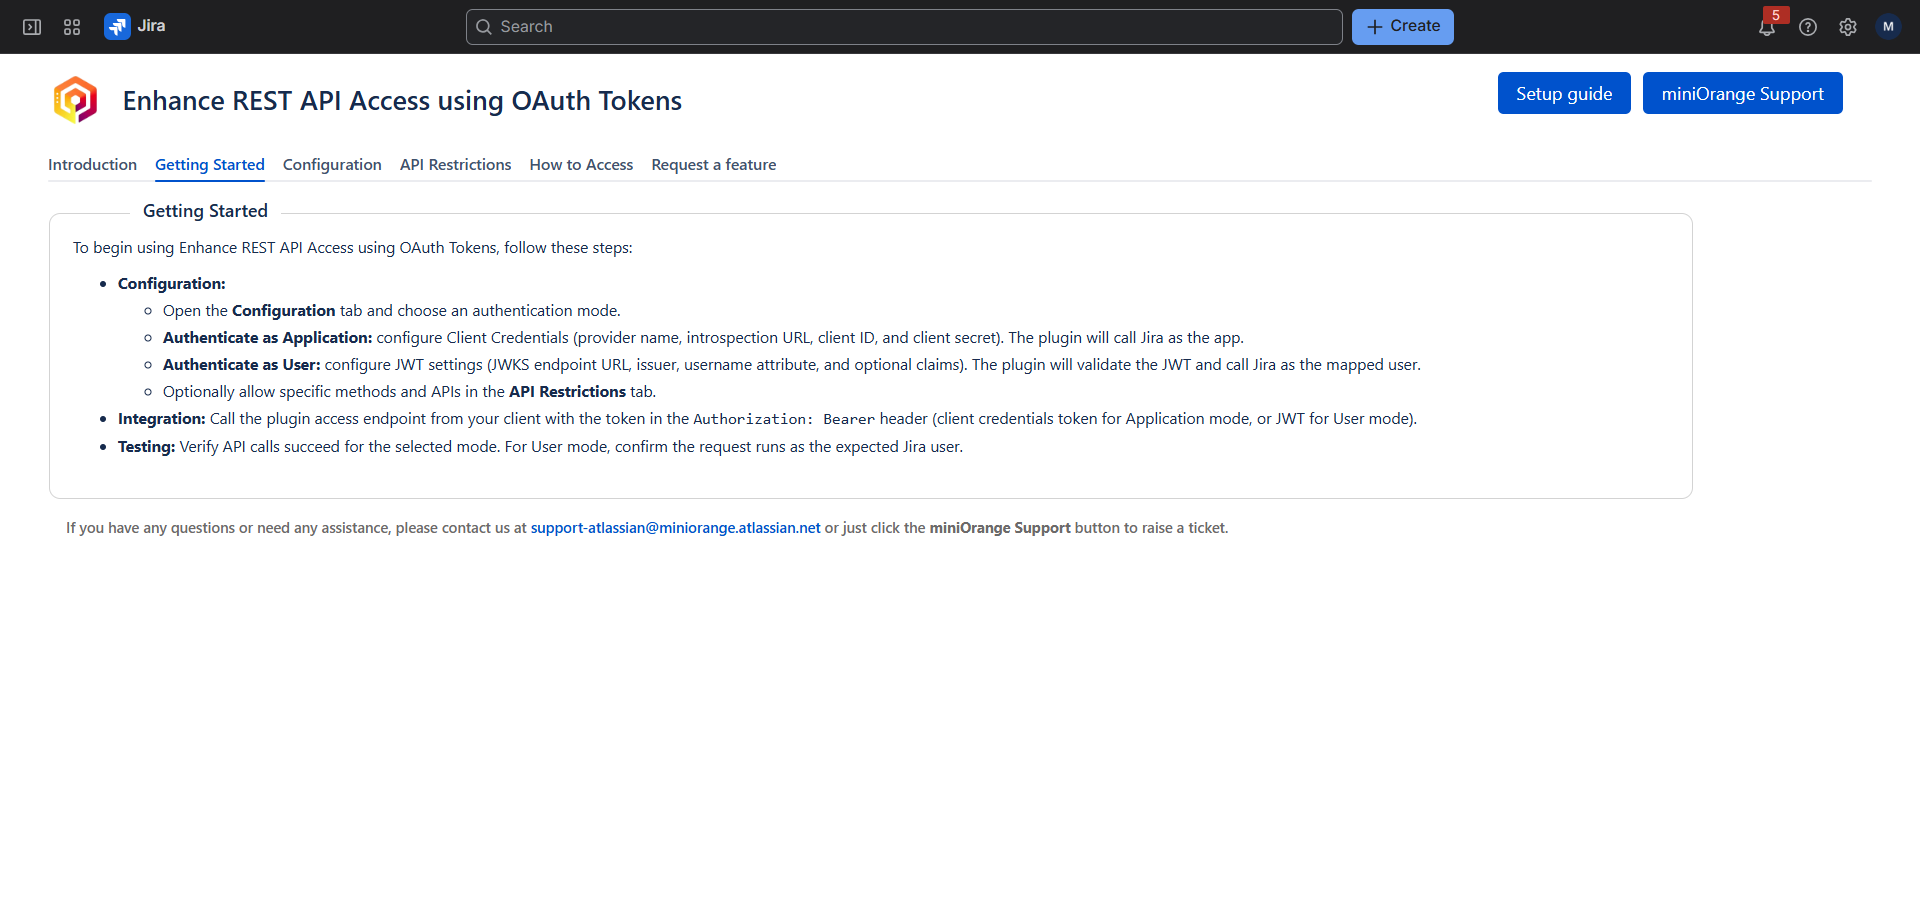
Open Getting Started and use it as the checklist:
- Open Configuration and select a mode.
- Save provider settings.
- Optionally restrict methods and endpoints on API Restrictions.
- Copy the Access Endpoint from How to Access and call it with Authorization: Bearer <token>.
3. Configure Authenticate as User (JWT)
Use this when each API call should run as an active Jira user (their permissions and audit trail). The plugin validates a JWT signed with RS256, RS384, or RS512, maps the identity in the token to a Jira account, and calls Jira as that user.
3.1 What to prepare
- JWKS URL (public signing keys)
- Exact Issuer (iss) value from the token
- A claim that identifies the user (usually email)
- That user must already exist in Jira Cloud
Decode a sample JWT (payload only) and copy the iss (issuer) and the username claim exactly.
3.2 Fill in the Configuration tab
- Open Configuration.
- Select Authenticate as User.
- Enter the fields below and click Save.
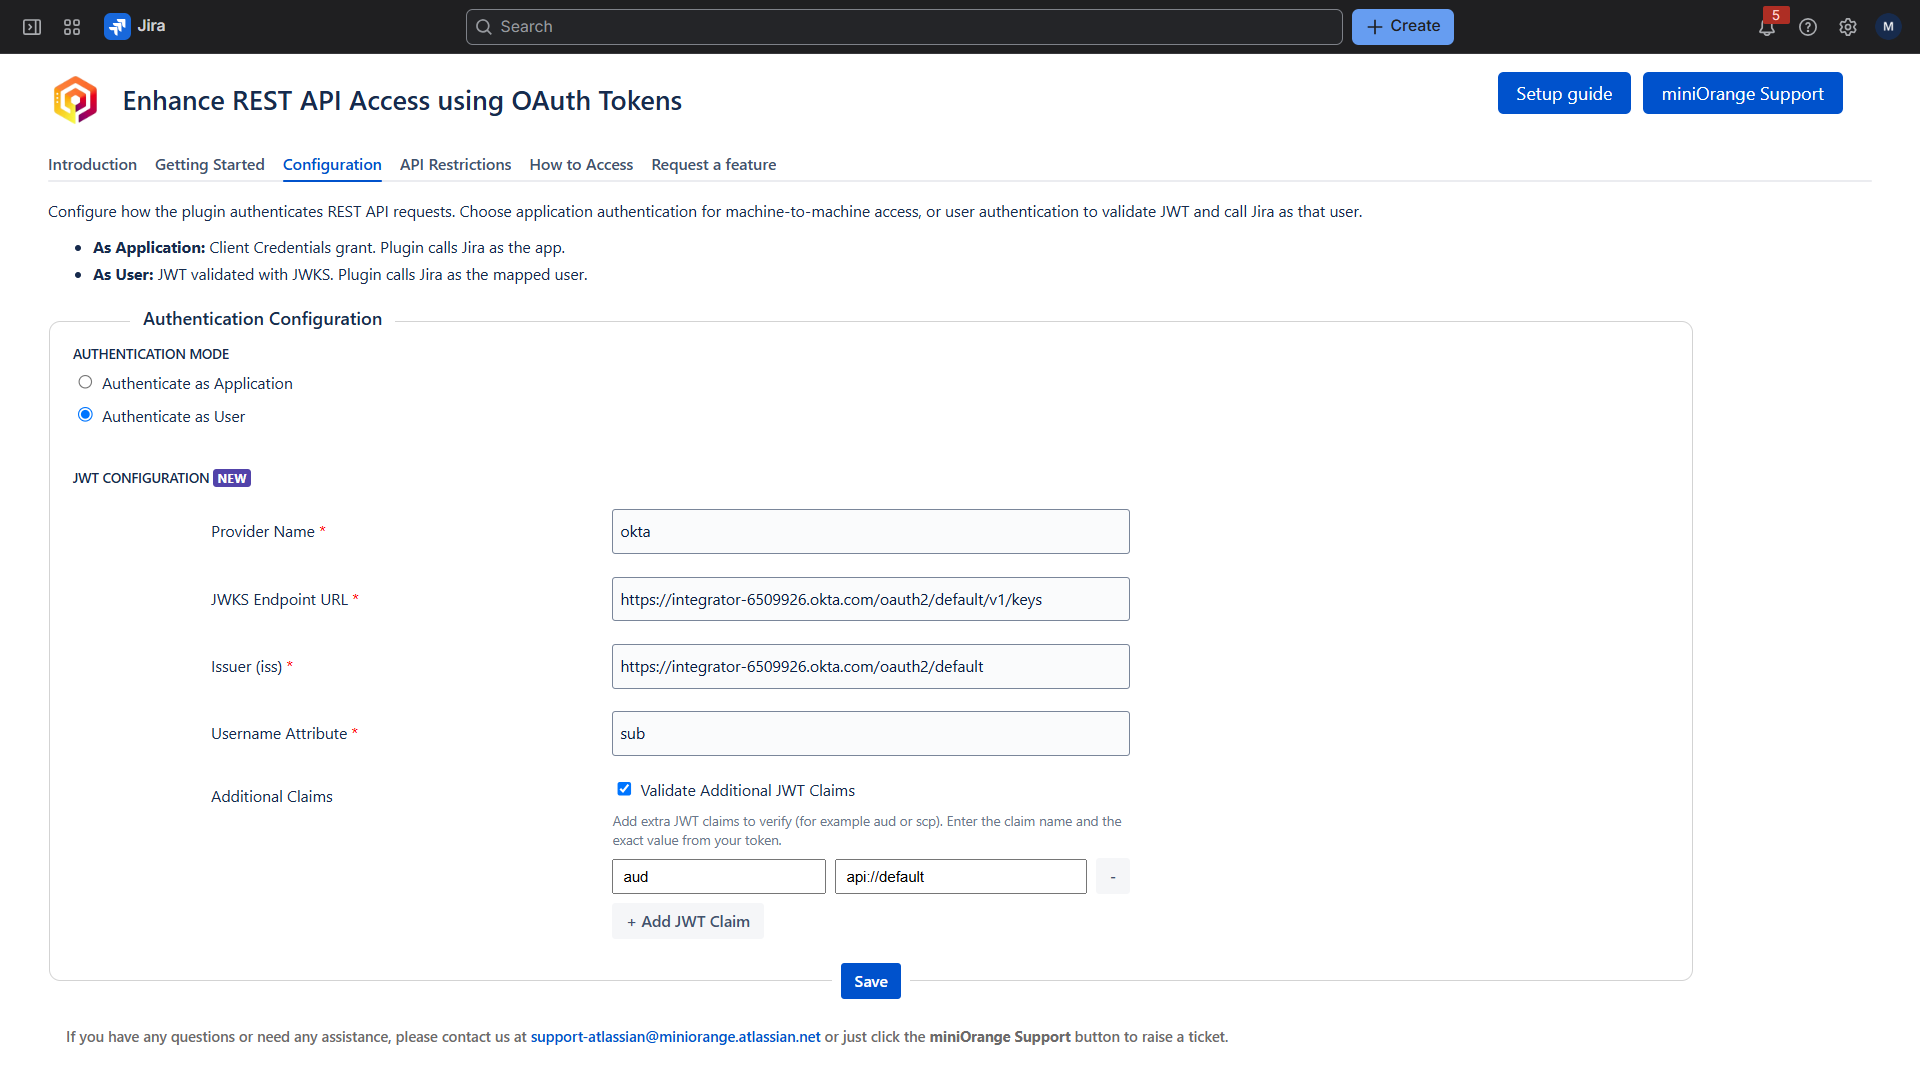
User mode fields:
| Field | Required | What to enter |
|---|---|---|
| Provider Name | Yes | Label for your reference only. |
| JWKS Endpoint URL | Yes | URL that returns { "keys": [ ... ] }. Must be http or https. |
| Issuer (iss) | Yes | Must match the iss claim in the JWT exactly (no trailing-slash mismatch). |
| Username Attribute | Yes | JWT claim used to find the Jira user. |
| Validate Additional JWT Claims | No | Optional extra checks (for example aud or scp). |
3.3 Username mapping (important)
The plugin:
- Reads the Username Attribute from the JWT.
- Searches Jira users for that value.
- Prefers an exact email match.
- If the plugin cannot match the email exactly, it still maps the token only when Jira search finds exactly one user. If more than one user is returned, the plugin does not select a user and the request fails.
- Calls Jira as that user’s accountId.
Practical rule:
Put the user’s Jira email in the JWT, keep Username Attribute as
email, and make sure that user exists in the site. If Jira profile
emails are hidden, or several users match, mapping fails.
3.4 Additional claims (optional)
Use this to require audience, scope, or other claims.
- Check Validate Additional JWT Claims.
- Enter the claim name and the exact value from the token.
- Click + Add JWT Claim for more rows.
- Click Save.
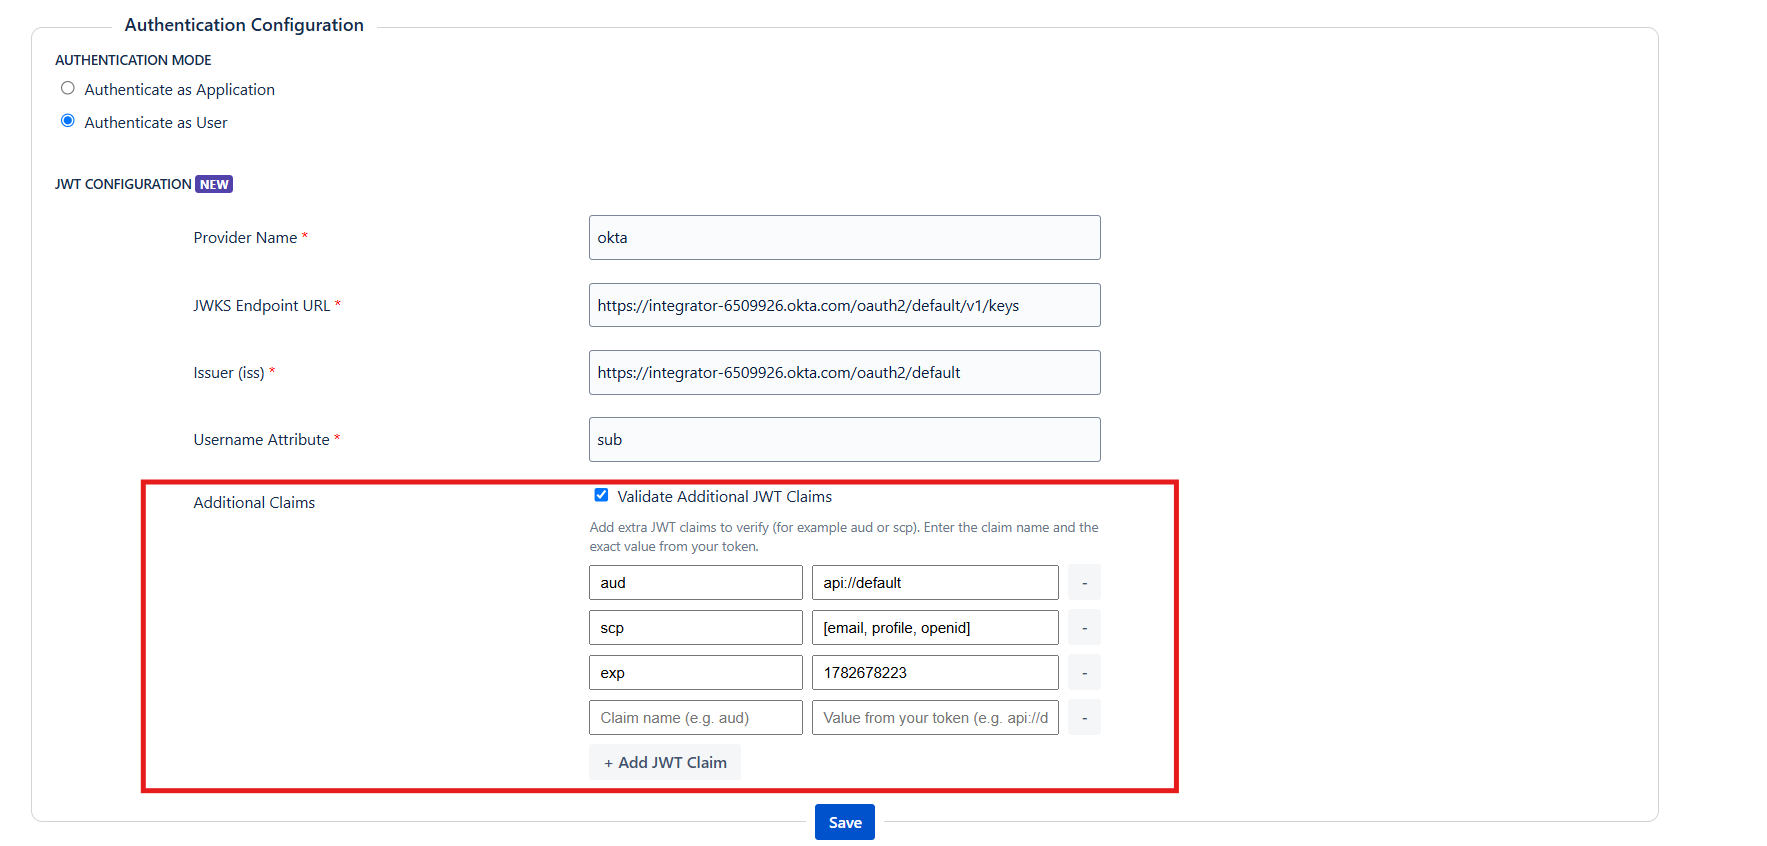
Rules:
- iss is already configured above — do not add it again.
- Claim names must be unique.
- Matching is exact. If the claim in the token is a string, enter that string. If it is an array or object, enter the JSON exactly as it appears (for example ["api://jira-rest"]).
- If you enable the checkbox, you must add at least one complete claim pair.
4. Configure Authenticate as Application
Use this when the client is a service, and Jira should be called as the miniOrange app itself.
4.1 What to prepare in the identity provider
Create a confidential OAuth client that:
- Allows the Client Credentials grant
- Can call the provider introspection endpoint
- Has a Client ID and Client Secret
Then copy the introspection URL, client ID, and client secret. Provider-specific values are in section 12.
4.2 Fill in the Configuration tab
- Open Configuration.
- Select Authenticate as Application.
- Enter the fields below and click Save.
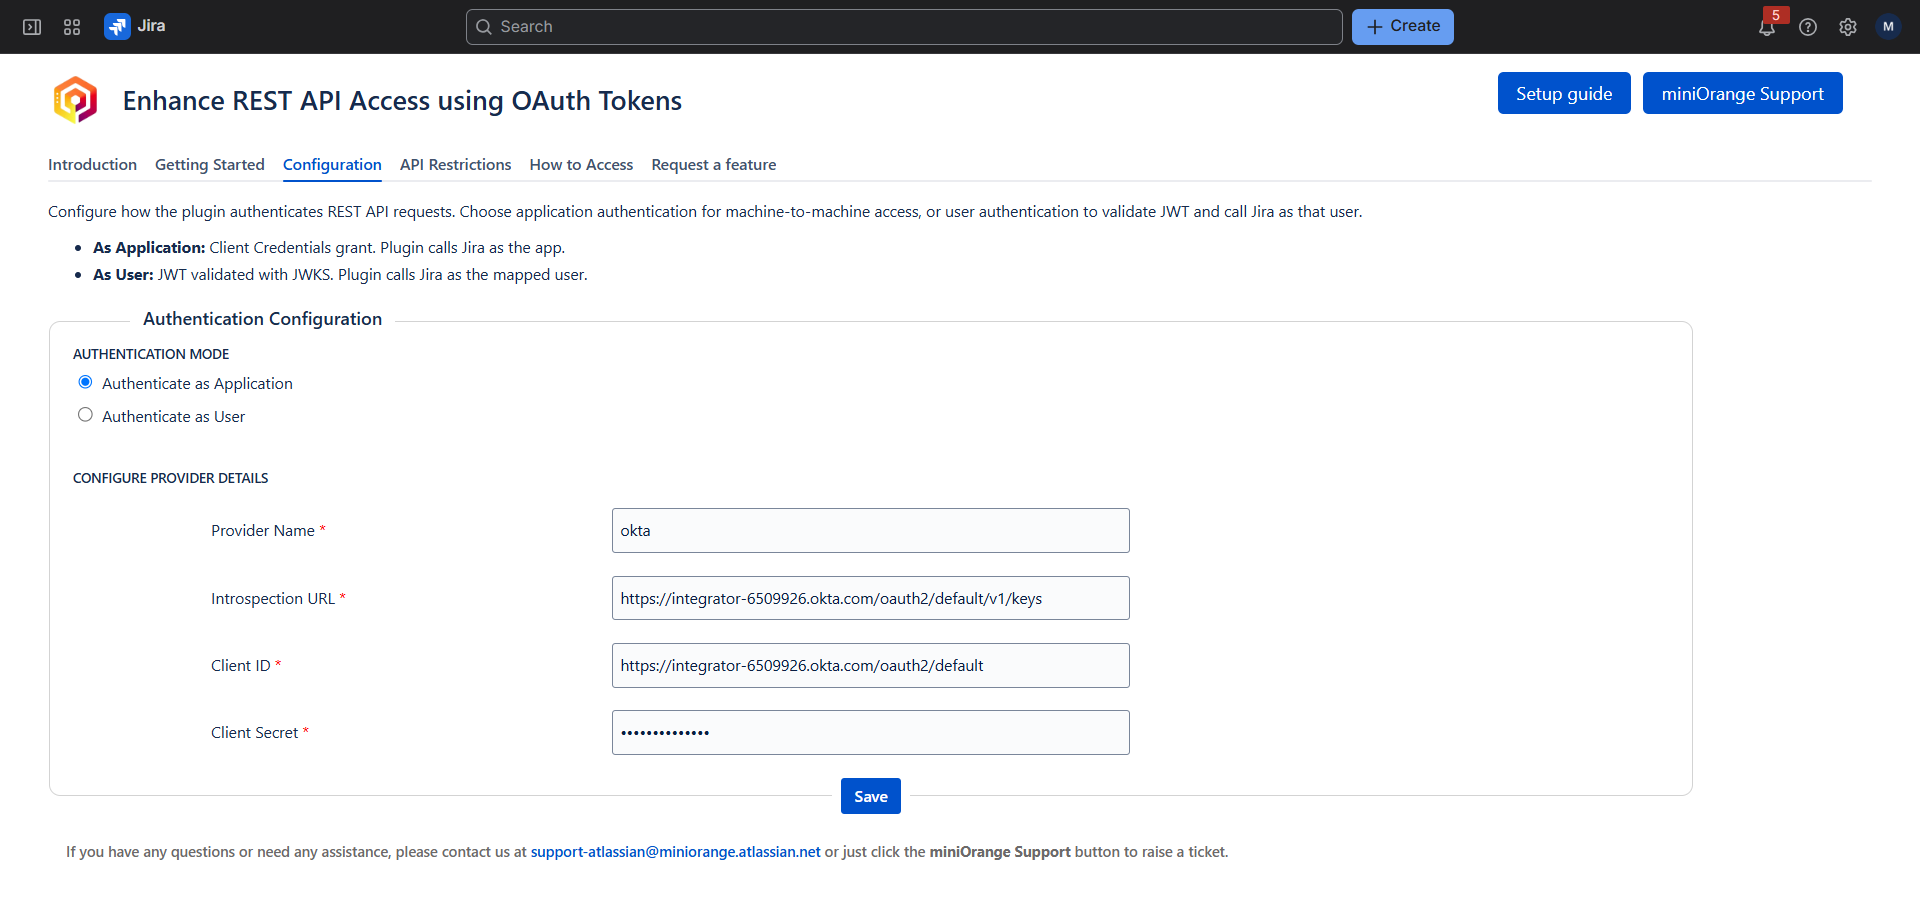
Application mode fields:
| Field | Required | What to enter |
|---|---|---|
| Provider Name | Yes | A label for your reference only (for example Okta or Keycloak). It does not change how tokens are validated. |
| Introspection URL | Yes | Full introspection endpoint URL from your IdP. Must be a valid http or https URL. |
| Client ID | Yes | Client ID of the confidential app in the IdP. |
| Client Secret | Yes | Client secret of that app. |
The plugin sends the caller’s token to this introspection URL (token=<access_token>, HTTP Basic auth with Client ID and Client Secret) and accepts the request only when the IdP returns the token as active.
5. Set API Restrictions (recommended)
Open API Restrictions. If you leave both fields empty, all methods and all APIs are allowed for a valid token. Keep this as tight as you can.
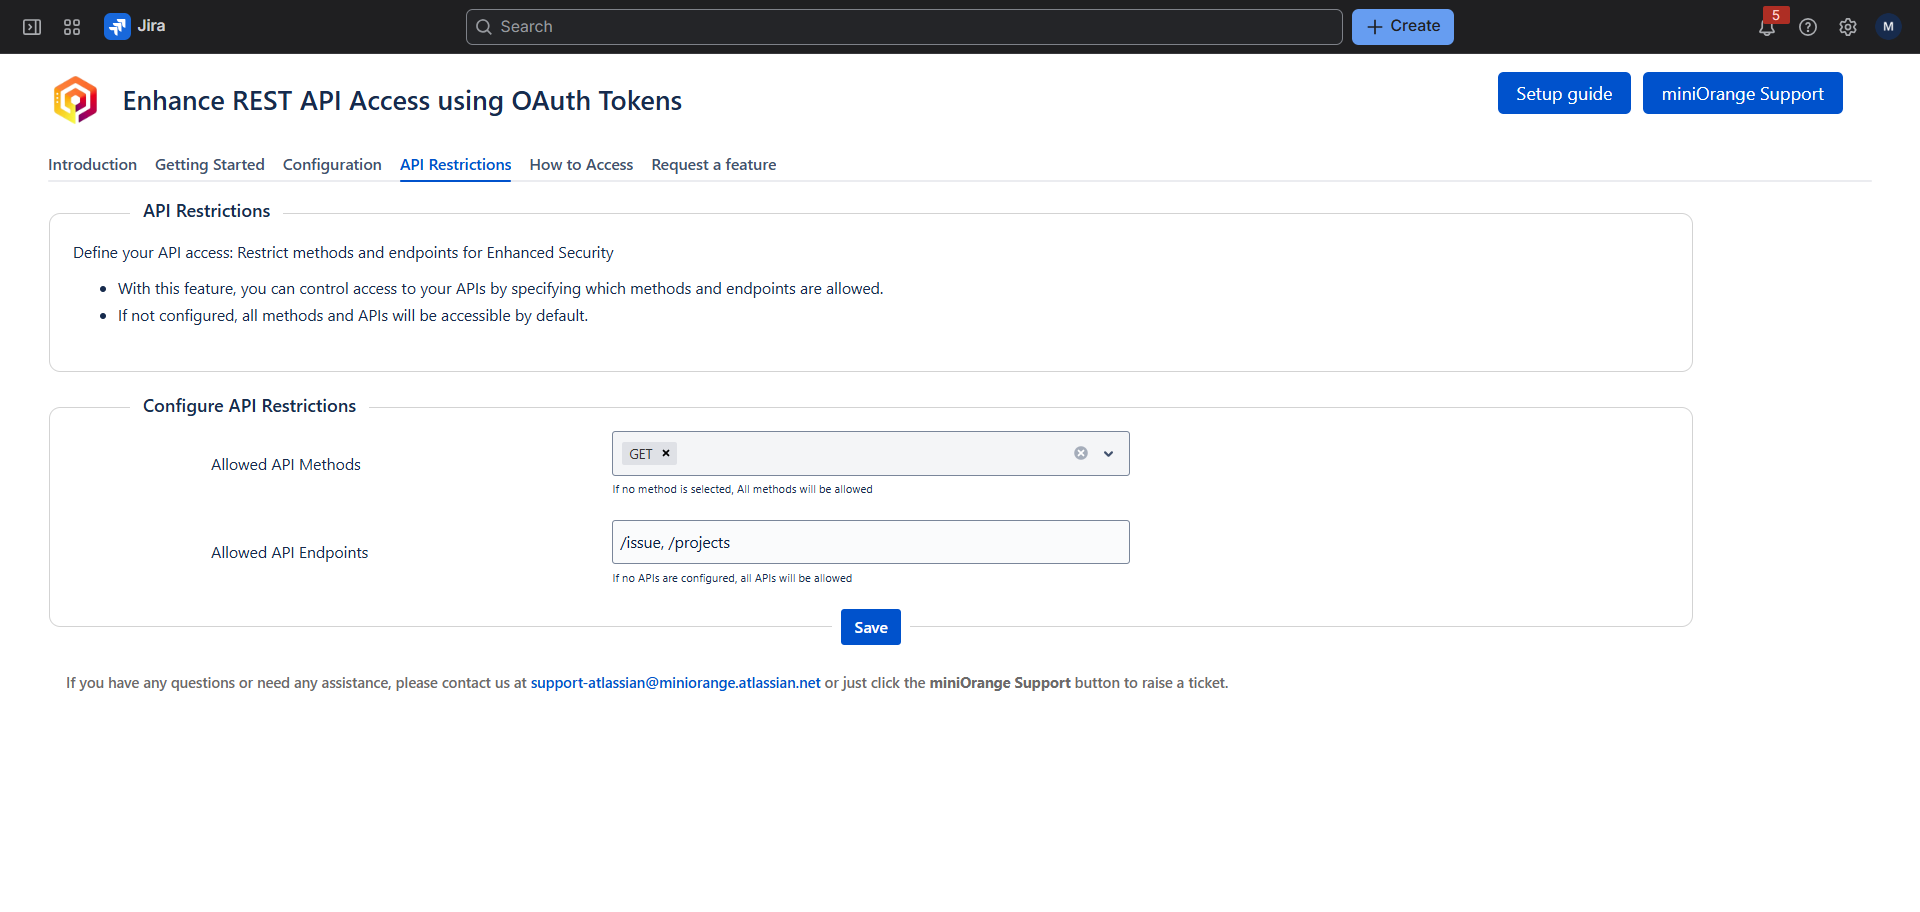
- Allowed API Methods — select GET, POST, PUT, and/or DELETE. None selected = all methods allowed.
- Allowed API Endpoints — comma-separated path fragments, for example /issue, /project. The requested URL must contain one of these strings. Empty = all endpoints allowed.
- Click Save.
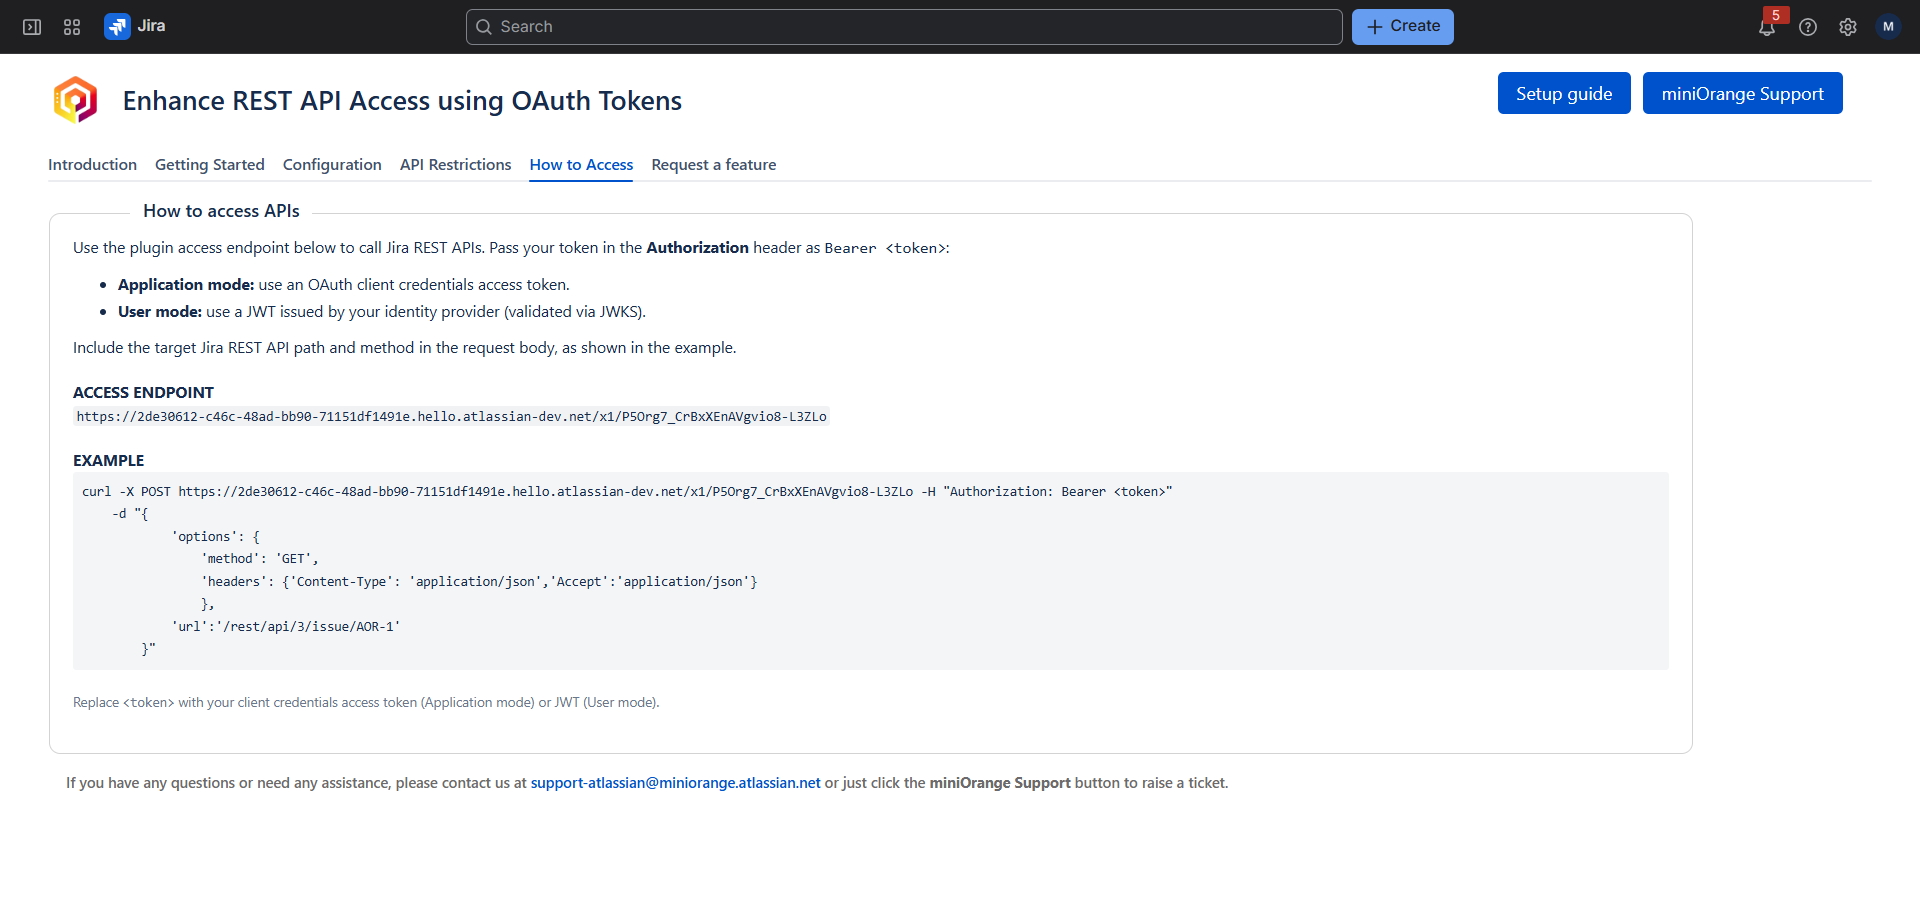
6. How to call Jira through the plugin
- Open How to Access.
- Copy ACCESS ENDPOINT. This URL is unique to your site.
- Always POST to this endpoint. The real Jira method goes in the JSON body.
- Send the token in the Authorization header as Bearer.
Authorization: Bearer <token>- Application mode: OAuth client credentials access token
- User mode: JWT from the IdP or in-house issuer
Example Request body
{
  "options": {
    "method": "GET",
    "headers": {
      "Content-Type": "application/json",
      "Accept": "application/json"
    }
  },
  "url": "/rest/api/3/issue/PROJ-1"
}| Body Field | Required | Meaning |
|---|---|---|
| url | Yes | Jira REST path, for example /rest/api/3/issue/PROJ-1. No spaces. |
| options.method | Yes | Jira method: GET, POST, PUT, or DELETE. |
| options.headers | Recommended | Headers forwarded to Jira. |
| options.body | For POST/PUT | JSON body for the Jira API. |
| options.params | Optional, GET only | Query parameters for GET requests. |
Replace <access_endpoint> with the value from How to Access, and <token> with the access token or JWT.
GET
                curl -X POST "<access_endpoint>" \
                    -H "Authorization: Bearer <token>" \
                    -H "Content-Type: application/json" \
                    -d "{
                      \"options\": {
                        \"method\": \"GET\",
                        \"headers\": {
                          \"Content-Type\": \"application/json\",
                          \"Accept\": \"application/json\"
                        }
                      },
                      \"url\": \"/rest/api/3/issue/<issue_key>\"
                    }"
POST (create issue)
                curl -X POST "<access_endpoint>" \
                    -H "Authorization: Bearer <token>" \
                    -H "Content-Type: application/json" \
                    -d "{
                      \"options\": {
                        \"method\": \"POST\",
                        \"headers\": {
                          \"Content-Type\": \"application/json\",
                          \"Accept\": \"application/json\"
                        },
                        \"body\": {
                          \"fields\": {
                            \"project\": { \"id\": \"<project_id>\" },
                            \"summary\": \"Created via REST API Access plugin\",
                            \"issuetype\": { \"id\": \"<issue_type_id>\" }
                          }
                        }
                      },
                      \"url\": \"/rest/api/3/issue\"
                    }"
PUT (assign issue)
            curl -X POST "<access_endpoint>" \
                -H "Authorization: Bearer <token>" \
                -H "Content-Type: application/json" \
                -d "{
                  \"options\": {
                    \"method\": \"PUT\",
                    \"headers\": {
                      \"Content-Type\": \"application/json\",
                      \"Accept\": \"application/json\"
                    },
                    \"body\": {
                      \"accountId\": \"<jira_account_id>\"
                    }
                  },
                  \"url\": \"/rest/api/3/issue/<issue_key>/assignee\"
                }"
DELETE
            curl -X POST "<access_endpoint>" \
                -H "Authorization: Bearer <token>" \
                -H "Content-Type: application/json" \
                -d "{
                  \"options\": {
                    \"method\": \"DELETE\",
                    \"headers\": {
                      \"Content-Type\": \"application/json\",
                      \"Accept\": \"application/json\"
                    }
                  },
                  \"url\": \"/rest/api/3/issue/<issue_key>\"
                }"
7. Test the setup
User mode
- Issue a JWT that contains the Username Attribute (usually email).
- Confirm iss matches Configuration.
- Call GET /rest/api/3/myself through the plugin.
- Confirm the response is the mapped Jira user, not the app.
Application mode
- Request a client credentials token from the IdP.
- Call GET /rest/api/3/myself or GET /rest/api/3/issue/<issue_key> through the plugin.
- Confirm the call succeeds. Jira runs the request as the app, not as a person.
Troubleshooting
| Error message | Typical cause | What to do |
|---|---|---|
| Unauthorized - Invalid Token | Token is missing, malformed, signature failed, JWKS fetch failed, or wrong key/algorithm | Issue a new token. For User mode, confirm the JWKS URL, RS256/RS384/RS512, and that JWKS is reachable from Atlassian Cloud. |
| Unauthorized - Expired Token | JWT exp has passed | Request a new token. |
| Unauthorized - Invalid / Expired Token | Introspection returned the token as not active | Request a new client credentials token. Confirm introspection URL, client ID, and secret. |
| Unauthorized - API access is Restricted | Method or URL is not allowed | On API Restrictions, allow that method and a matching endpoint fragment. |
| Invalid URL provided | URL contains spaces or is malformed | Use a path like /rest/api/3/issue/PROJ-1 with no spaces. |
| Authorization Bearer token Parameter Missing | Authorization: Bearer <token> header is missing | Send Authorization: Bearer <token>. Names are case-sensitive in the JSON body. |
| URL Parameter Missing | Request JSON has no url | Include "url": "/rest/api/3/..." |
| Method Parameter Missing | options.method is missing | Include "options": { "method": "GET", ... } |
| Request body is empty | POST body to the plugin is empty | Send the JSON body shown in How to Access. |
| Invalid / Expired License | Marketplace license is missing or expired | Apply a valid license, then retry. |
| Invalid Configurations - Please configure the provider details in the Configuration tab | Required fields for the active mode are not saved | Application: introspection URL, client ID, secret. User: JWKS URL, issuer, username attribute. Click Save. |
| Unauthorized - Token is valid but does not identify a user | JWT is valid, but the Username Attribute claim is missing or empty | Put that claim in the token, or change Username Attribute to a claim that exists (for example, email vs preferred_username). |
| Unauthorized - No Jira user found for the token identity | No unique Jira user for the claim value | Create/invite the user, use the email Jira knows, and avoid values that match several users. |
| Unauthorized - Invalid JWT claim | iss mismatch, or an additional claim missing/wrong | Copy iss from the token. If additional claims are on, copy those values from the token exactly. |
| Failed to call Jira API. If using User mode, reinstall/upgrade the app to grant impersonation scopes. | User-mode call to Jira failed, often missing impersonation scopes | Reinstall or upgrade the app as a Jira admin and accept the requested permissions, then retry. |
Support
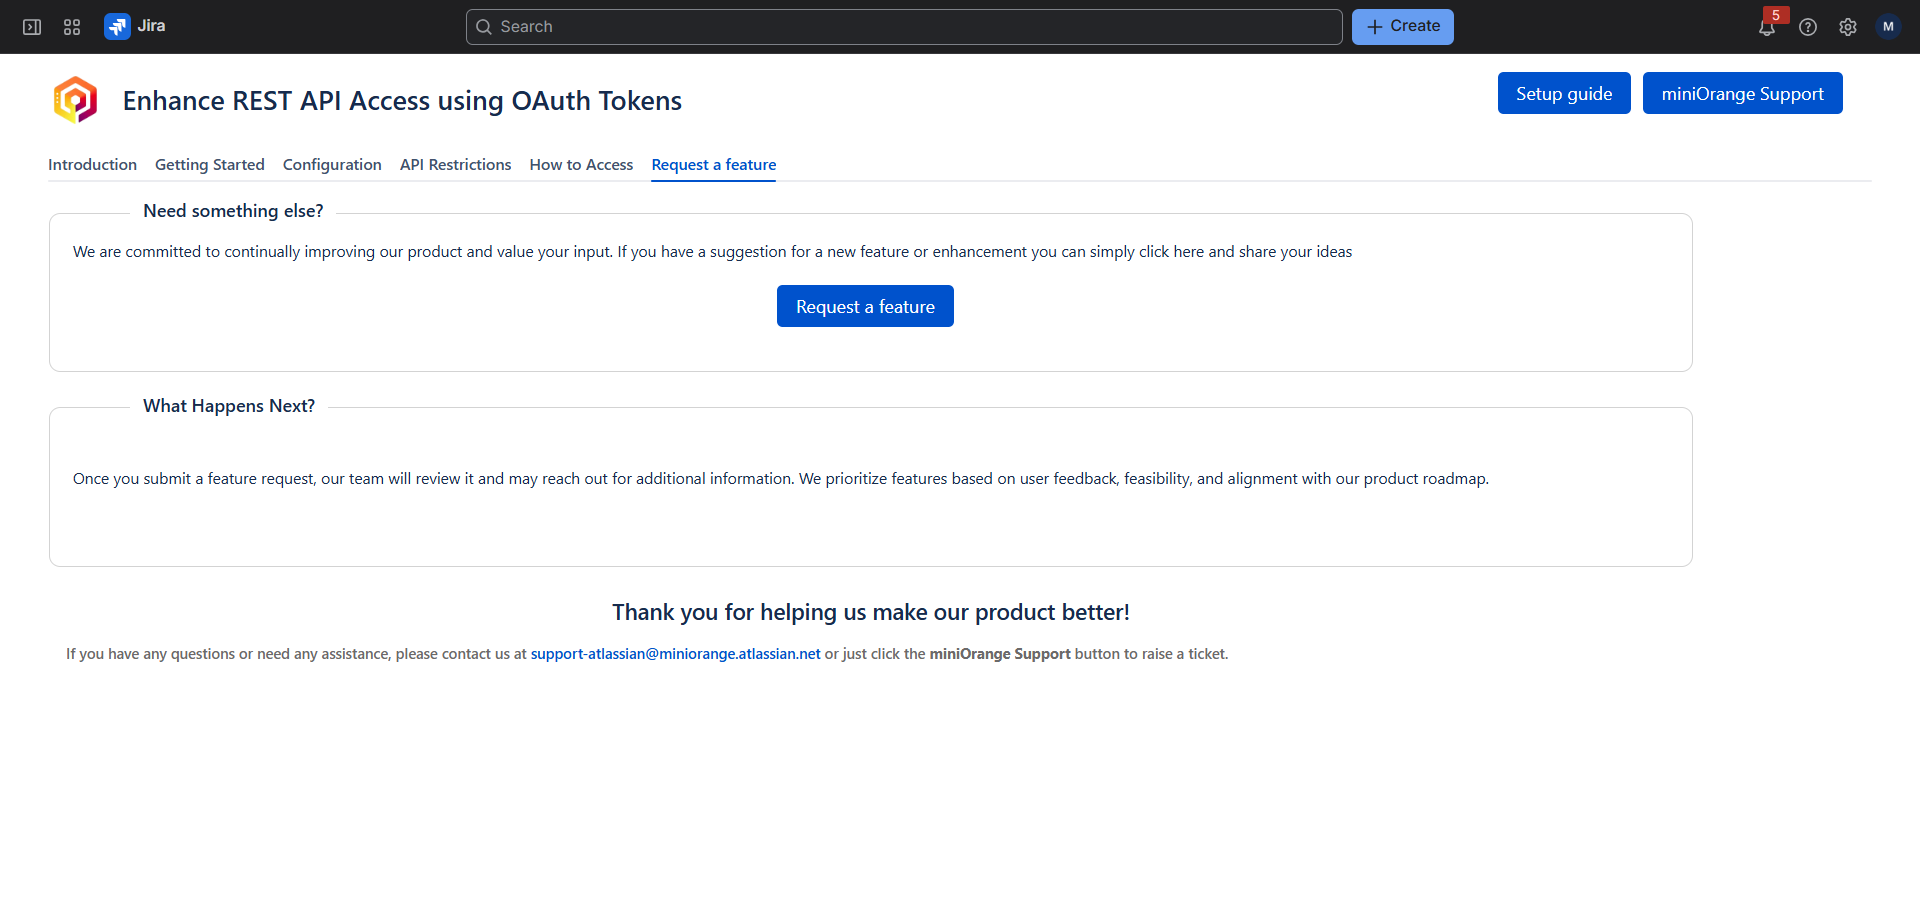
Open the Request a feature tab in the app, or use miniOrange Support in the header.
If you need help, email support-atlassian@miniorange.atlassian.net or raise a ticket: miniOrange Support.
Did this page help you?