Time Restriction for
Office 365
Enable time-based restrictions for MS Office 365 apps with miniOrange security solutions. Onboard users and configure custom time policies to secure your data. Select the solution that fits your business needs for
authenticating users within specific time ranges, restricting access in real-time, and managing access to mobile and desktop apps when the time window expires.

Authenticate Users within a Time Window
Verify and authenticate users based on their access time before granting them entry to MS Office 365 apps using IAM.
Learn More
Setup Now

MS 365 Cloud App Time Restriction
Allow access to MS Office 365 apps only during a specified time range, and block access in real-time when the time period ends using CASB.
Learn More
Setup Now

Office 365 Mobile App Time Restriction
Allow access to MS Office 365 apps on mobile devices (Android/iOS) only within specific time windows, securing employees' use of mobile devices with MDM.
Learn More
Setup Now
Connect with External Source of Users
miniOrange provides user authentication from various external sources, which can be Directories (like ADFS, Microsoft Active Directory, OpenLDAP, AWS etc), Identity Providers (like Microsoft Entra ID, Okta, AWS), and many more. You can configure your existing directory/user store or add users in miniOrange.
Prerequisites
1. Sync On-Premise Active Directory with Microsoft Entra ID
NOTE: If you want to use your On-Premise Active Directory as a user store for Office 365 IP Restriction then follow the below steps to sync your AD and Microsoft Entra ID.
- Download the Microsoft Entra ID Connect
- Run the Microsoft Entra ID installer on your domain machine and follow the setup.
2. Verify your UPN Domain in Azure Portal
- In the Azure portal navigate to Microsoft Entra ID >> Custom domain names and click on Add custom domain.
- Enter the full domain name in the right pane that pops up and click on Add domain.
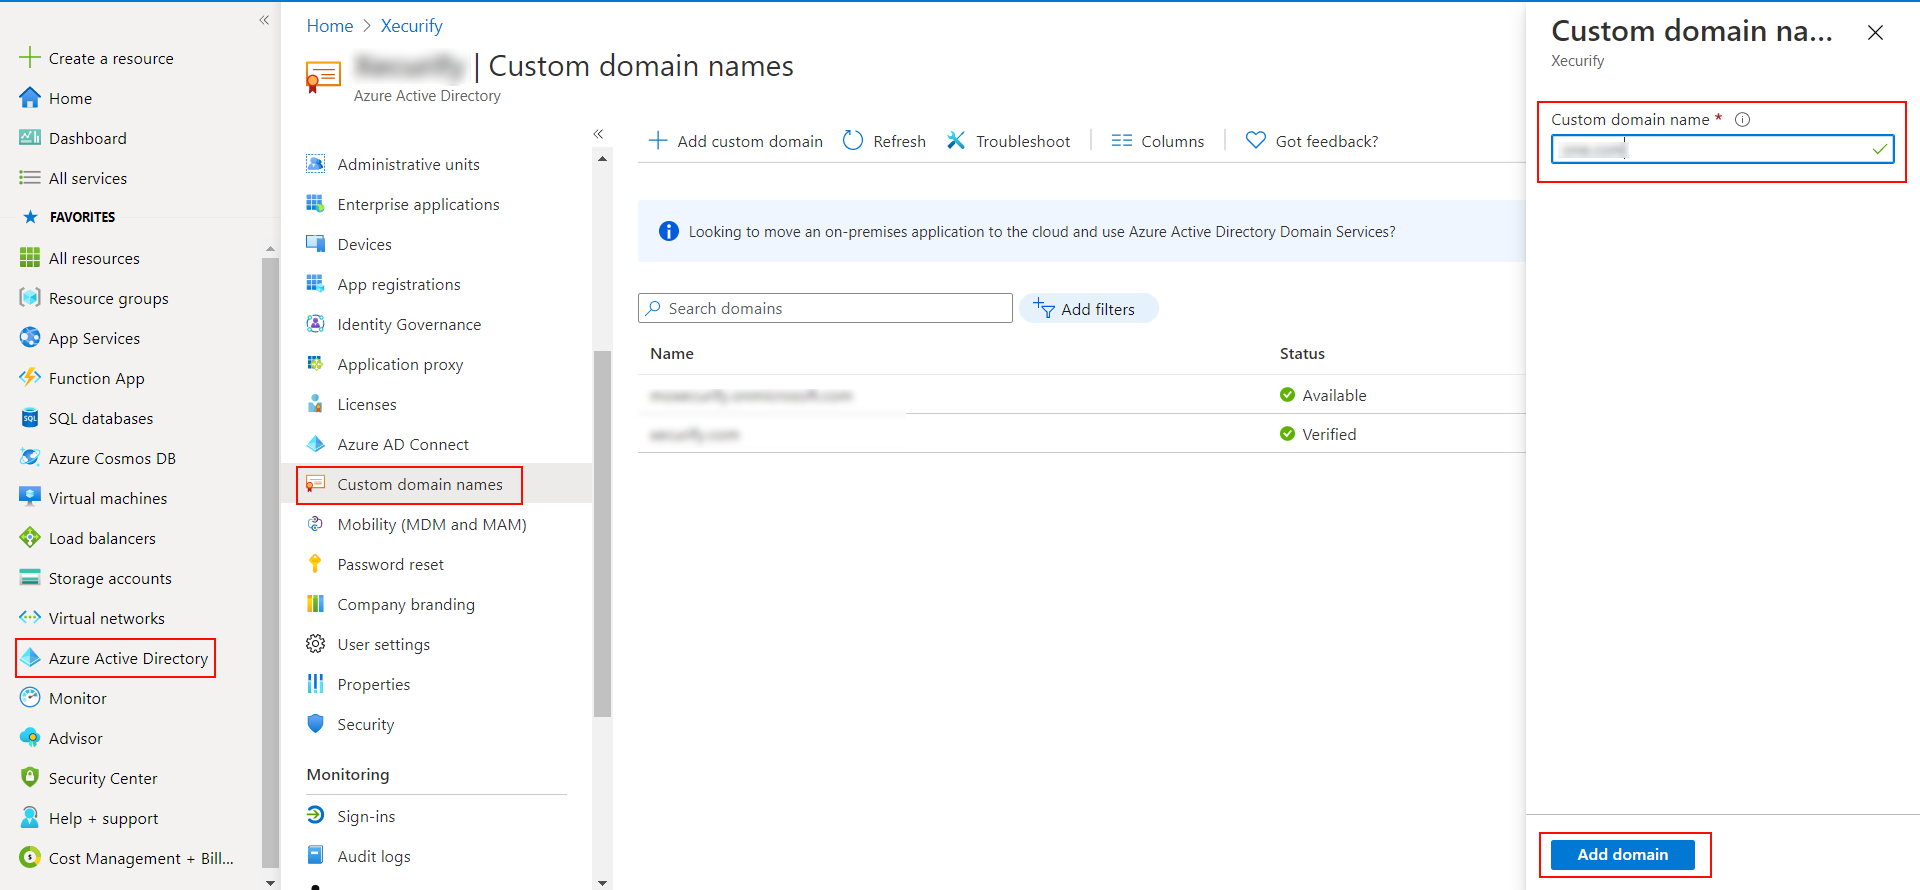
- A new window will open up with TXT/MX records for the domain. You will have to add the resented entry in your domain name registrar.
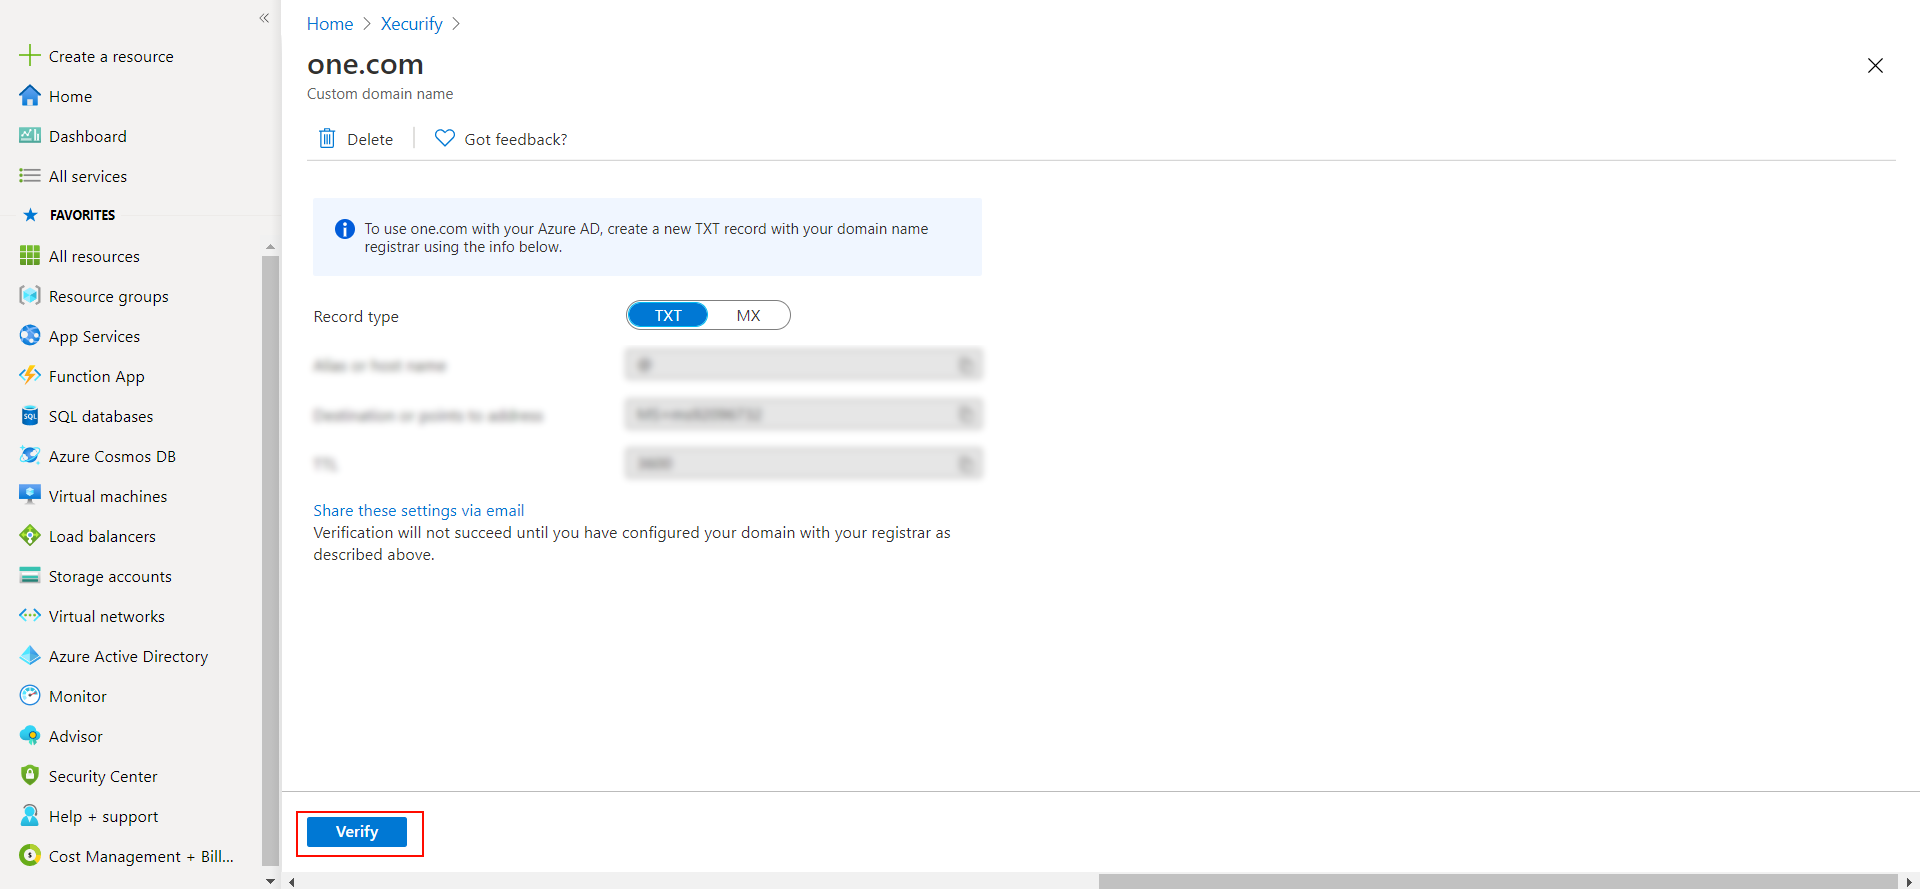
- Click on verify once you have added the entry
Configure User Access for Office 365 with Time Restrictions
Configure Real-time Time Restriction for Office 365 apps
Configure Time Restriction for Office 365 apps over mobile devices
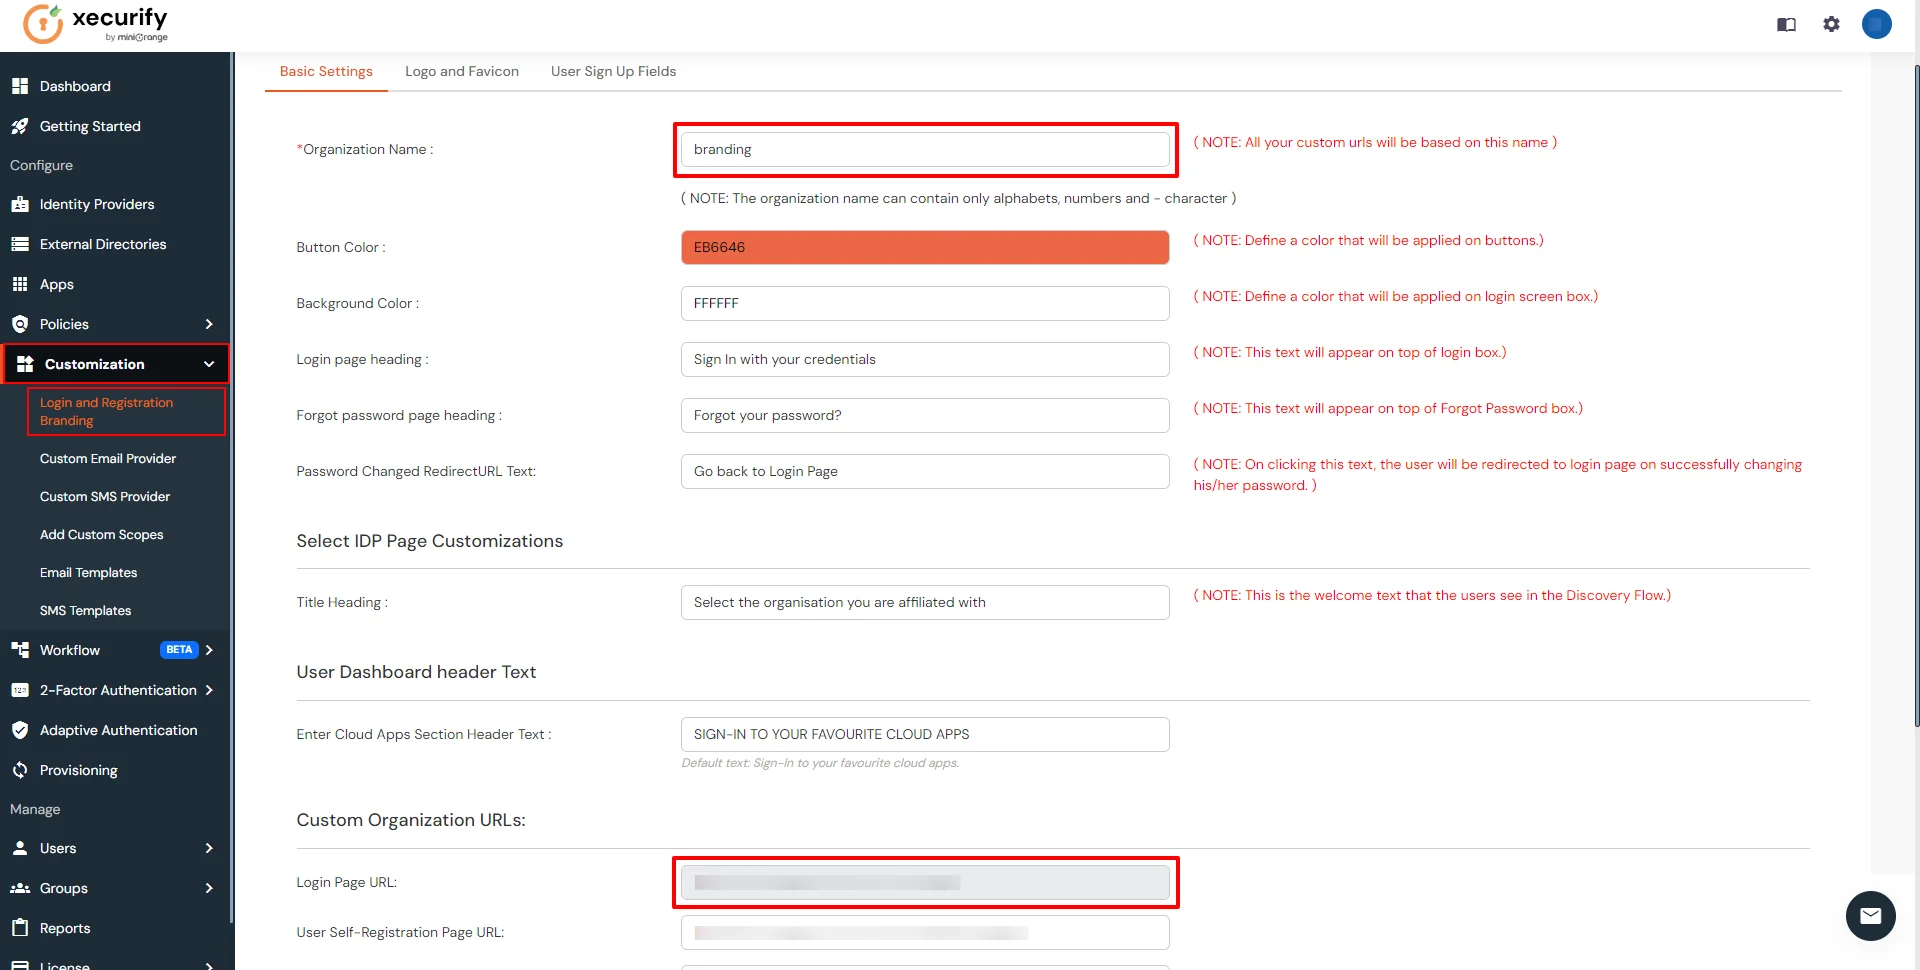
1. Setup a Custom Branded URL in miniOrange Admin Console
Single Sign-On into Office 365 requires a custom branded URL to be set. Access to miniOrange and connected resources will need to be through the custom branded URL in the format:
https://<custom_domain>.xecurify.com/moas
- Login to miniOrange Admin Console.
- Click on Customization in the left menu of the dashboard.
- In Basic Settings, set the Organization Name as the custom_domain name.
- Click Save. Once that is set, the branded login URL would be of the format https://<custom_domain>.xecurify.com/moas/login
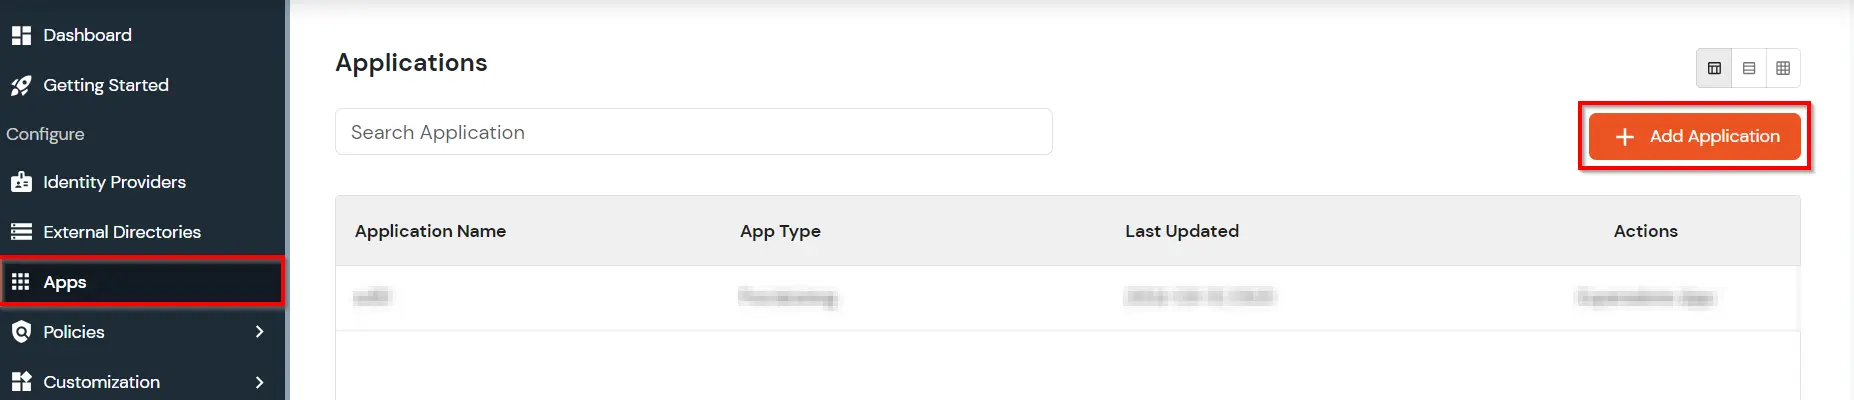
2. Configure Office 365 in miniOrange
-
Login into miniOrange Admin Console .
- Go to Apps and click on Add Application button.
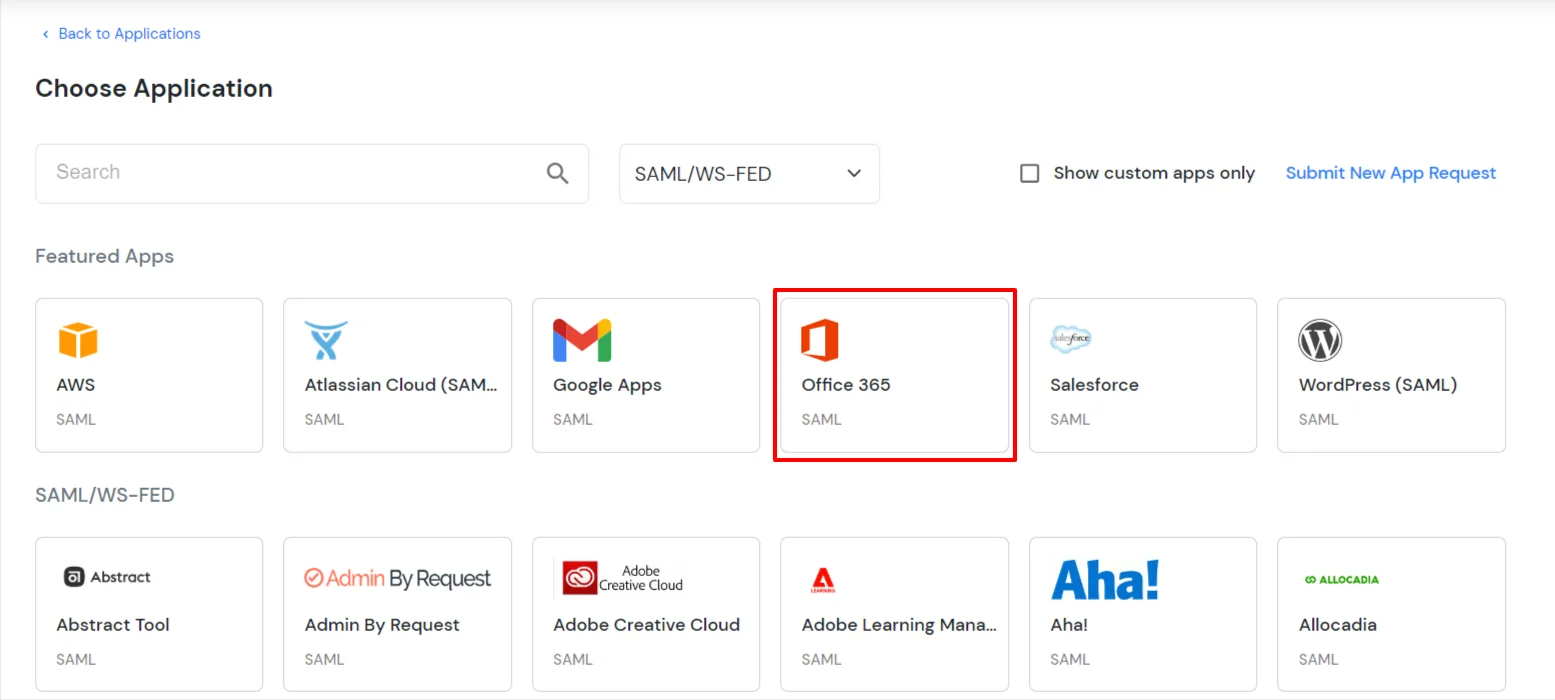
- In Choose Application Type click on Create App button in SAML/WS-FED application type.
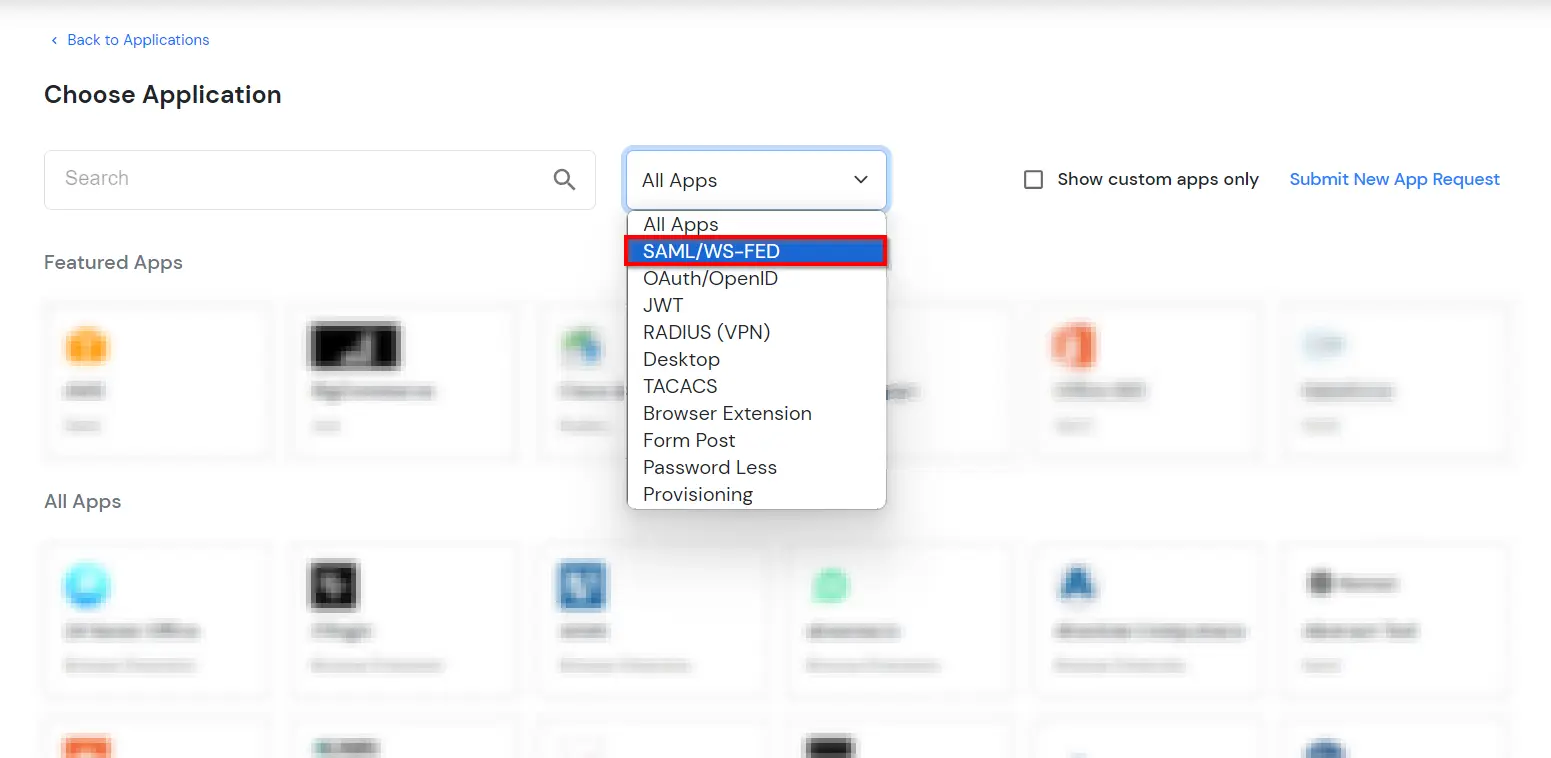
- In the next step, search for Office 365. Click on Office 365 app.
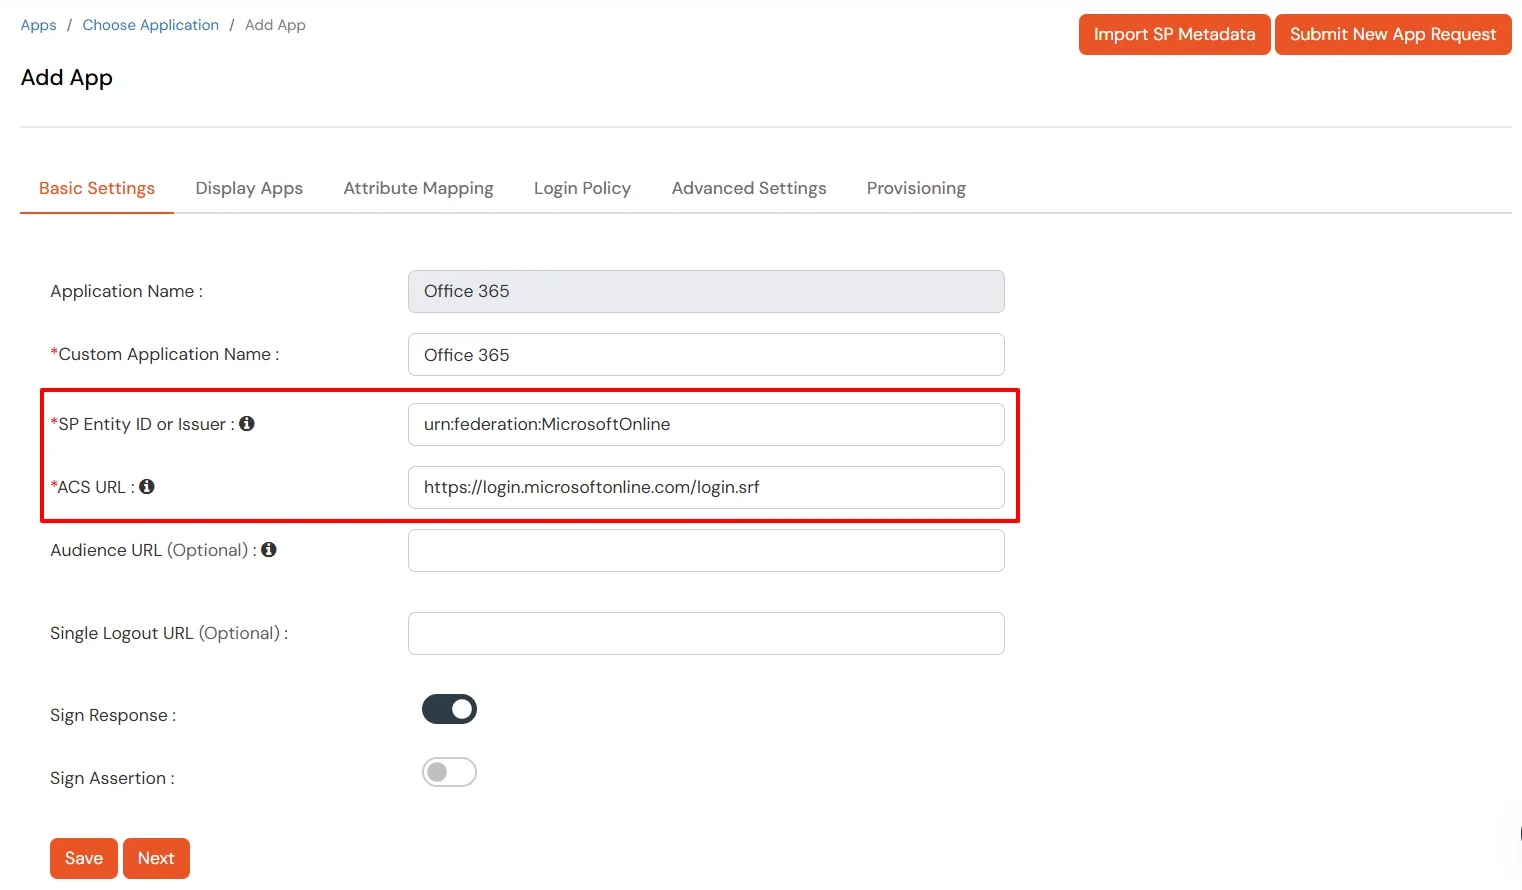
- Make sure the SP Entity ID or Issuer is: urn:federation:MicrosoftOnline
- Make sure the ACS URL is: https://login.microsoftonline.com/login.srf
- Click on Next.
-
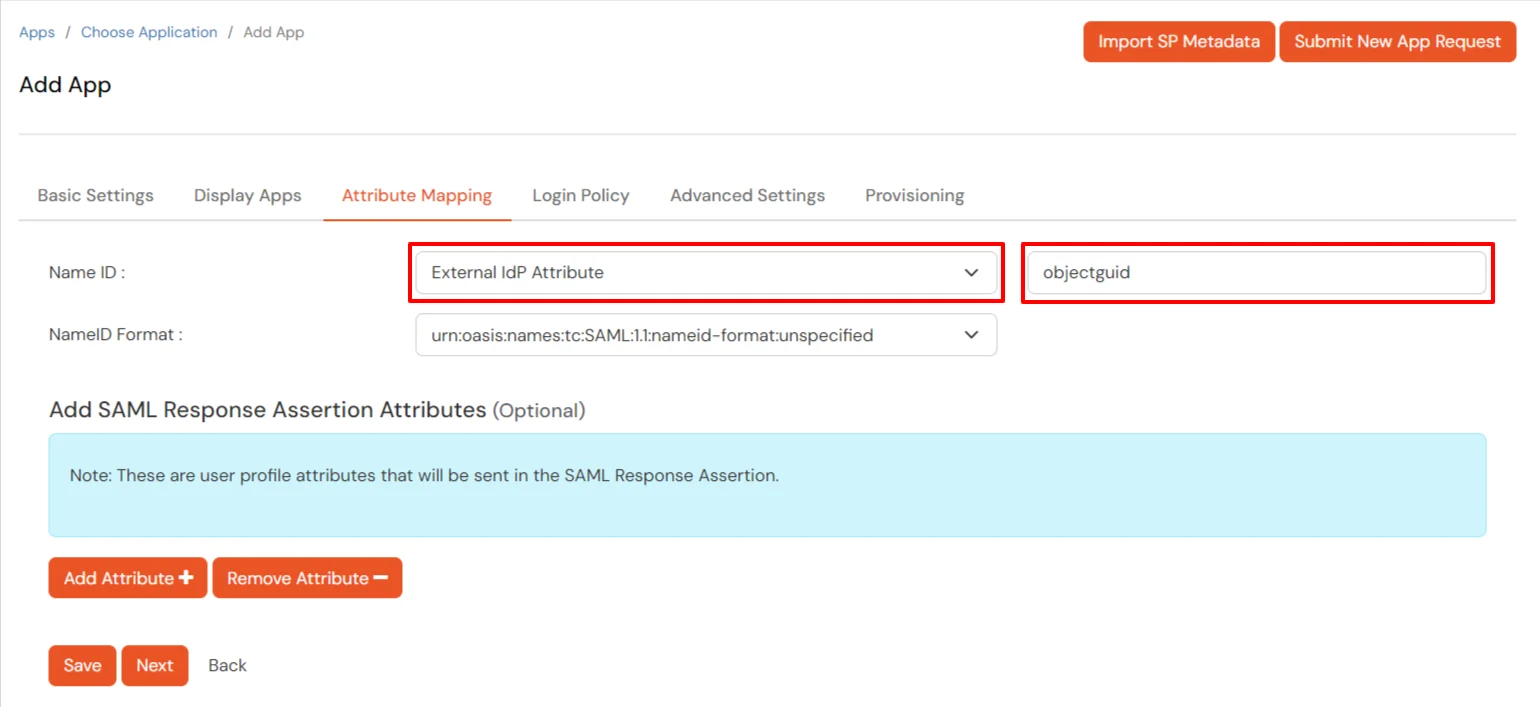
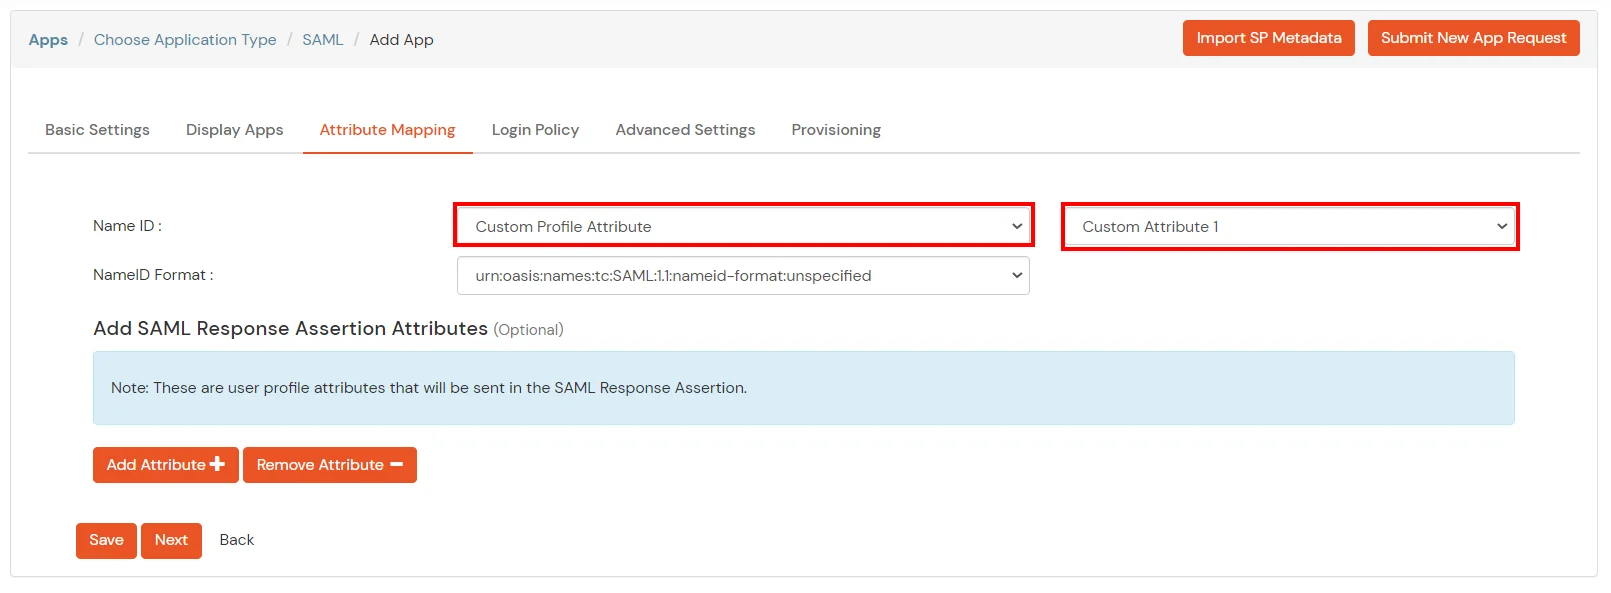
Configure Name ID based on the User Store you are using:
- Using Active Directory / miniOrange brokering service: Select External IDP Attribute from the dropdown and add objectguid in the text-box that appears.
- Using miniOrange as a User Store: Select Custom Profile Attribute and select a Custom Attribute from the drop-down.
- Set the login policy. You can choose to enable 2FA for login or have users login using a standard username-password.
- Click on Save to configure Office 365.
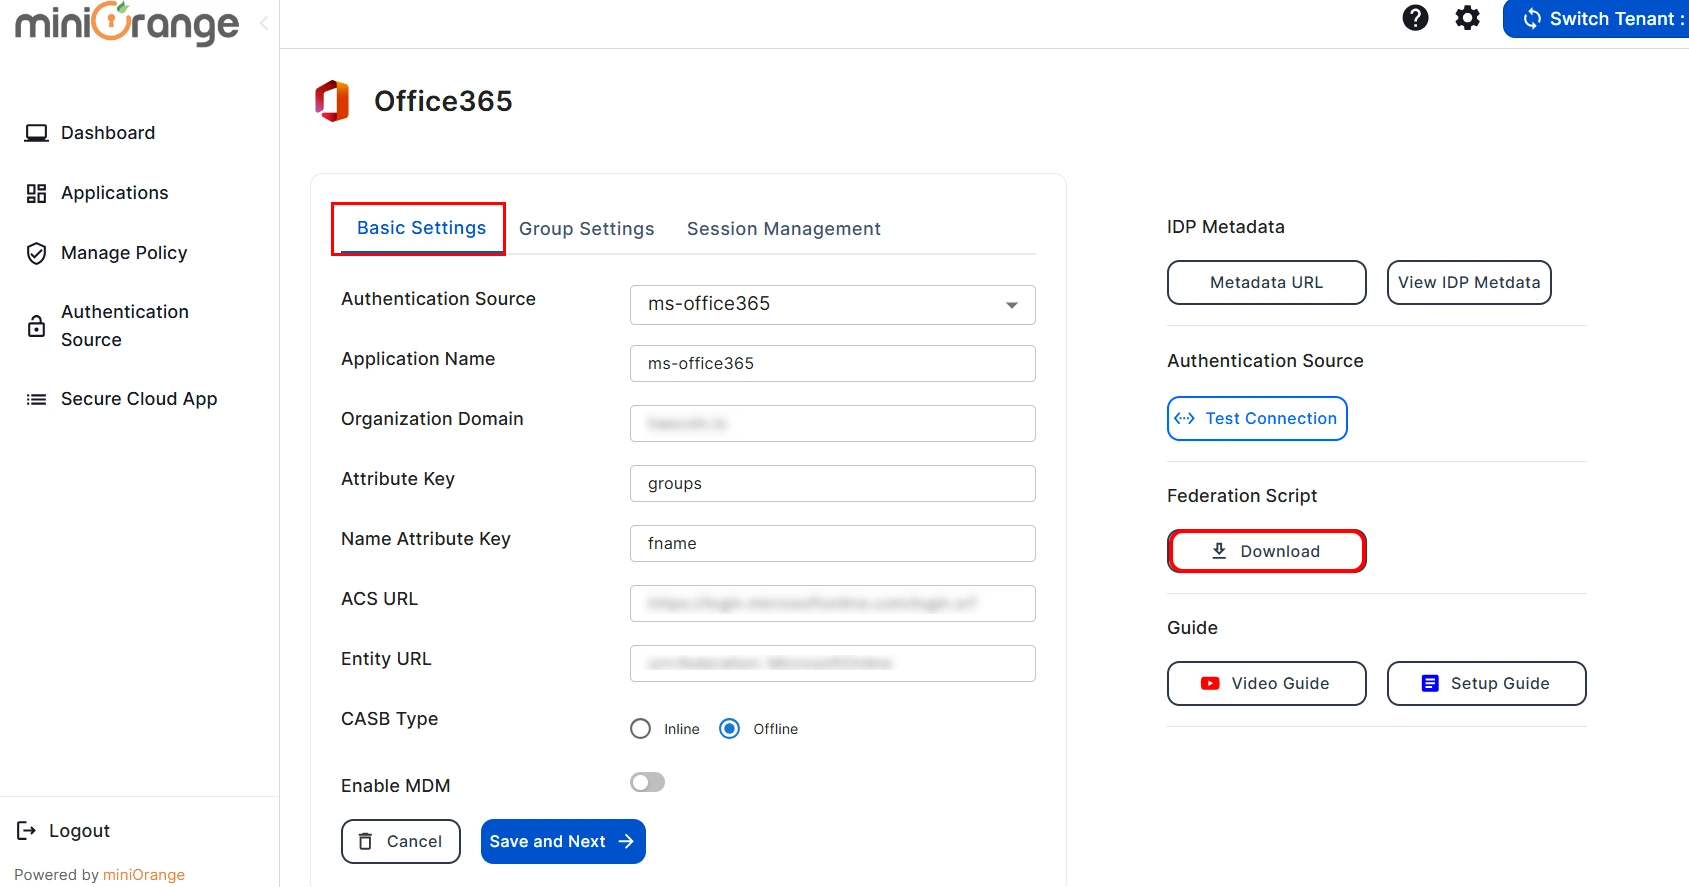
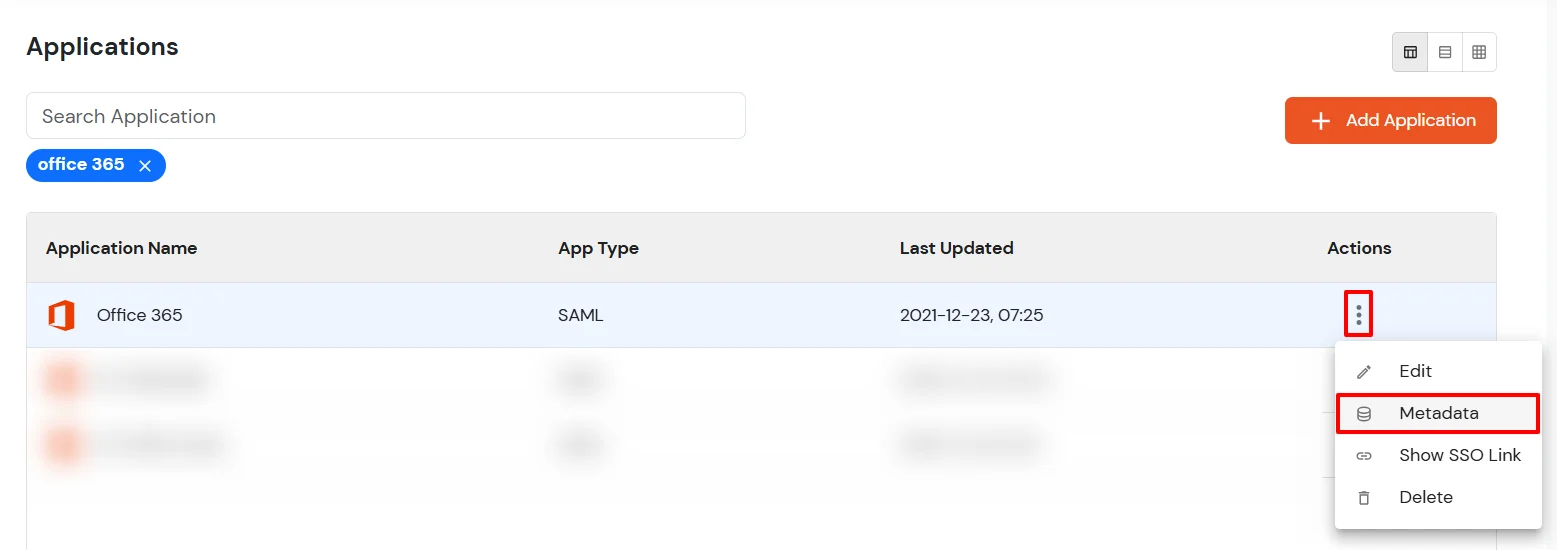
3. Configure Microsoft Online Services
- Click on Select dropdown and choose Metadata.
- Click on the Download Federate Domain Script button under "INFORMATION REQUIRED TO AUTHENTICATE VIA EXTERNAL IDPS"
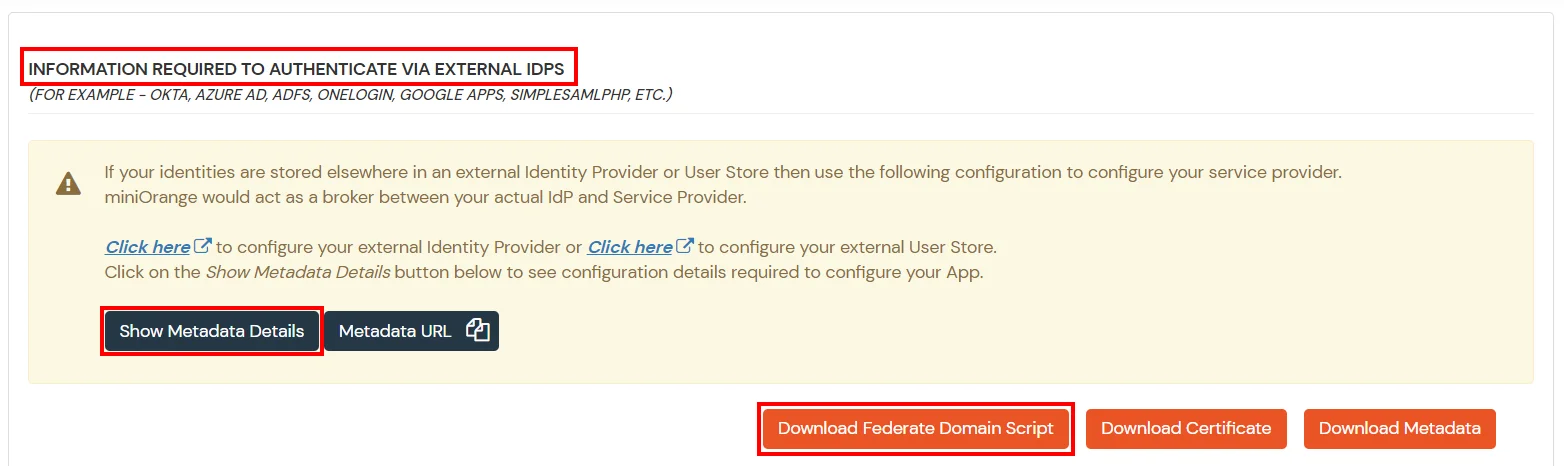
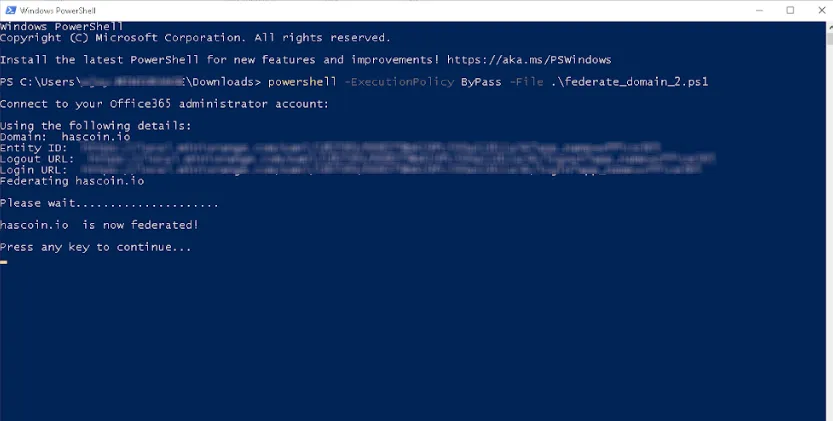
-
Enter the domain name that you want to federate and click on Download. Note: You cannot federate your default "onmicrosoft.com" domain. To federate your Office 365 tenant, you
must add a custom domain to Office 365.

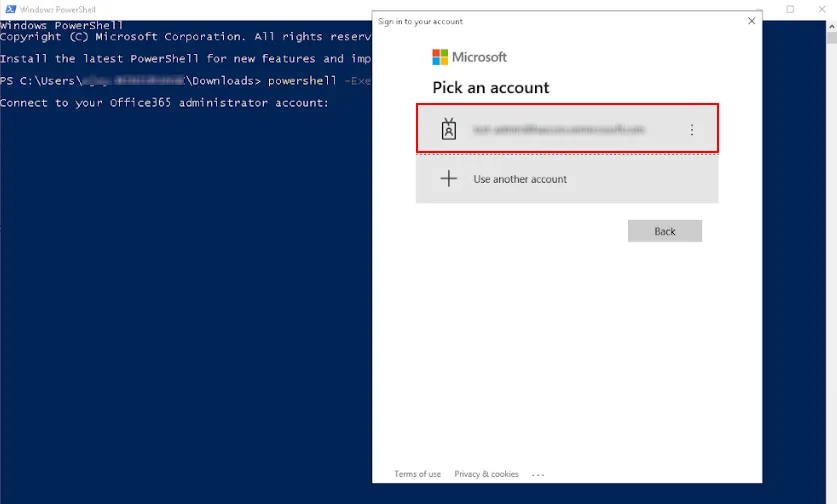
-
After downloading the script, Open PowerShell run the federate_domain script using:
cd ./Downloads powershell -ExecutionPolicy ByPass -File federate_domain.ps1
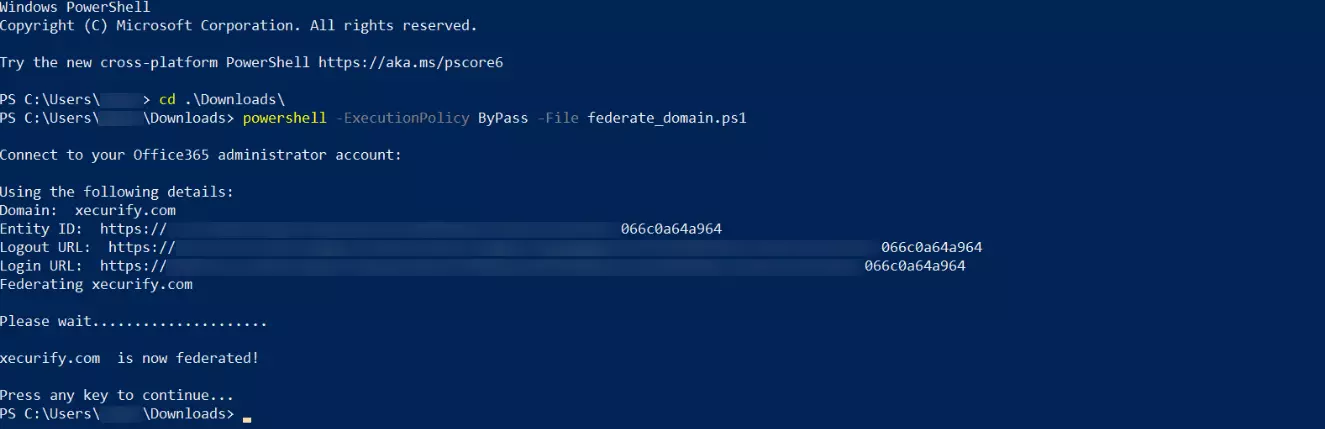
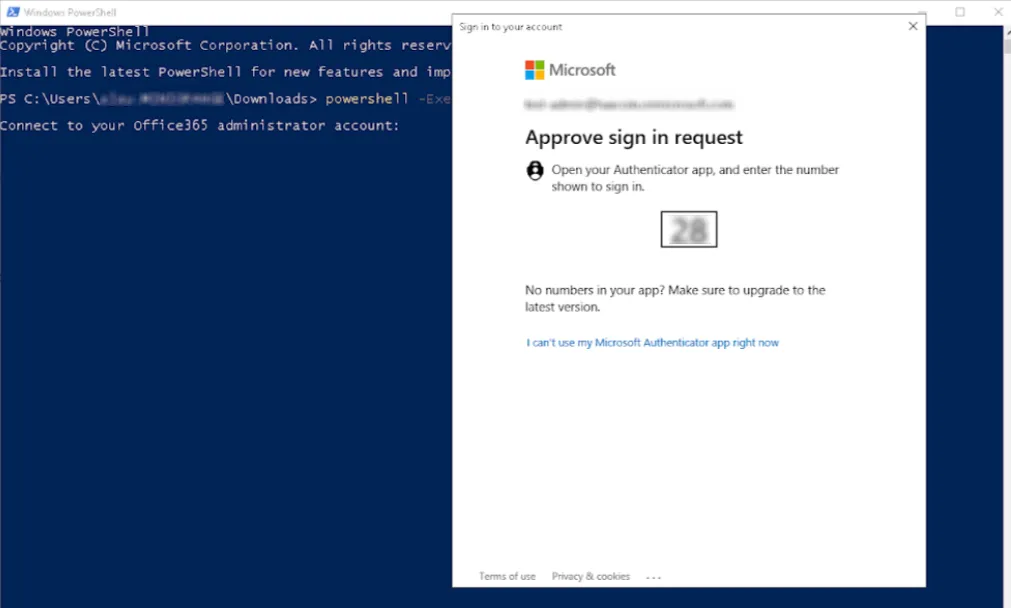
-
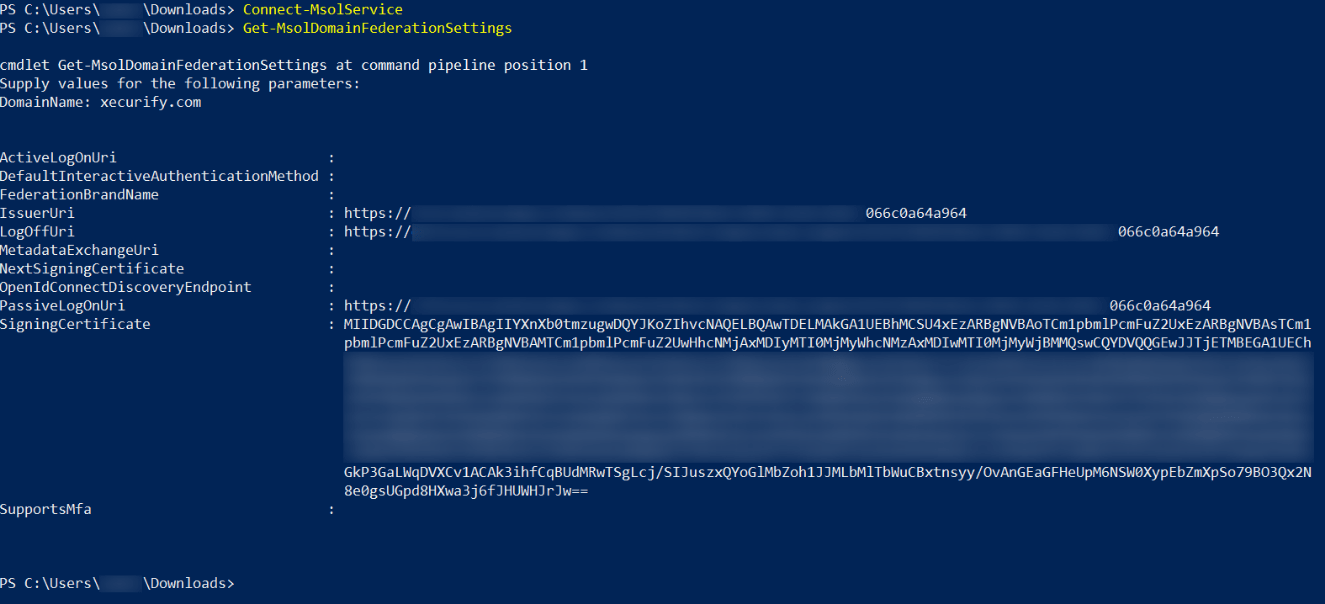
Your domain is now federated. Use the commands below to check your federation settings:
Connect-MsolService Get-MsolDomainFederationService
4. Configure Time Restriction: Restricting access by Limiting the Time Zones
In this restriction method admin configures a time zone with Start and End Time's for that time zone and users are either allowed, denied or challenged based on the condition in the policy. When an end-user tries
to login with the adaptive authentication enabled, his time zone related attributes such as Time-Zone and Current System Time are verified against the list configured by the admin and based on the configuration
the user is either allowed, denied or challenged.
You can configure Adaptive Authentication with Time Restriction in the following way:
- Go to Adaptive Authentication from the left navigation bar.
- Click on Add Policy tab.
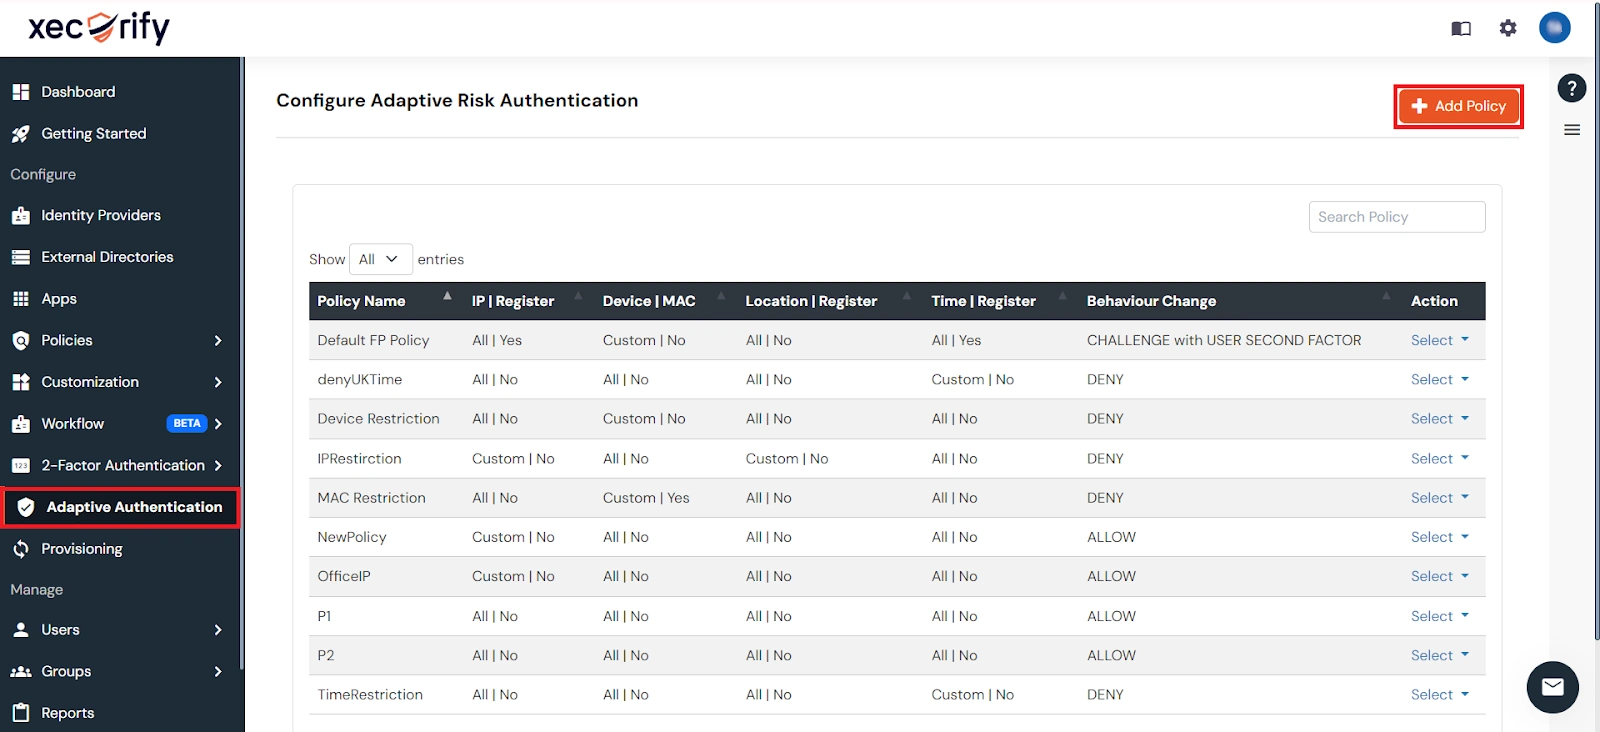
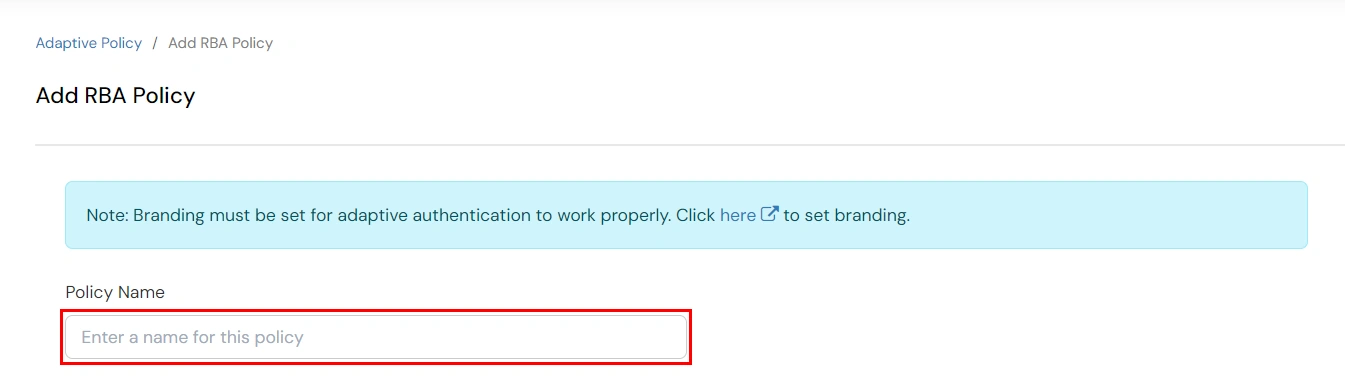
- Add a Policy Name for your Adaptive Authentication Policy.
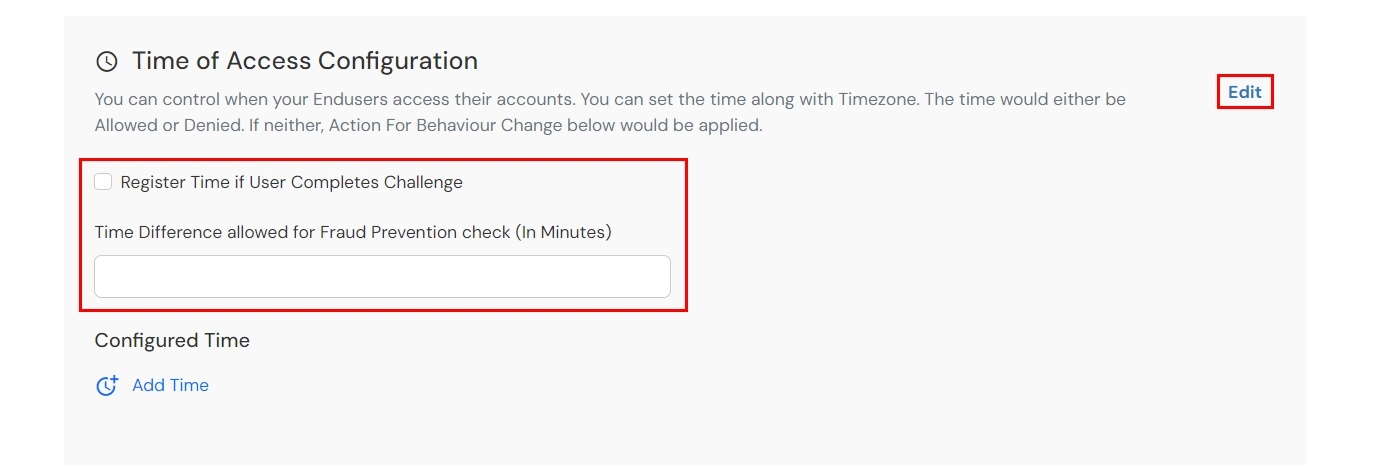
- Scroll down to Time Configuration section and click on Edit.

- Here, you can Enable Time Registration if User Completes Challenge.
-
Enter the a value in minutes in the input field of Time Difference allowed for Fraud Prevention check (In Minutes). This value allows you to specify some relaxation before your start time and after
your end time. (so if the start time is 6 AM and the end time is 6PM with a time difference value set to 30 minutes, then the policy will consider time from 5:30AM to 6:30 PM). If no value is entered in this
field, the default value is set which is 15 minutes.
-
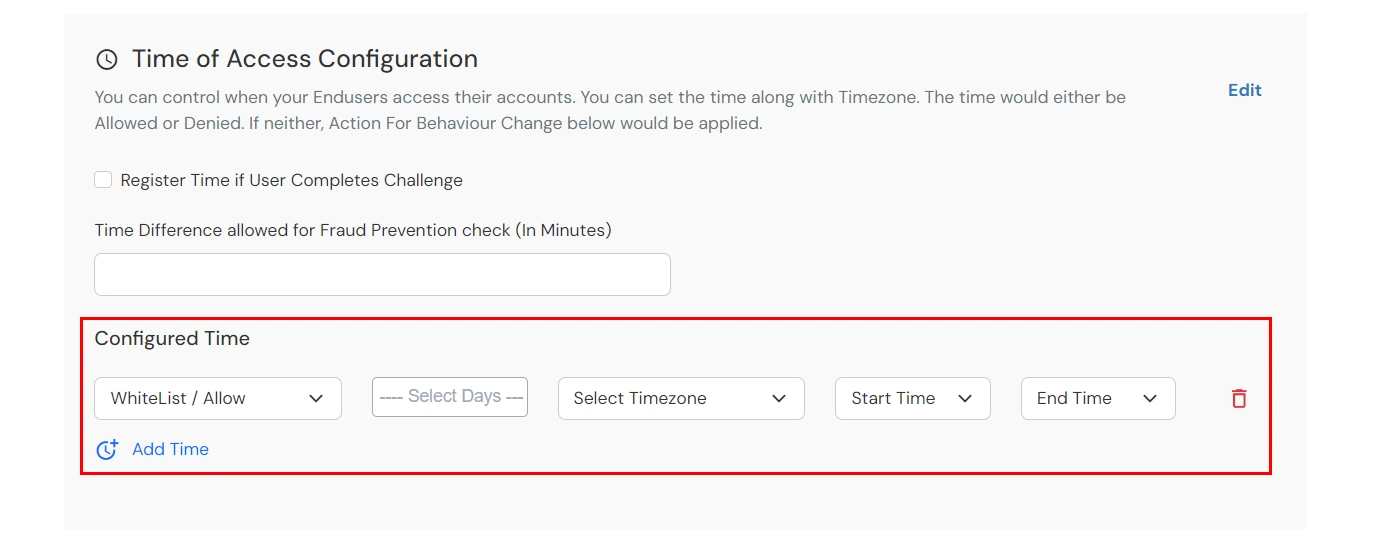
Under Configured Time, click on Add Time. Select a day/days from the Select Days dropdown. From the Select Timezone list, select the timezone. From the Start Time and
End Time lists select the appropriate values. For each Time configuration you add, you can choose to either whitelist/allow or blacklist/deny it by selecting the suitable the option.
- You can click on the Add time button to add more than one Time Configurations and then follow steps as mentioned above.
-
Now, scroll down to the Action For Behaviour Change section and click on Edit. Select the action you want to perform if the IP address is out of the range. i.e. Allow, Challenge or Deny.
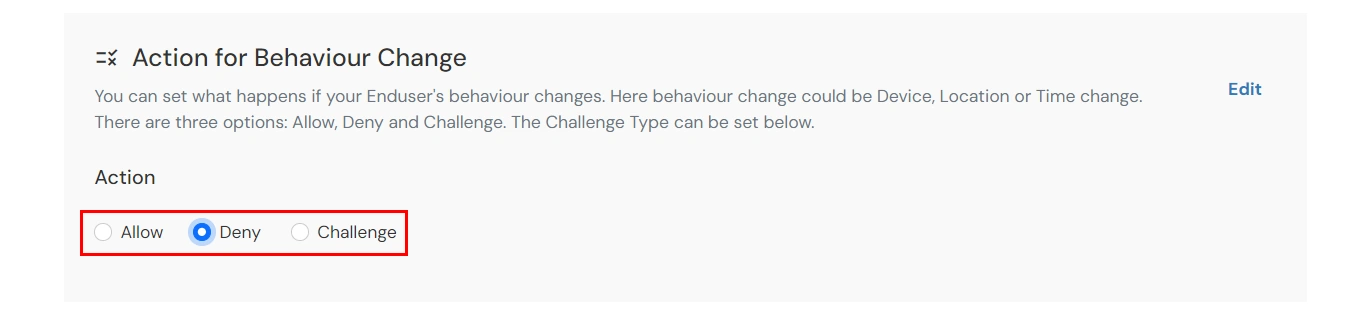
Action for behavior Change Options :
| Attribute |
Description |
| Allow |
Allow user to authenticate and use services if Adaptive authentication condition is true. |
| Challenge |
Challenge users with one of the three methods mentioned below for verifying user authenticity. |
| Deny |
Deny user authentications and access to services if Adaptive authentication condition is true. |
Challenge Type Options :
| Attribute |
Description |
| User second Factor |
The User needs to authenticate using the second factor he has opted or assigned for such as
- OTP over SMS
- PUSH Notification
- OTP over Email
- And 12 more methods.
|
| KBA (Knowledge-based authentication) |
The System will ask user for 2 of 3 questions he has configured in his Self Service Console. Only after right answer to both questions user is allowed to proceed further. |
| OTP over Alternate Email |
User will receive a OTP on the alternate email he has configured threw Self Service Console. Once user provides the correct OTP he is allowed to proceed further. |
- Scroll to the end and click on save.
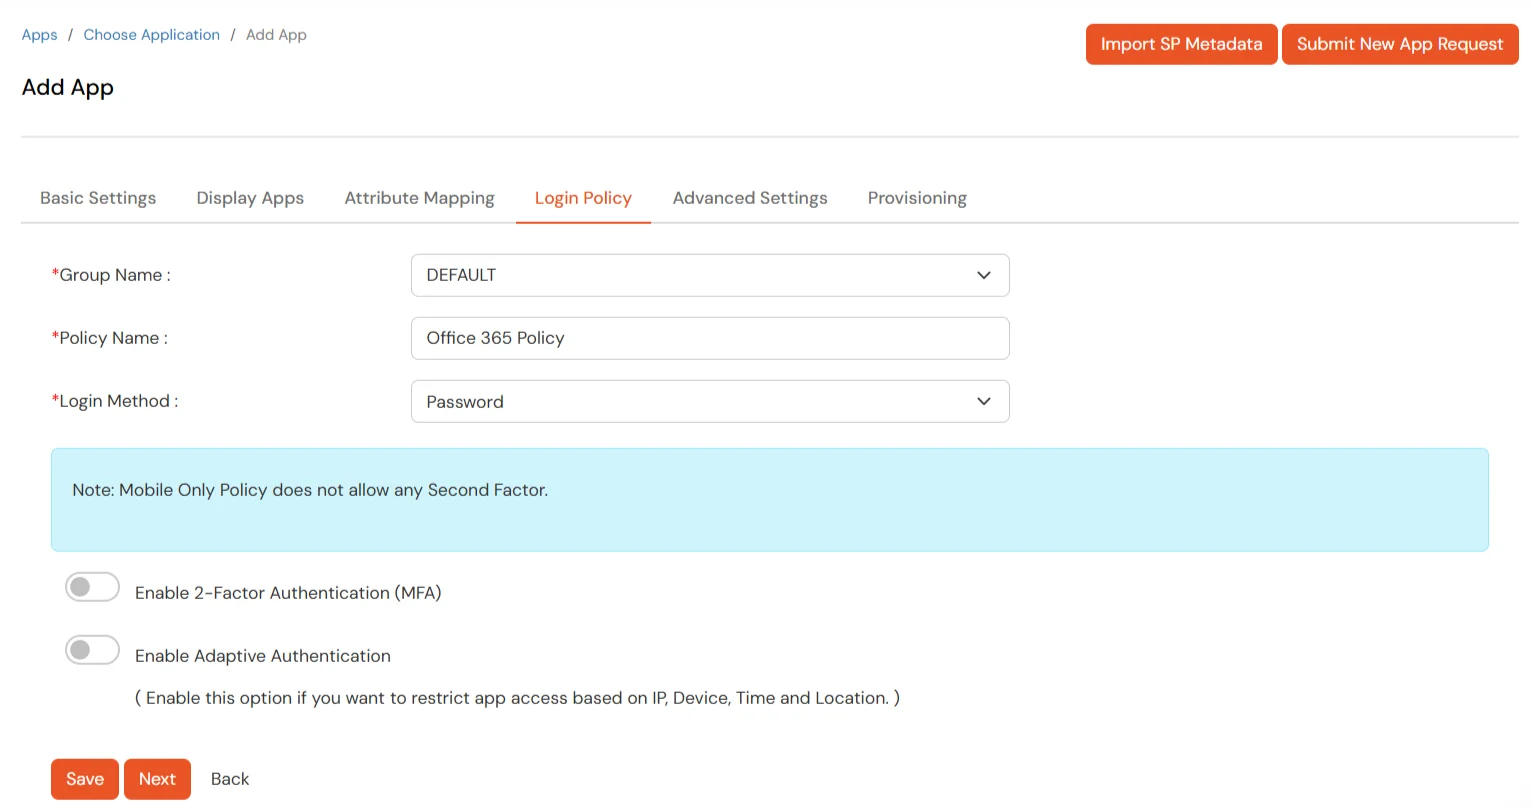
5. Enable Restriction for Office 365
- Go to Policies >> App Login Policy from the left navigation bar.
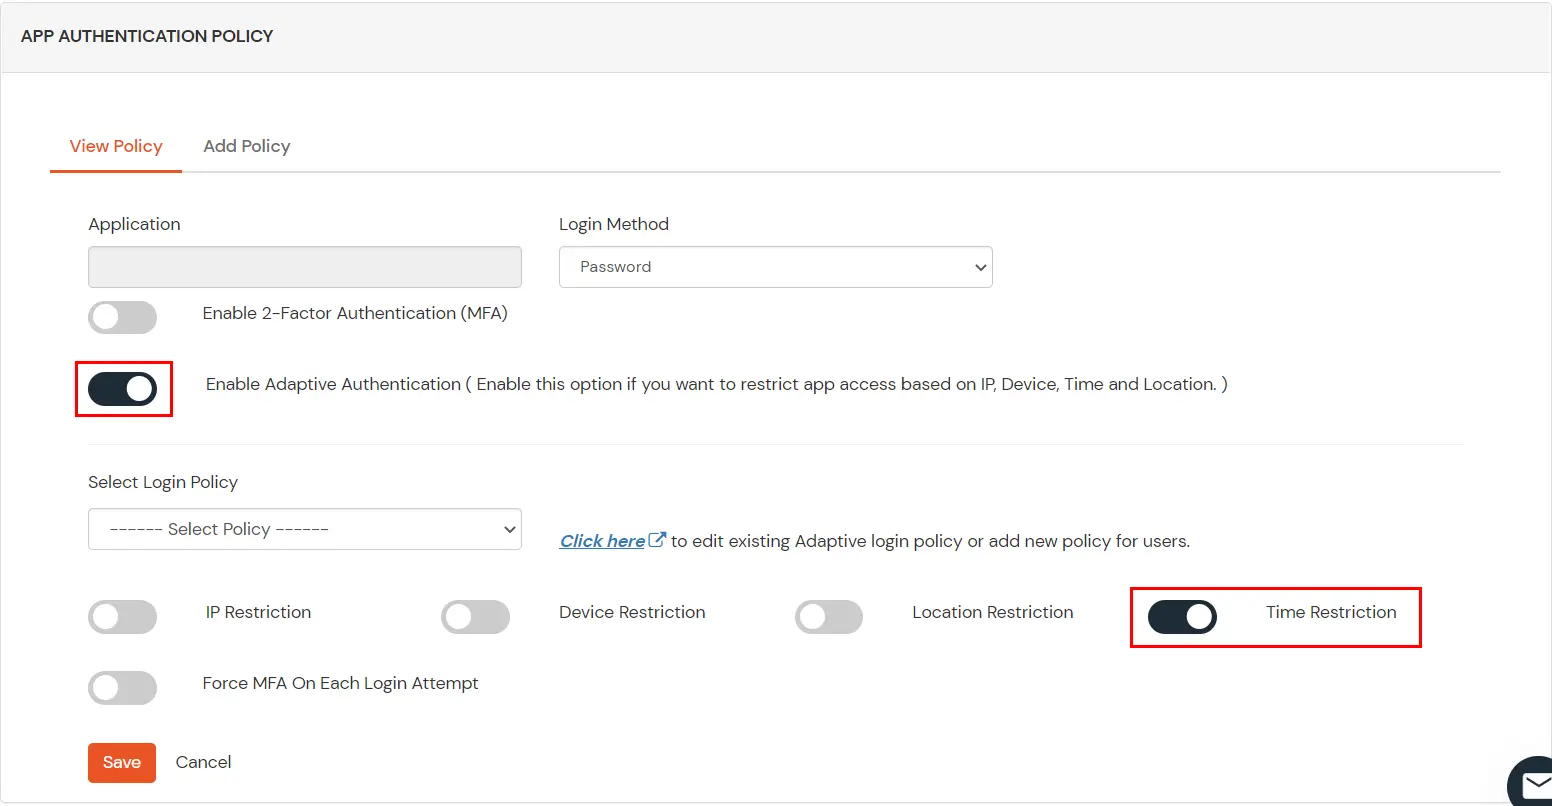
- Click on Edit option against your selected app.
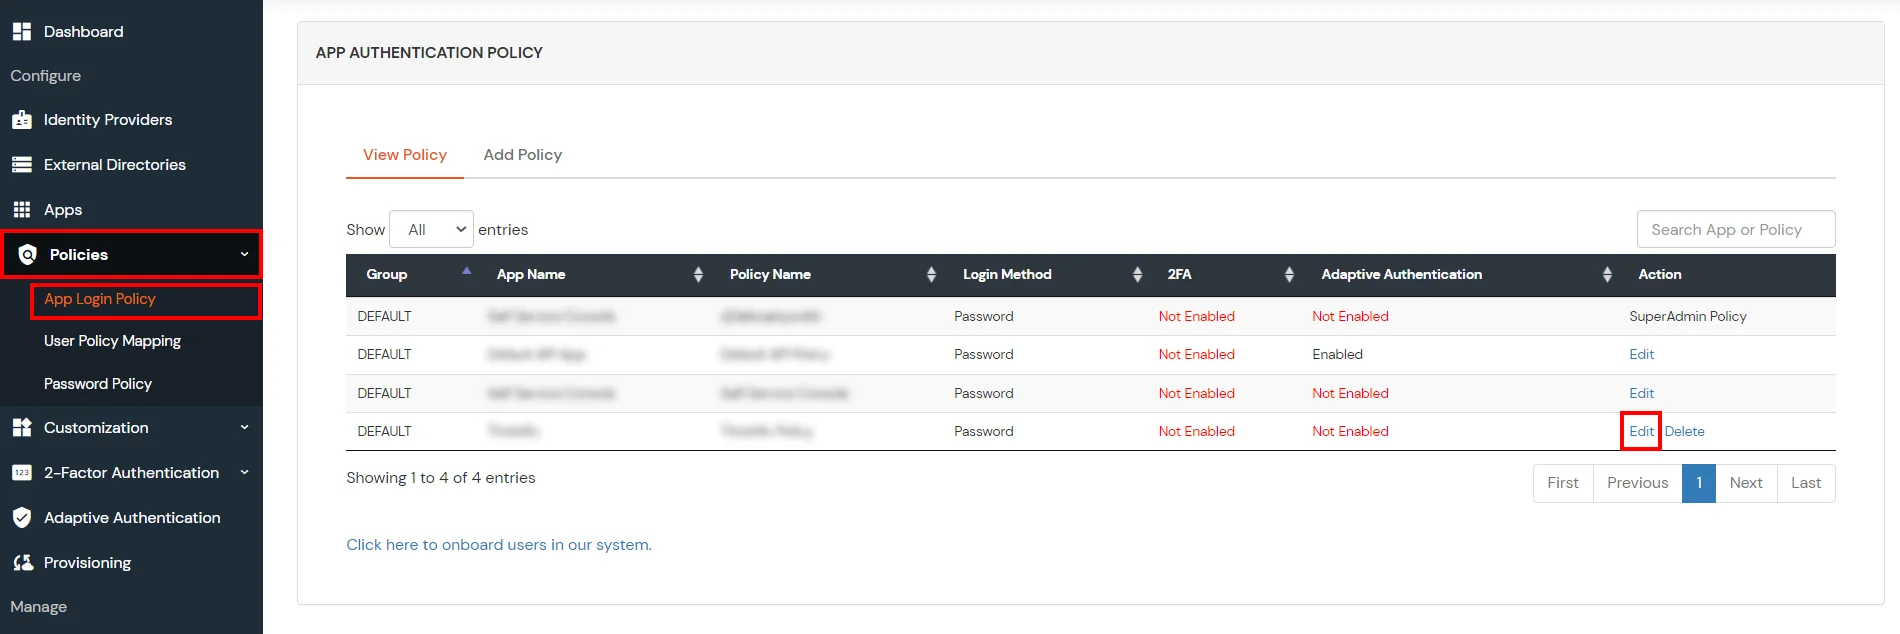
- Set your application name in the Application and select password as Login Method.
- Enable Adaptive Authentication.
- From the Select Login Policy dropdown, select the policy we created in the last step and select the required restriction method as an option.
- Click Save.
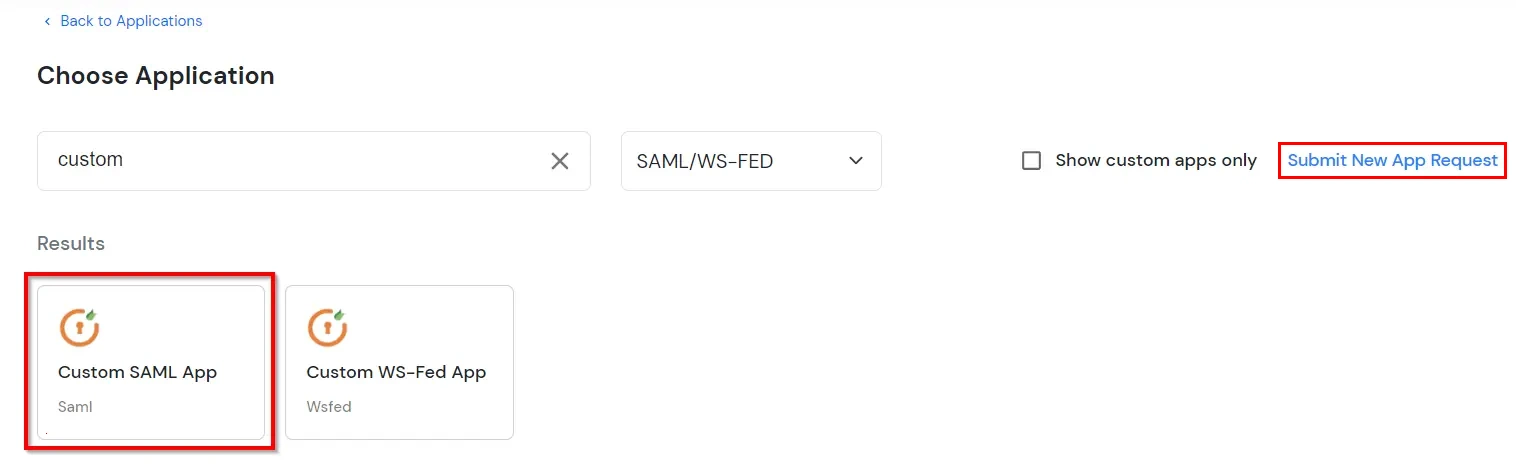
2. Configure SAML app in miniOrange
- Login into miniOrange Admin
Console.
- Go to Apps and click on Add Application button.
- Under Choose Application, select SAML/WS-FED from the All Apps dropdown.
- In the next step, search for Custom SAML App and click on it .
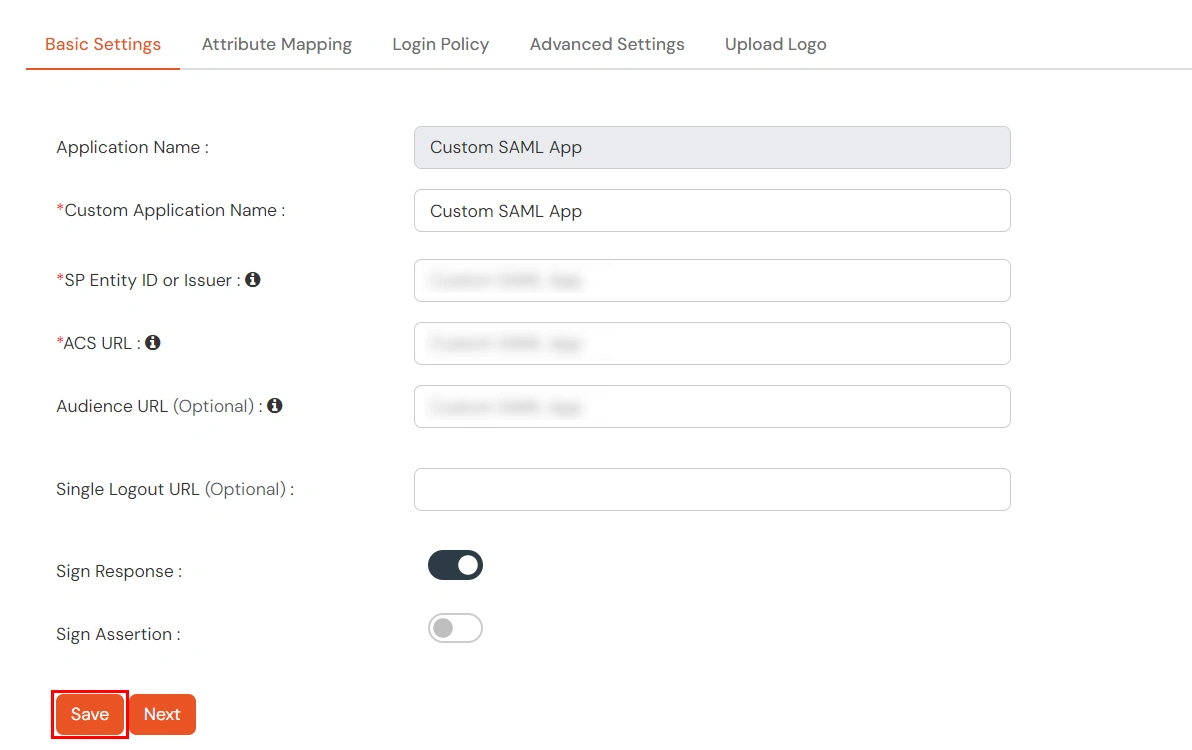
- In the Basic Settings tab, enter your desired app name and add the SP metadata
by clicking the Import SP Metadata button; you can find the metadata in the authentication source tab in CASB.

- Once done, click on Save button.
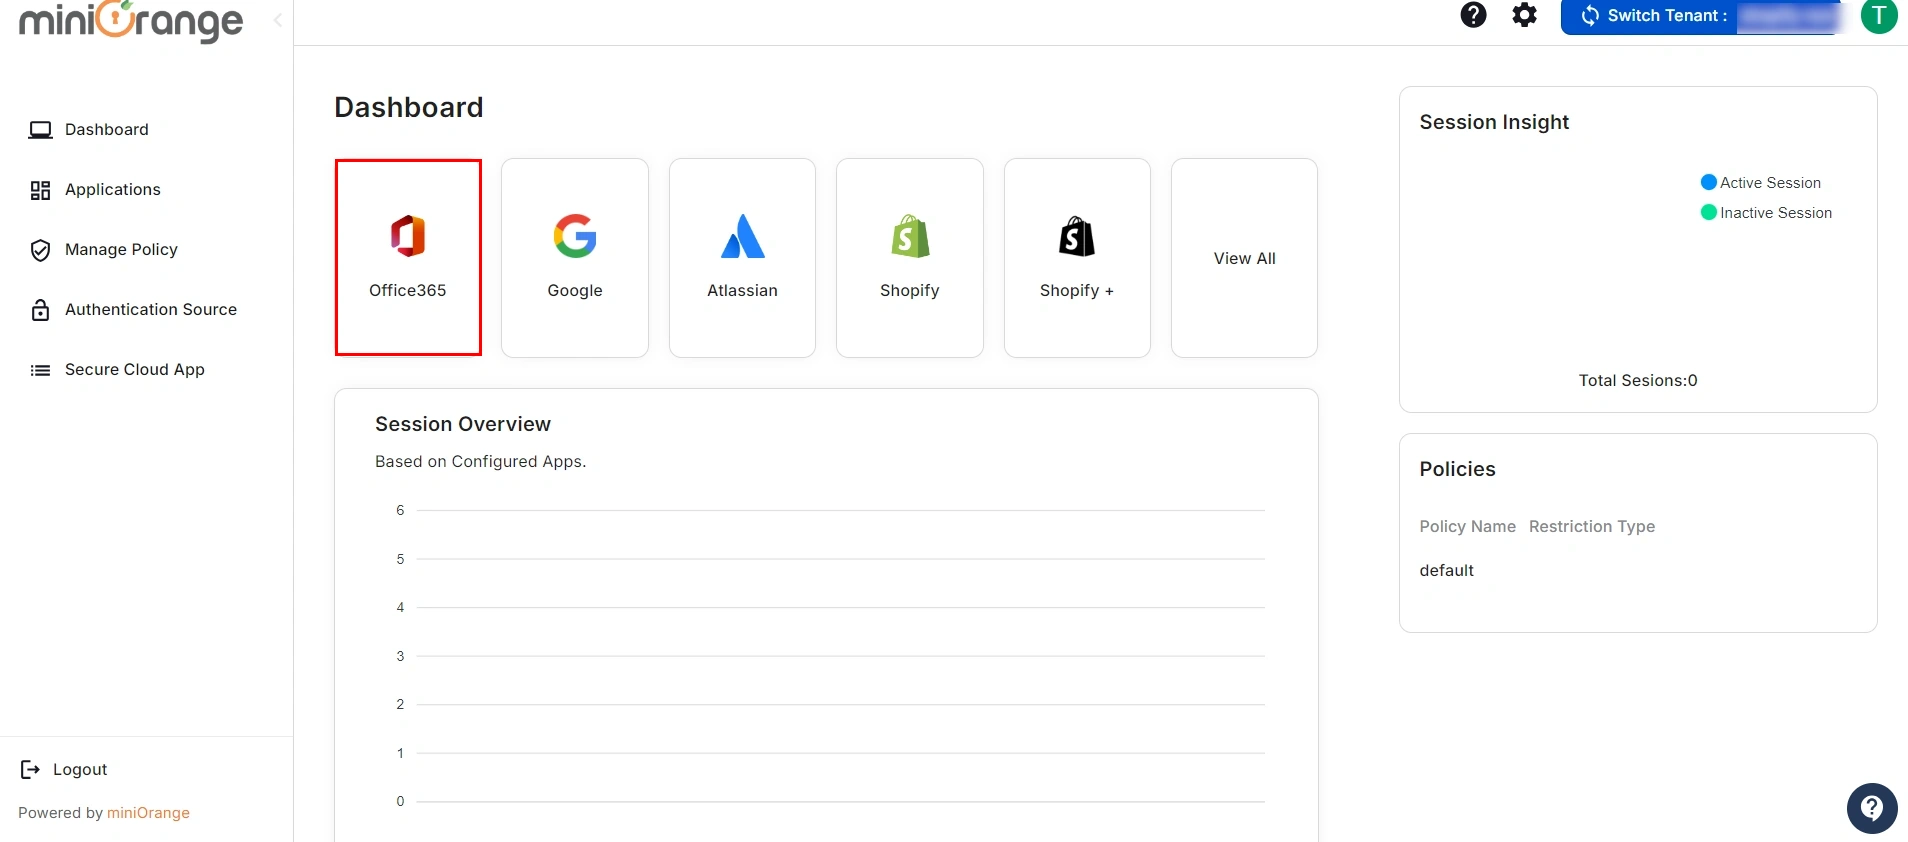
- Now, go to miniOrange CASB dashboard by clicking here.

- After signing in, you should be taken to the miniOrange dashboard page. Locate the
"Office365"
tab and click on the Add App button.
- Select the Add Authentication Source option from the drop-down menu.
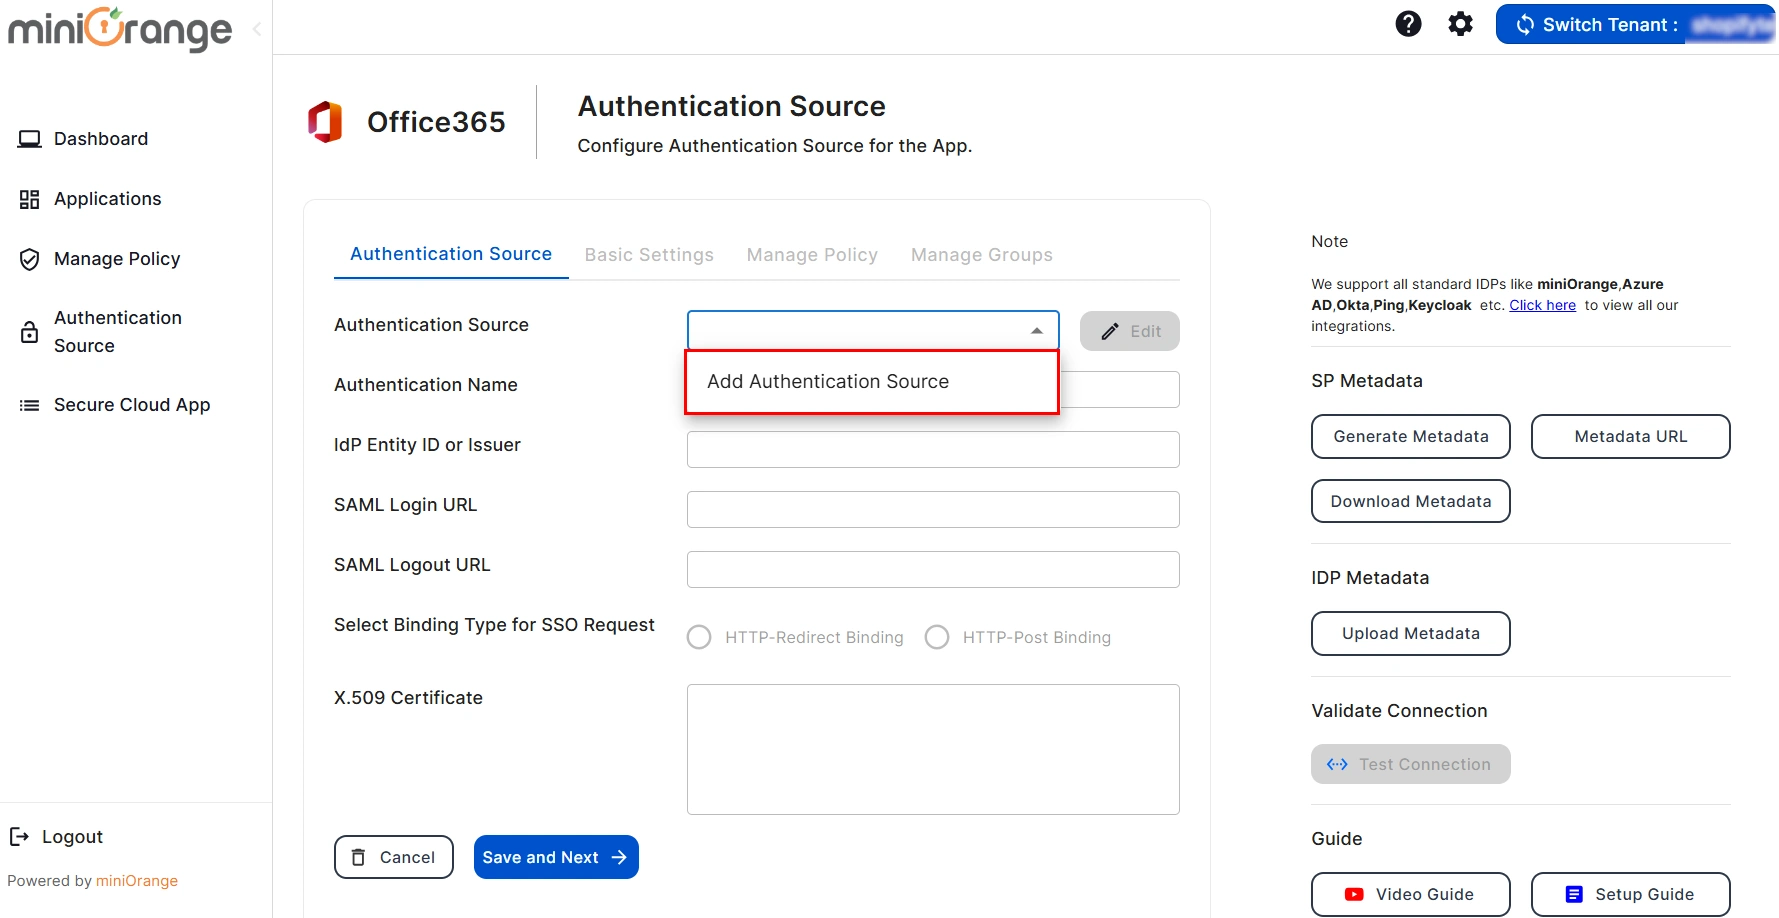
- Mention an Authentication name for the authentication source, and click on
Generate
Metadata.
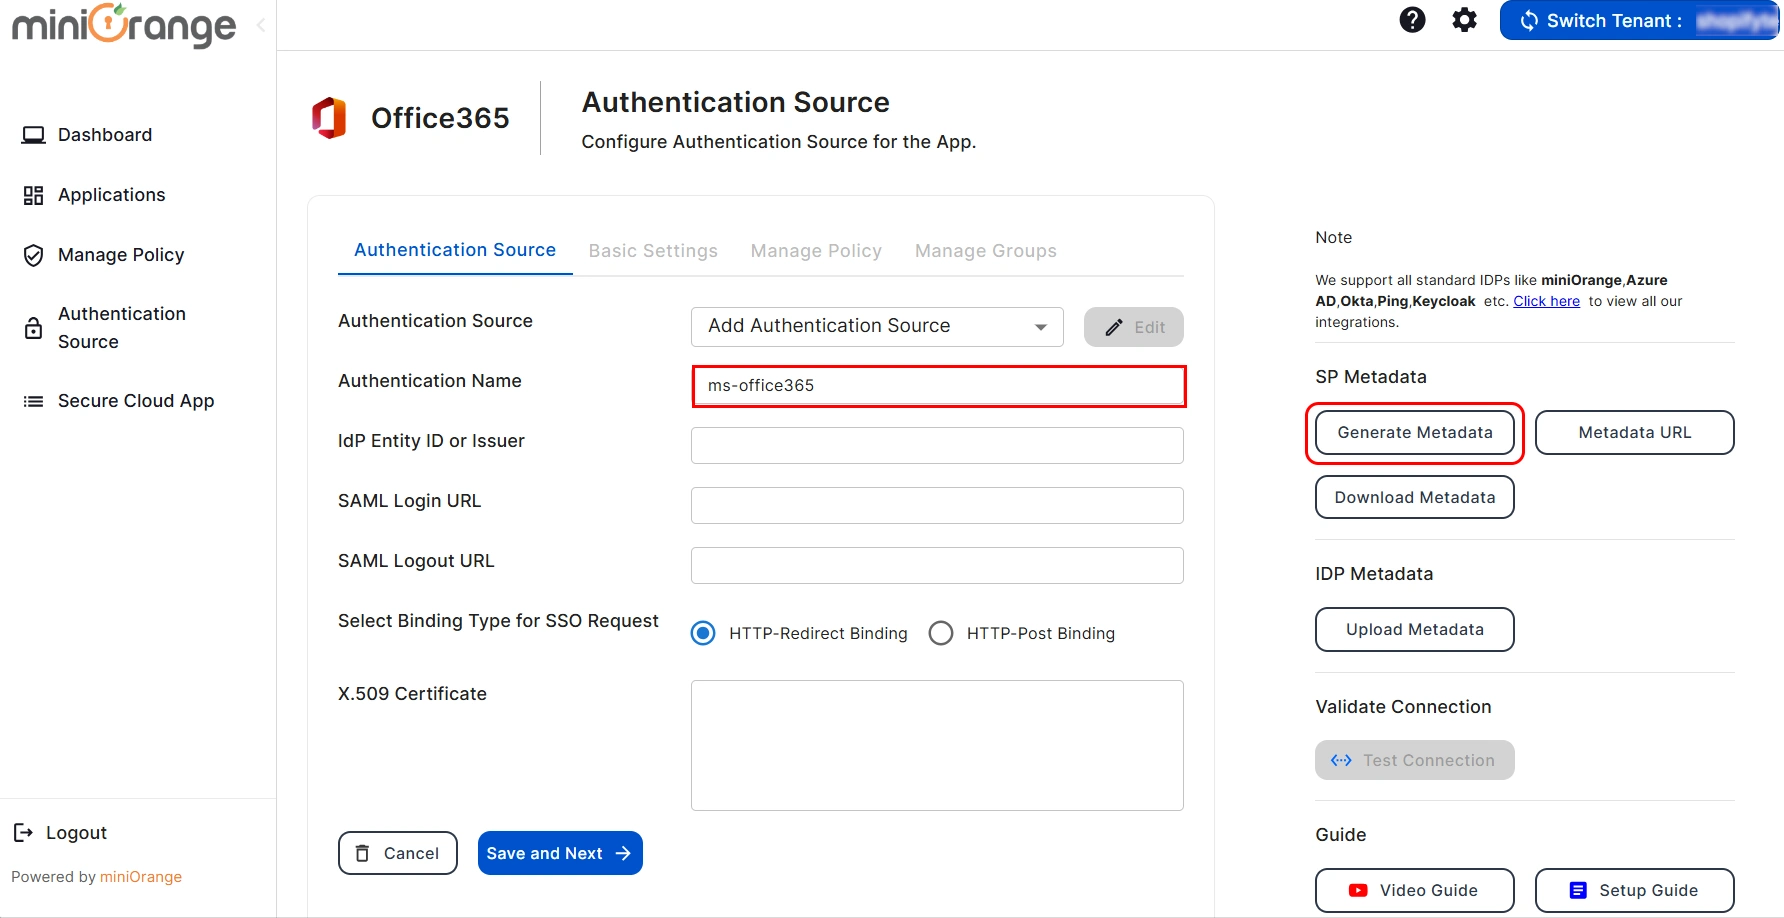
- After clicking on Generate Metadata, you will get the metadata details,
as shown in the image
below. Use this data to configure the SAML application in your Identity Provider
(IDP).
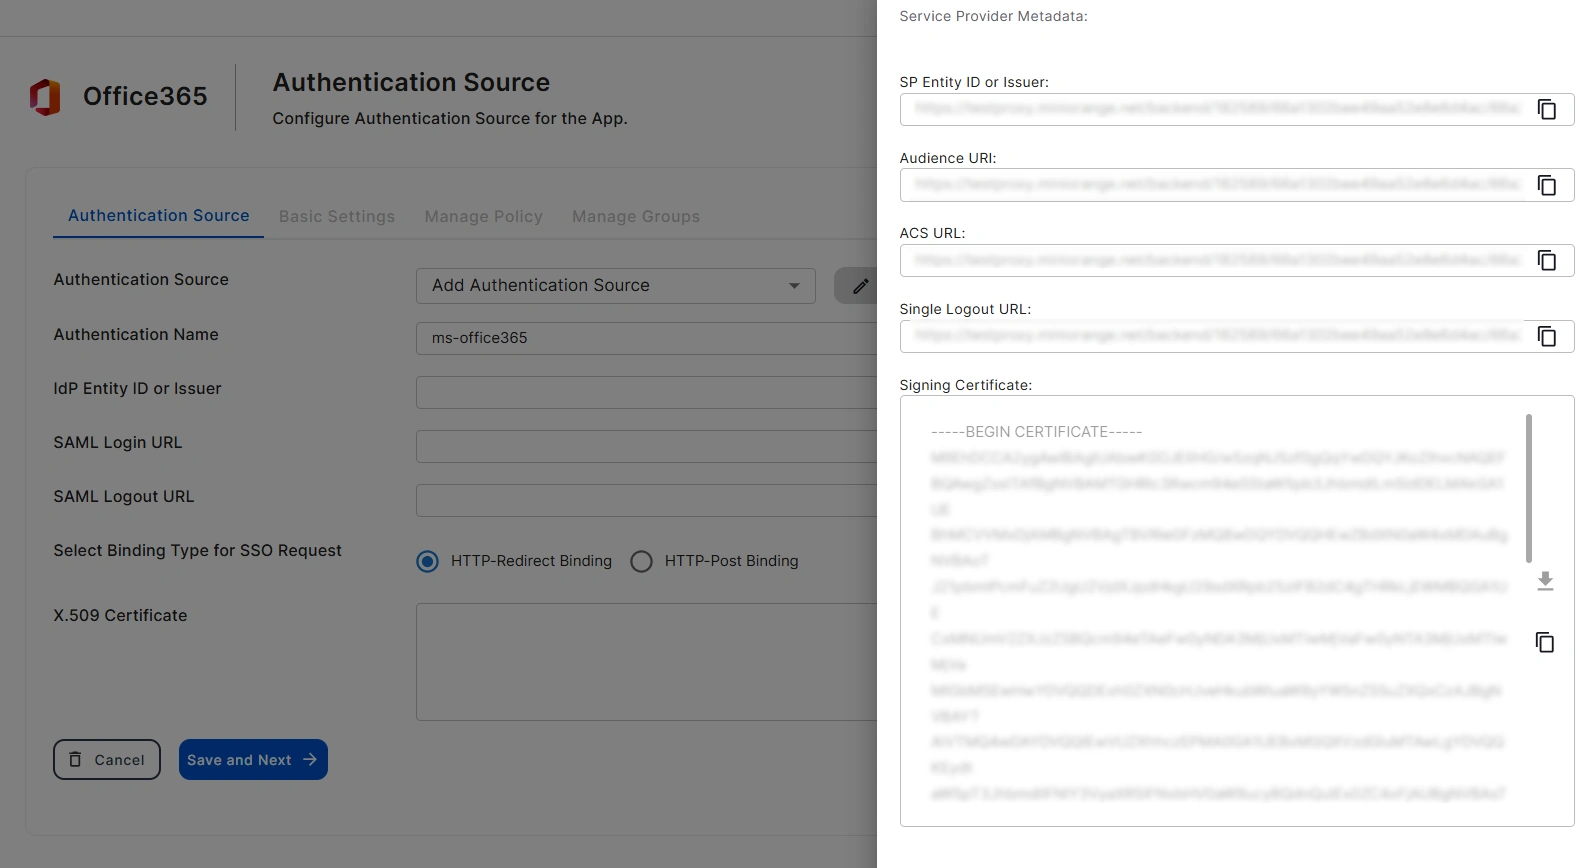
- If you would like to view the metadata details again, then you can click on the View
Metadata
button.
- You can obtain the required IDP metadata from the saml app you configured using the
miniorange
identity provider.
- Now, Enter the remaining details like the IDP Entity ID, SAML Login URL,
SAML Logout
URL, and X.509 Certificate which you will find in your Identity
Provider
metadata.
- Once done, Choose the Binding Type for SSO Request as required. You will find this
information in the
IDP metadata. However, if you are not sure, please select the HTTP-Redirect Binding
as the
default configuration.
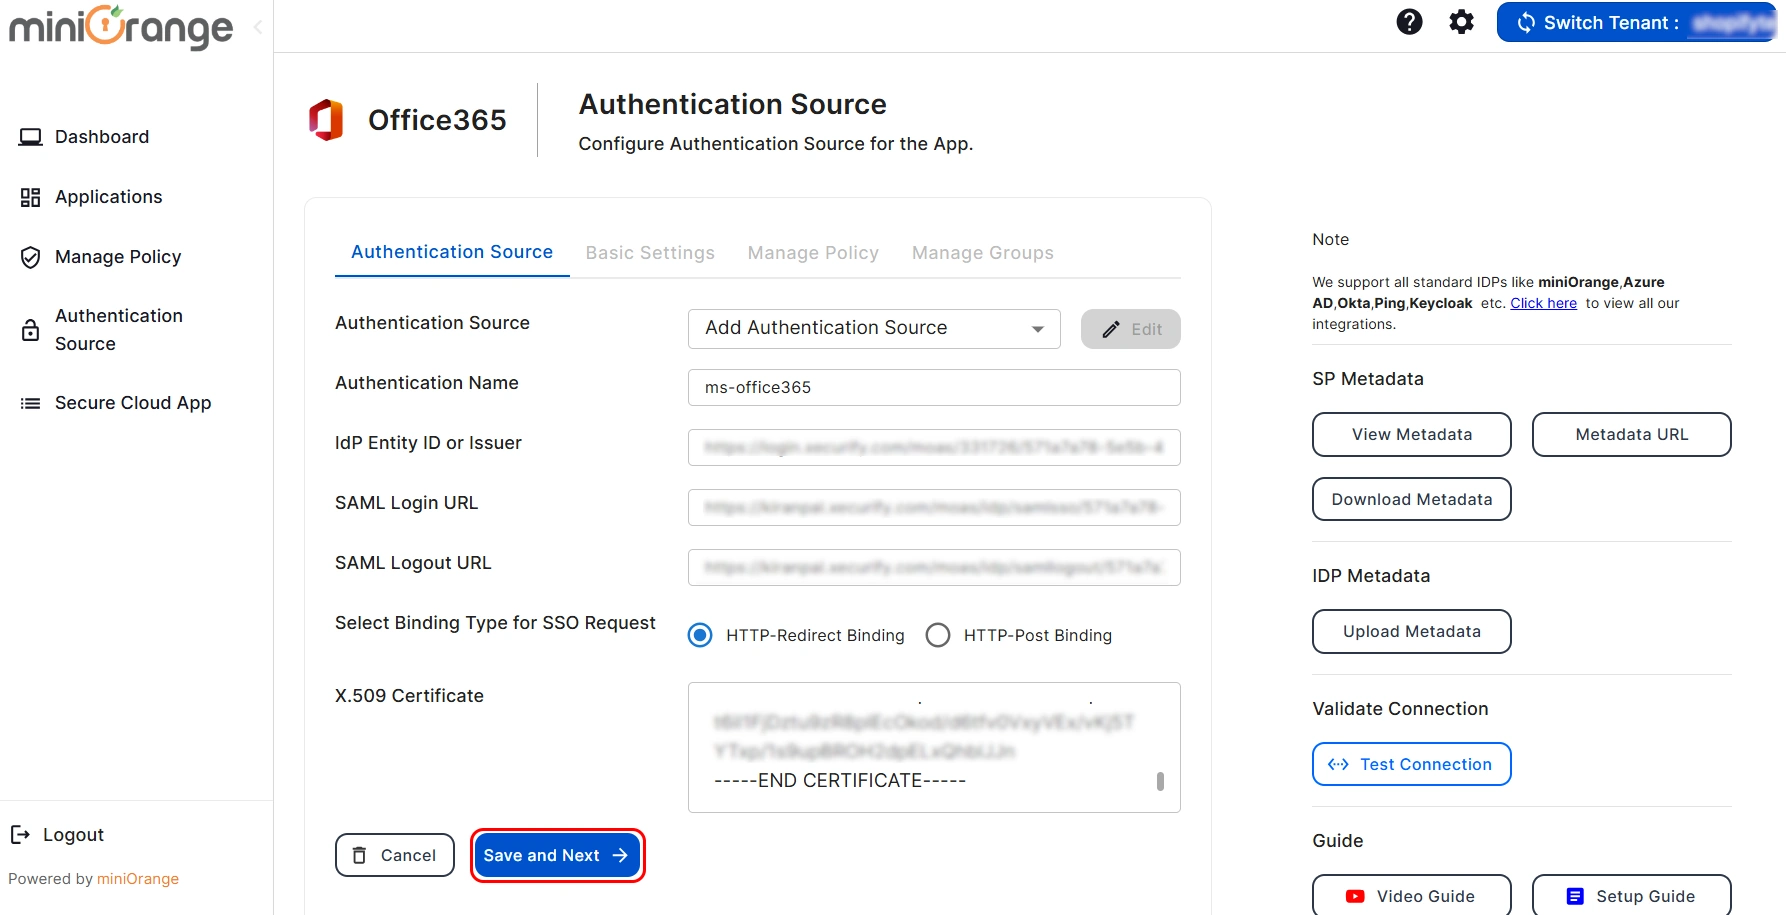
- Click the Save & Next button once you have filled out all the details.
- Now, You will be redirected to the Basic Settings section.
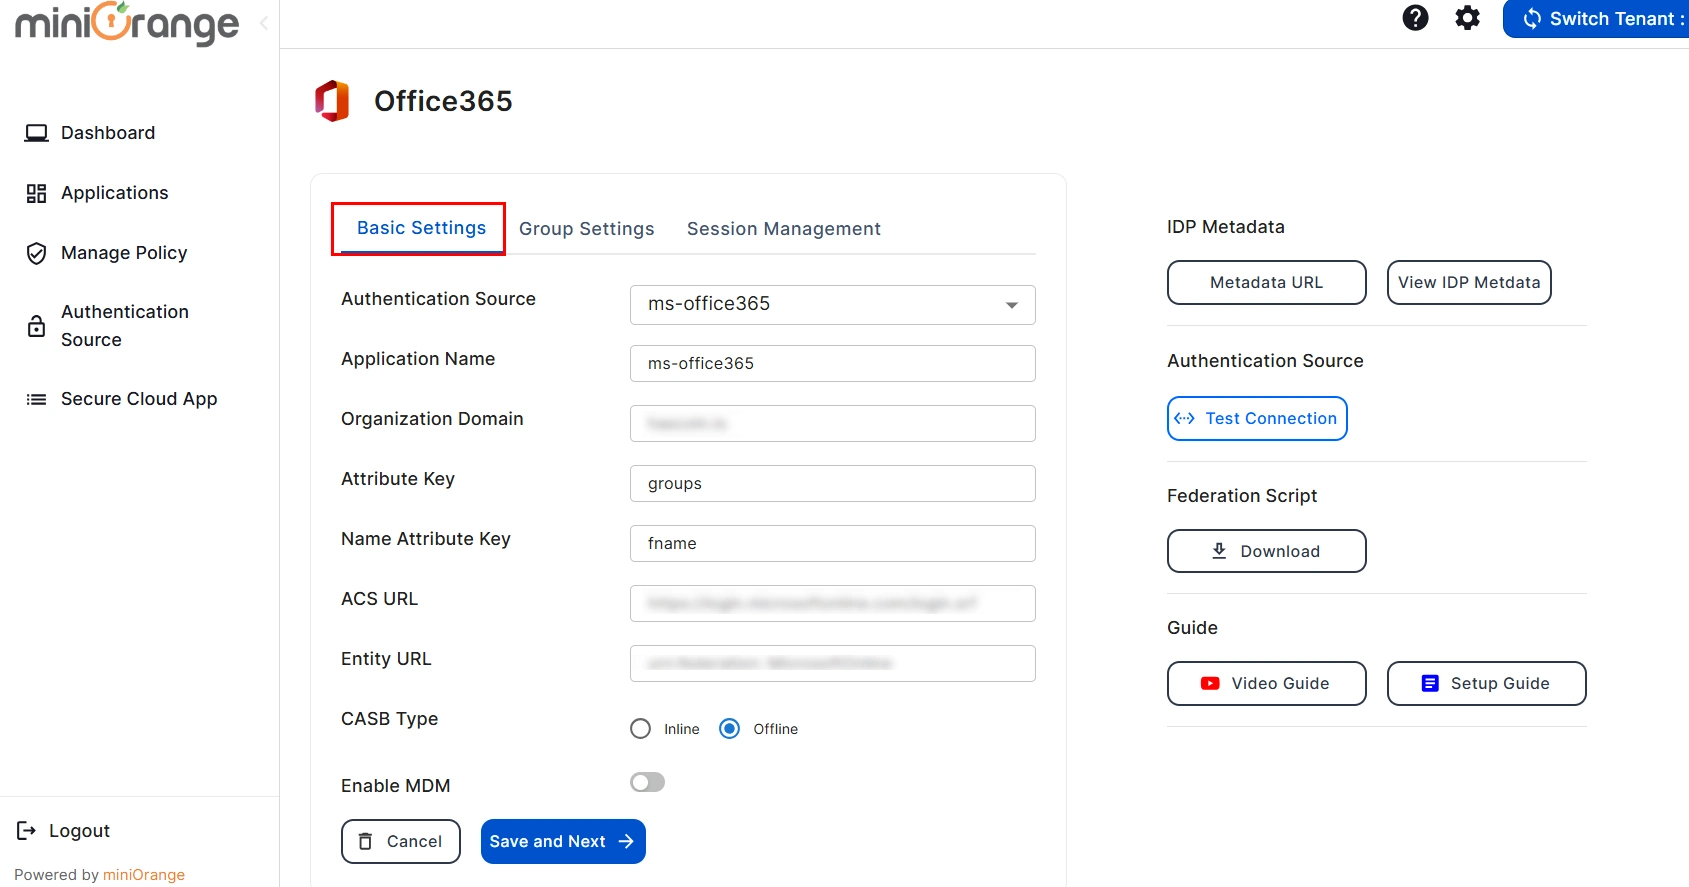
- Fill in the following details to configure the Office365 Application:
| Application Name: |
Enter the name of your application |
| Organization Domain: |
Enter the domain of your organization on Shopify. (Ex: example.com)
|
| Attribute Key: |
Enter the Group Attribute Key for the SSO app, which you have configured in
the IDP under
the SAML attributes section.
|
| Name Attribute Key: |
Enter the attribute name like fname,Lname etc.
|
| Enter ACS URL: |
Enter the office365 ACS URL as : https://login.microsoftonline.com/login.srf
|
| Enter Entity URL: |
Enter the office365 Entity URL as : urn:federation:MicrosoftOnline |
| CASB Type |
Select CASB type as Offline |
| Enable MDM |
If you want to configure MDM on your device, enable it |
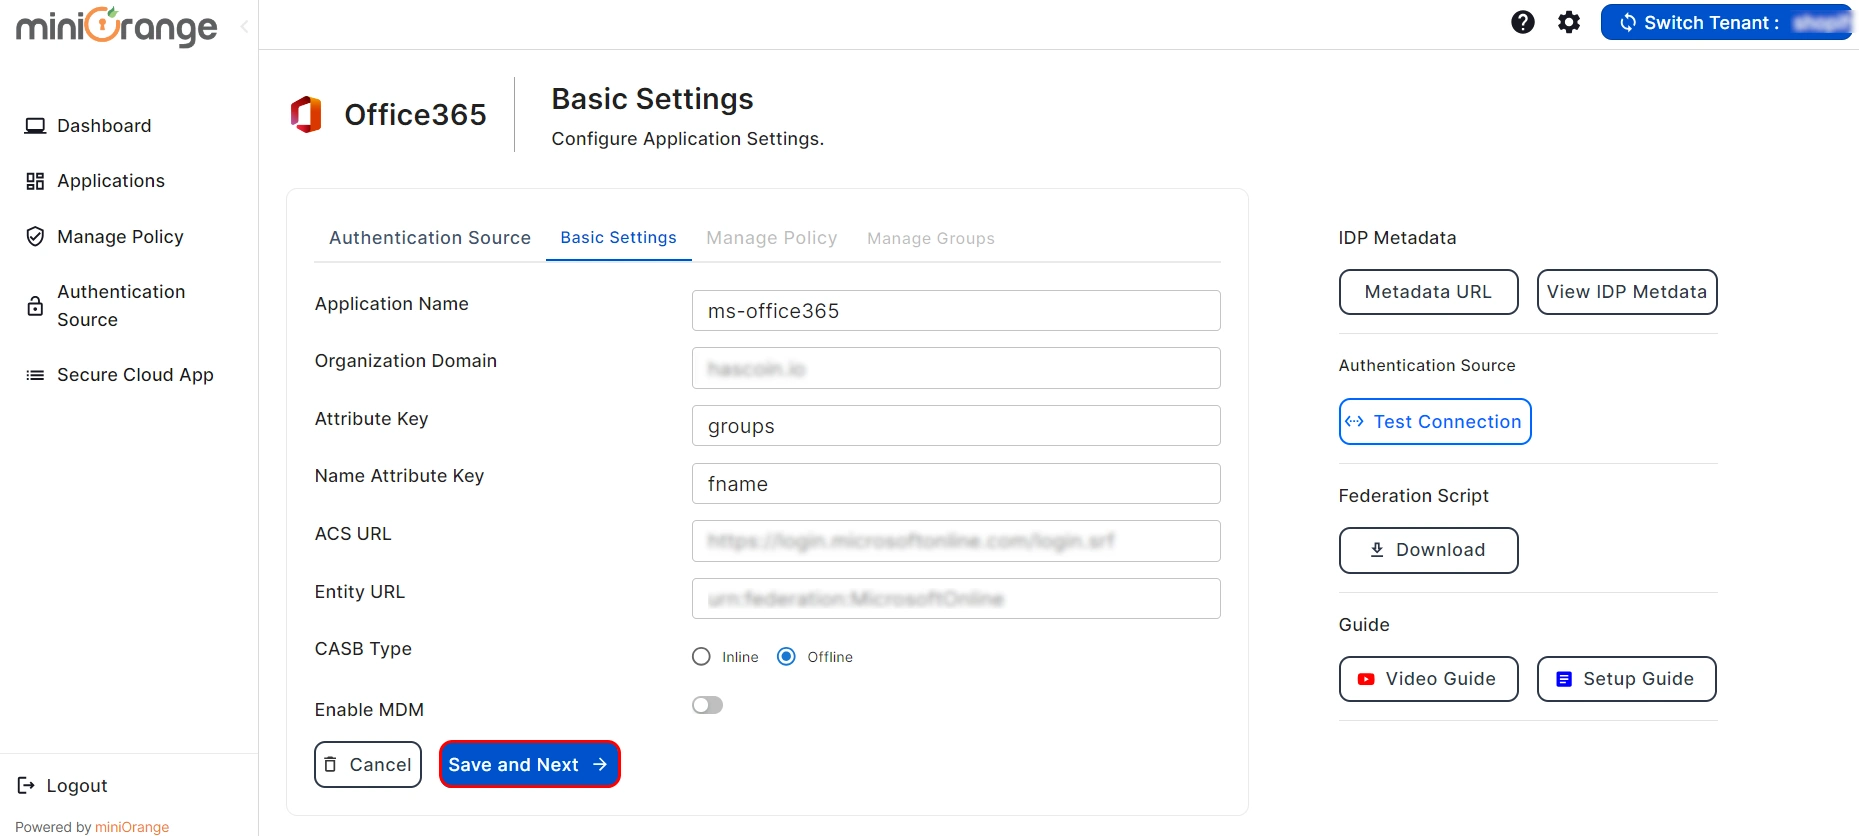
- Once done, click on Save & Next to save your changes.
3.
Configuring Policy
Let’s see how to configure policies for Office365 CASB.
- You should be taken to the Manage Policy screen. Enter your policy details, like
Policy
Name and Policy Description.
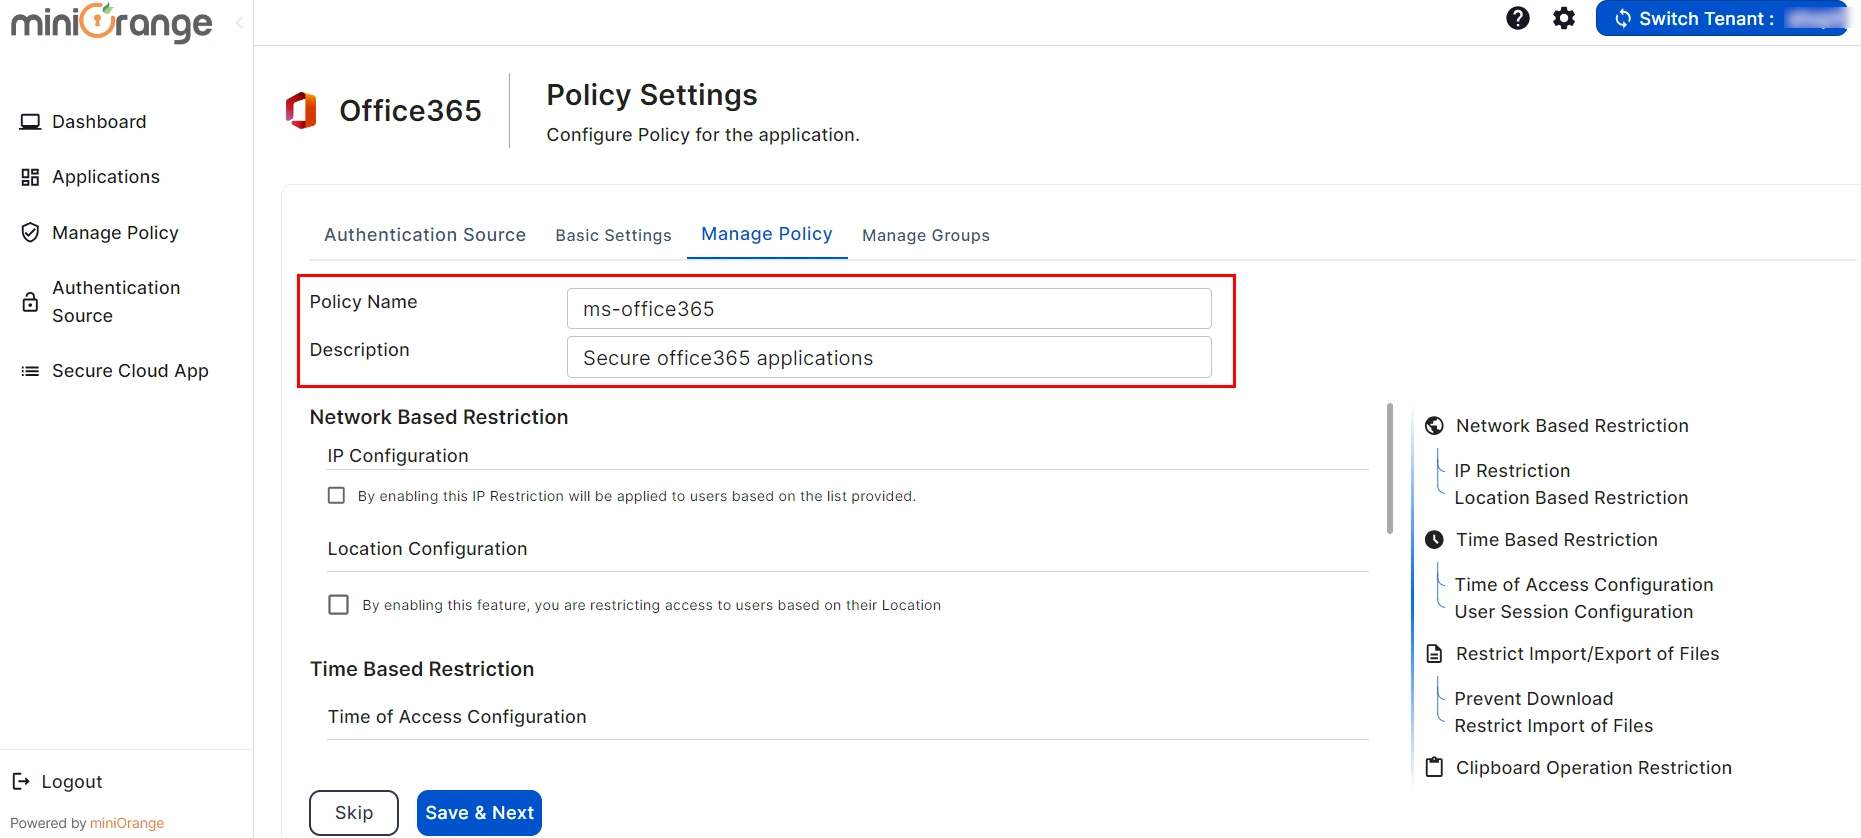
- Click on Checkbox for “Enable Time of Access Configuration” as shown in the image
below.
- By enabling this feature, you will apply time restrictions to users based on the configured
settings and specified timings.
1) Select Allow or Deny to permit or restrict user access during the selected time
slot.
2) Select the user's timezone.
3) Select the start and end times for the time-based restriction.

4.
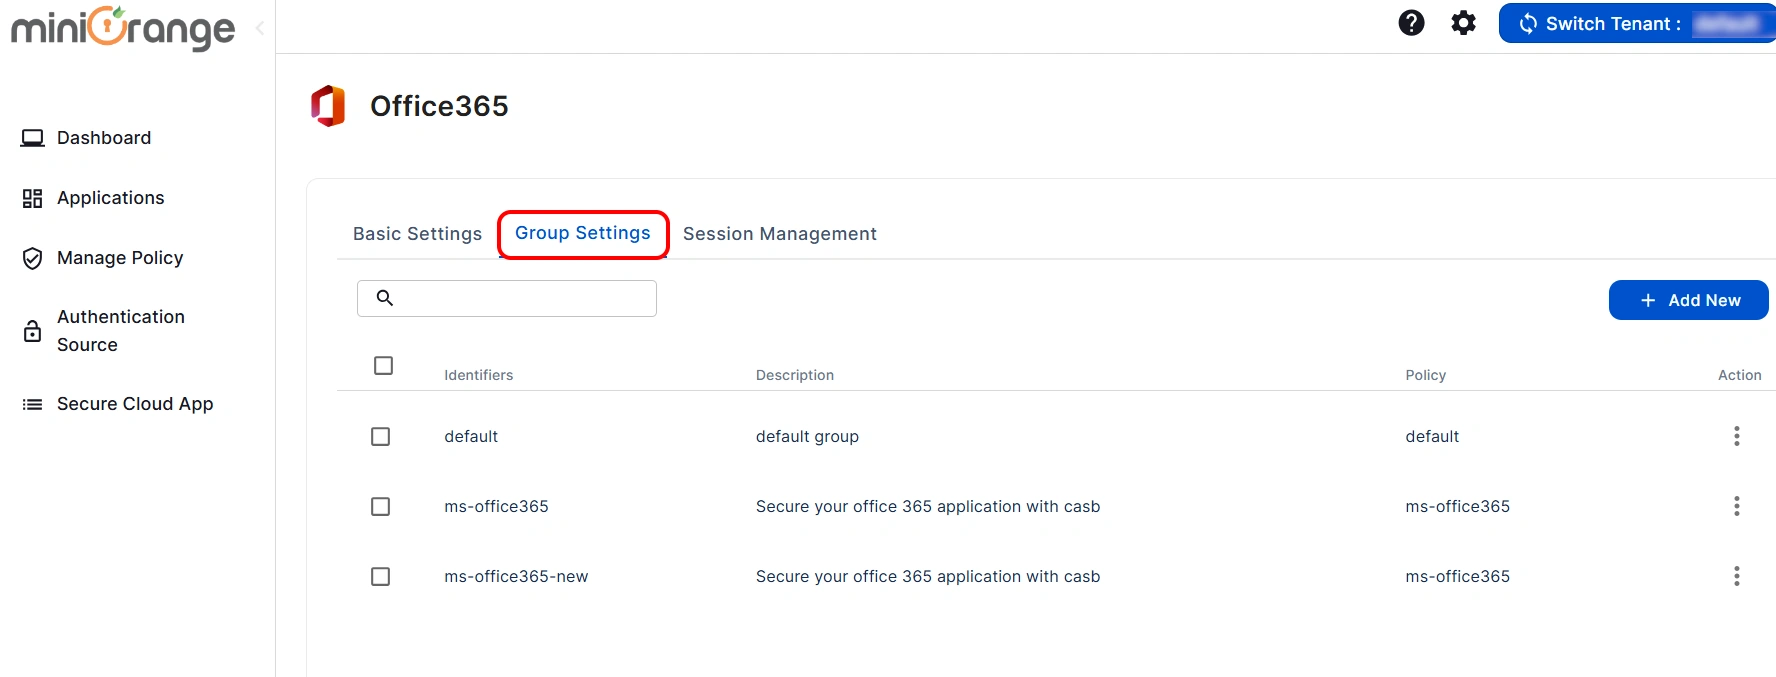
Configuring Groups
Let’s see how to configure Groups for Office365 CASB.
- Now, You are redirected to the Manage Group screen. Enter the Group Name and
Group
Description. Select the Office365 Policy from the drop-down menu.
- Choose the application to which you want to apply below permissions.
1) App Restriction: In this, the restrictions will be applied over the application
based on
the policy that you have configured for the group.
2) No App Restriction: In this, there will be no restrictions on the application
for the
group.
3) Disable App: By choosing this option, the application becomes inaccessible from
anywhere
for the entire group.
4) Custom App Restriction: By using this, you can apply an application-specific
custom
application restriction policy to an application that overpowers the group's restriction
policy.
- Now, click on Save & Next button.
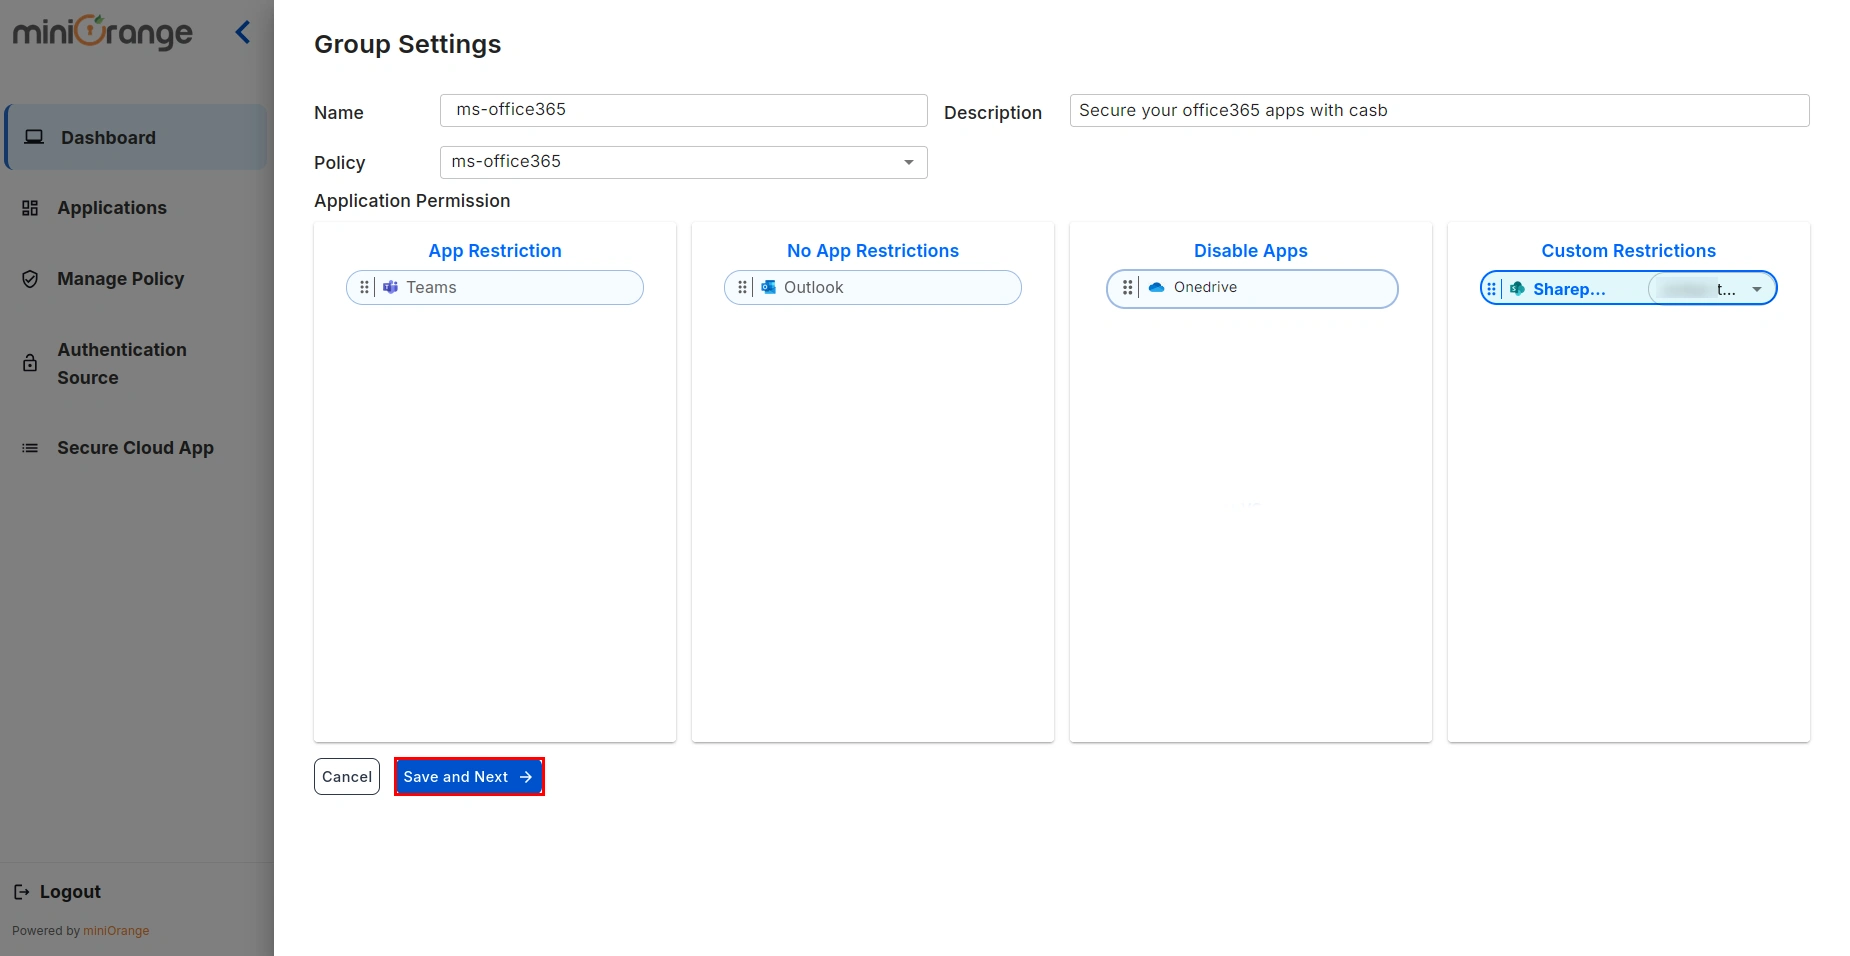
- After successfully configuring all screens, you will be redirected to the edit
screen.
5.
Edit Screen
1. Register your organization with Android Enterprise.
- Login into miniOrange MDM dashboard by clicking here.
- Once logged in, Navigate to ANDROID -> Android Enterprise and click on
Register button.
You will need to Register your organization with Android Enterprise initially and this will
be a one-time
process.
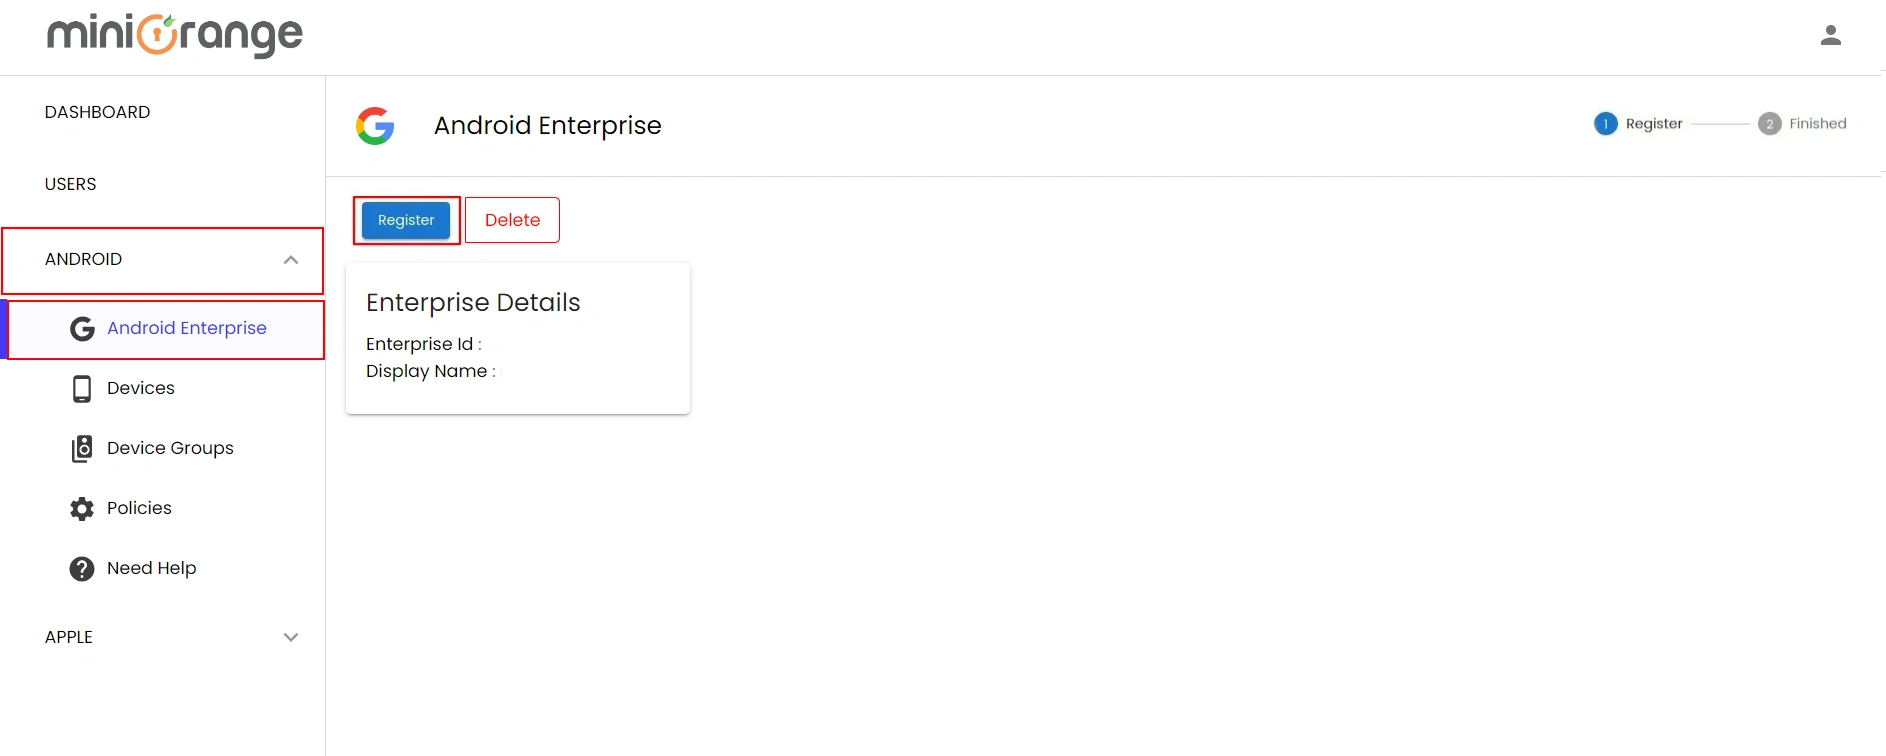
- Click here for detailed instructions on registering your
organization with Android
Enterprise.
2. Create a new policy
- Go to ANDROID -> Policies. Click on Create Policy to create the new policy.

- Now, provide a name and description for your policy and go to App Catalog → Applications → Select Play Store Apps, then add all the work-related apps that you want to be installed on the enrolled devices.
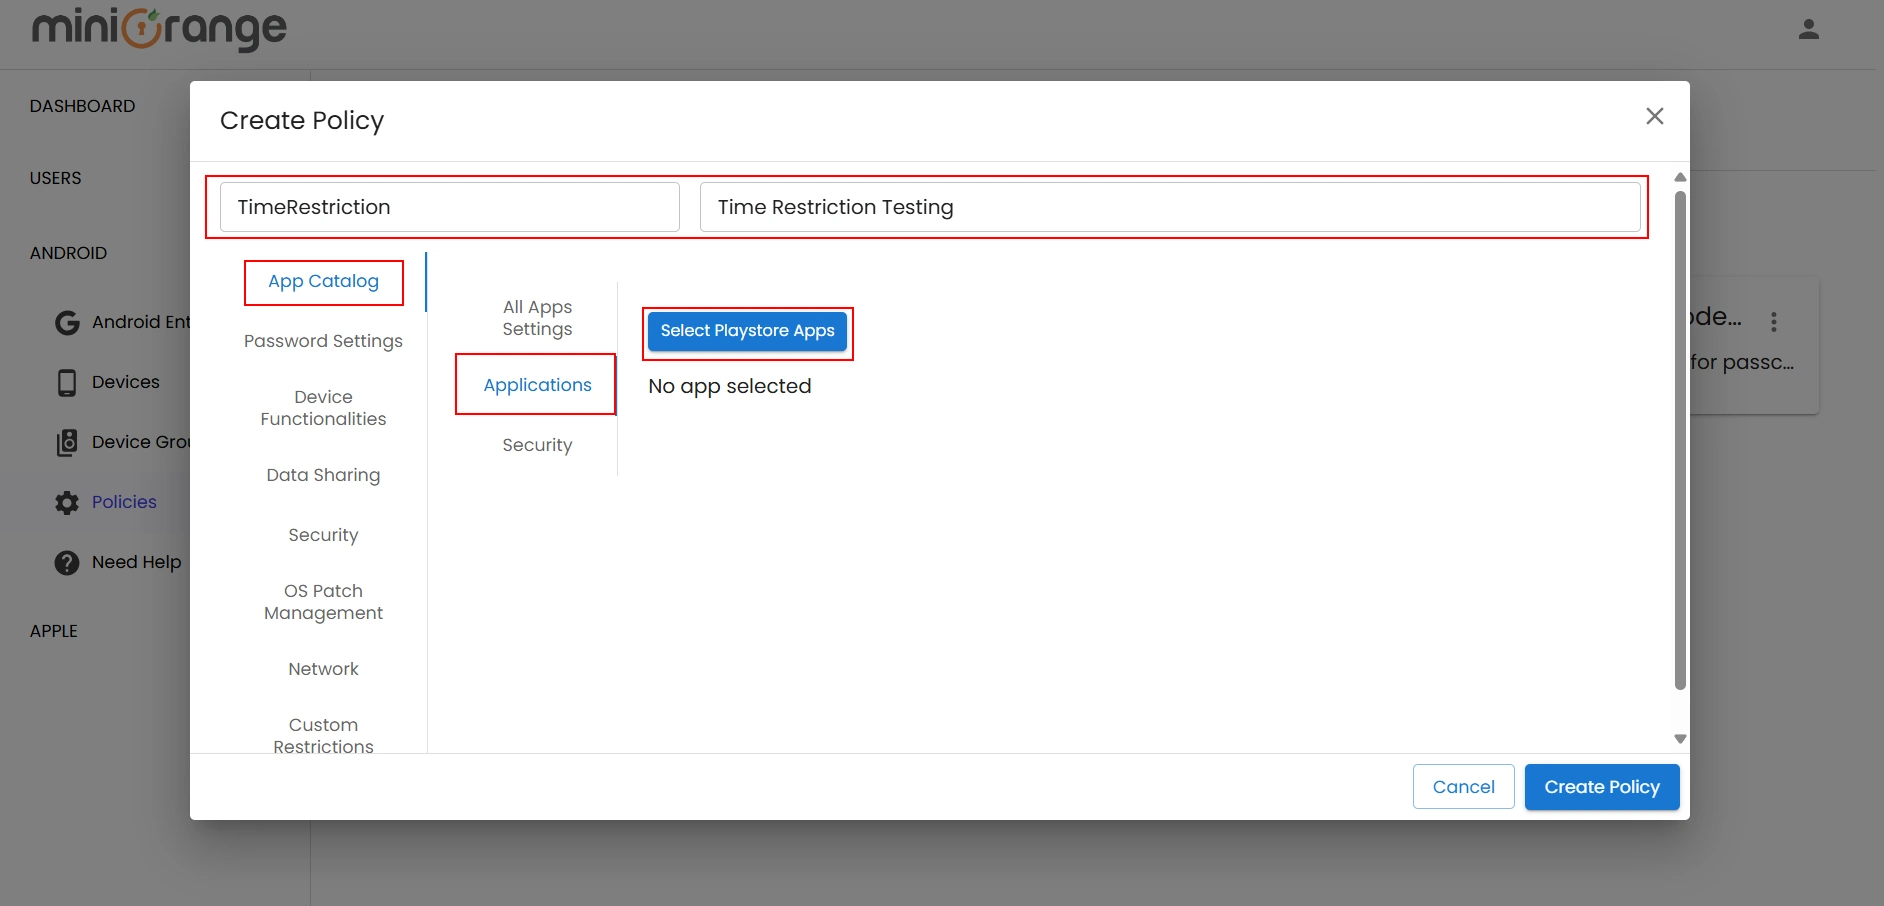
- Clicking on Select Play Store Apps will open the Play Store, where you can search for Office 365 apps. Choose the app you need, then click the Select button on the individual app to add it to your policy configuration.

- Once you close the Play Store, you will see a list of all the selected applications. On this screen, you can configure the installation type for each app.

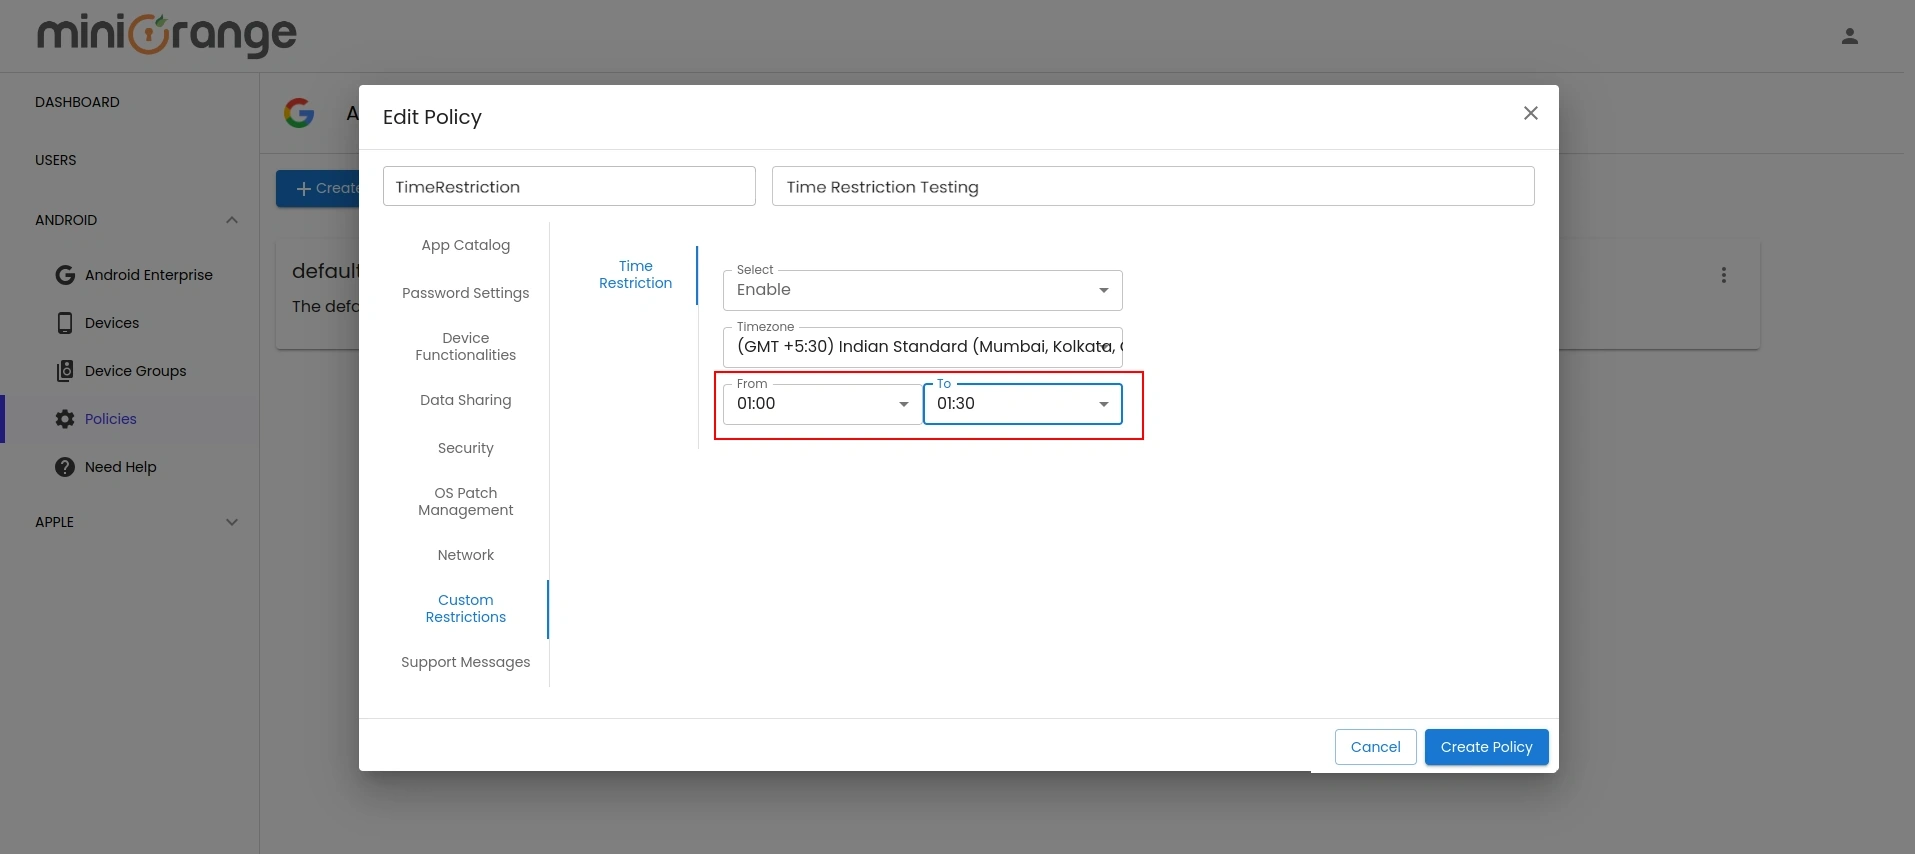
3. Configure Time Restriction: Restricting access by Limiting the Time Zones
- Click on Custom Restrictions and go to Time Restriction to configure the restrictions.
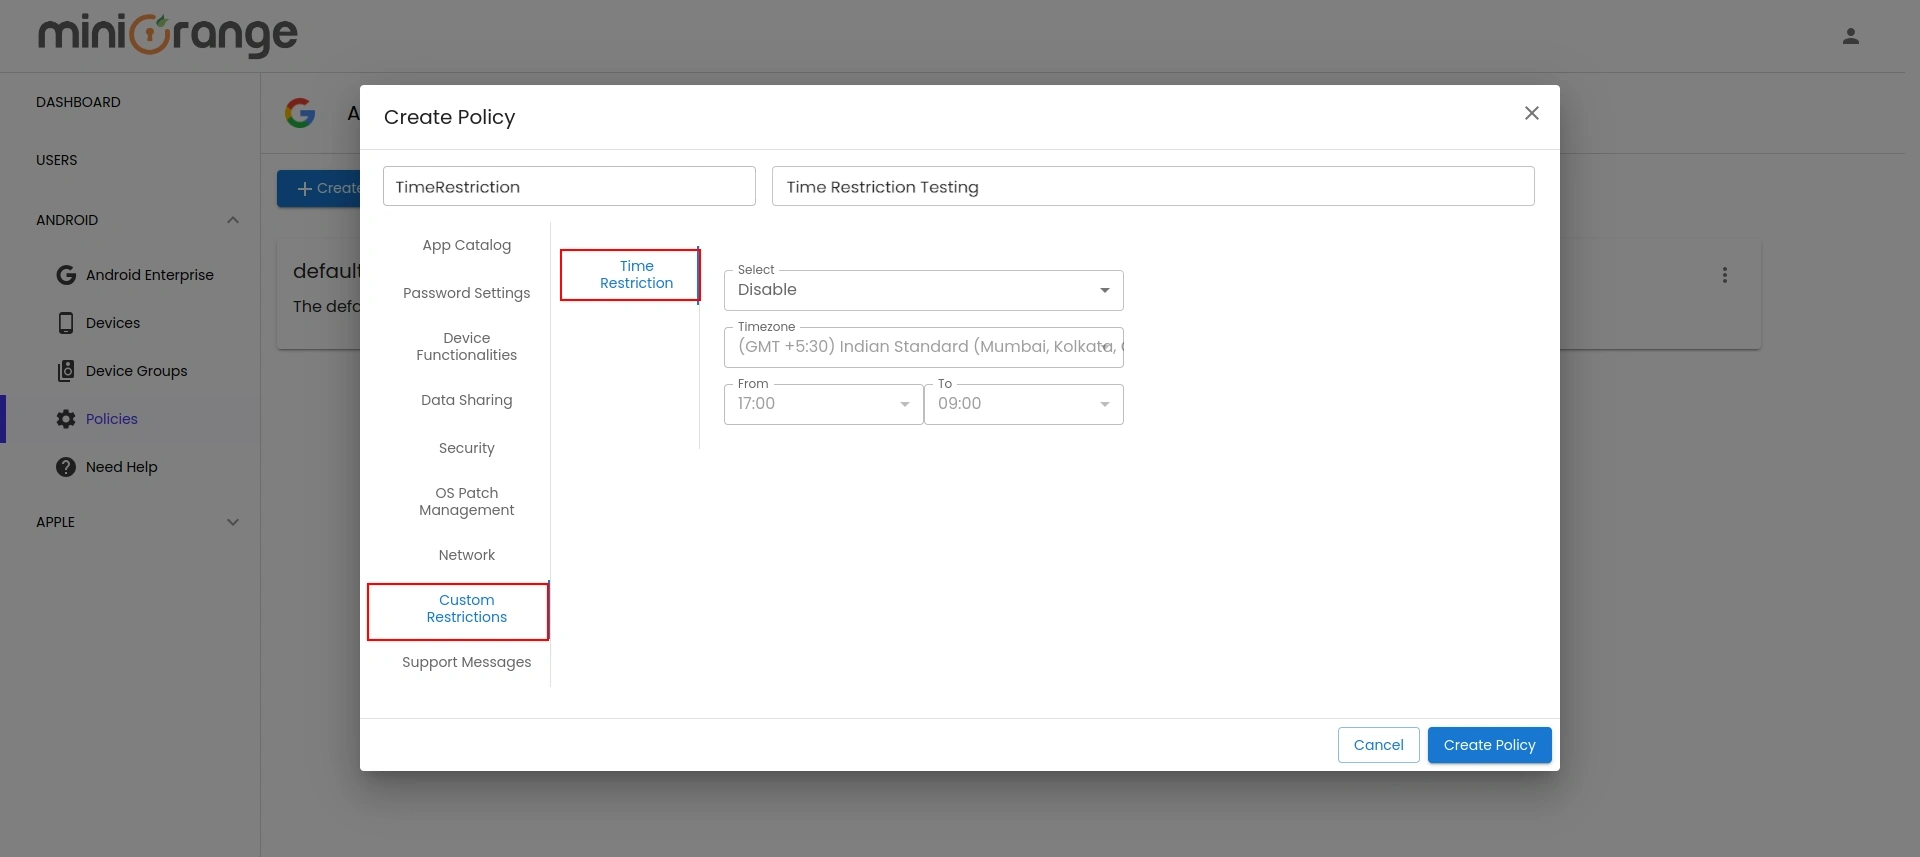
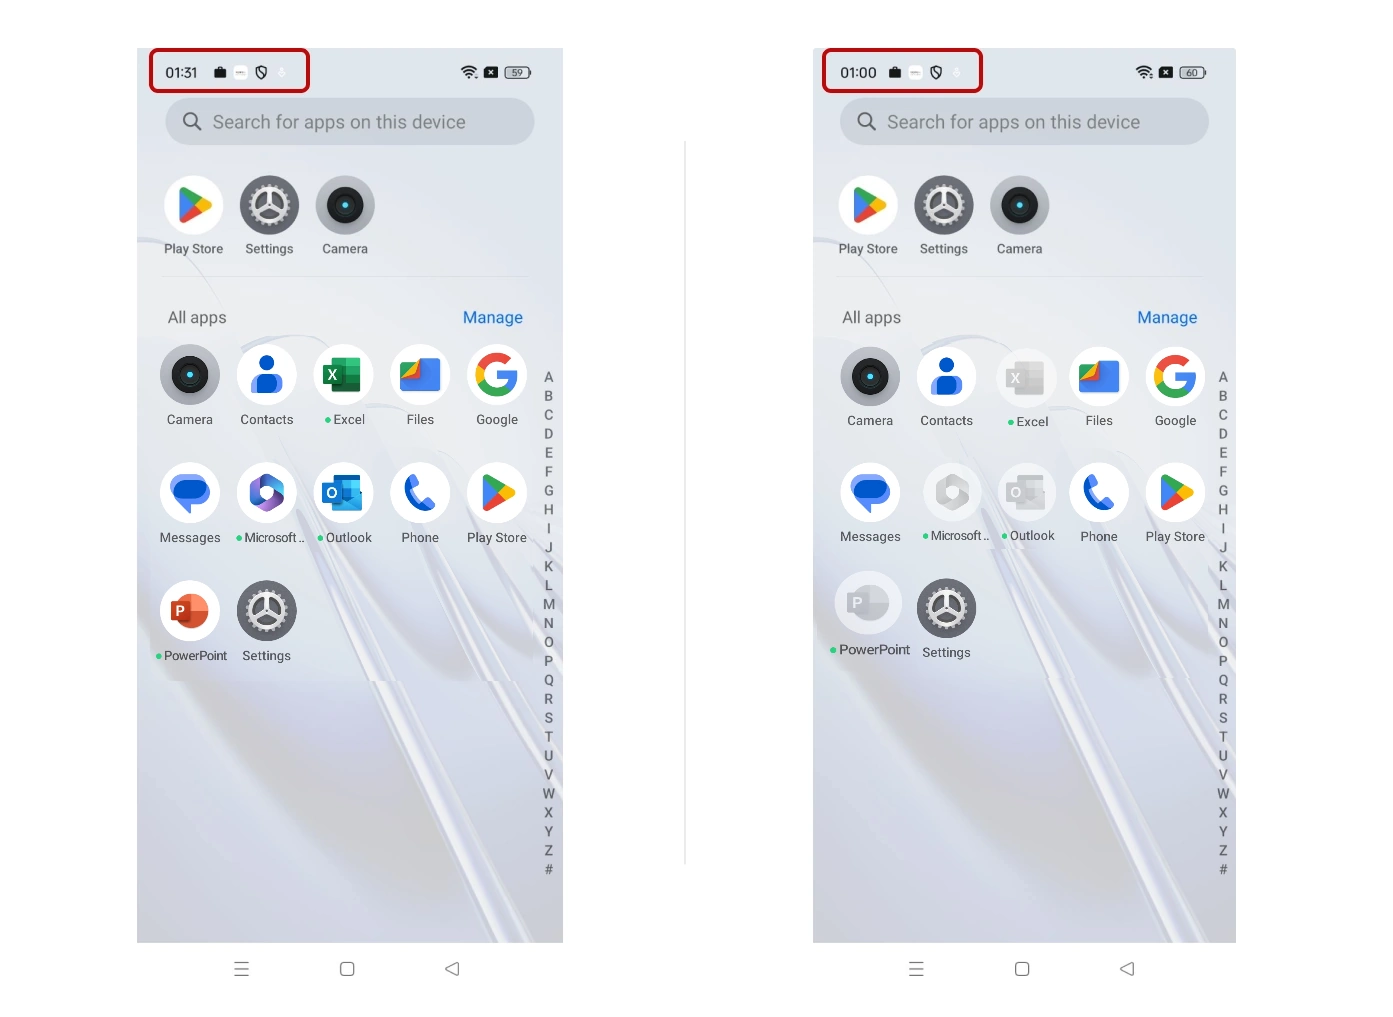
- Enable the feature, then select the appropriate timezone and set the start time and end time during which the device or work profile will be disabled. For instance, we have selected the timezone, start time and end time as IST, 01:00 AM and 01:30 AM respectively.
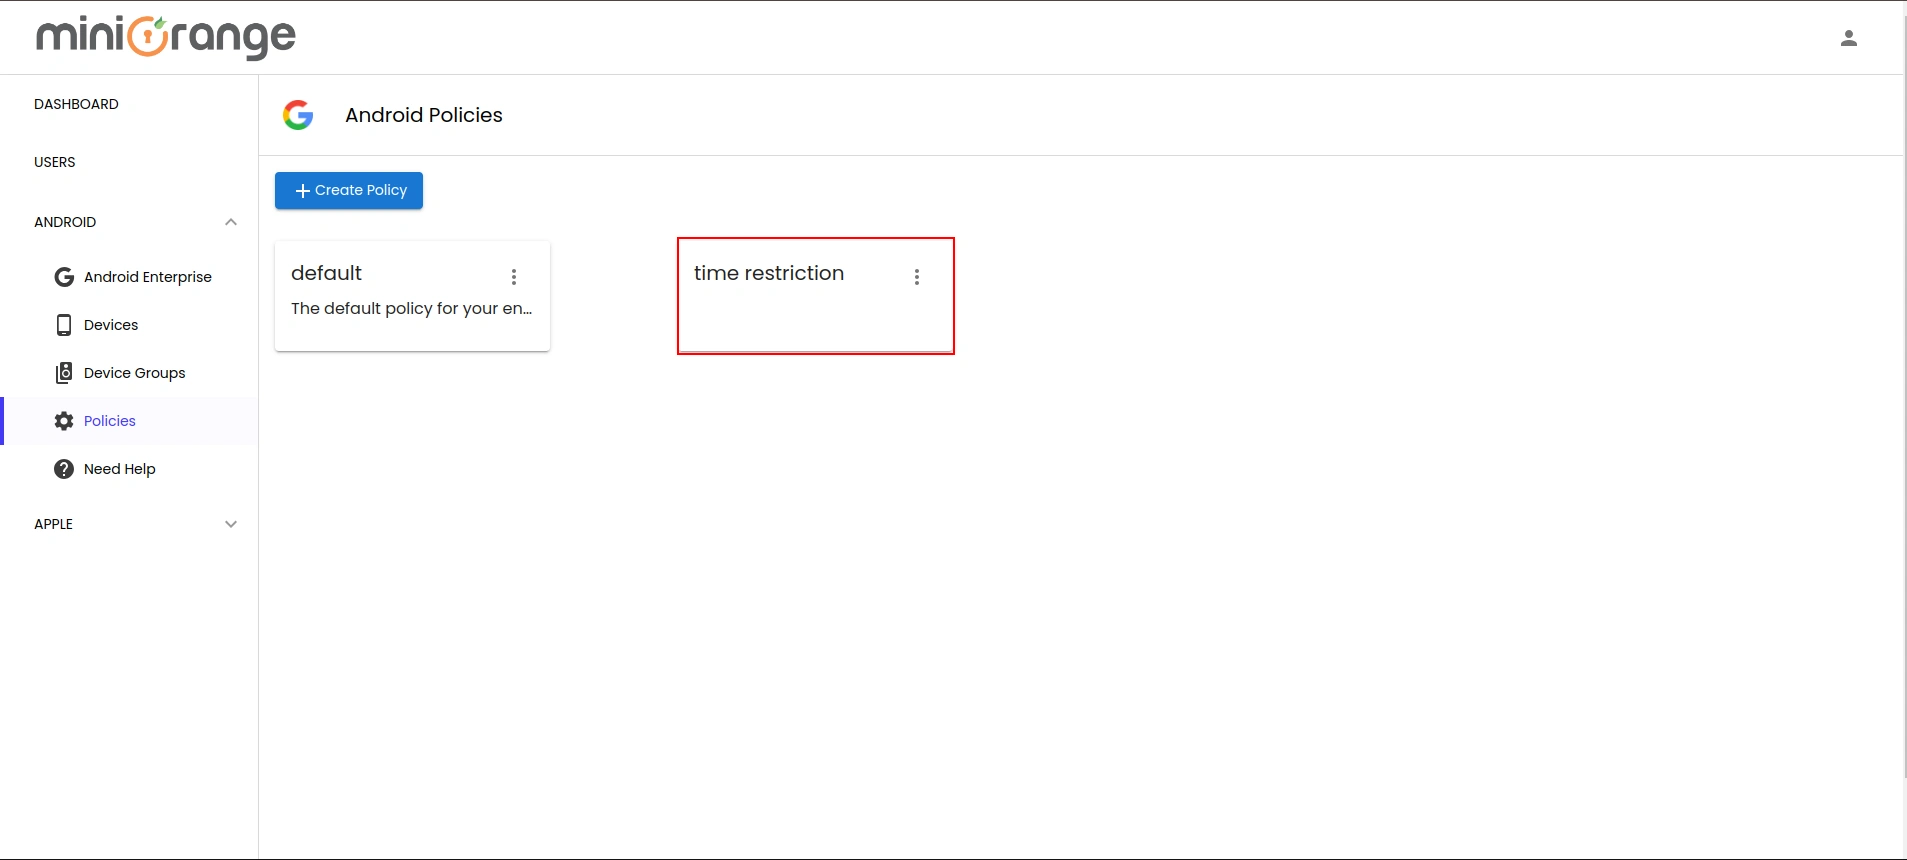
- Once you have configured all details, click on Create Policy and your new policy will be listed as shown in the image below.
4. Test the Device Behavior
System applications, including Contacts, File Manager, and Managed Google Play Store, cannot be blocked. However, applications installed via the MDM dashboard can be restricted based on the policy settings.
- In BYOD mode, applications are blocked starting at 1:00 AM and are unblocked at 1:30 AM (see the image below for reference).
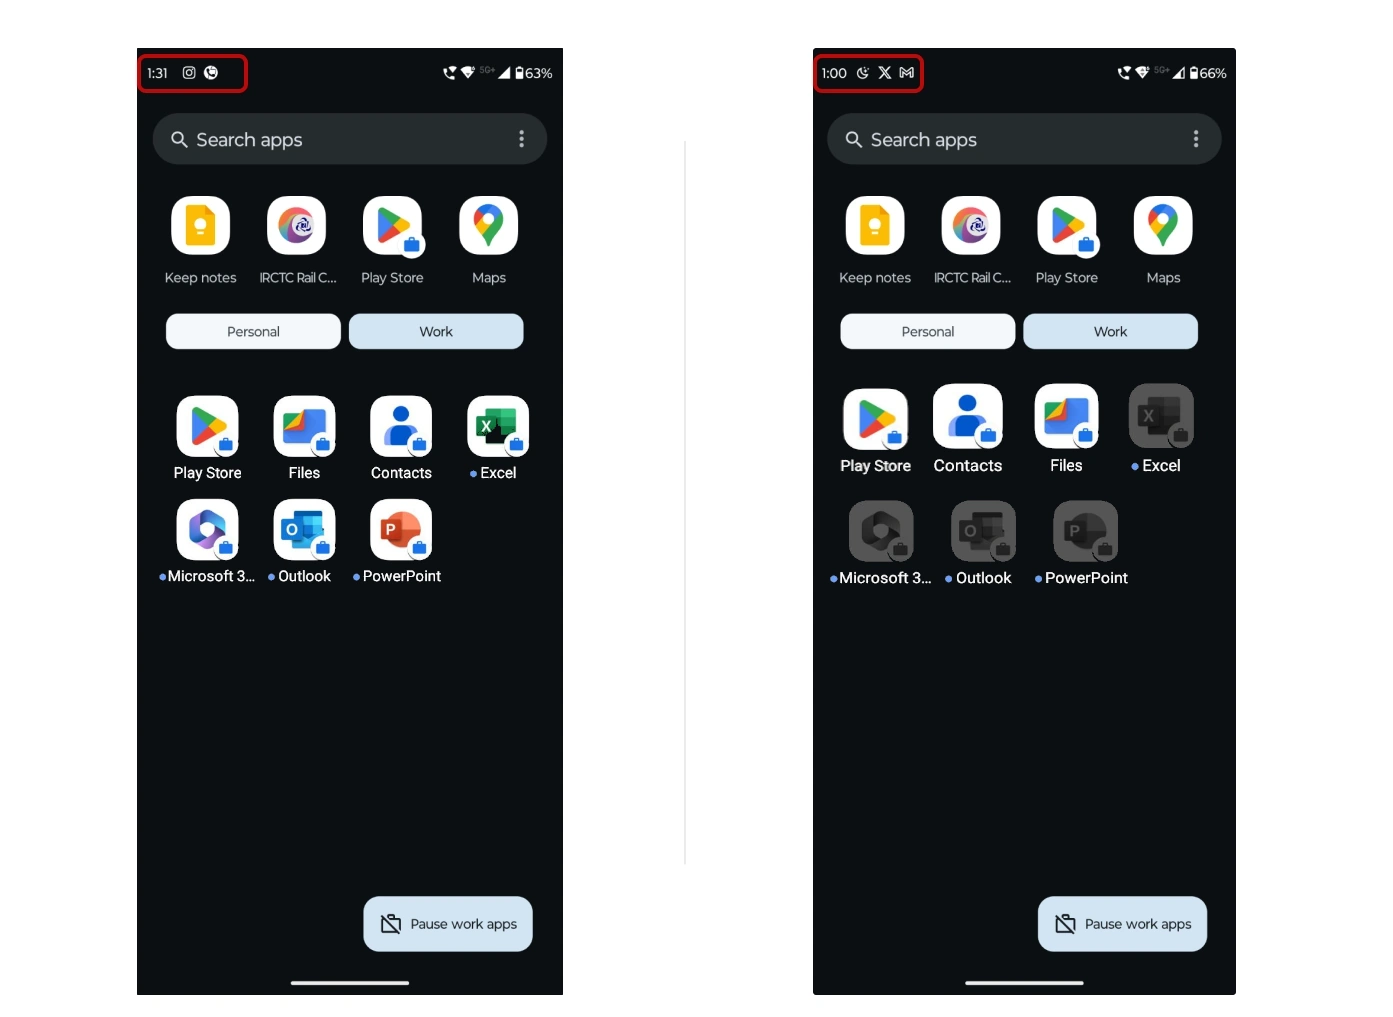
- For company-owned devices, applications are blocked at 1:00 AM and unblocked at 1:30 AM (see the image below for reference).
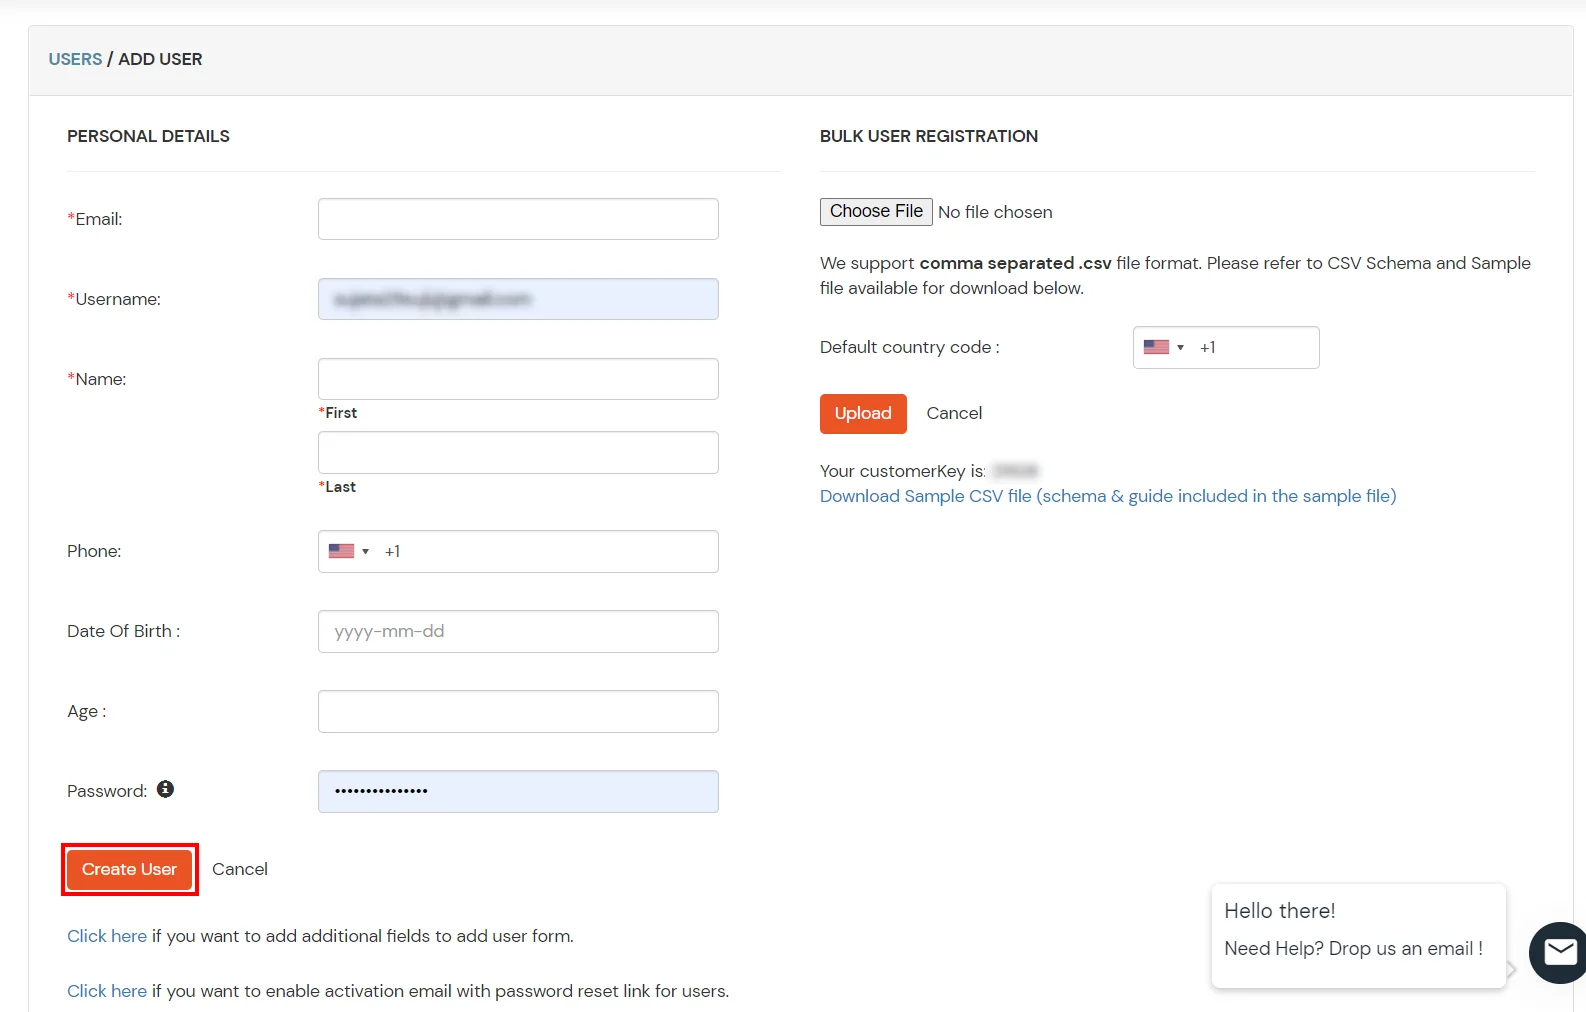
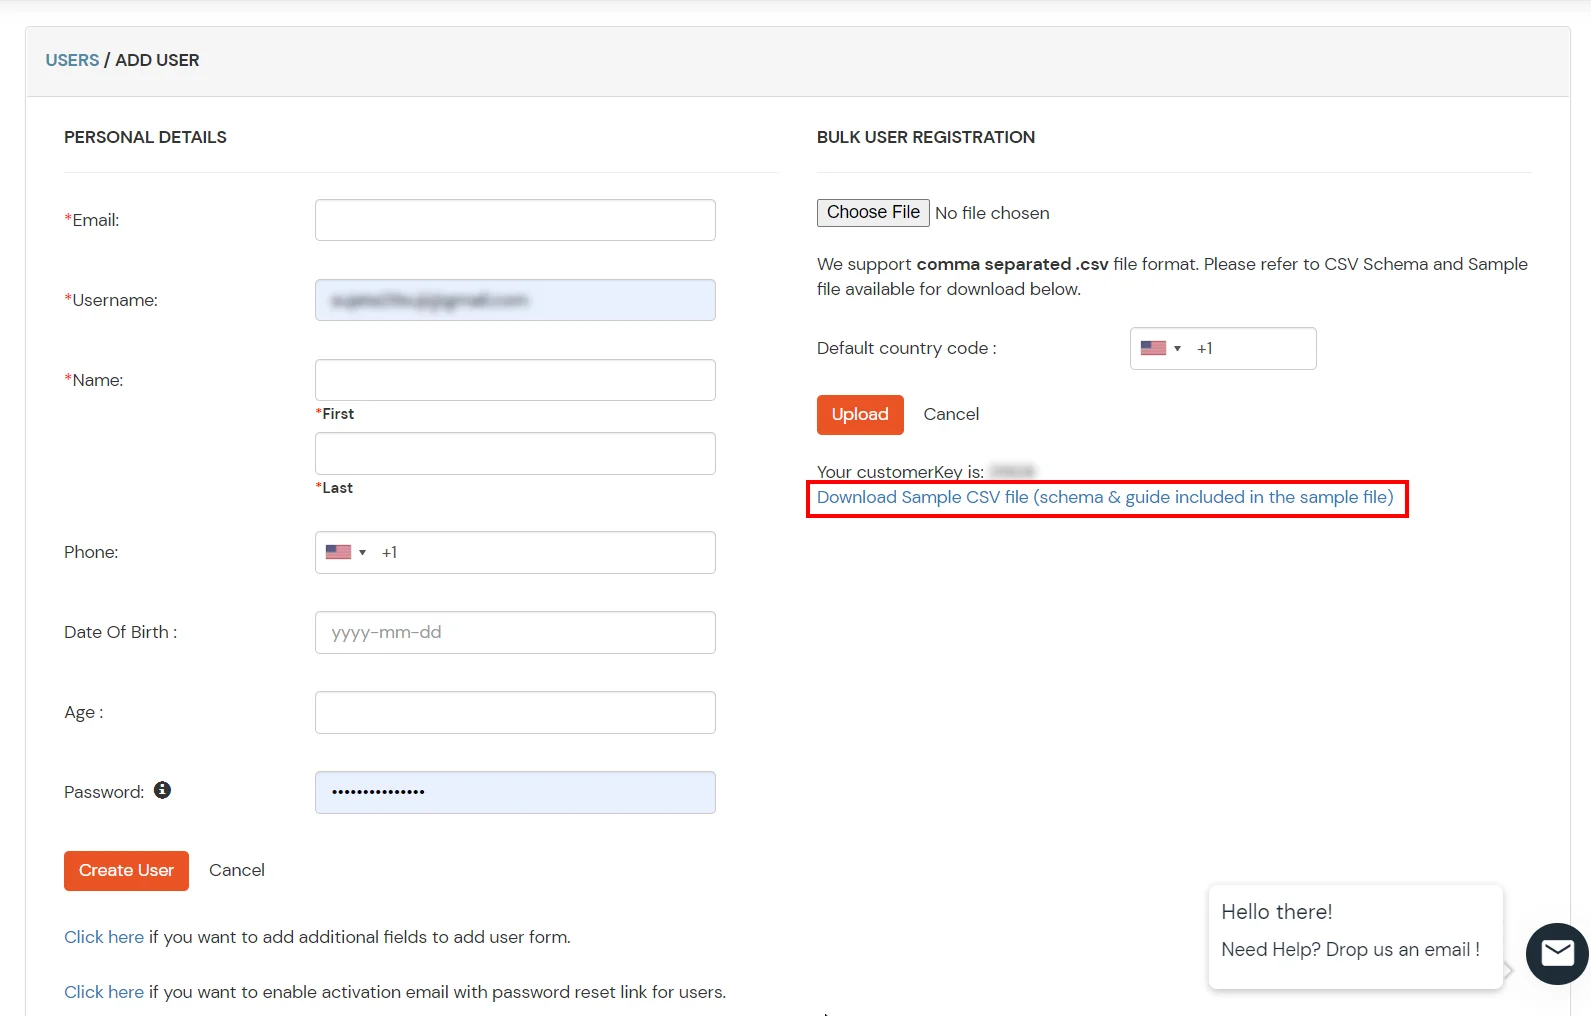
6. Configure Your User Directory (Optional)
miniOrange provides user authentication from various external sources, which can be Directories (like ADFS, Microsoft Active Directory, Microsoft Entra ID, OpenLDAP, Google, AWS Cognito etc), Identity Providers (like Okta, Shibboleth, Ping, OneLogin, KeyCloak), Databases (like MySQL, Maria DB, PostgreSQL) and many more. You can configure your existing directory/user store or add users in miniOrange.
- Click on External Directories >> Add Directory in the left menu of the dashboard.
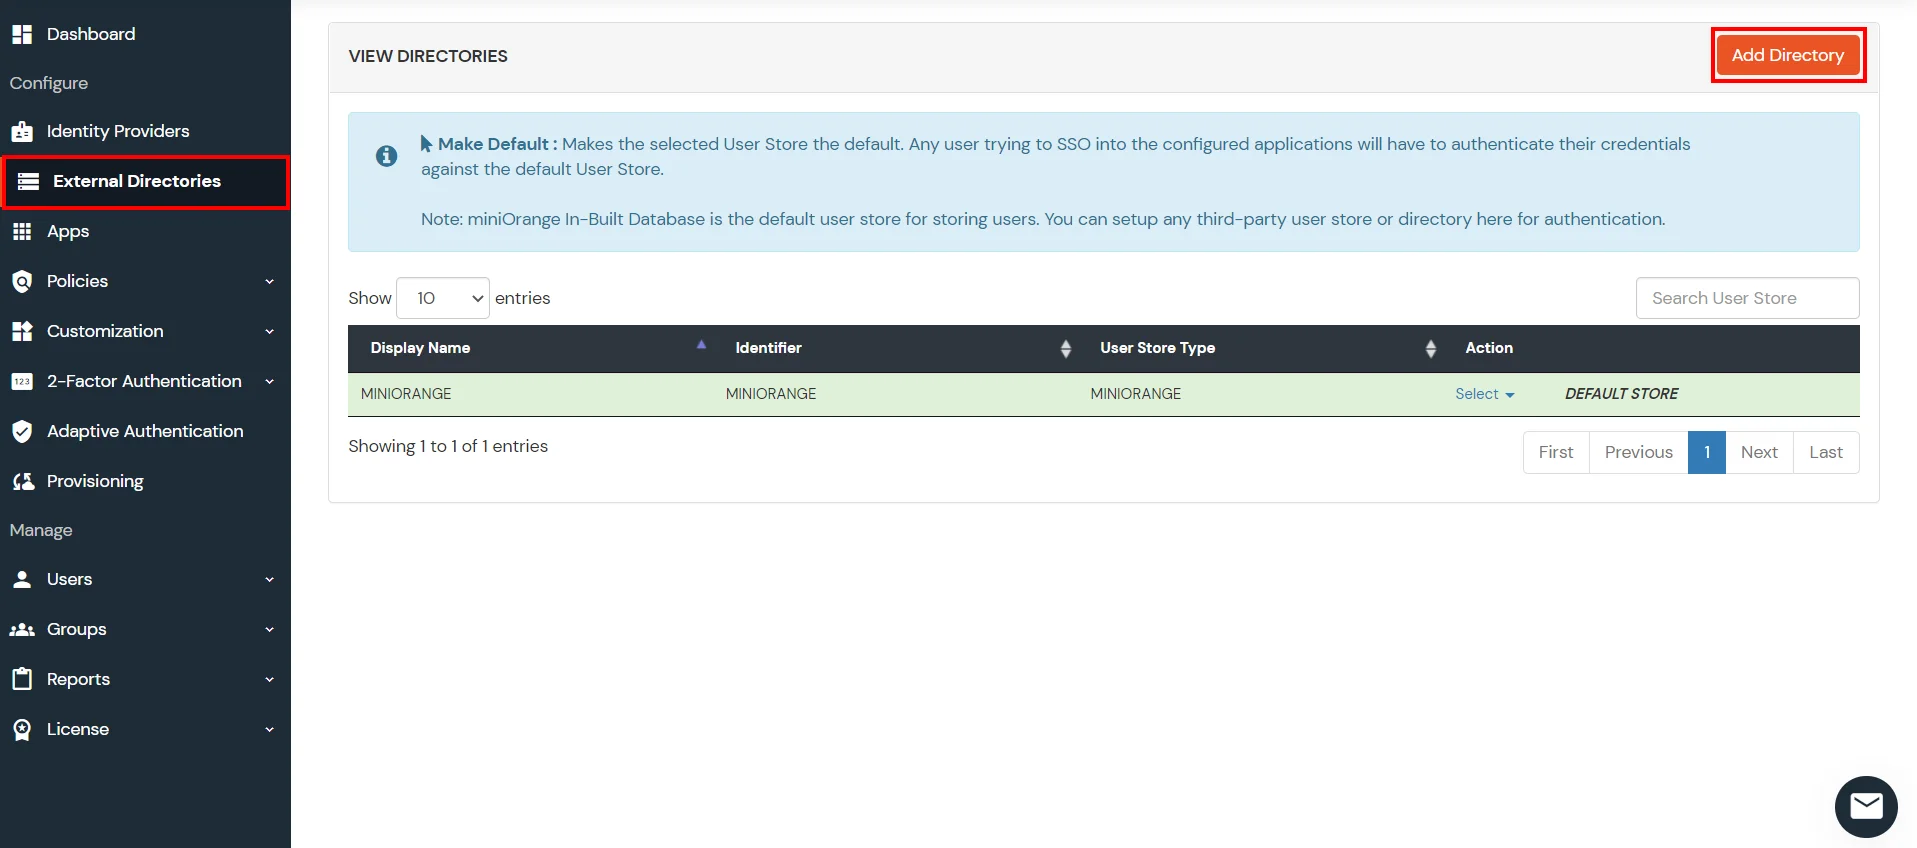
- Select Directory type as AD/LDAP.
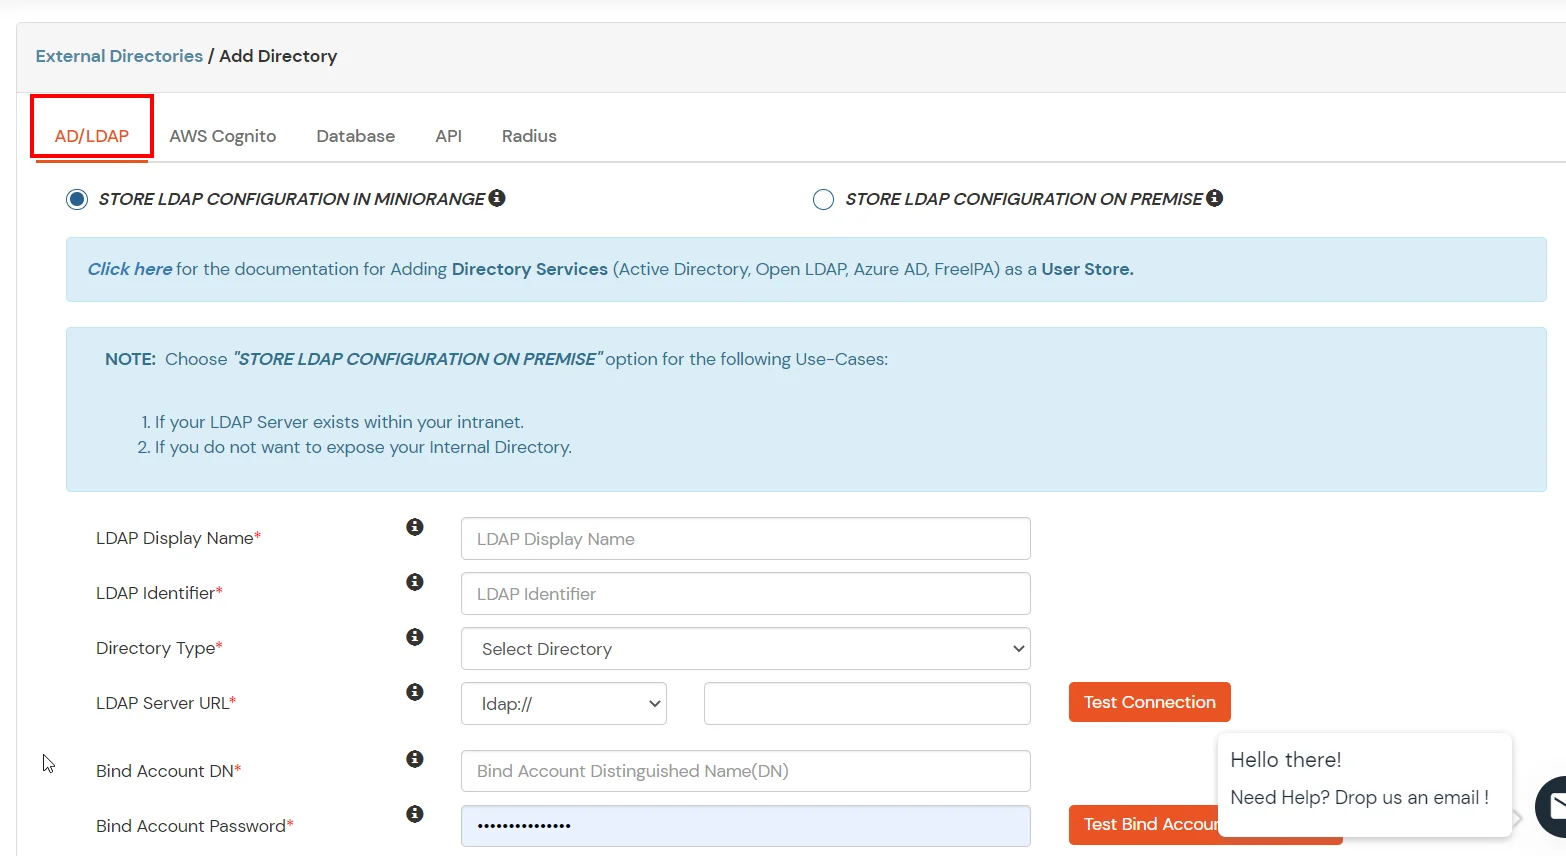
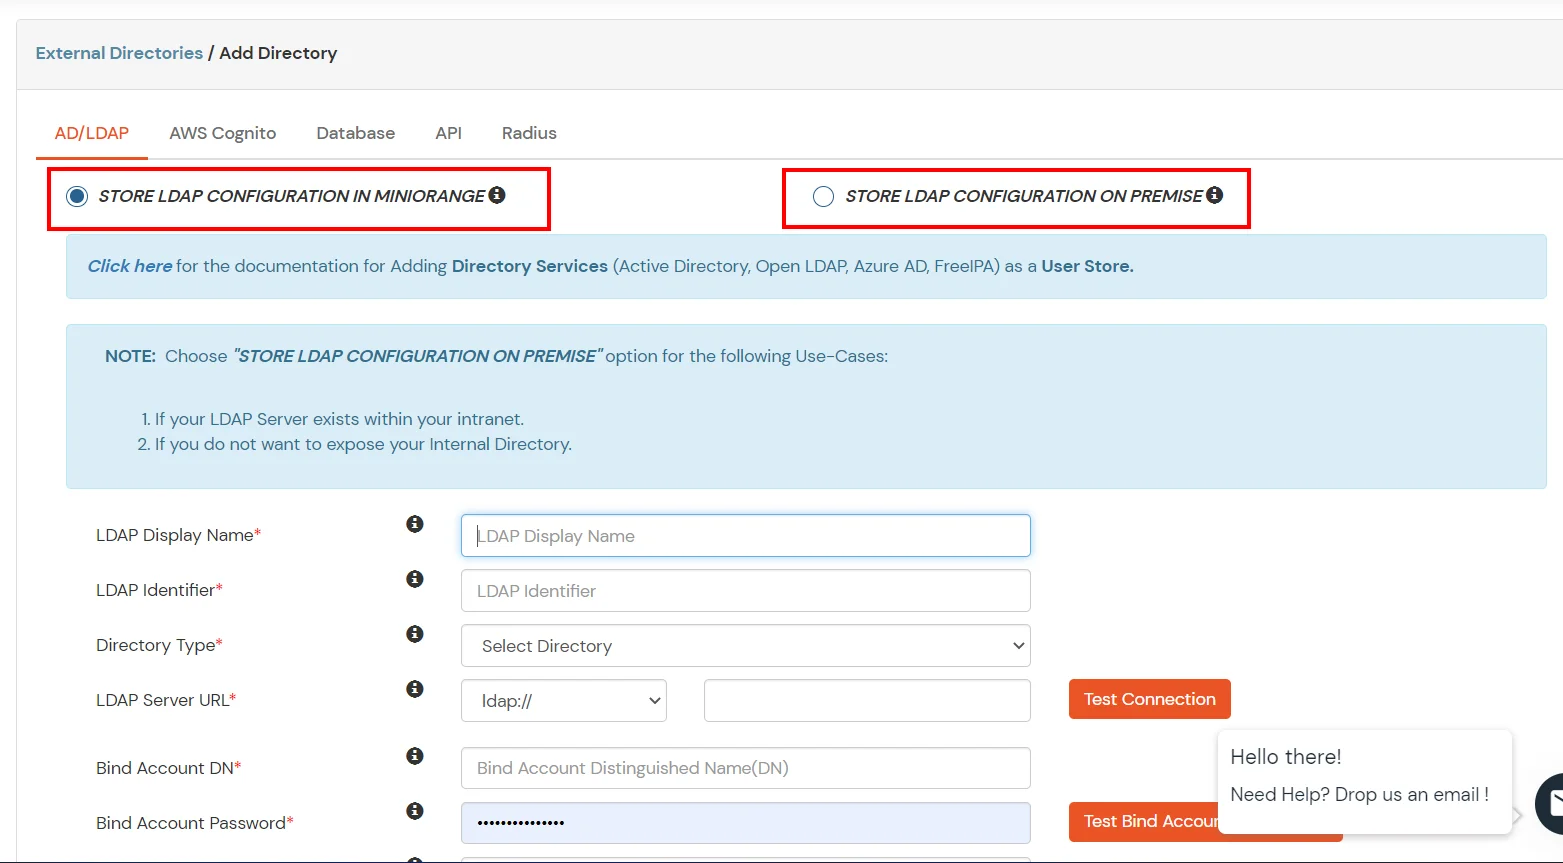
- STORE LDAP CONFIGURATION IN MINIORANGE: Choose this option if you want to keep your configuration in miniOrange. If active directory is behind a firewall, you will need to open the firewall to allow incoming requests to your AD.
- STORE LDAP CONFIGURATION ON PREMISE: Choose this option if you want to keep your configuration in your premise and only allow access to AD inside premises. You will have to download and install miniOrange gateway in your premise.
- Enter LDAP Display Name and LDAP Identifier name.
- Select Directory Type as Active Directory.
- Enter the LDAP Server URL or IP Address against LDAP Server URL field.
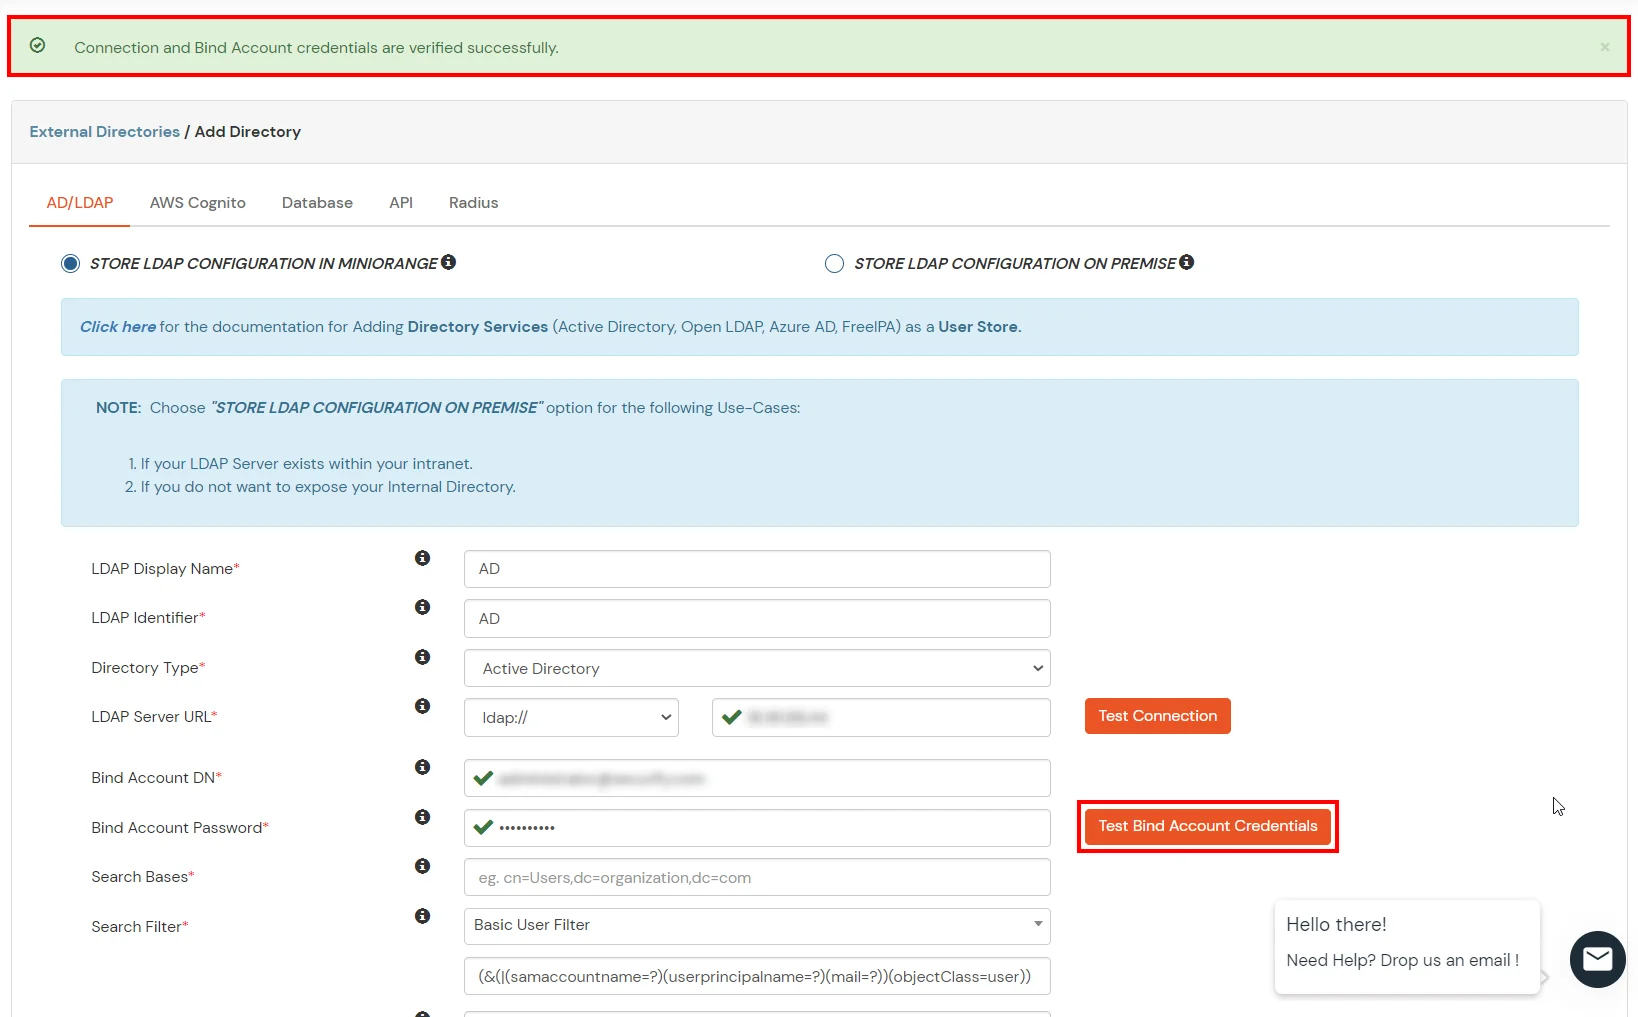
- Click on Test Connection button to verify if you have made a successful connection with your LDAP server.
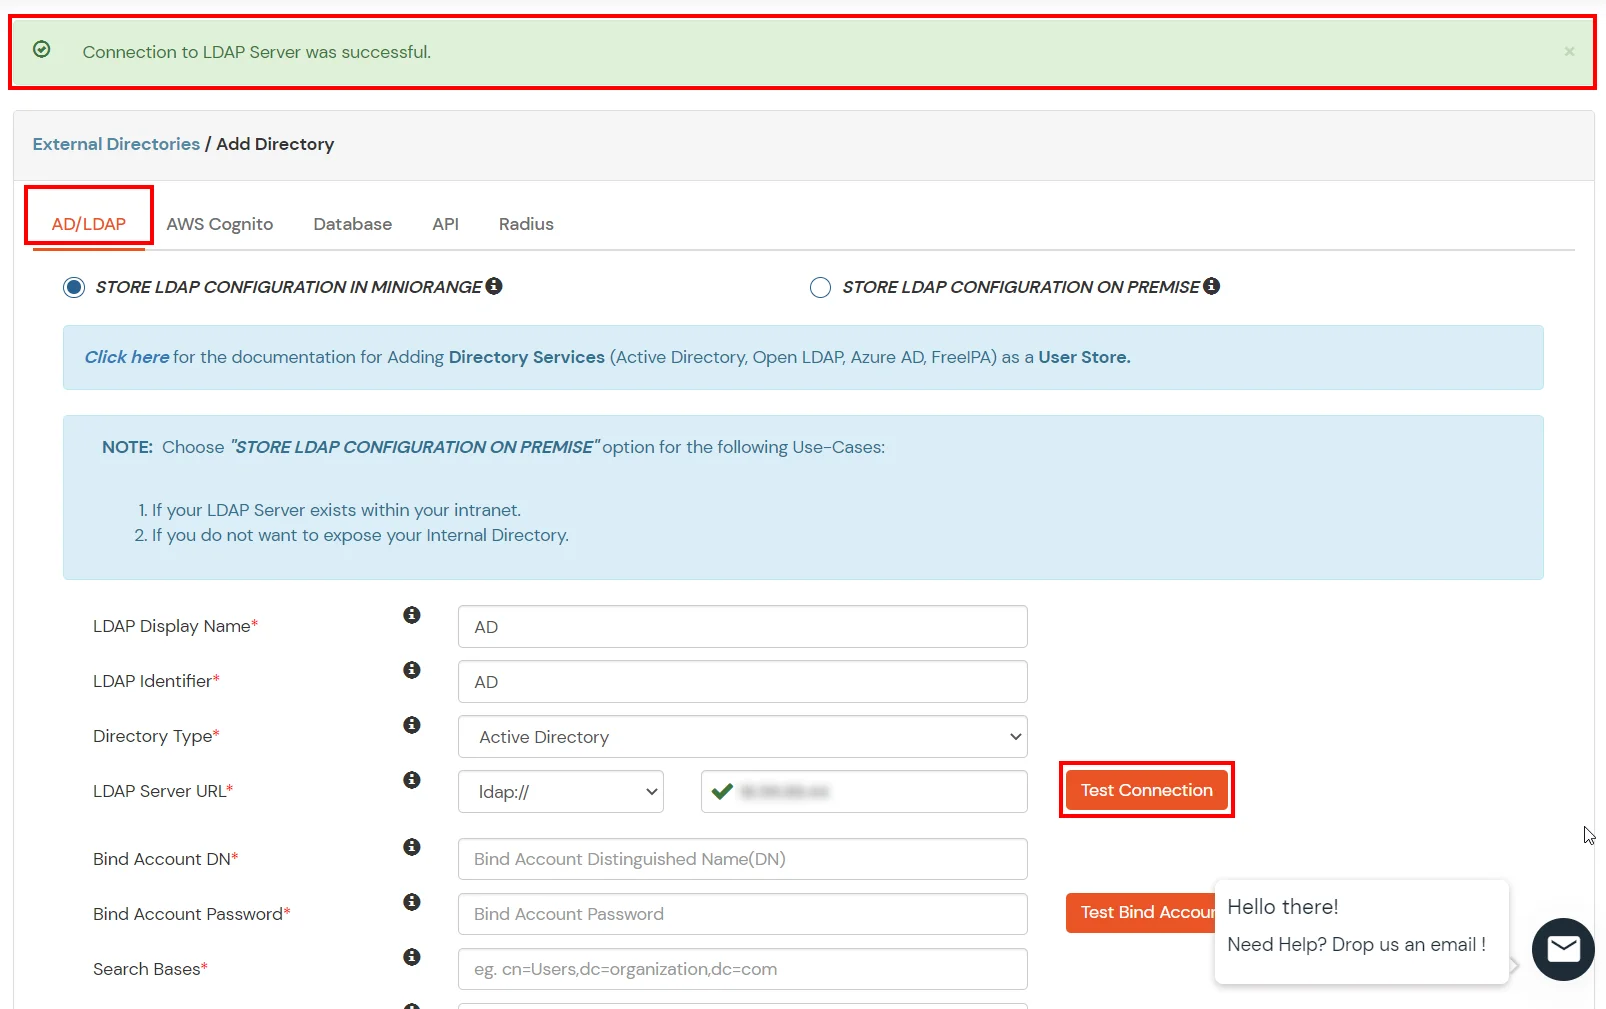
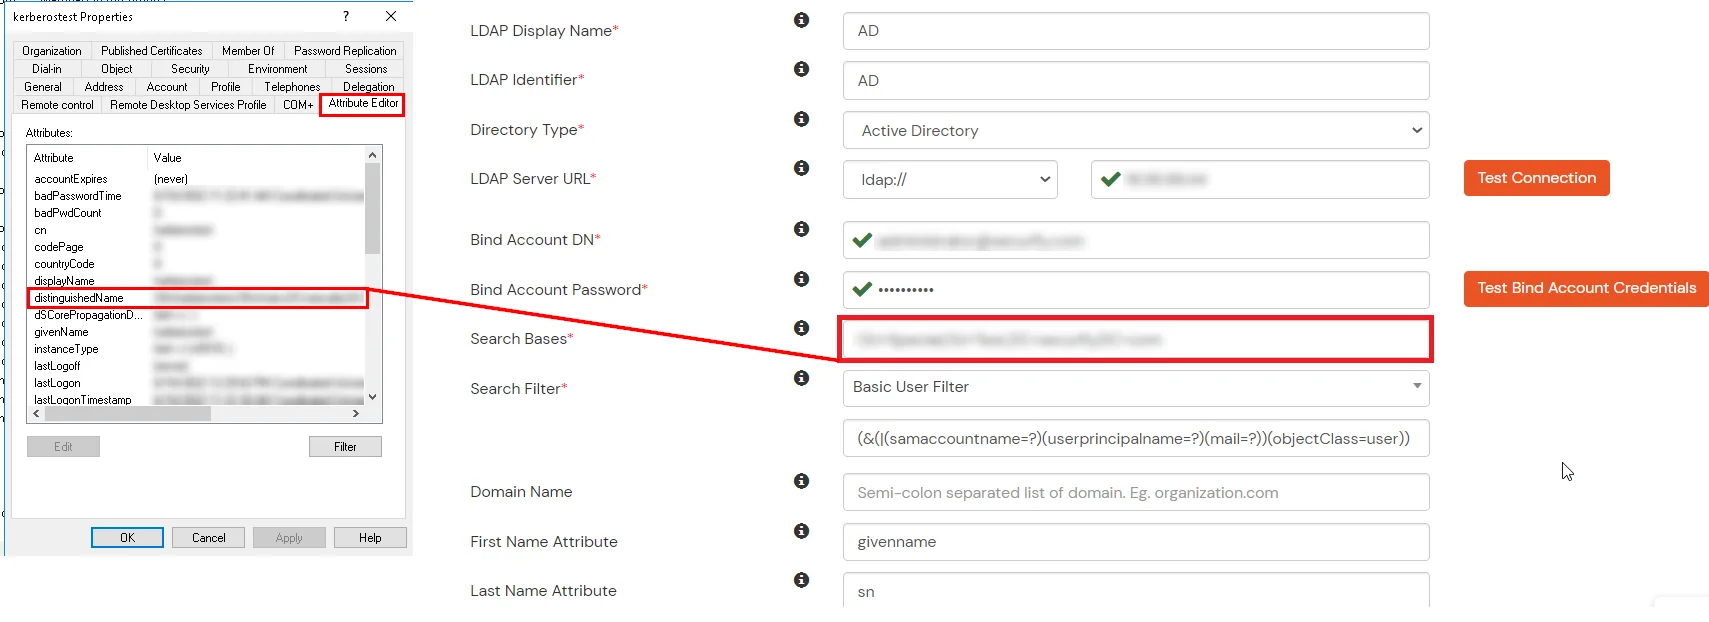
- In Active Directory, go to the properties of user containers/OU's and search for Distinguished Name attribute.

- Enter the valid Bind account Password.
- Click on Test Bind Account Credentials button to verify your LDAP Bind credentials for LDAP connection.
- Search Base is the location in the directory where the search for a user begins. You will get this from the same place you got your Distinguished name.
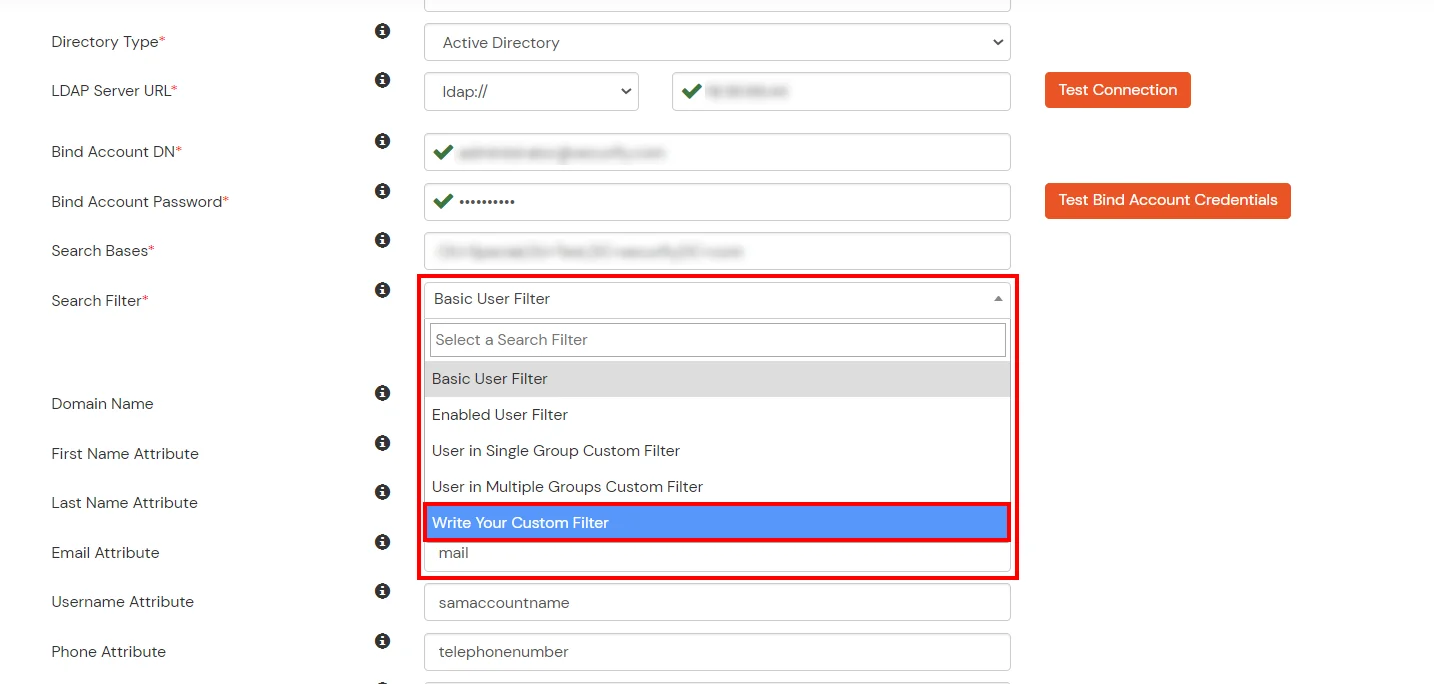
- Select a suitable Search filter from the drop-down menu. If you use User in Single Group Filter or User in Multiple Group Filter, replace the <group-dn> in the search filter with the distinguished name of the group in which your users are present. To use custom Search Filter select "Write your Custom Filter" option and customize it accordingly.
- You can also configure following options while setting up AD. Enable Activate LDAP in order to authenticate users from AD/LDAP. Click on the Save button to add user store.
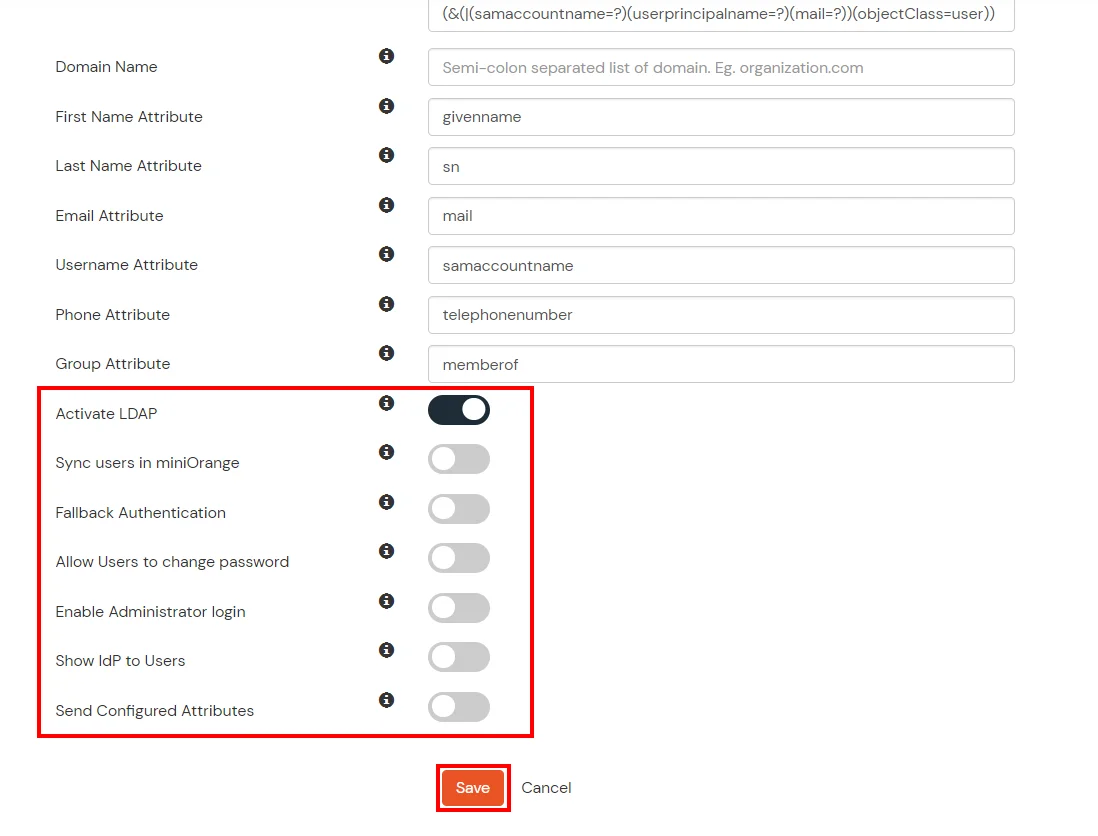
Here's the list of the attributes and what it does when we enable it. You can enable/disable accordingly.
| Attribute |
Description |
| Activate LDAP |
All user authentications will be done with LDAP credentials if you Activate it |
| Sync users in miniOrange |
Users will be created in miniOrange after authentication with LDAP |
| Fallback Authentication |
If LDAP credentials fail then user will be authenticated through miniOrange |
| Allow users to change password |
This allows your users to change their password. It updates the new credentials in your LDAP server |
| Enable administrator login |
On enabling this, your miniOrange Administrator login authenticates using your LDAP server |
| Show IdP to users |
If you enable this option, this IdP will be visible to users |
| Send Configured Attributes |
If you enable this option, then only the attributes configured below will be sent in attributes at the time of login |
- Click on Save. After this, it will show you the list of User stores. Click on Test Connection to check whether you have enter valid details. For that, it will ask for username and password.
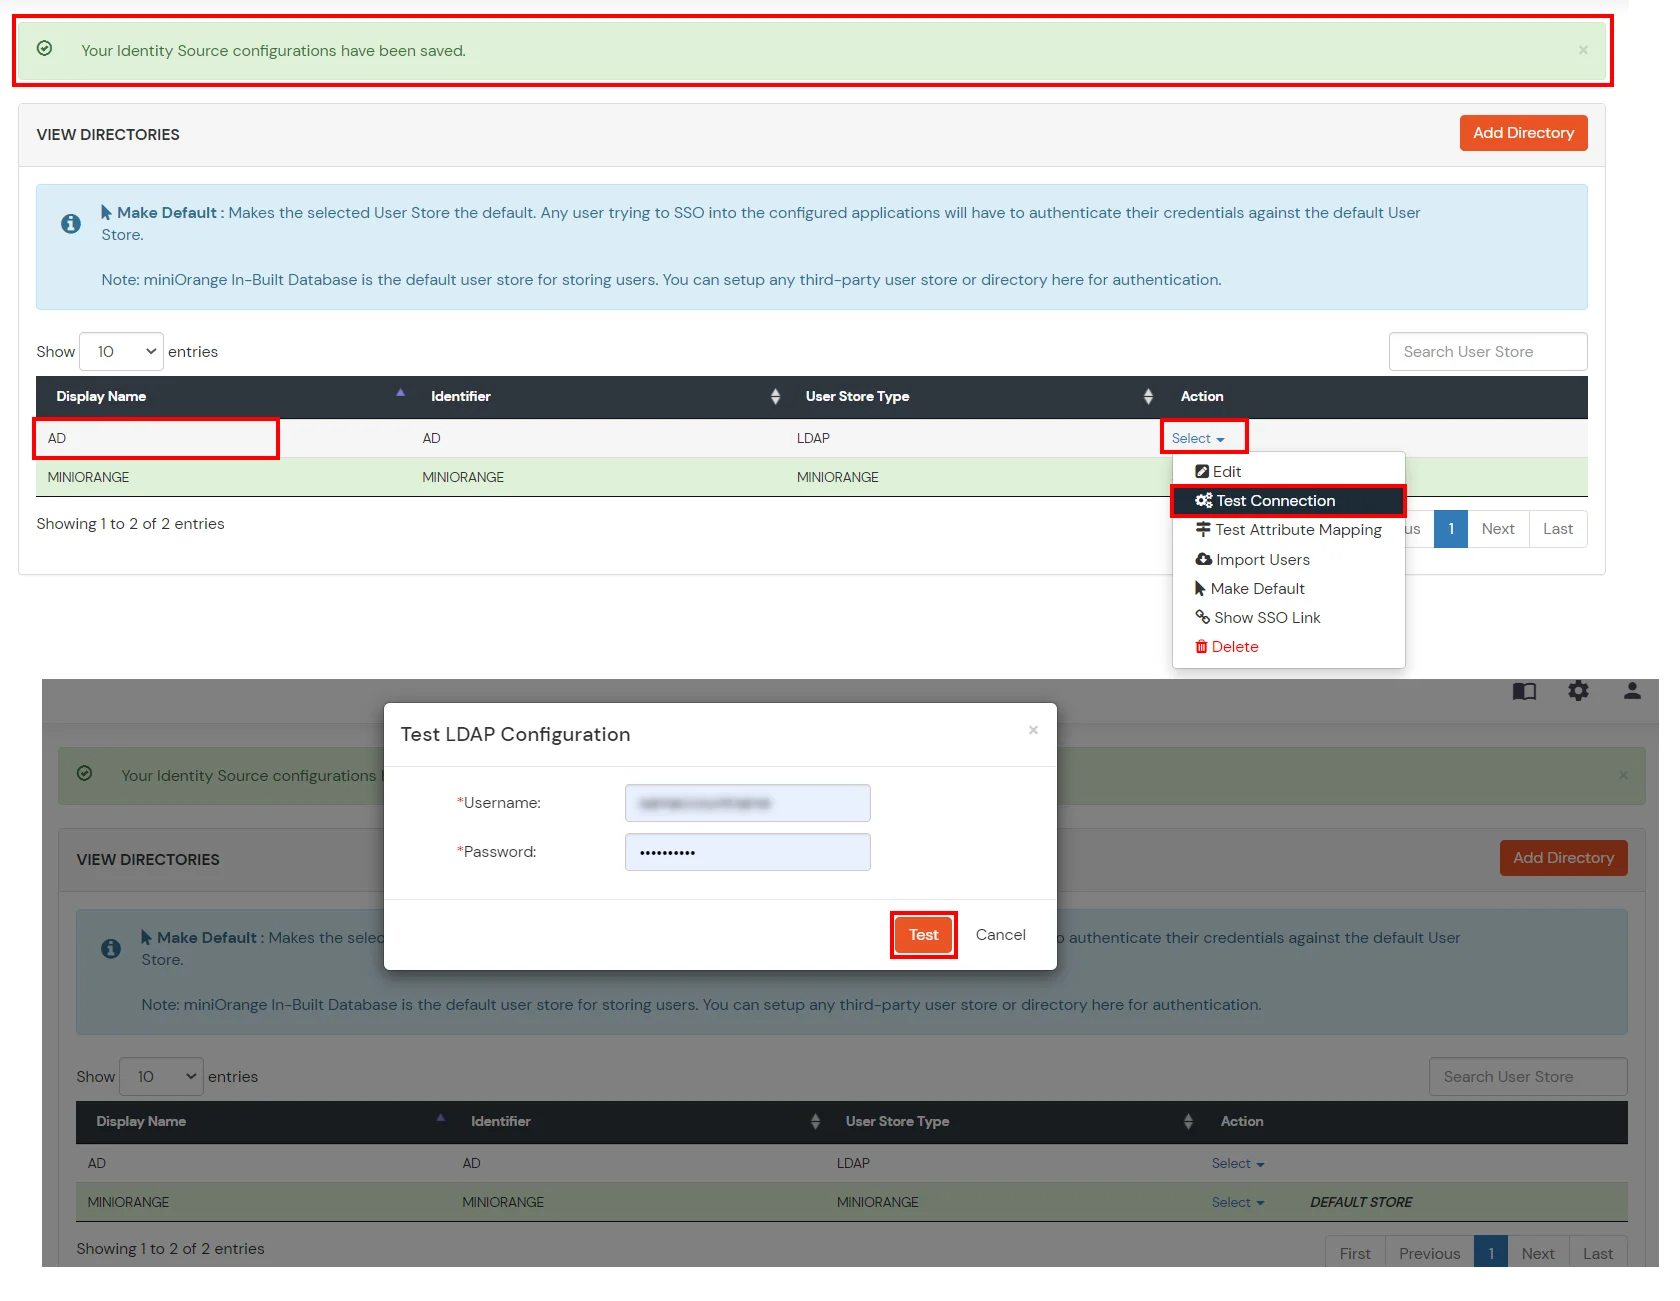
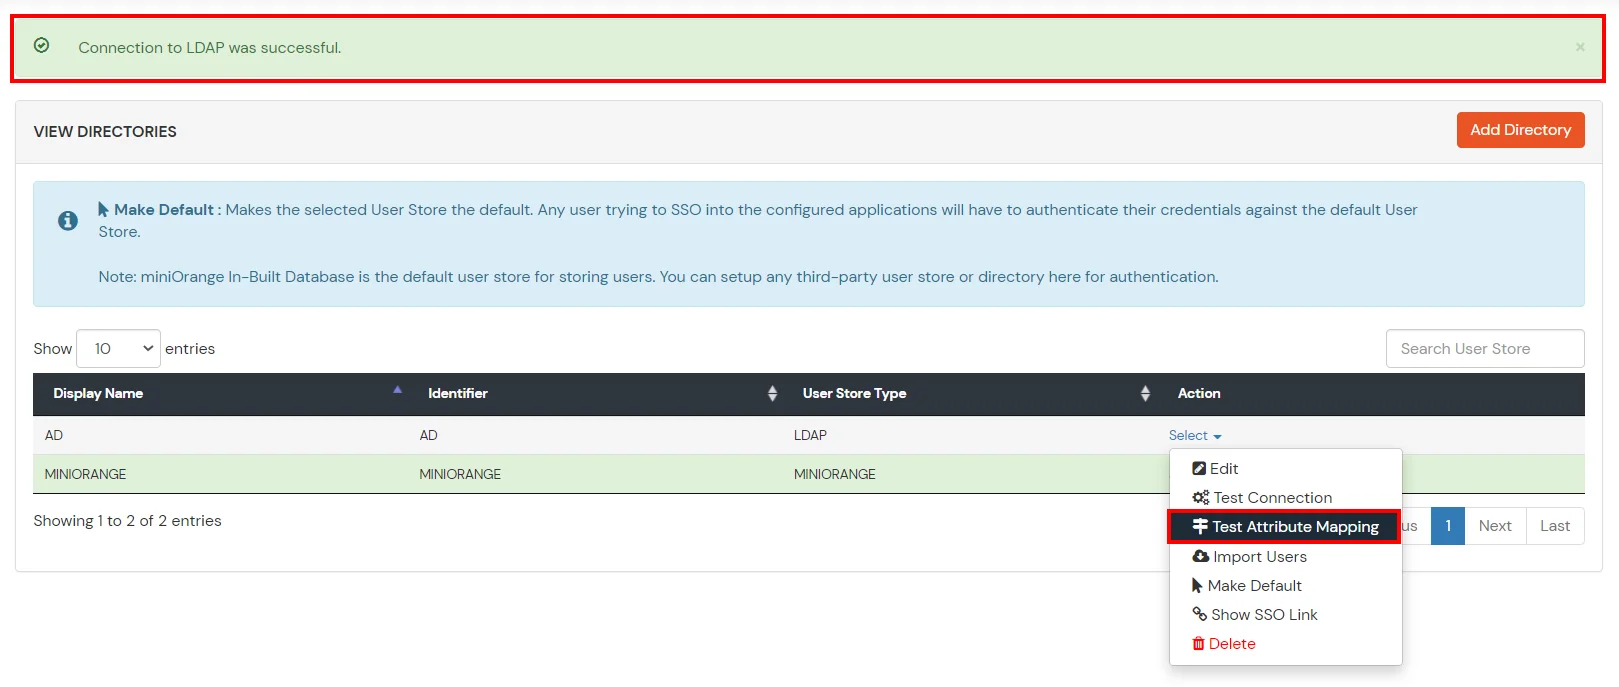
- On Successful connection with LDAP Server, a success message is shown.
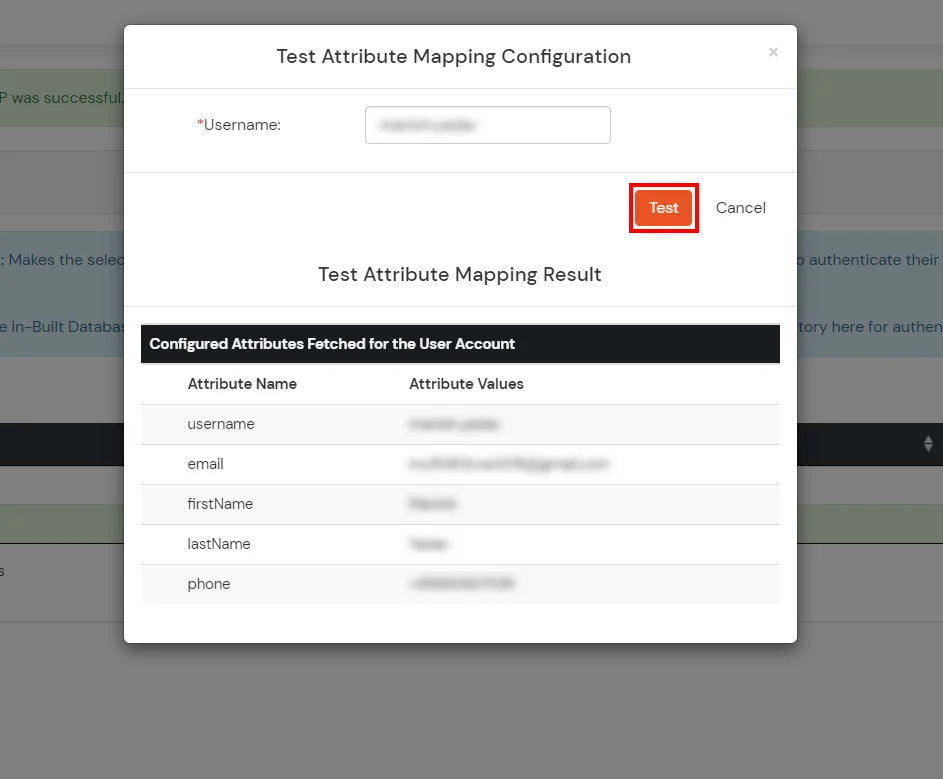
- Click on Test Attribute Mapping.
- Enter a valid Username. Then, click on Test. Mapped Attributes corresponding to the user are fetched.
- After successful Attribute Mapping Configuration, go back to the ldap configuration and enable Activate LDAP in order to authenticate users from AD/LDAP.
Refer our guide to setup LDAPS on windows server.
User Import and Provisioning from AD
- Go to Settings >> Product Settings in the Customer Admin Account.
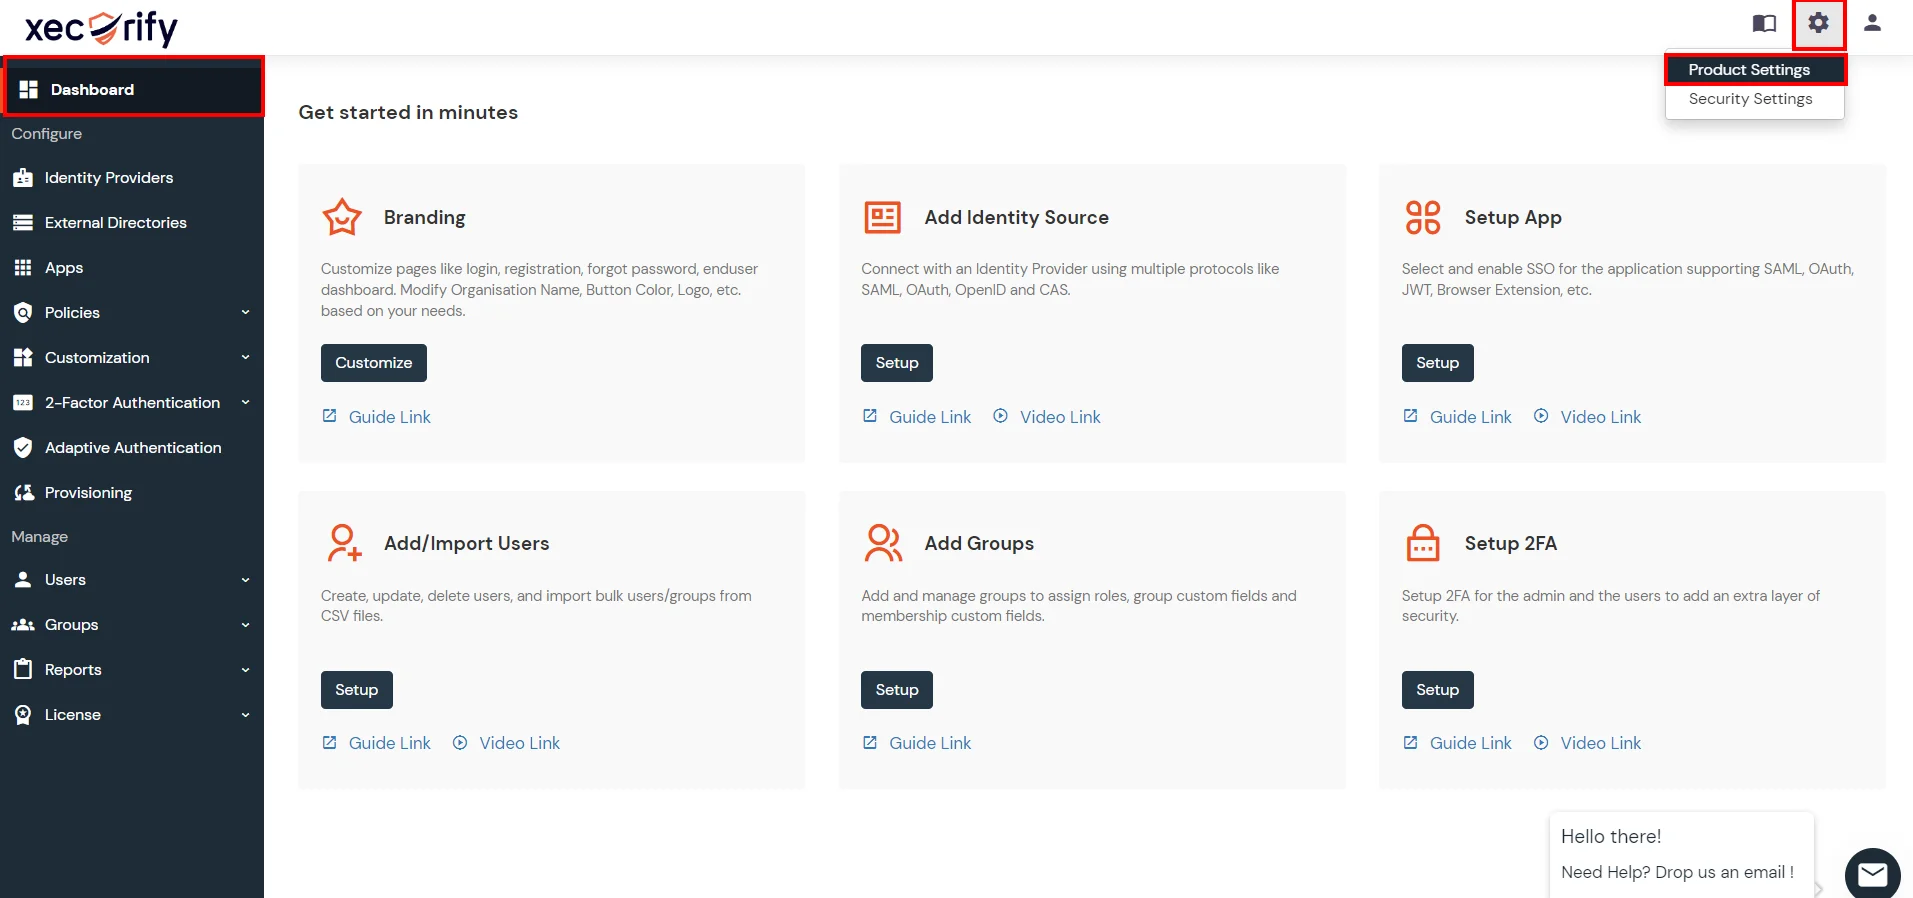
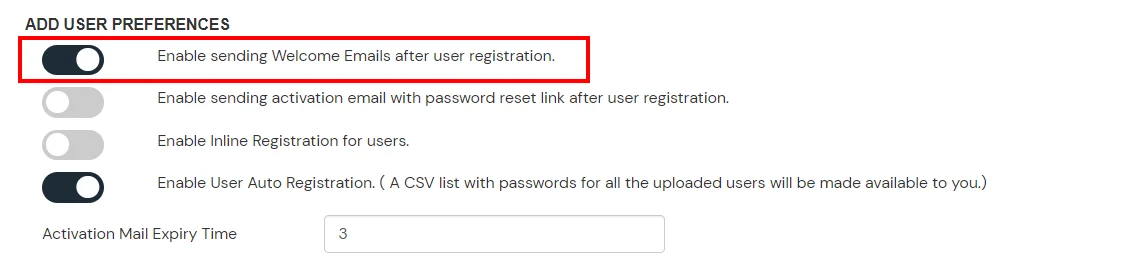
- Enable the "Enable User Auto Registration" option and click Save.

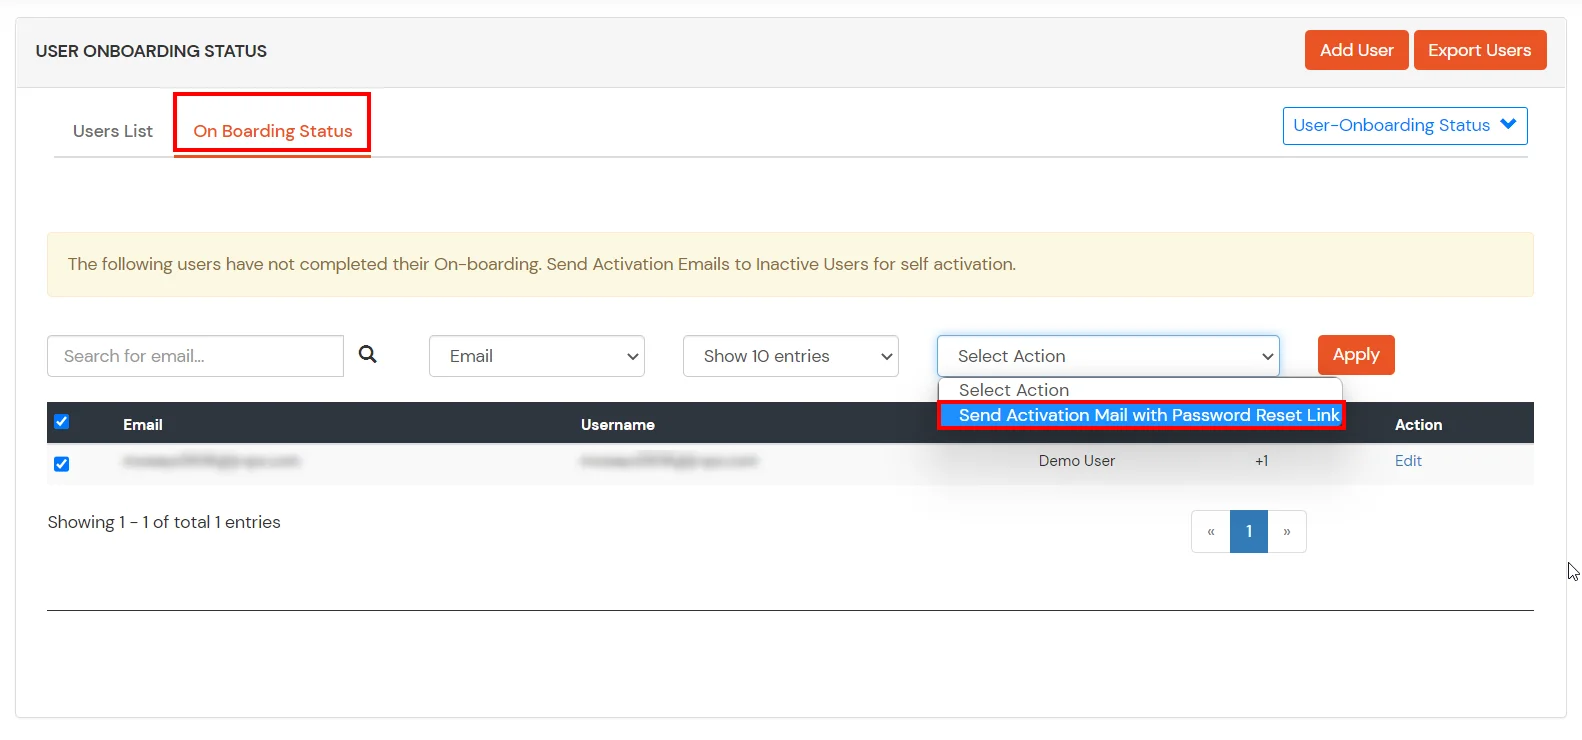
- (Optional) To send a welcome email to all the end users that will be imported, enable the "Enable sending Welcome Emails after user registration" option and click Save.
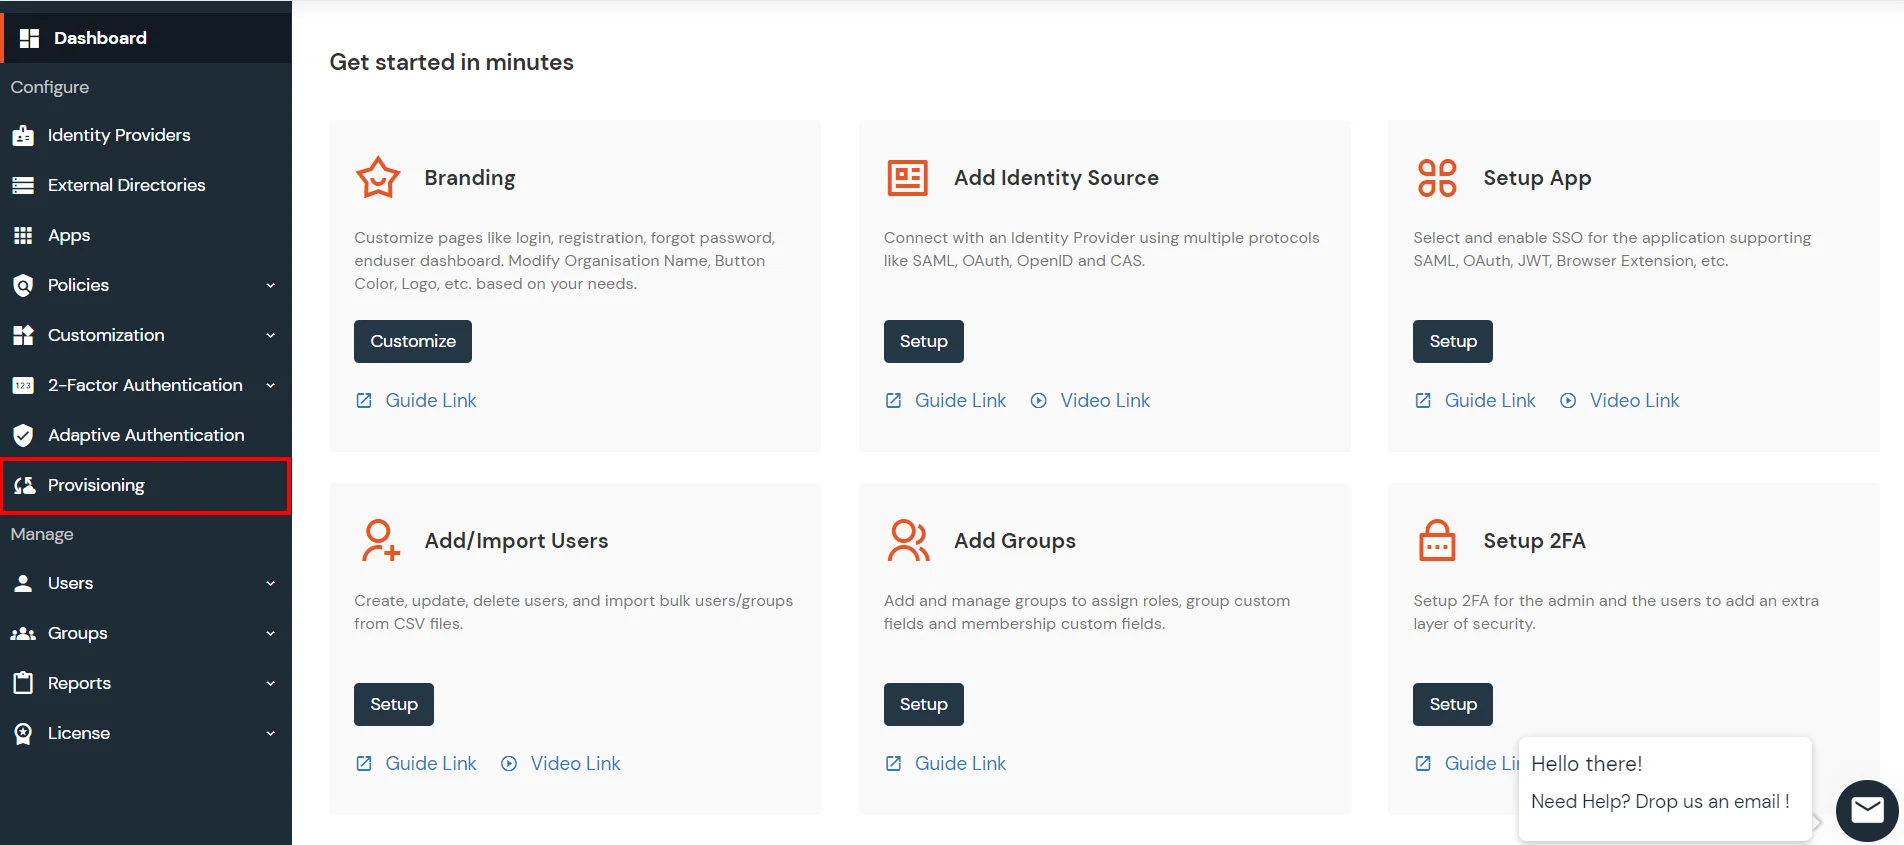
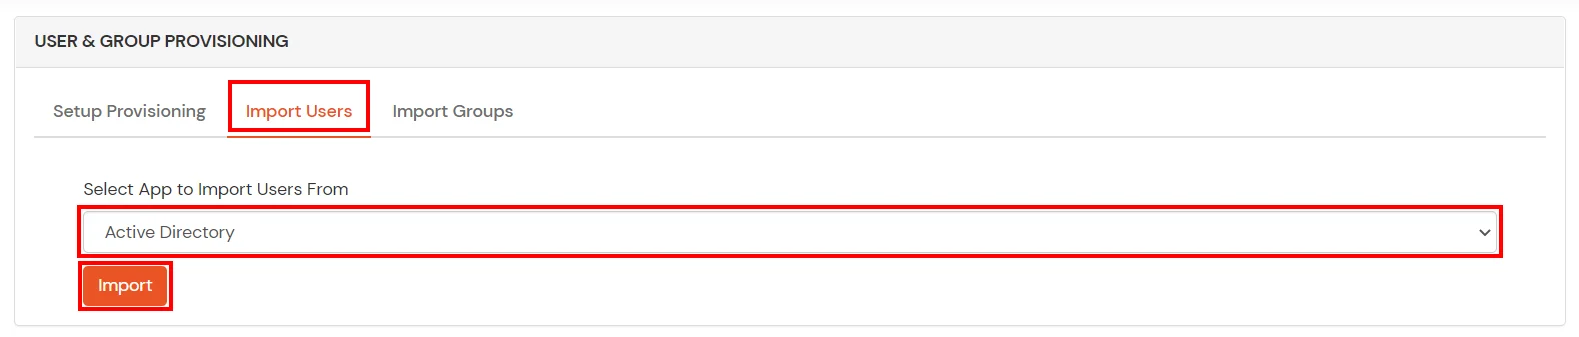
- From the Left-Side menu of the dashboard select Provisioning.
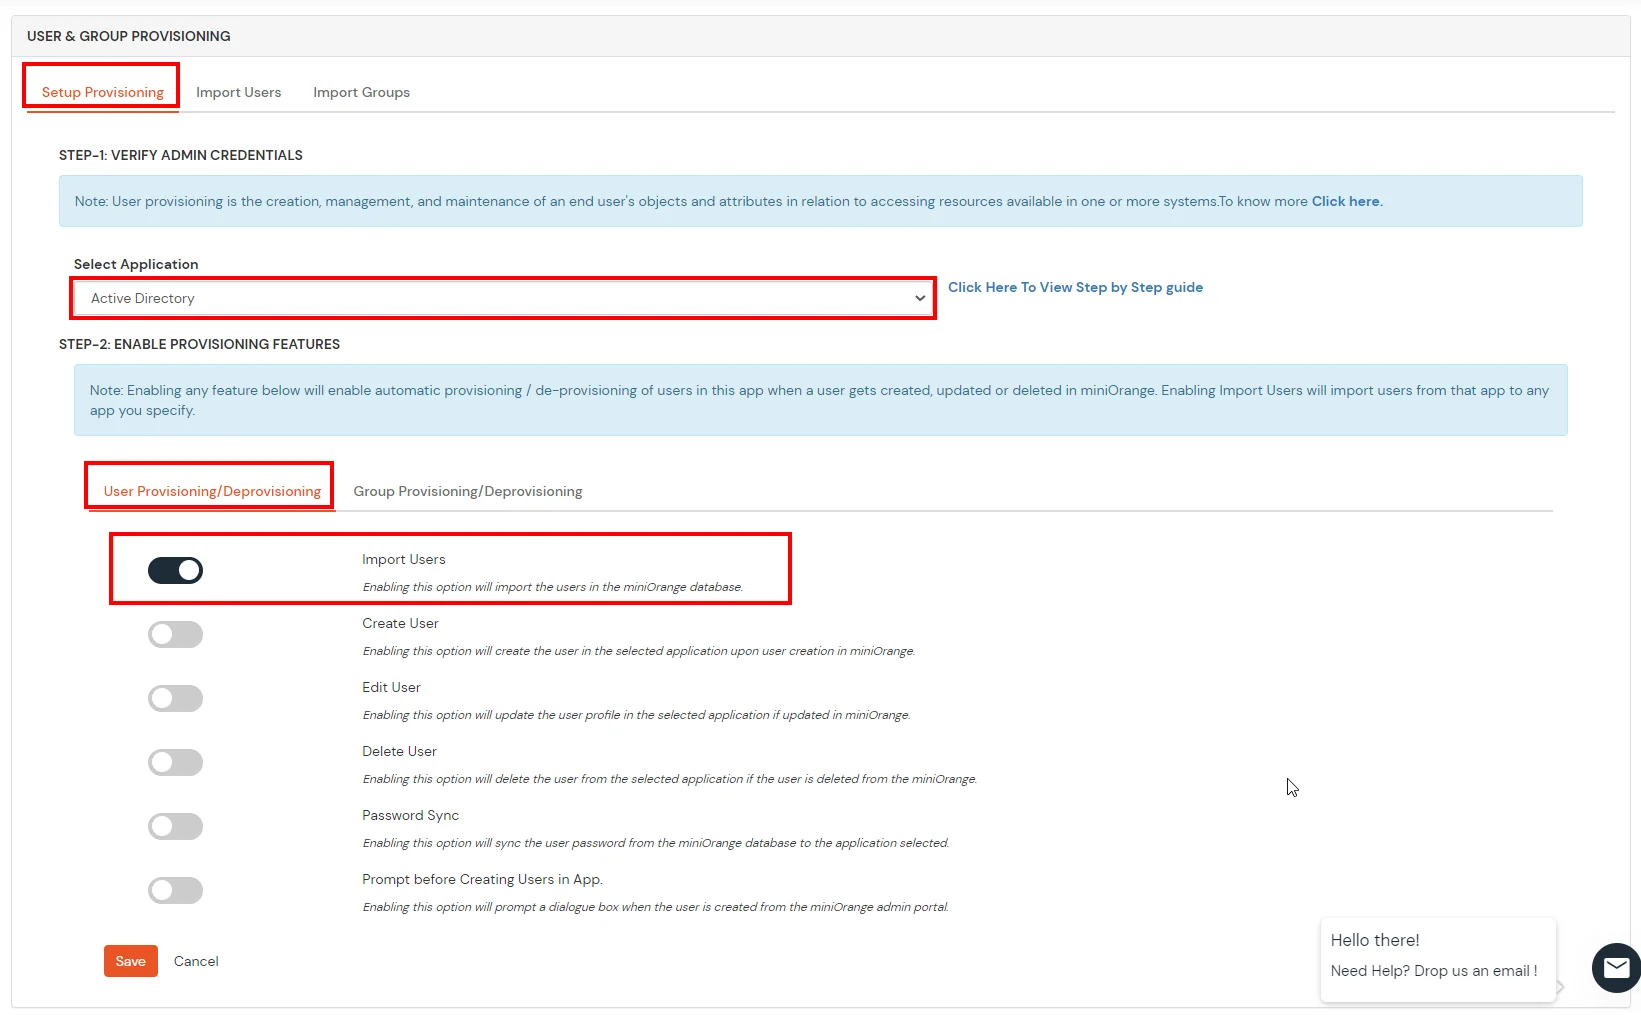
- In Setup Provisioning tab select Active Directory in the Select Application drop-down.
- Toggle the Import Users tab, click on Save button.
- On the same section, switch to Import Users section.
- Select Active Directory from the dropdown and click on the Import Users tab, to import all the users from Active Directory to miniOrange.
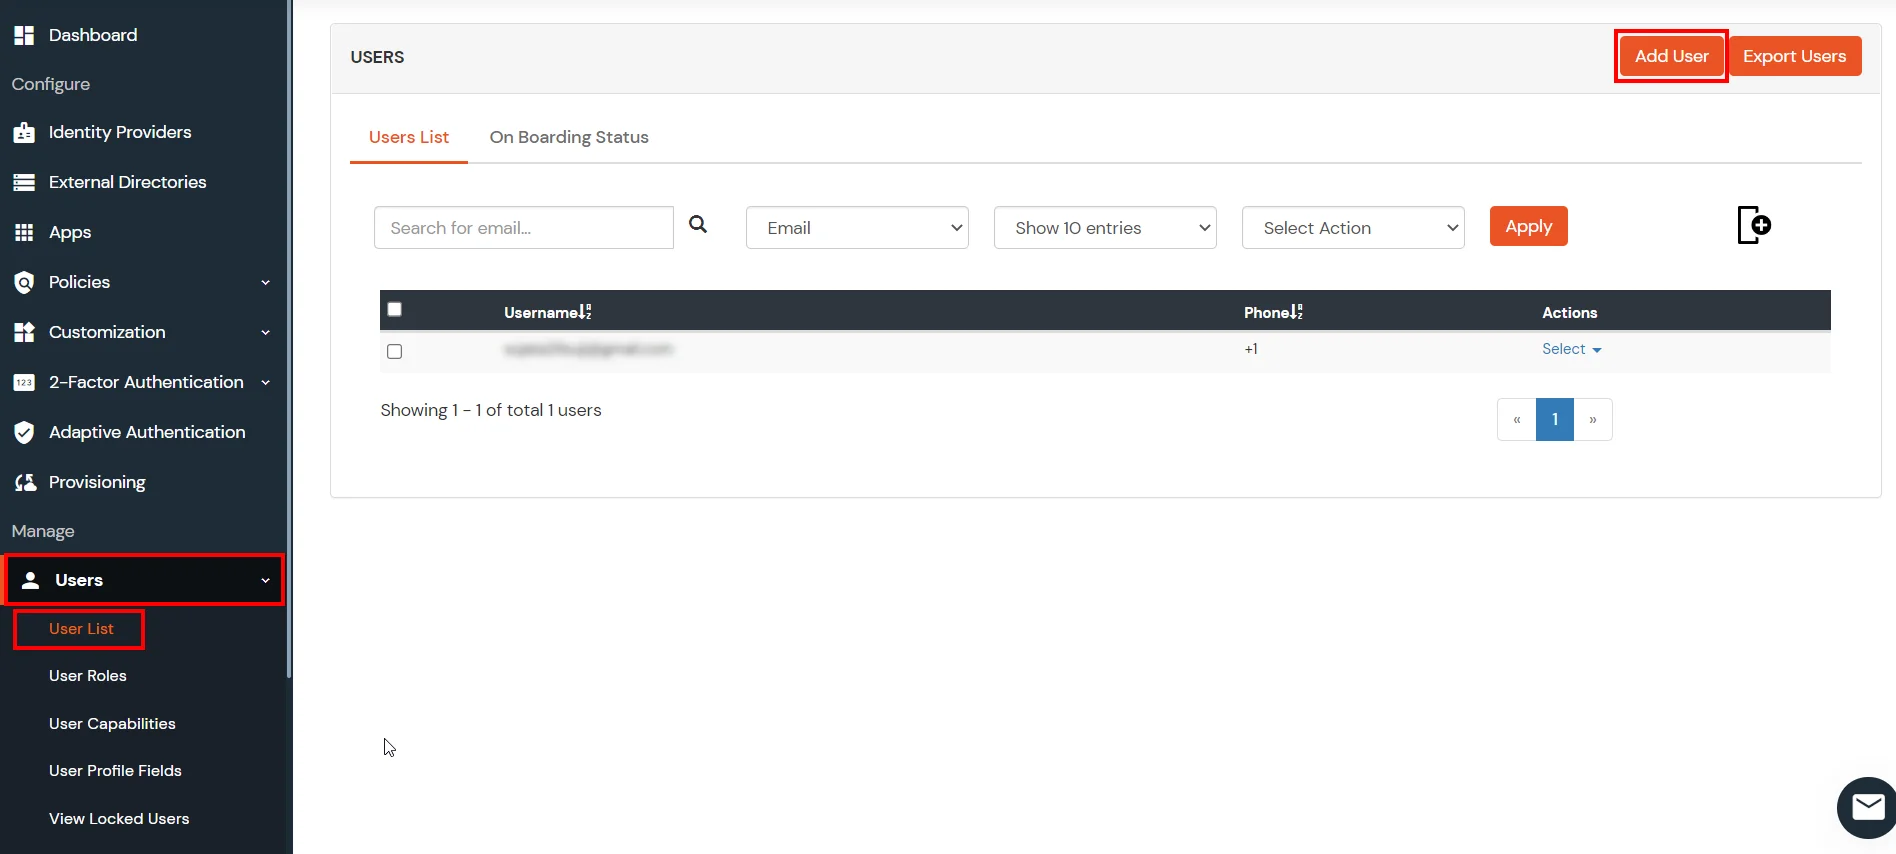
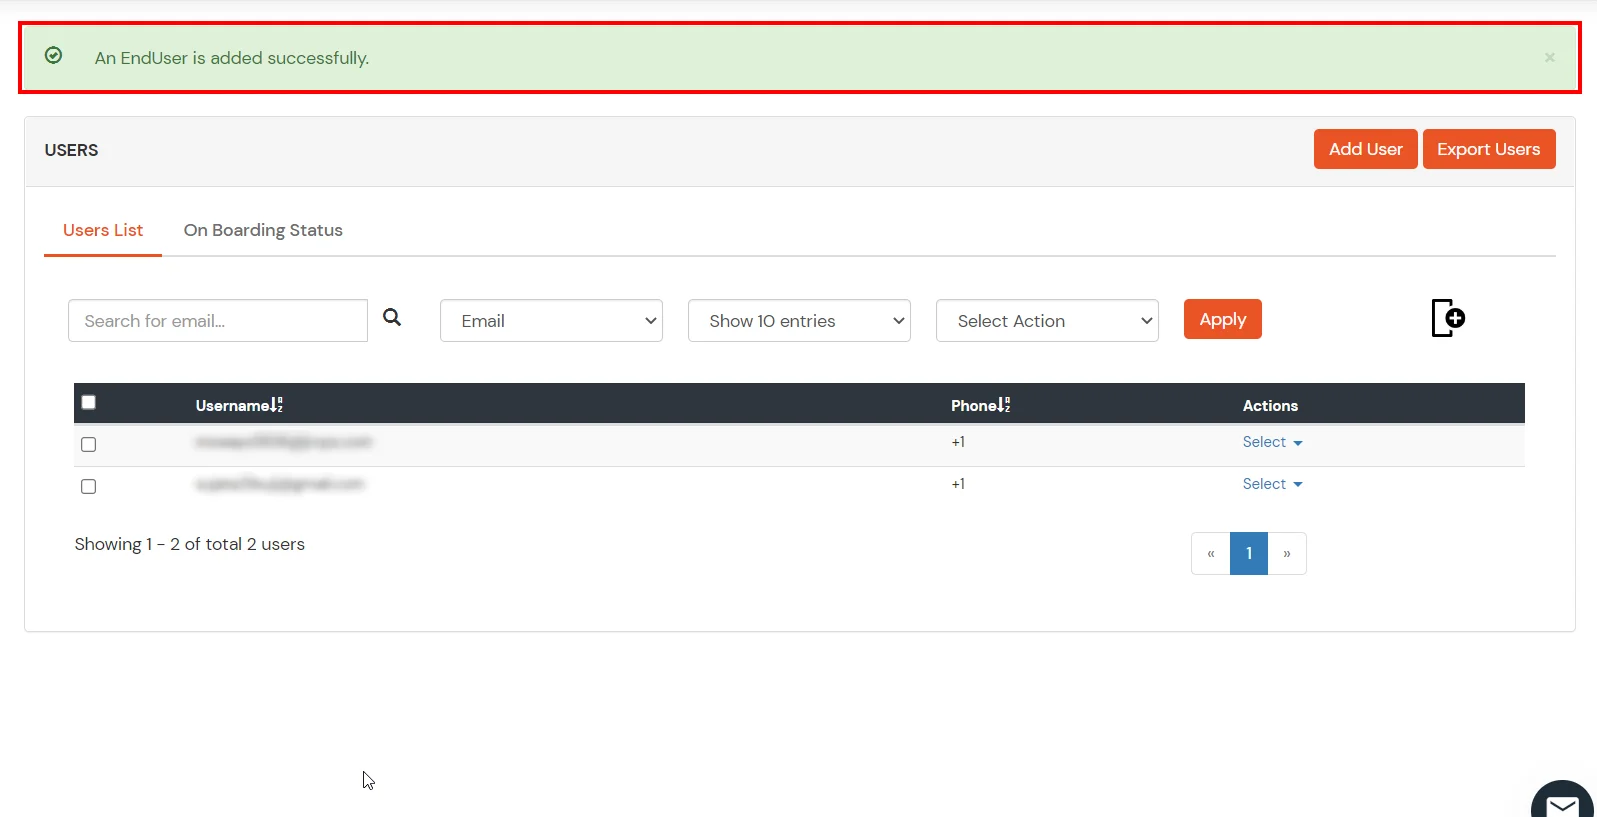
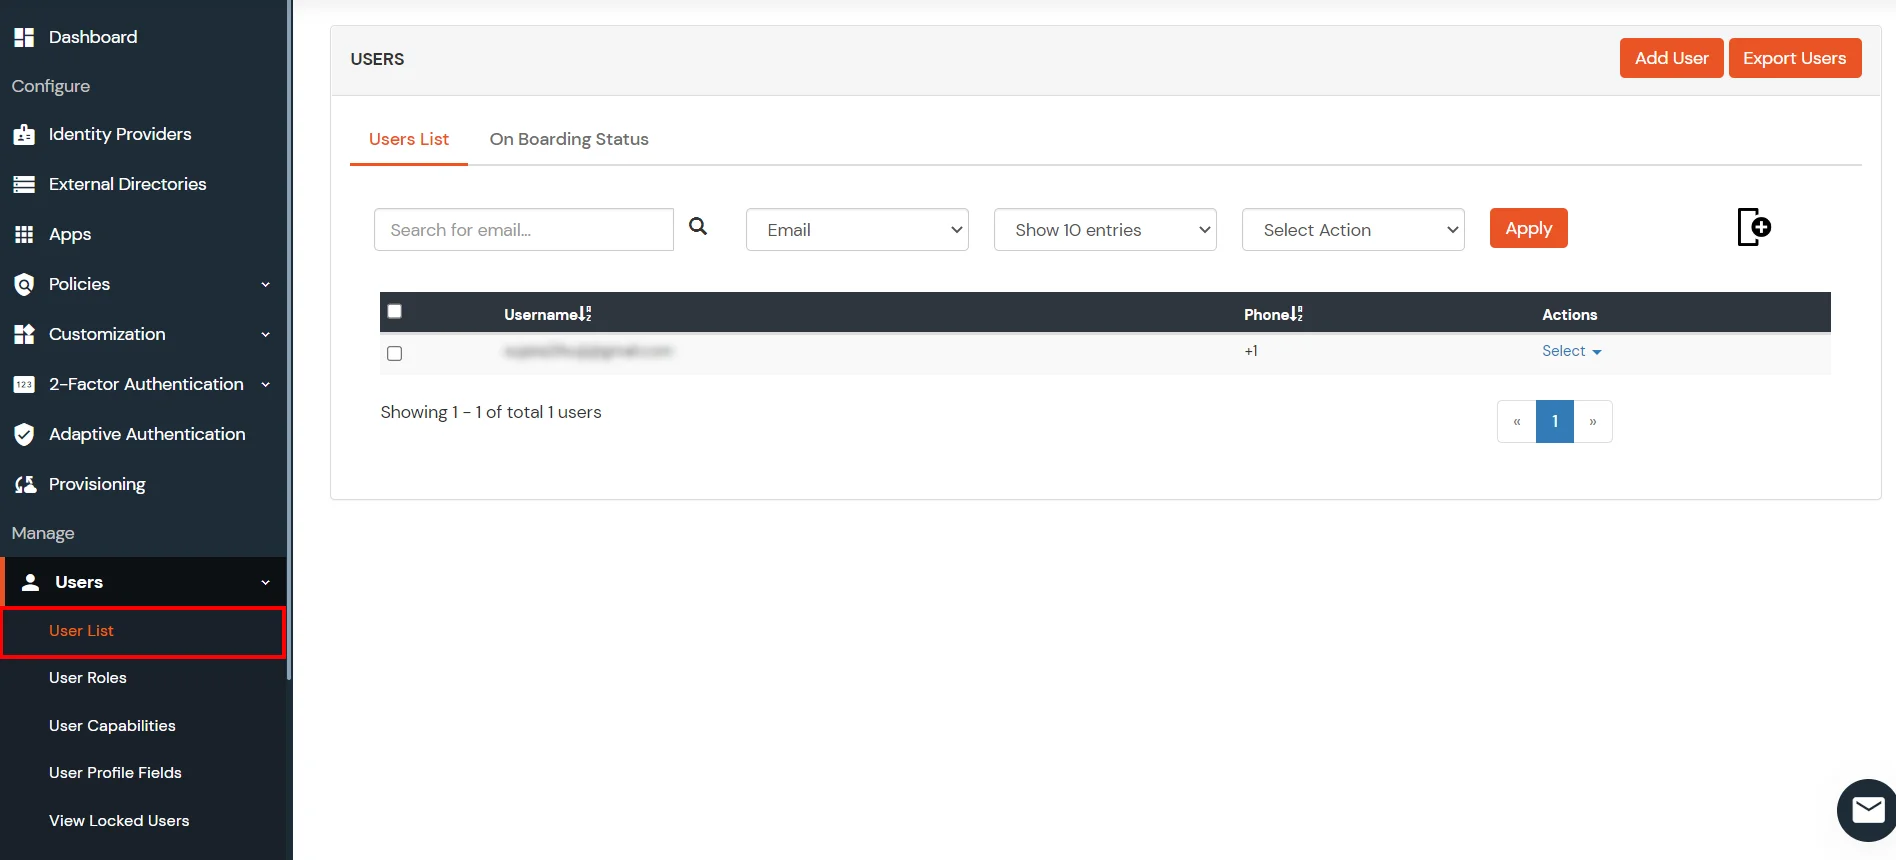
- You can view all the Users you have imports by selecting Users >> User List from Left Panel.
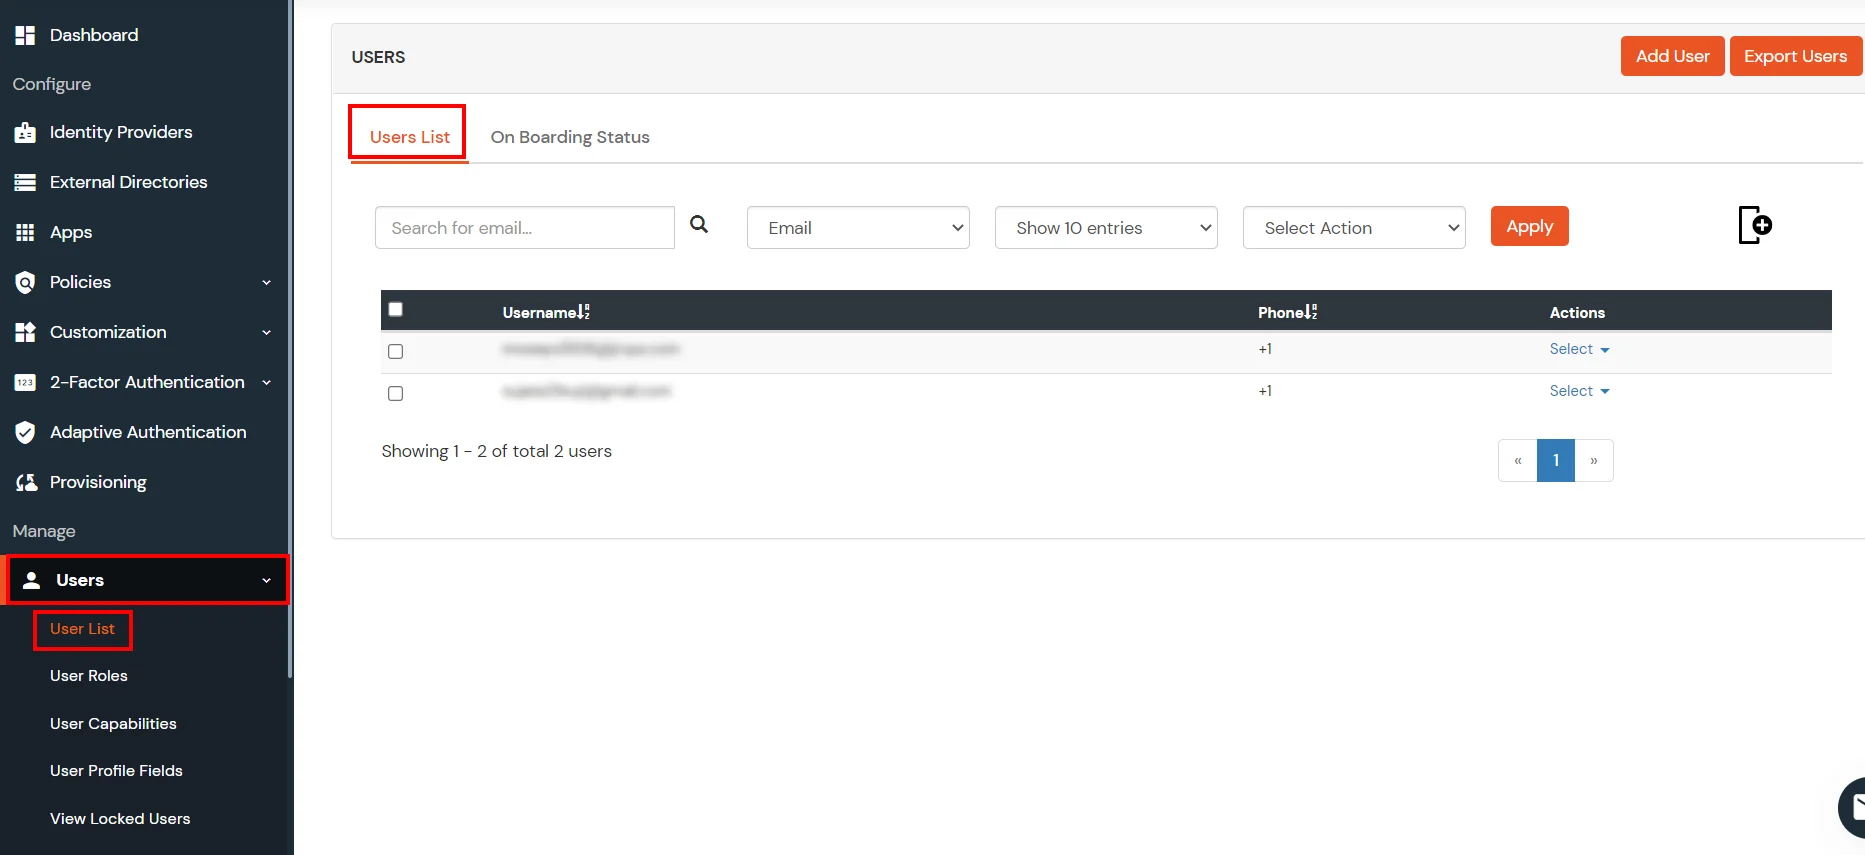
- All the imported users will be auto registered.
- These groups will be helpful in adding multiple 2FA policies on the applications.
miniOrange integrates with various external user sources such as directories, identity providers, and etc.
External References