Hello there!

Need Help? We are right here!

Support Icon
miniOrange Email Support
success

Thanks for your Enquiry. Our team will soon reach out to you.

If you don't hear from us within 24 hours, please feel free to send a follow-up email to info@xecurify.com

Search Results:

×

Webflow SSO with Microsoft Entra ID


Webflow Microsoft Entra ID integration by miniOrange helps customers allow their users to access Microsoft Entra ID credentials for seamless access to Webflow using SSO. This solution ensures that you are ready to roll out secure access to Webflow using Microsoft Entra ID within minutes instead of managing users in Webflow. miniOrange also provides 30-days free trial to test out the solution on your own.

miniOrange Webflow integration is just not limited to Microsoft Entra ID but you can easily connect with any of your IDP (Okta, Ping, Microsoft, etc), Active & LDAP without migrating your users. Webflow SSO integration helps your organization's time and efforts with improved security to your data present in the cloud or on-premise.
Note: You don't need any enterprise plan or premium feature to enable SSO for Webflow.

Video Setup Guide


Prerequisites

Please make sure your organisation branding is already set under Customization >> Login and Registration Branding in the left menu of the dashboard.


Connect with External Source of Users


miniOrange provides user authentication from various external sources, which can be Directories (like ADFS, Microsoft Active Directory, OpenLDAP, AWS etc), Identity Providers (like Microsoft Entra ID, Okta, AWS), and many more. You can configure your existing directory/user store or add users in miniOrange.


Follow the step-by-step guide given below for Webflow Single Sign-On (SSO) with AzureAD

1. Configure Webflow in miniOrange:

  • Login into miniOrange Admin Console.
  • miniOrange Identity Platform Admin Handbook: Dashboard applications

  • Go to Apps and click on Add Application button.
  • Webflow Single Sign-On (SSO) add app

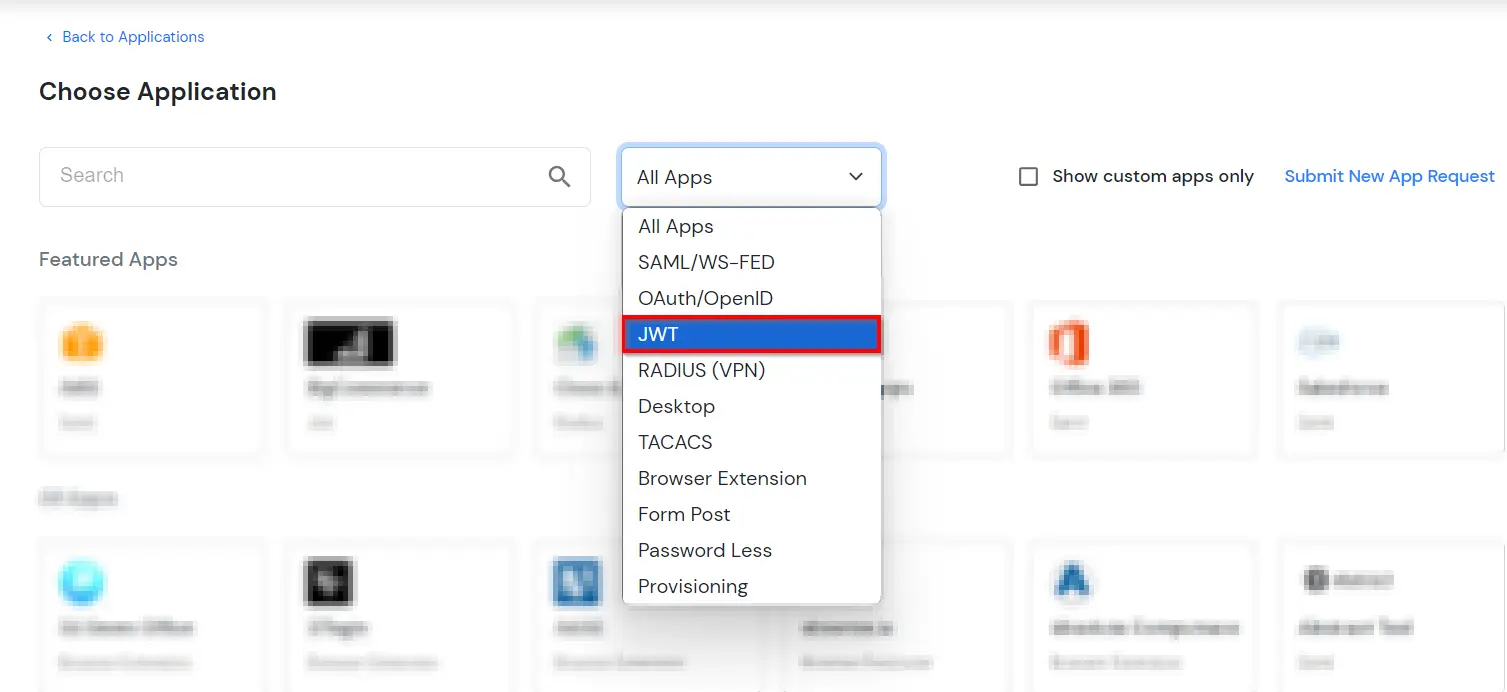
  • In Choose Application, select JWT from the application type dropdown.
  • miniOrange Identity Platform Admin Handbook: Select JWT App from the All Apps dropdown

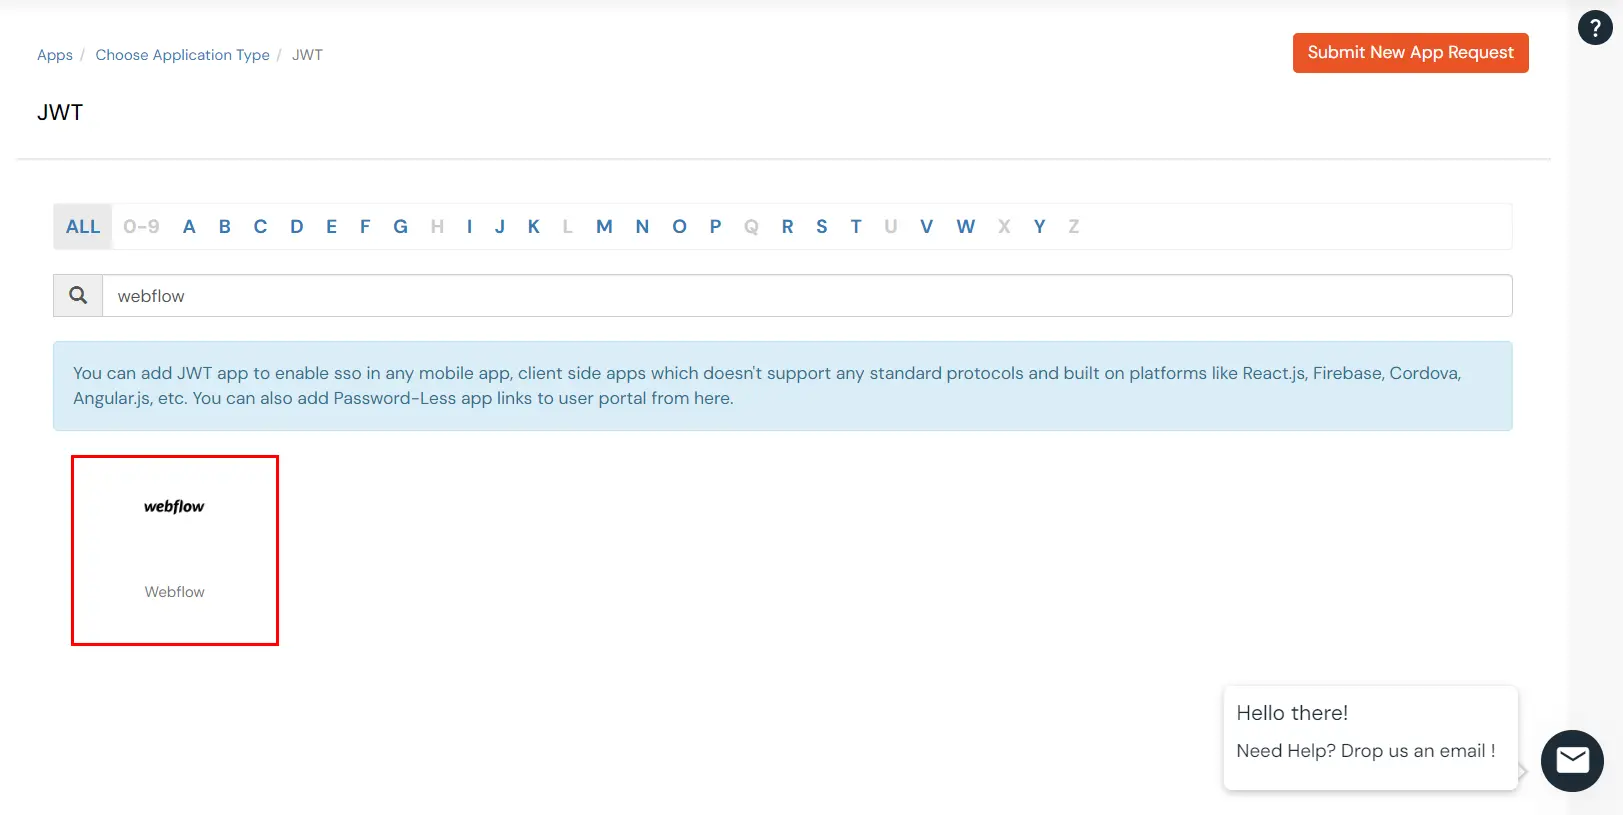
  • In the next step, search for Webflow application from the list. If your application is not found, search for JWT App and you can set up your Application.
  • Configure JWT application: Search Webflow JWT application

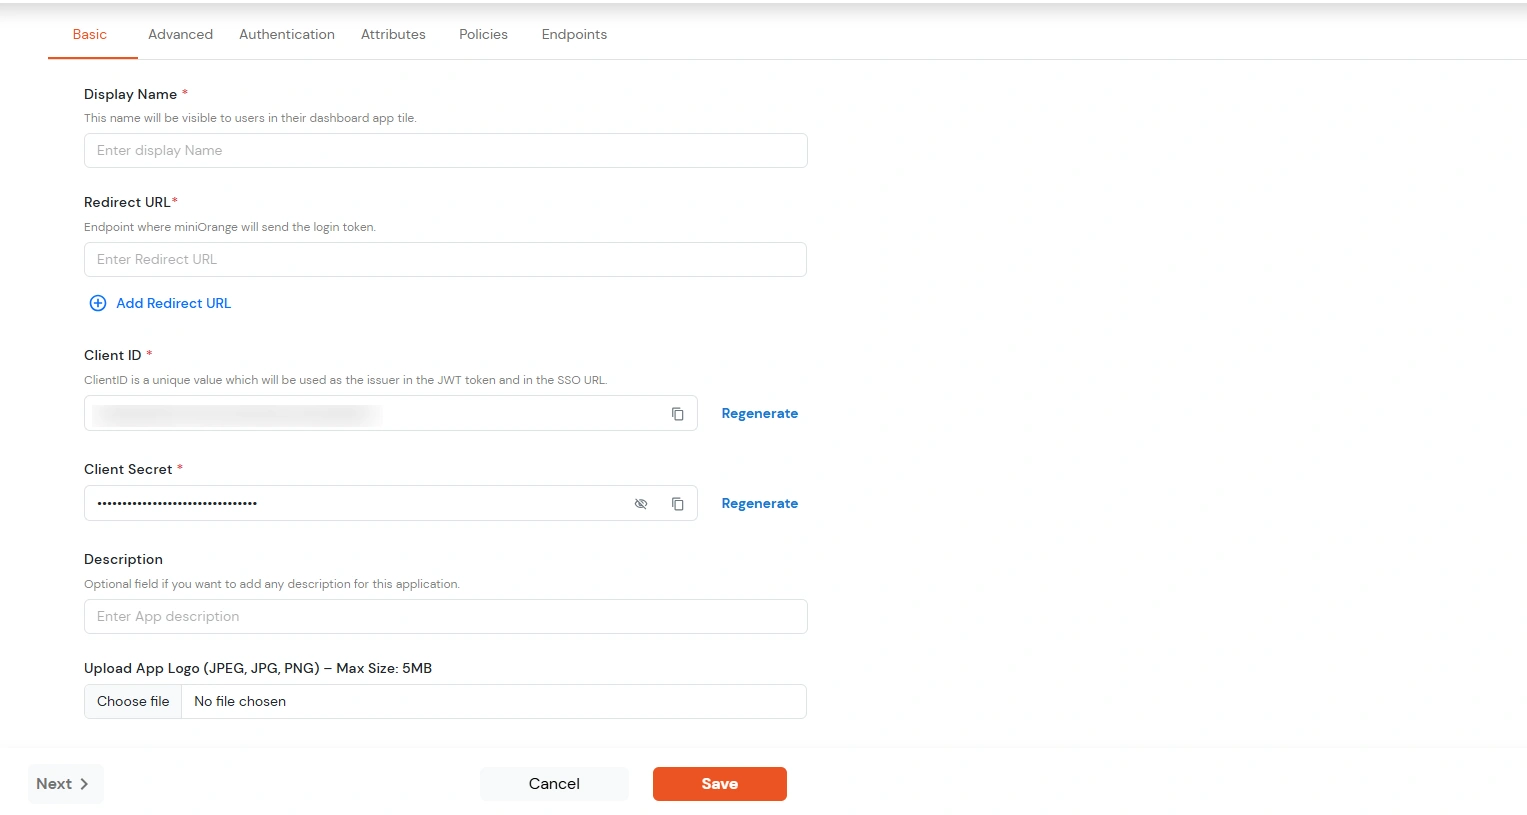
  • You can configure the following details in the application:
    Display Name Enter the Display Name (i.e. the name for this application)
    Redirect URL Enter the Redirect URL (i.e. the endpoint where you want to send/post your JWT token). You can add multiple redirect URLs by separating them with a ‘;’.E.g. abc.com;xyz.com
    Client ID The Client ID is shown in the field below. Click the clipboard icon to copy it.
    Client Secret Client Secret is hidden by default. Click the eye icon to reveal it and use the clipboard icon to copy it. This is used in the HS256 signature algorithm for generating the signature.
    Description (Optional) Add a description if required.
  • miniOrange Identity Platform Admin Handbook: Enter JWT app details

  • Click Save.
  • You will be redirected to the Policies section. Click Add Policy.
  • miniOrange Identity Platform Admin Handbook: Go to Policies and Add Policy

  • A dialog box will open enter the following details:
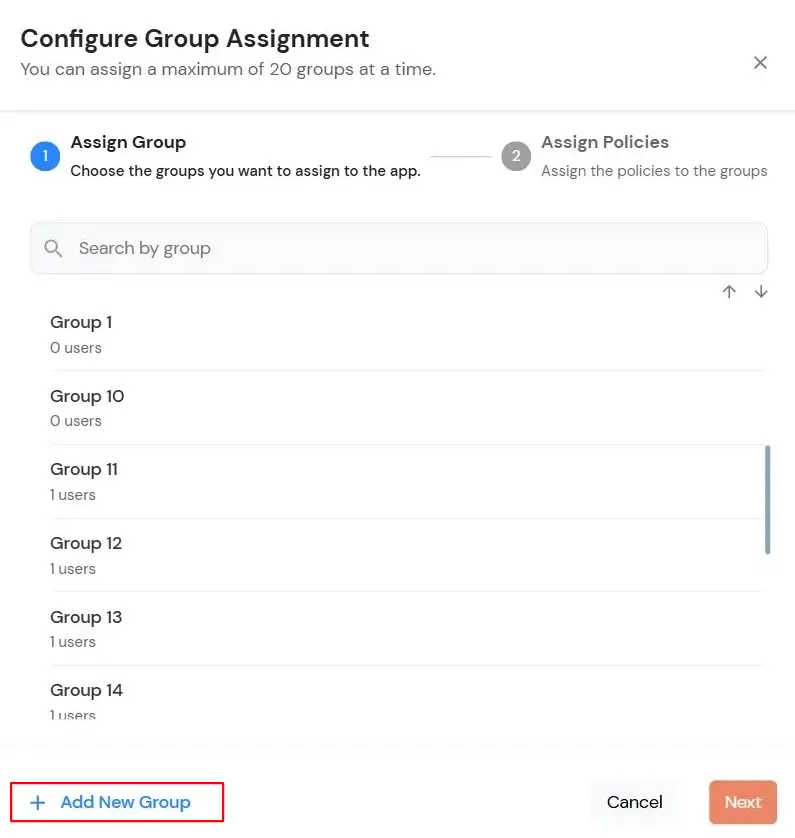
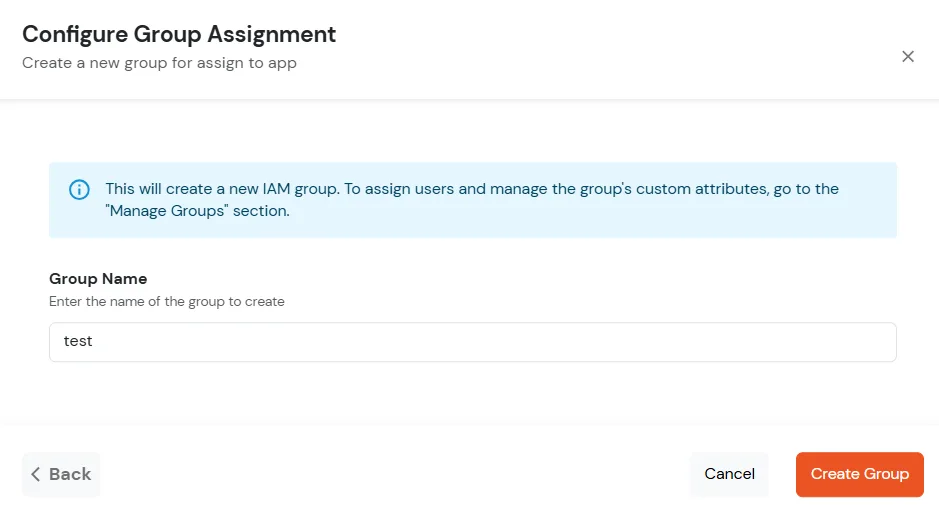
    Group Name Select the group for which you wish to add a this policy. For multiple groups, you can click here to add a multiple/separate policies for each group.
    Policy Name You can give a name for the authentication policy.
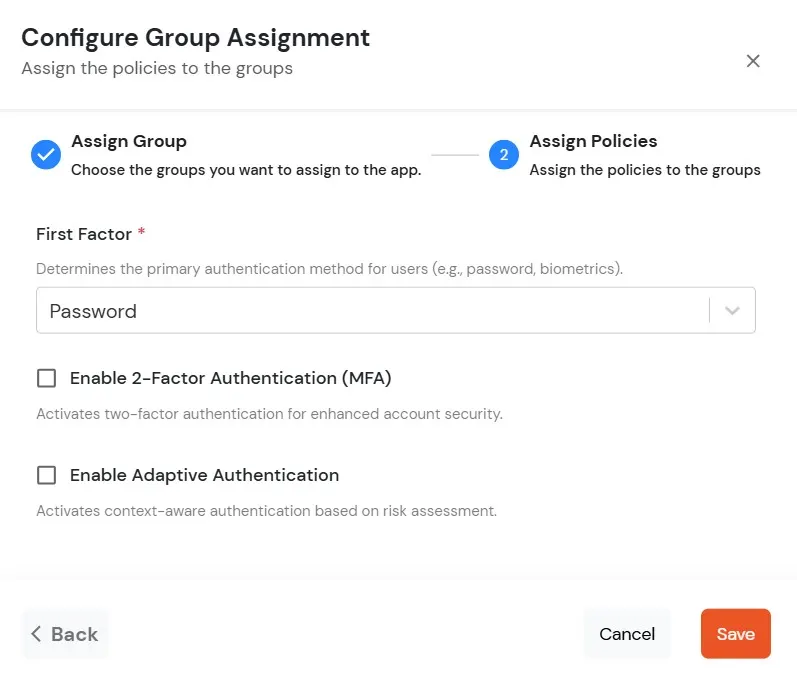
    First Factor Select the login method as Password and Password-less. You can enable 2-Factor Authentication (MFA), Adaptive Authentication and Force MFA On Each Login Attempt.
  • miniOrange Identity Platform Admin Handbook: Under the Add Login Policy, provide the details

  • Click Submit to add the policy.
  • You will see the policy listed once it’s successfully added.
  • miniOrange Identity Platform Admin Handbook: Policy was successfully added

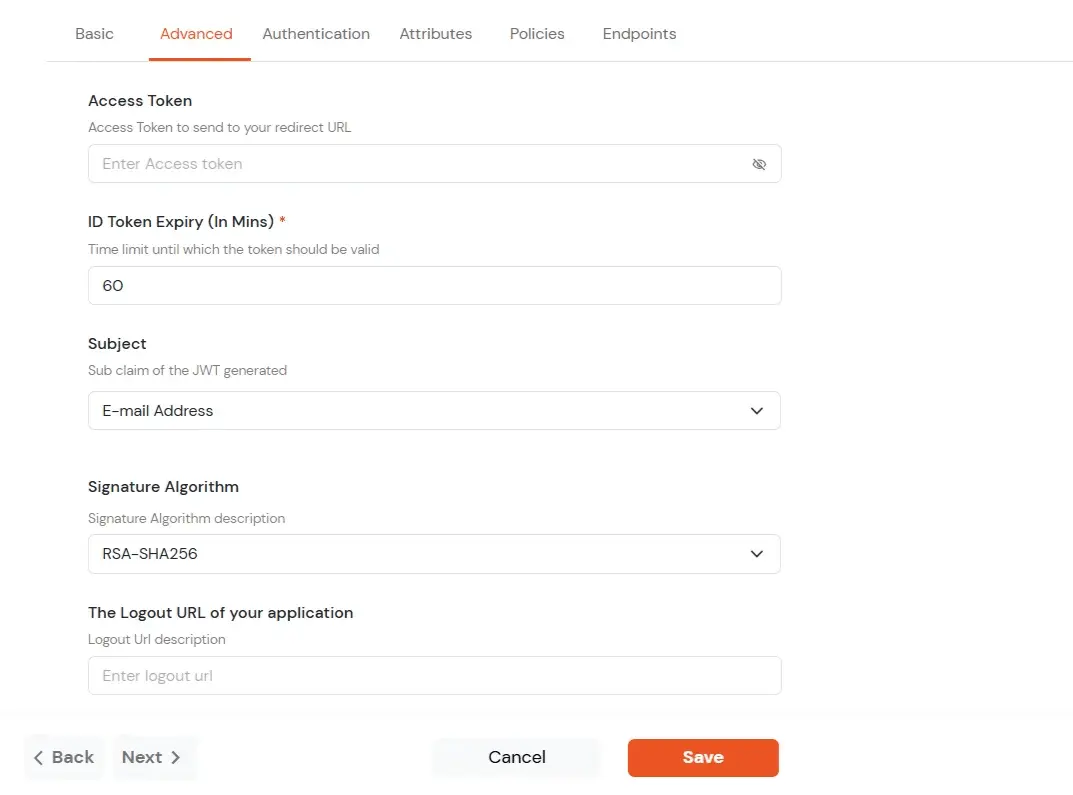
  • Click on Advanced tab.
  • Enter the following details as required:
    Access Token Enter the access token that will be sent to your redirect URL after a user logs in. This token helps your app know the user is allowed to access certain features.
    ID Token Expiry (In Mins) Set how long (in minutes) the ID token will be valid. After this time, the user will need to log in again to get a new token.
    Subject Choose what information, like the user’s email address, will be used to identify them in the token. This helps your app know which user is logged in.
    Signature Algorithm Select your signature algorithm from the dropdown.
    The Logout URL of your application Enter the web address where users should be sent after they log out.
  • miniOrange Identity Platform Admin Handbook: Navigate to Advanced tab

  • Signature Algorithms for JWT
    • RSA-SHA256

      • Asymmetric, uses a set of private and public keys to generate and validate the signature which is included in the JWT token.
      • The private key is used to generate the signature on the IDP side.
      • The public key is used to verify the signature on the SP side.
      • We provide the public key for this.

      HS256

      • Symmetric, uses the same secret key to generate and validate the signature
      • The secret key in this case is configurable from the app configuration page.
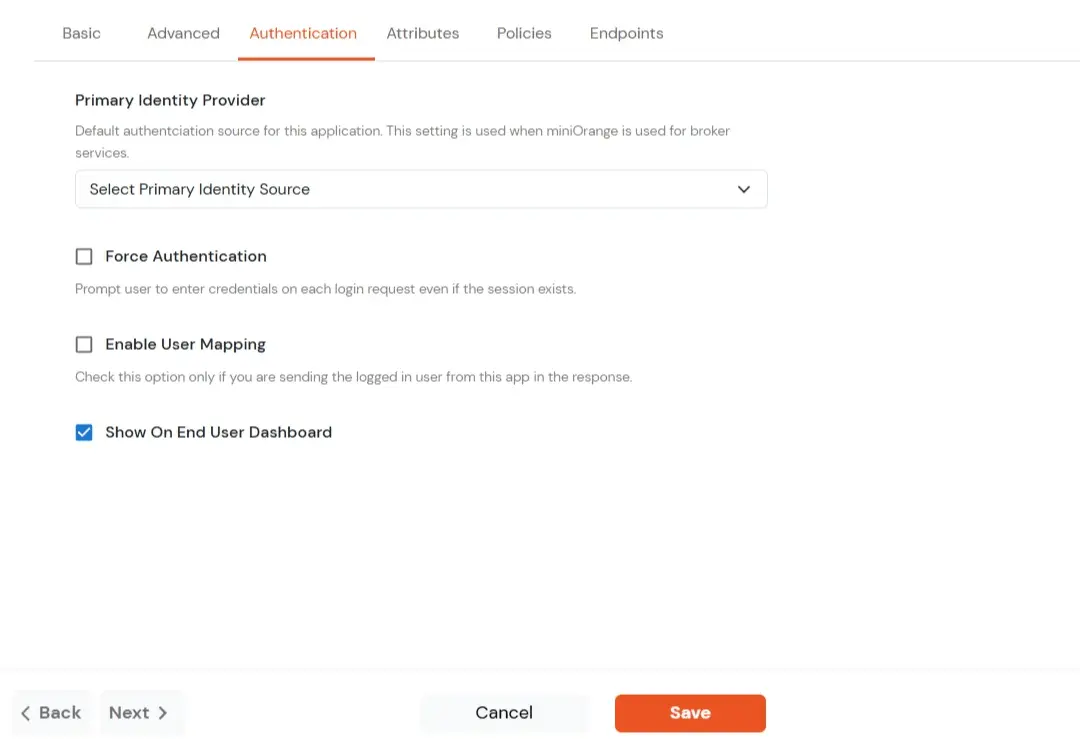
  • Switch to Authentication tab.
    Primary Identity Provider Select the default ID source from the dropdown for the application. If not selected, users will see the default login screen and can choose their own IDP. [Choose miniOrange in this case.]
    Force Authentication If you enable this option, users will have to log in every time, even if their session already exists.
    Enable User Mapping Enable this option, if you want the app to show which user is signed in when it responds.
    Show On End User Dashboard Enable this option if you want to show this app in the end-user dashboard.
  • miniOrange Identity Platform Admin Handbook: Navigate to Authentication tab

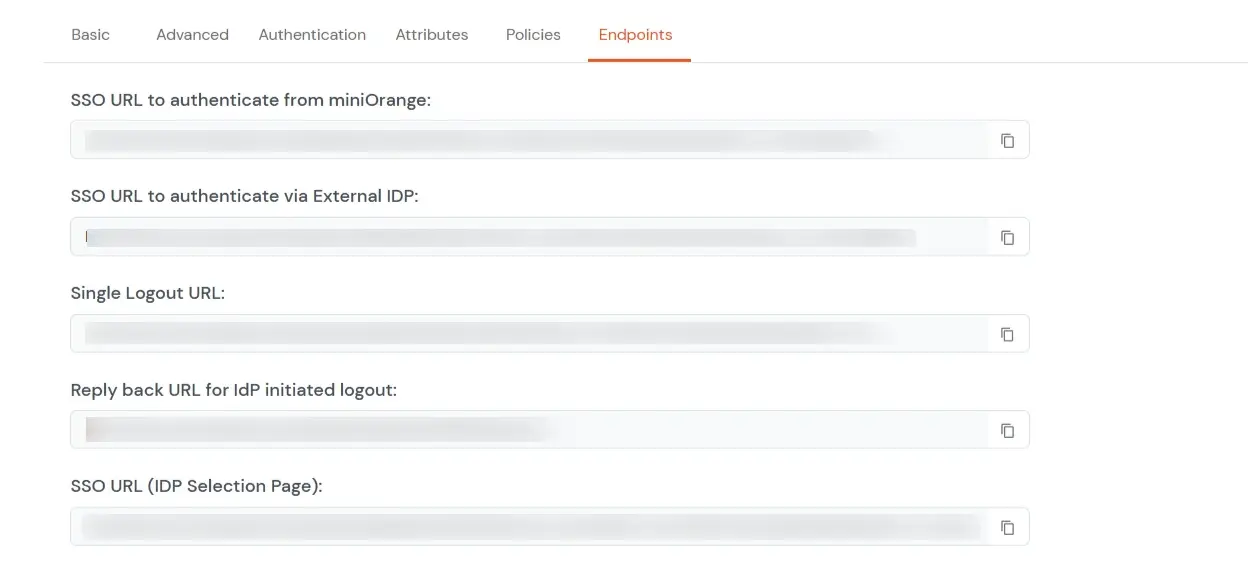
  • Navigate to Endpoints and copy the following details:
  • miniOrange Identity Platform Admin Handbook: Navigate to Endpoints and copy the following URLs

    • Single Sign-On URL:
      • This URL is used to initiate user authentication to obtain the JWT token.
      • Take redirect_uri as one of the query parameters.
      • After successful authentication on the IDP end, an active user session is created in the IDP and the user is redirected to the redirect_uri with the JWT token.
    • Single Logout URL:
      • This URL is used to log out the user from the IDP by removing the active user session.
      • Take redirect_uri as one of the query parameters.
      • After removing the active user session, the IDP redirects the user to the redirect_uri.
    • Reply back URL for IdP initiated logout:
      • This URL is used to initiate the logout in case the JWT user login was IDP Initiated [User logged in to the dashboard
        first and then initiated the login for the app from the dashboard.]
      • After logging out the user from the IDP, the user is redirected to the IDP dashboard login page.

2. Adding Script on Webflow's End

  • To enable SSO on Webflow's end, all you need to do is add a Single Sign-On URL and Customized Script to retrieve the required attributes from the JWT token.
  • Please click here to contact us for the script which is to be added.

3. Setting up on Microsoft Entra ID


3.a. Configuring miniOrange as Service Provider (SP) in Microsoft Entra ID
  • Log in to Microsoft Entra ID Portal.
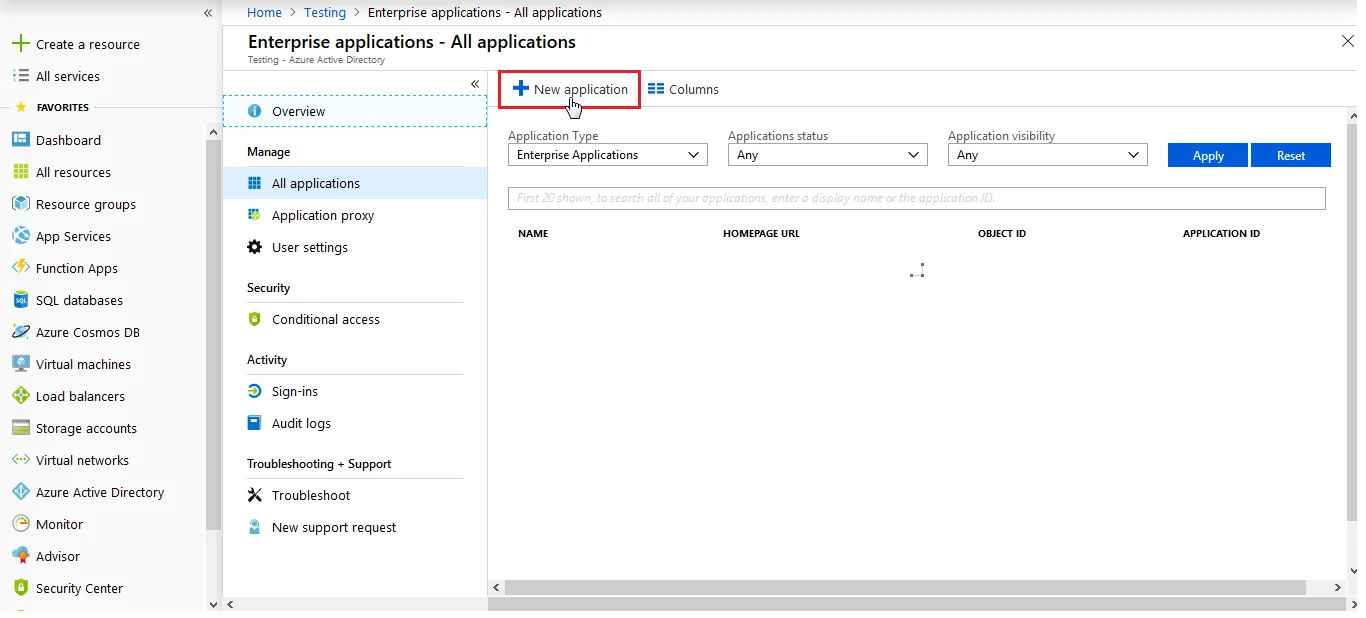
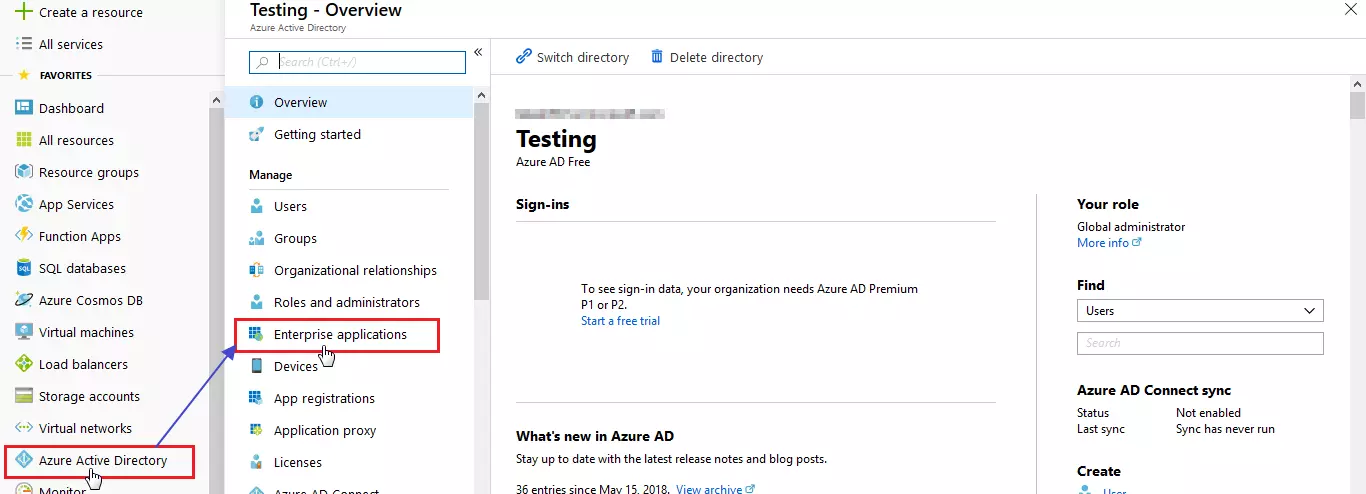
  • Select Microsoft Entra ID (Azure Active Directory) ⇒ Enterprise Applications.
  • Webflow Microsoft Entra ID: Microsoft Entra ID sso Enterprise Applications

  • Click on New Application.

  • Webflow Microsoft Entra ID: Microsoft Entra ID sso New Application

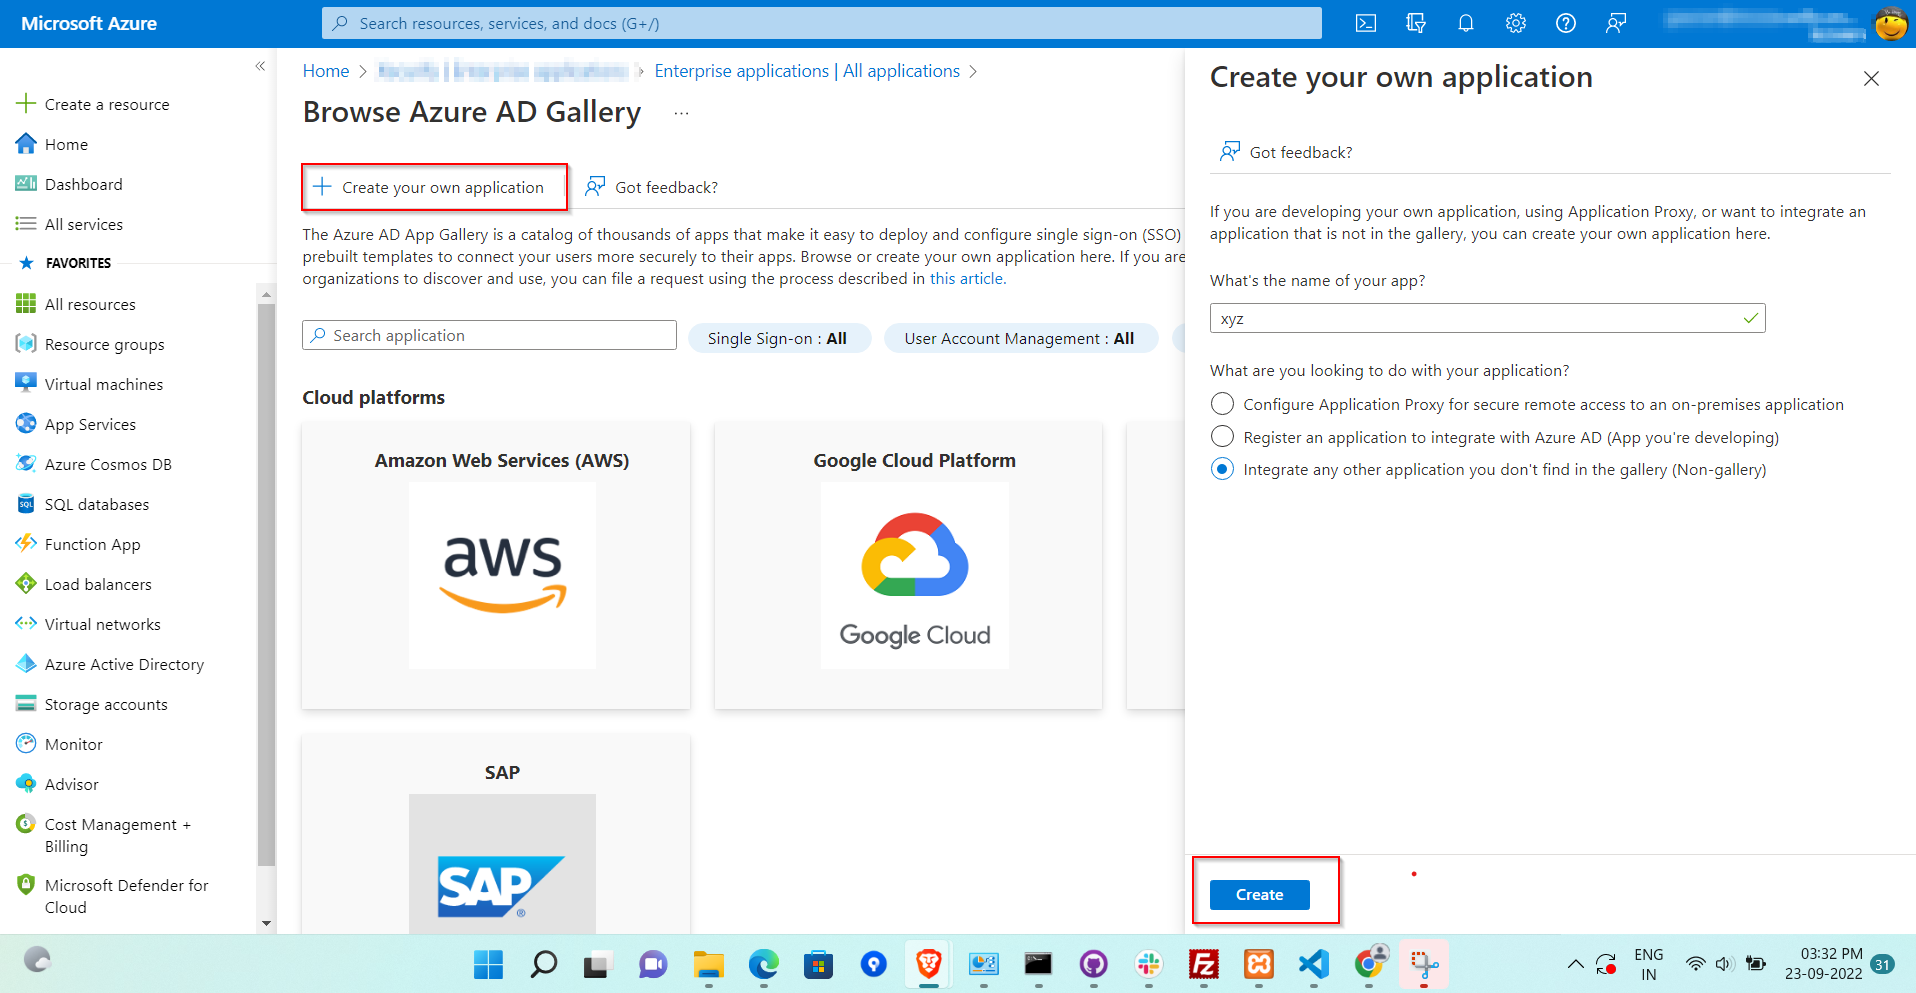
  • Click on Create your own application section and enter the name for your app and click on Create button.
  • Webflow Microsoft Entra ID: Microsoft Entra ID sso Non-gallery application

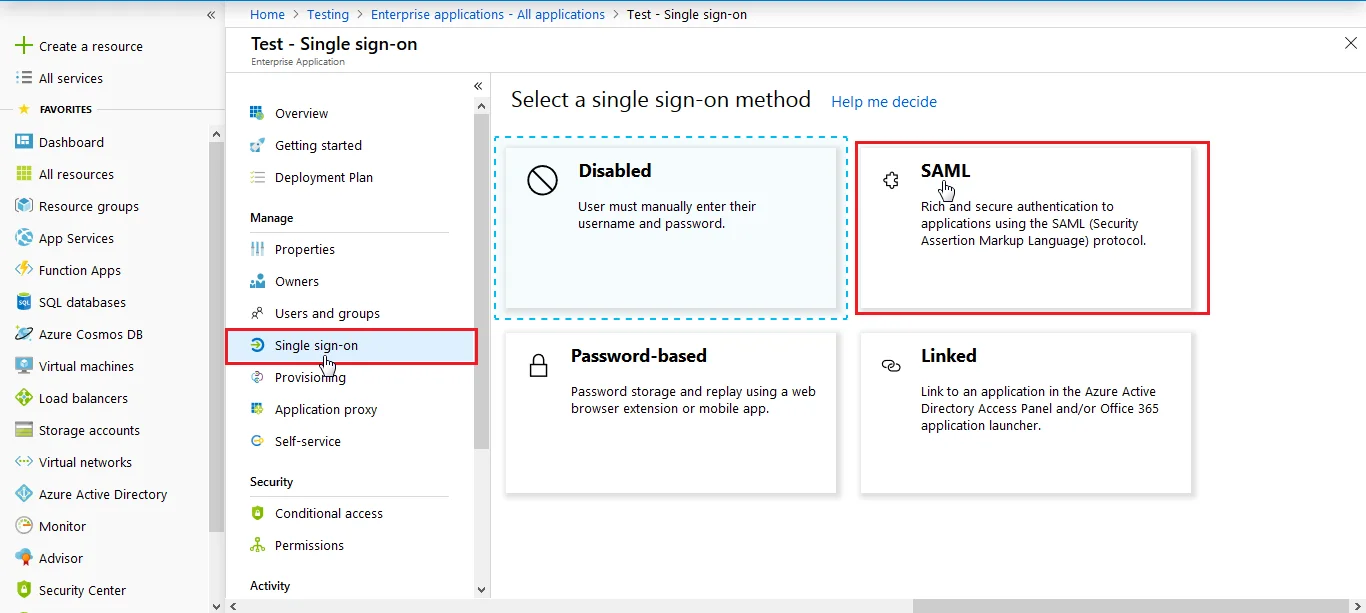
  • Click on Single sign-on from the application's left-hand navigation menu. The next screen presents the options for configuring single sign-on. Click on SAML.
  • Webflow Microsoft Entra ID: Microsoft Entra ID sso Single sign-on

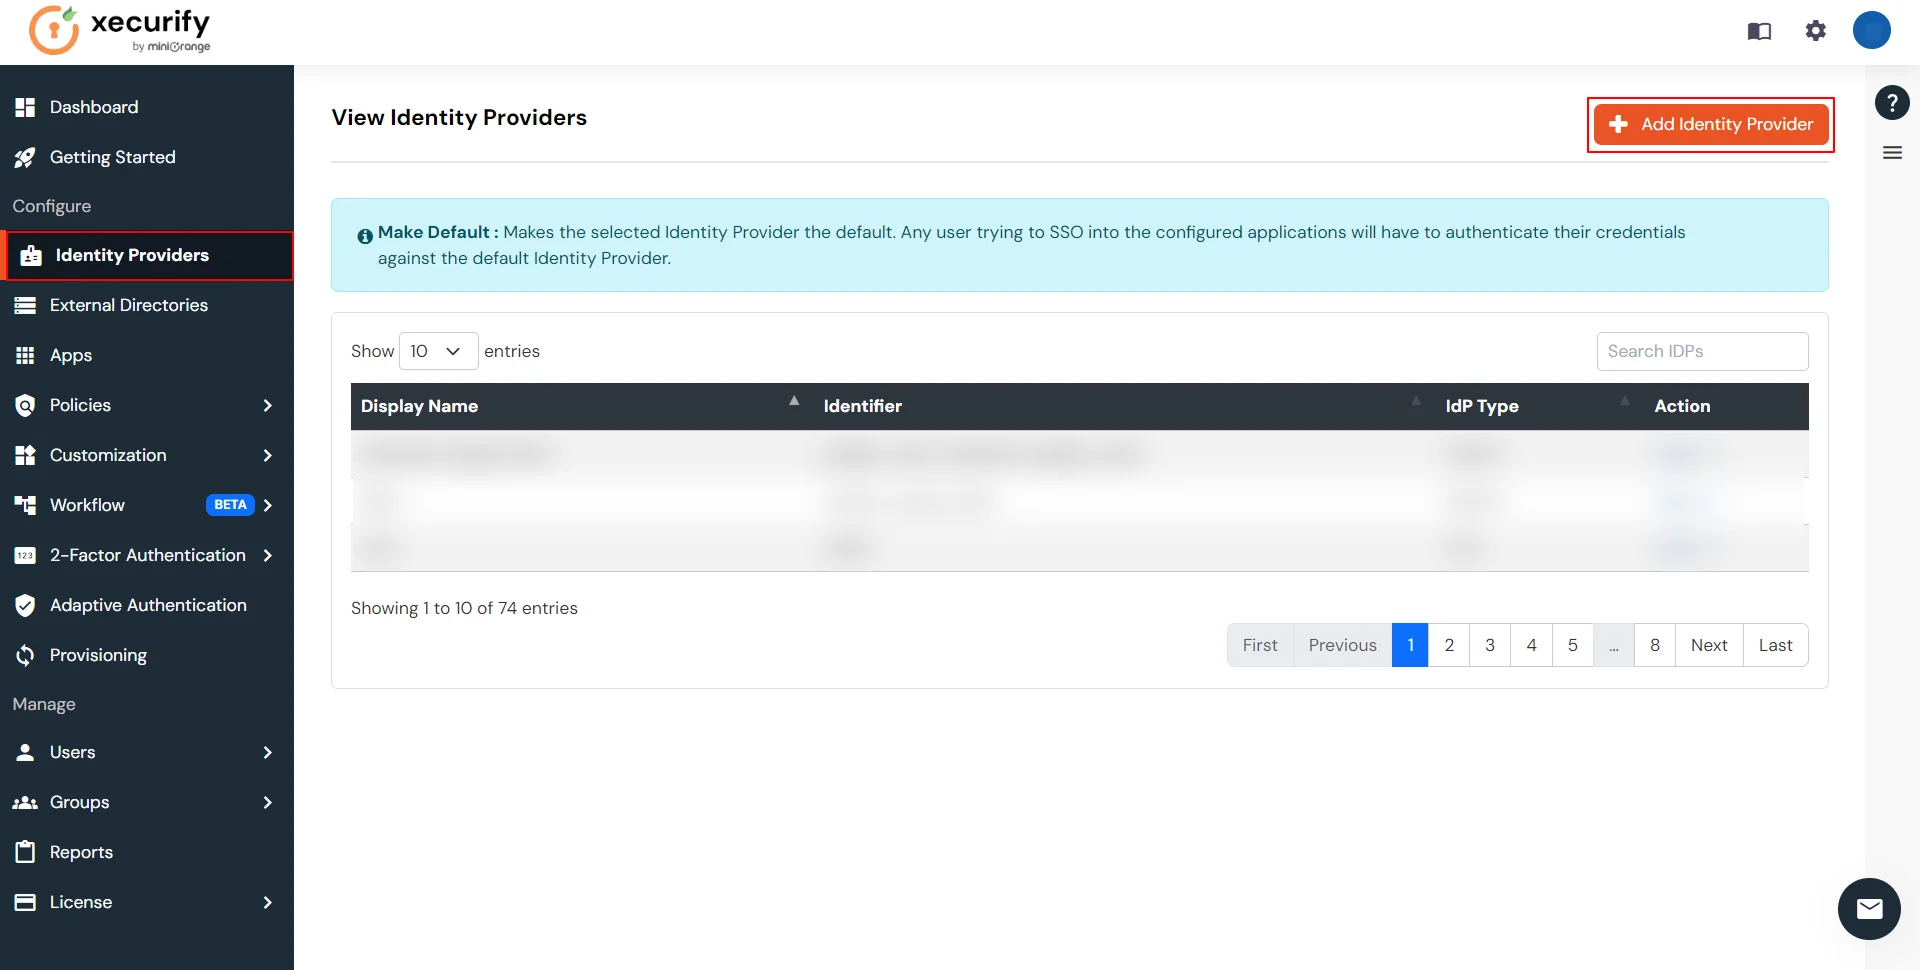
  • Go to miniOrange Admin Console and navigate to Identity Providers in the left navigation menu. Then, click on Add Identity Provider button.
  • Webflow Microsoft Entra ID: Microsoft Entra ID add external IDP

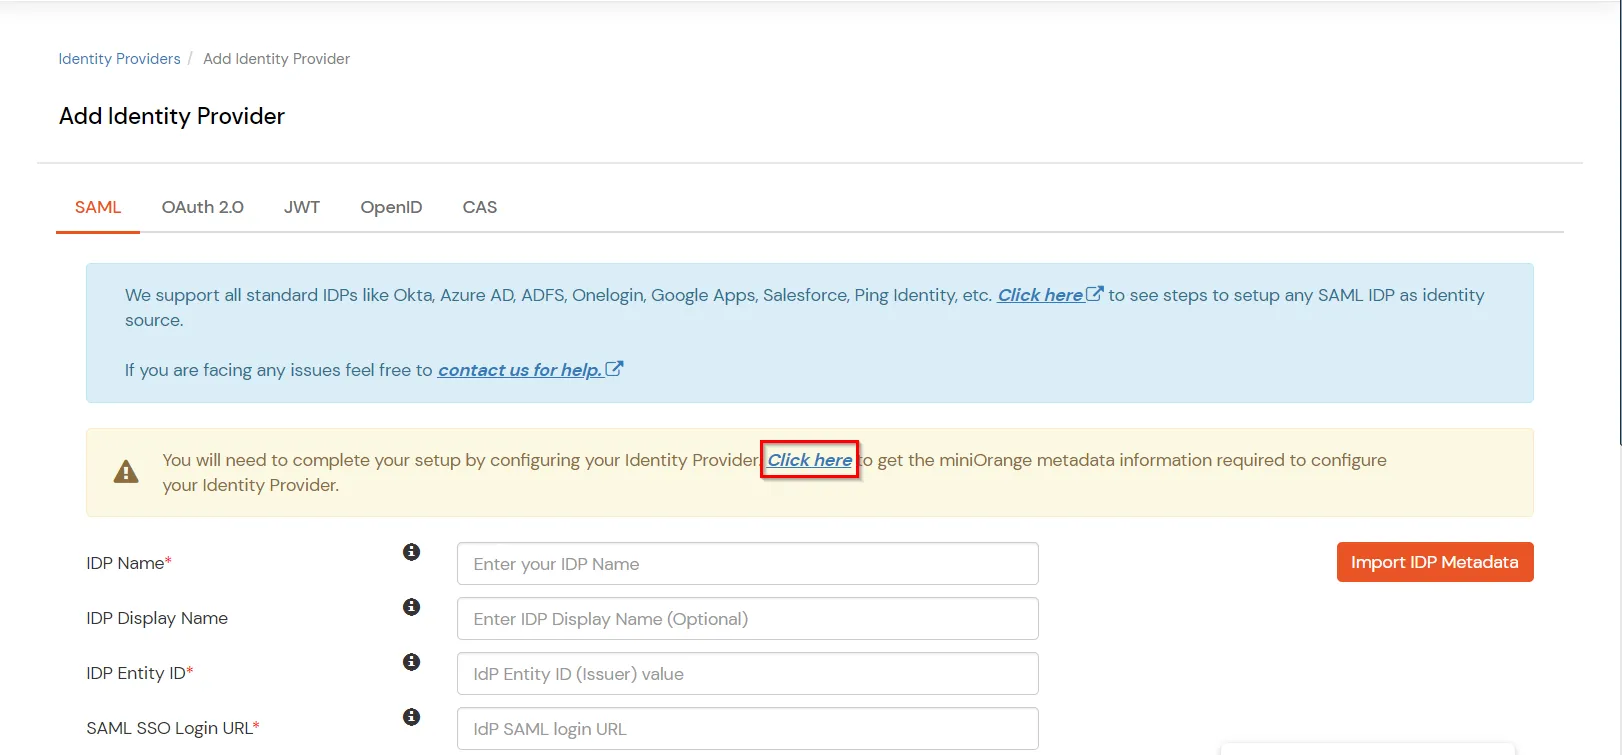
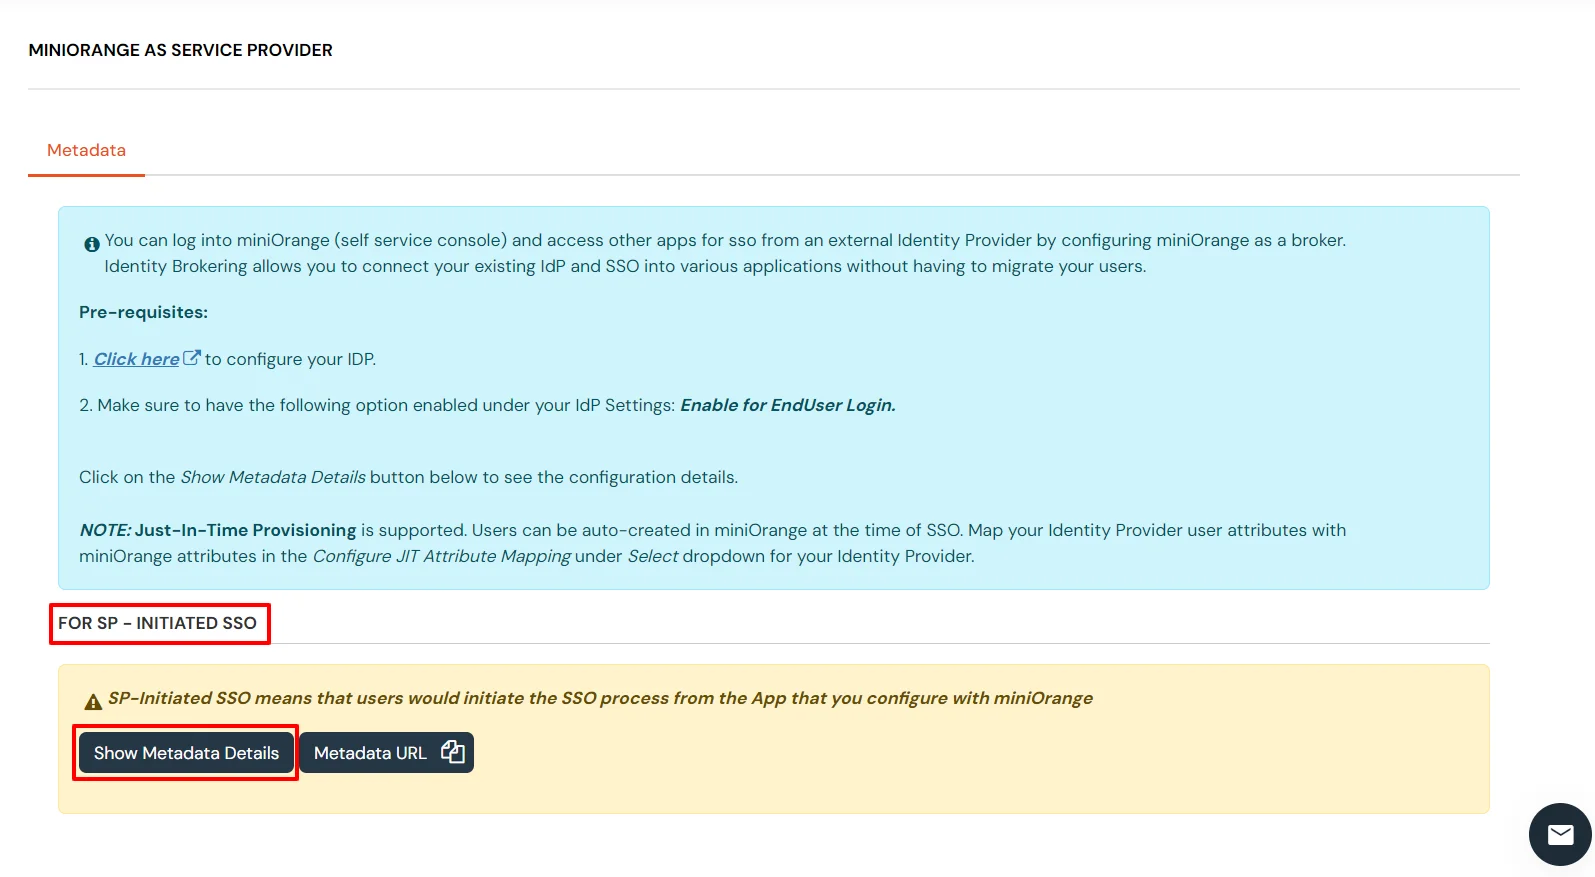
  • Now click on the Click here link to get miniorange metadata as shown in Screen below.
  • Webflow Microsoft Entra ID: Microsoft Entra ID get miniorange metadata

  • Here you will see 2 options, if you are going to initiate SSO from the Application copy the metadata details related to miniOrange from the SP - Initiated SSO section otherwise go for the metadata details from the IDP - Initiated section.
  • Webflow Microsoft Entra ID: Microsoft Entra ID SP initiated Metadata

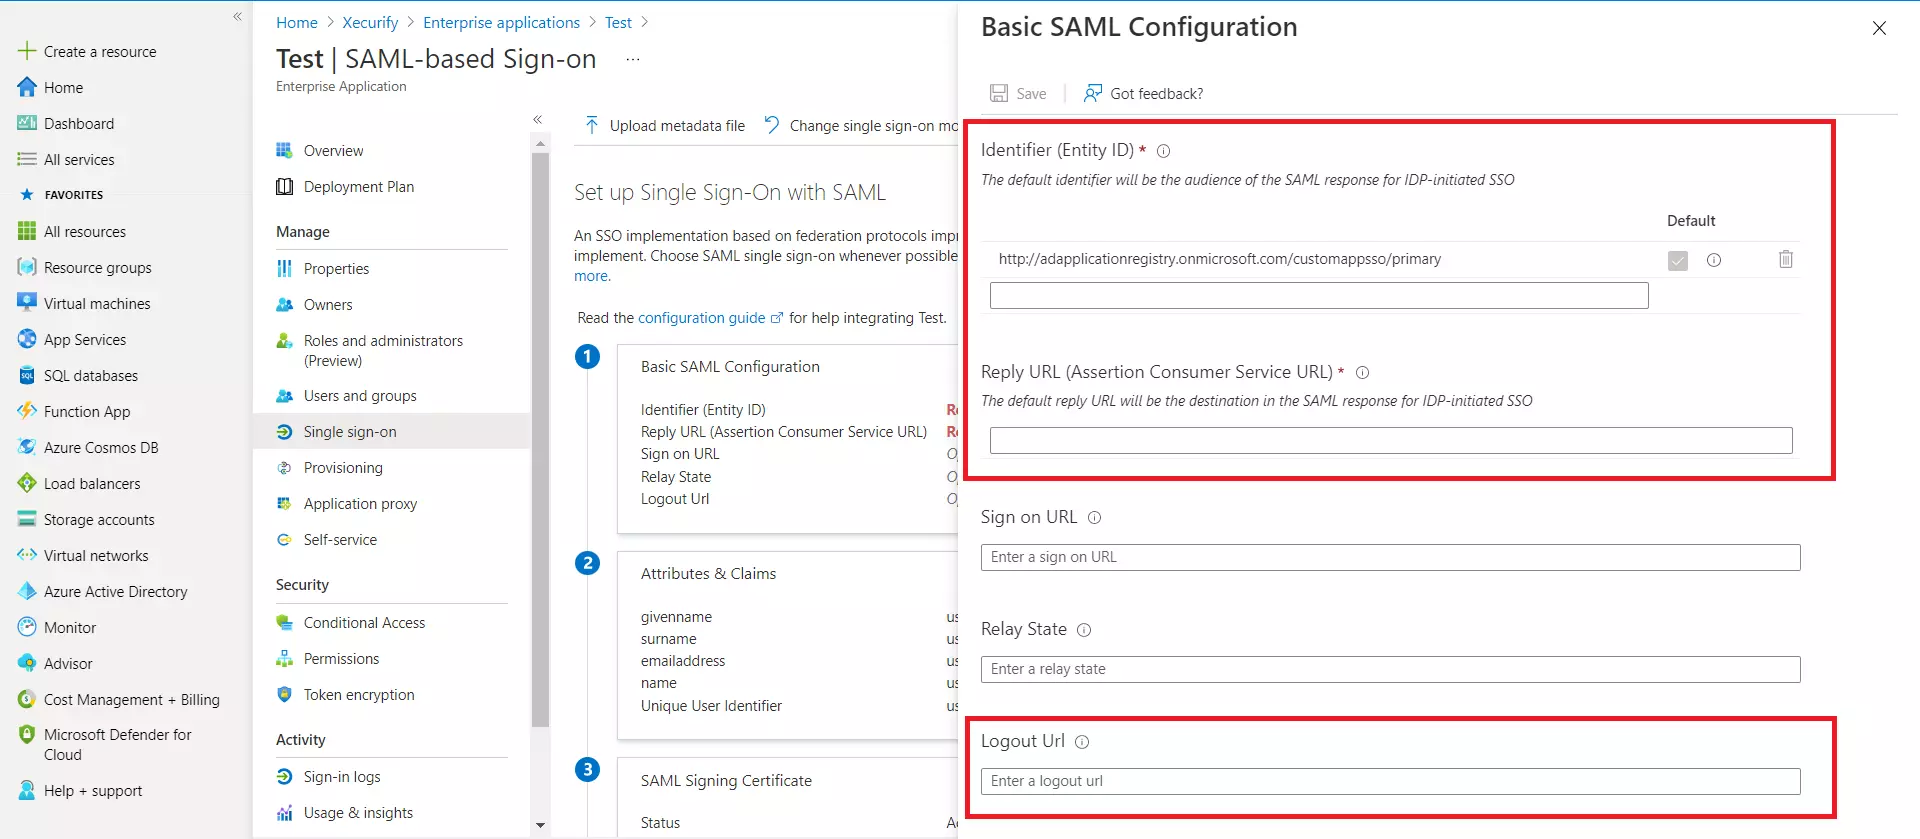
  • For Basic SAML configuration you need to get the Entity ID, ACS URL, and the Single Logout URL from miniOrange. You will be able to find the necessary details here.
  • Microsoft Entra ID saml configuration

  • Enter the values in basic SAML configuration as shown in below screen
  • Identifier (Entity ID) Entity ID or Issuer copied from the miniOrange metadata section mentioned in the previous step.
    Reply URL (Assertion Consumer Service URL) ACS URL copied from the miniOrange metadata section mentioned in the previous step.
    Logout URL Single Logout URL copied from the miniOrange metadata section mentioned in the previous step.

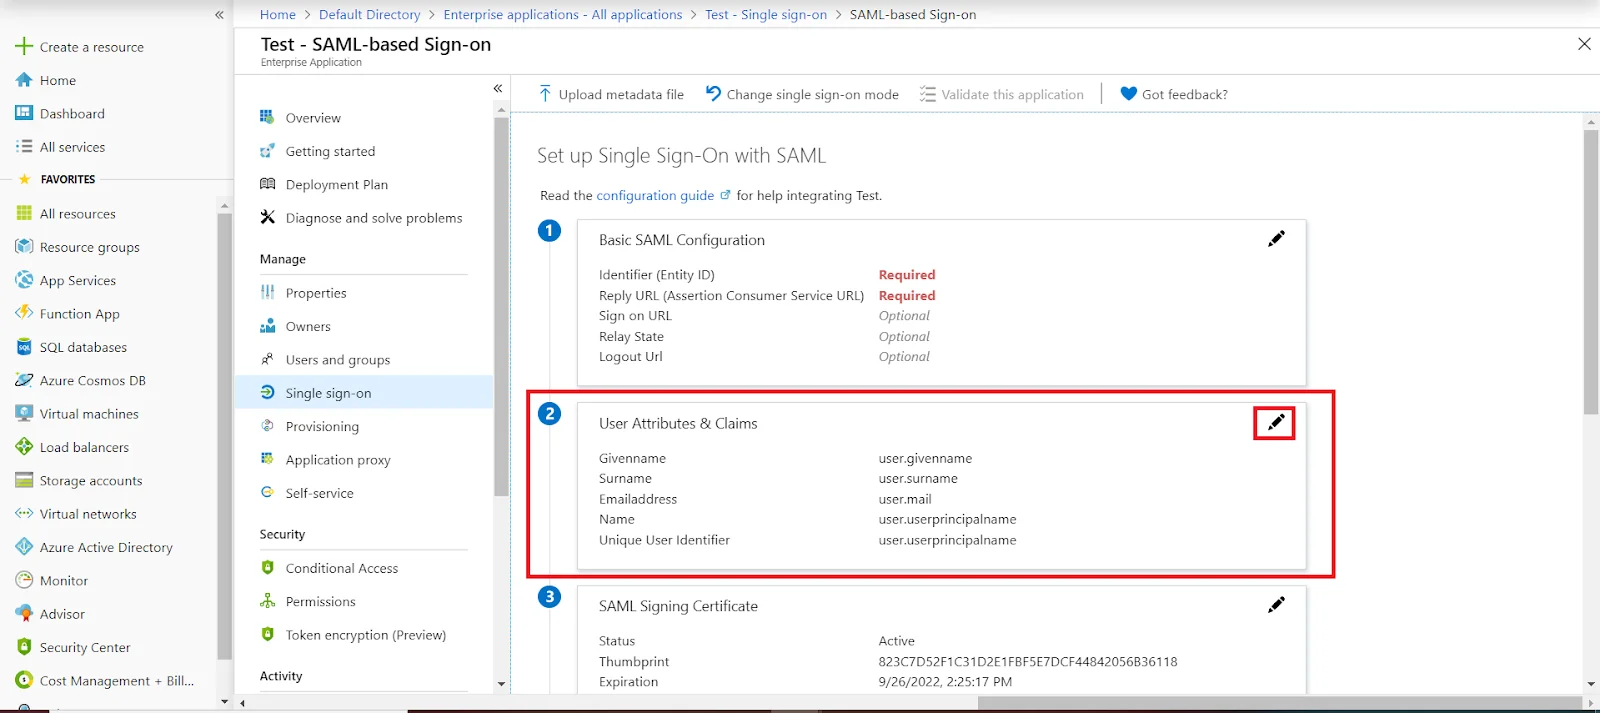
  • By default, the following Attributes will be sent in the SAML token. You can view or edit the claims sent in the SAML token to the application under the Attributes tab.

  • Webflow Microsoft Entra ID: Microsoft Entra ID sso Attributes tab

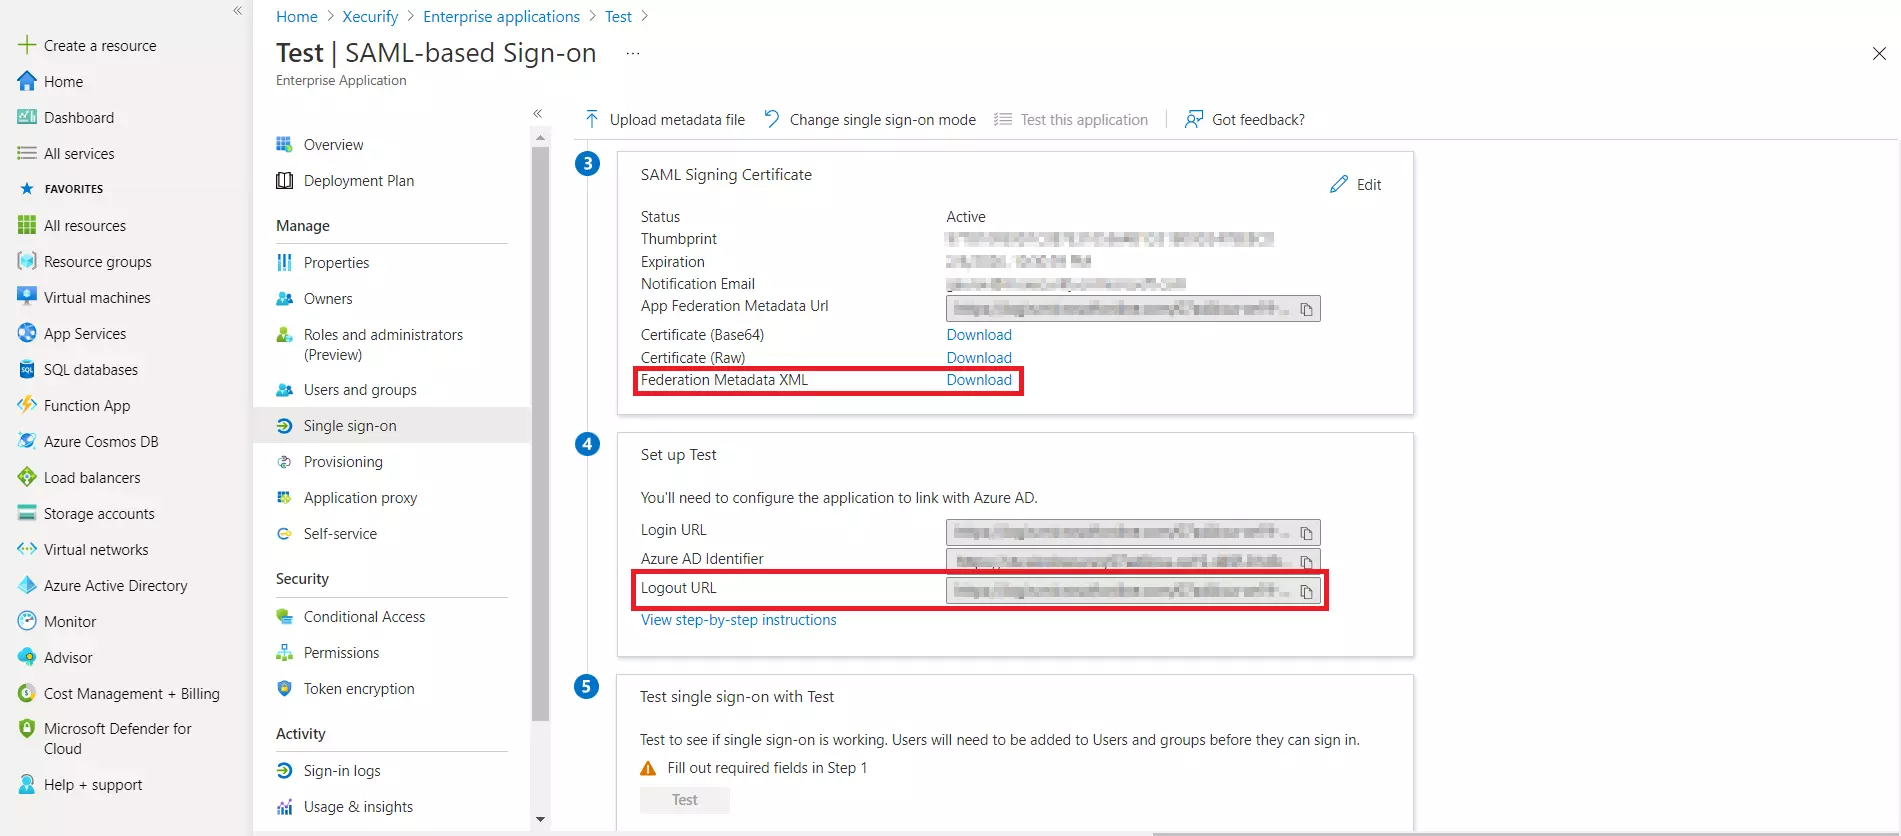
  • Download Federation Metadata xml, and copy the Logout URL as well. This will be used while configuring the Microsoft Entra ID as IDP in Step 3.b.
  • Download Federation Metadata

3.b. User/Group Assignment

  • Assign users and groups to your SAML application.
  • As a security control, Microsoft Entra ID will not issue a token allowing a user to sign in to the application unless Microsoft Entra ID has granted access to the user. Users may be granted access directly, or through group membership.
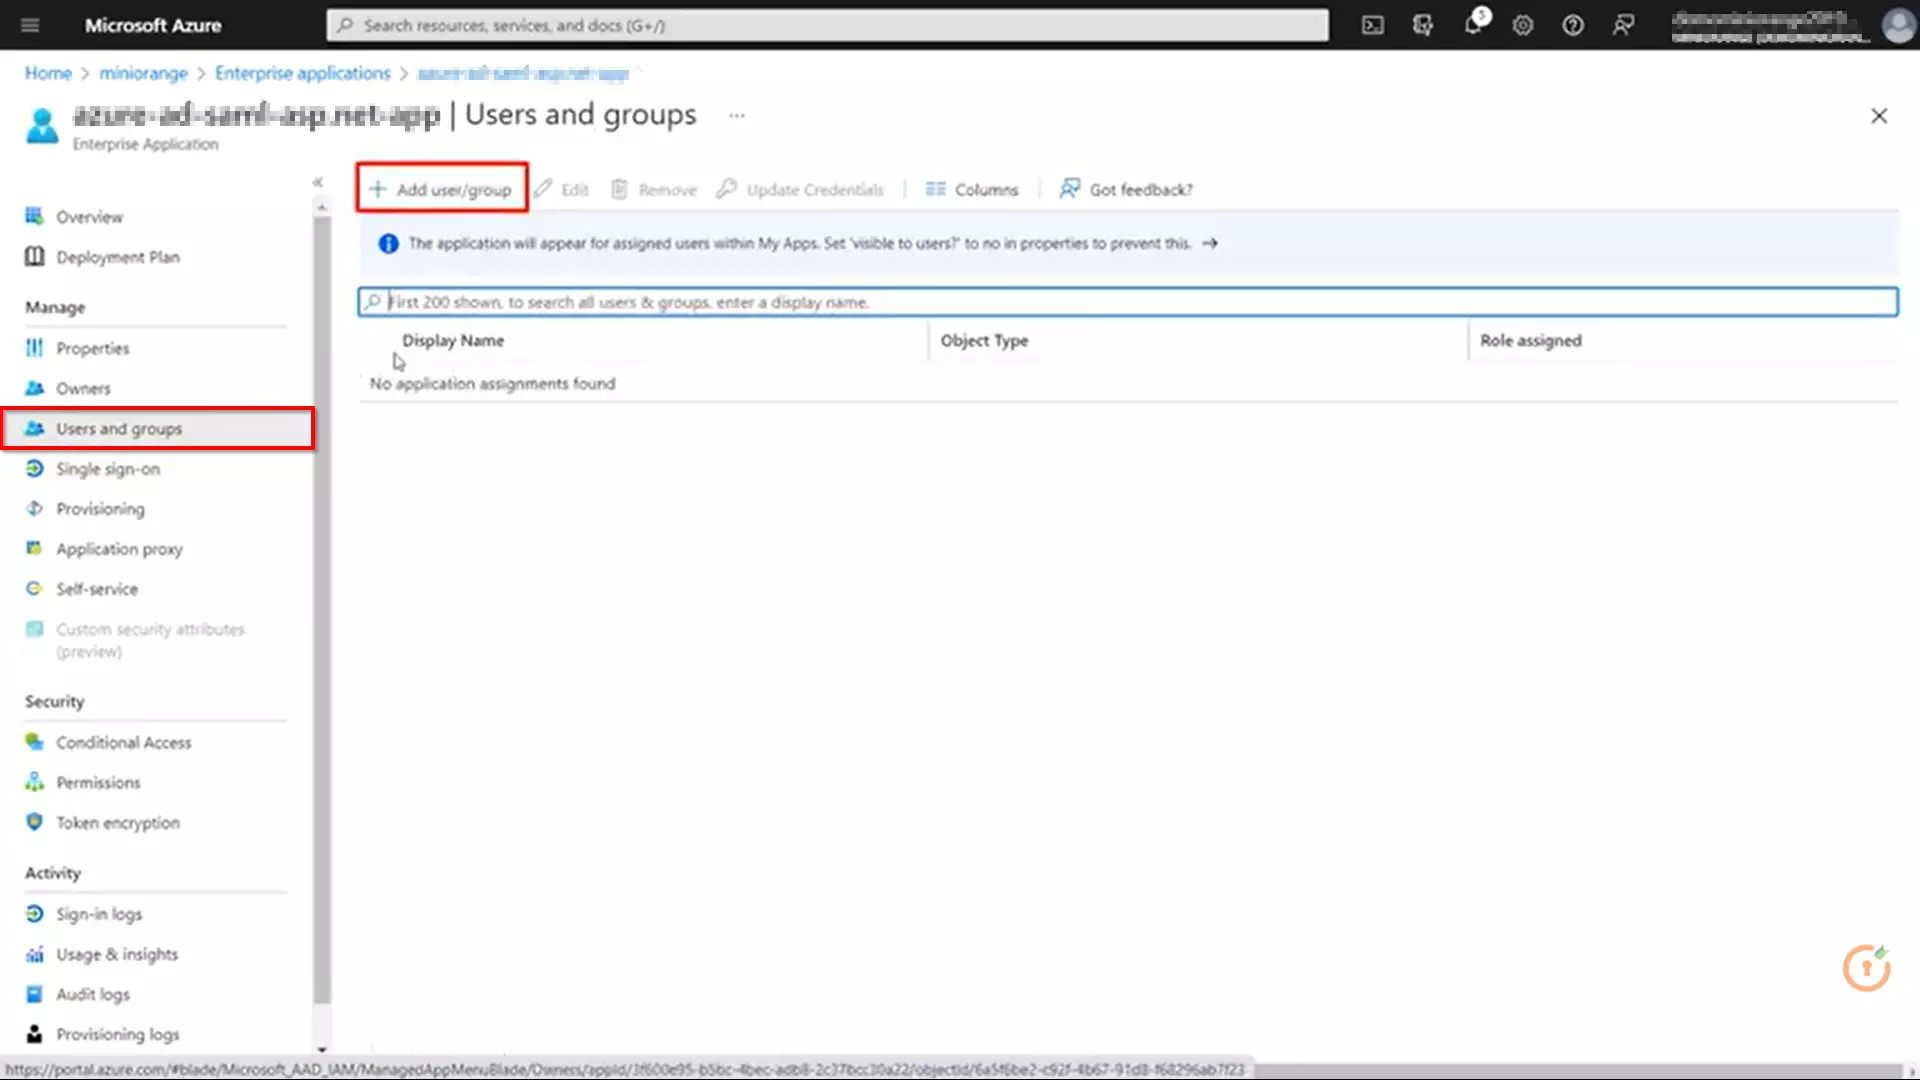
  • Click on Users and groups from the applications left-hand navigation menu. The next screen presents the options for assigning the users/groups to the application.
  • Webflow Microsoft Entra ID: Microsoft Entra ID sso-13

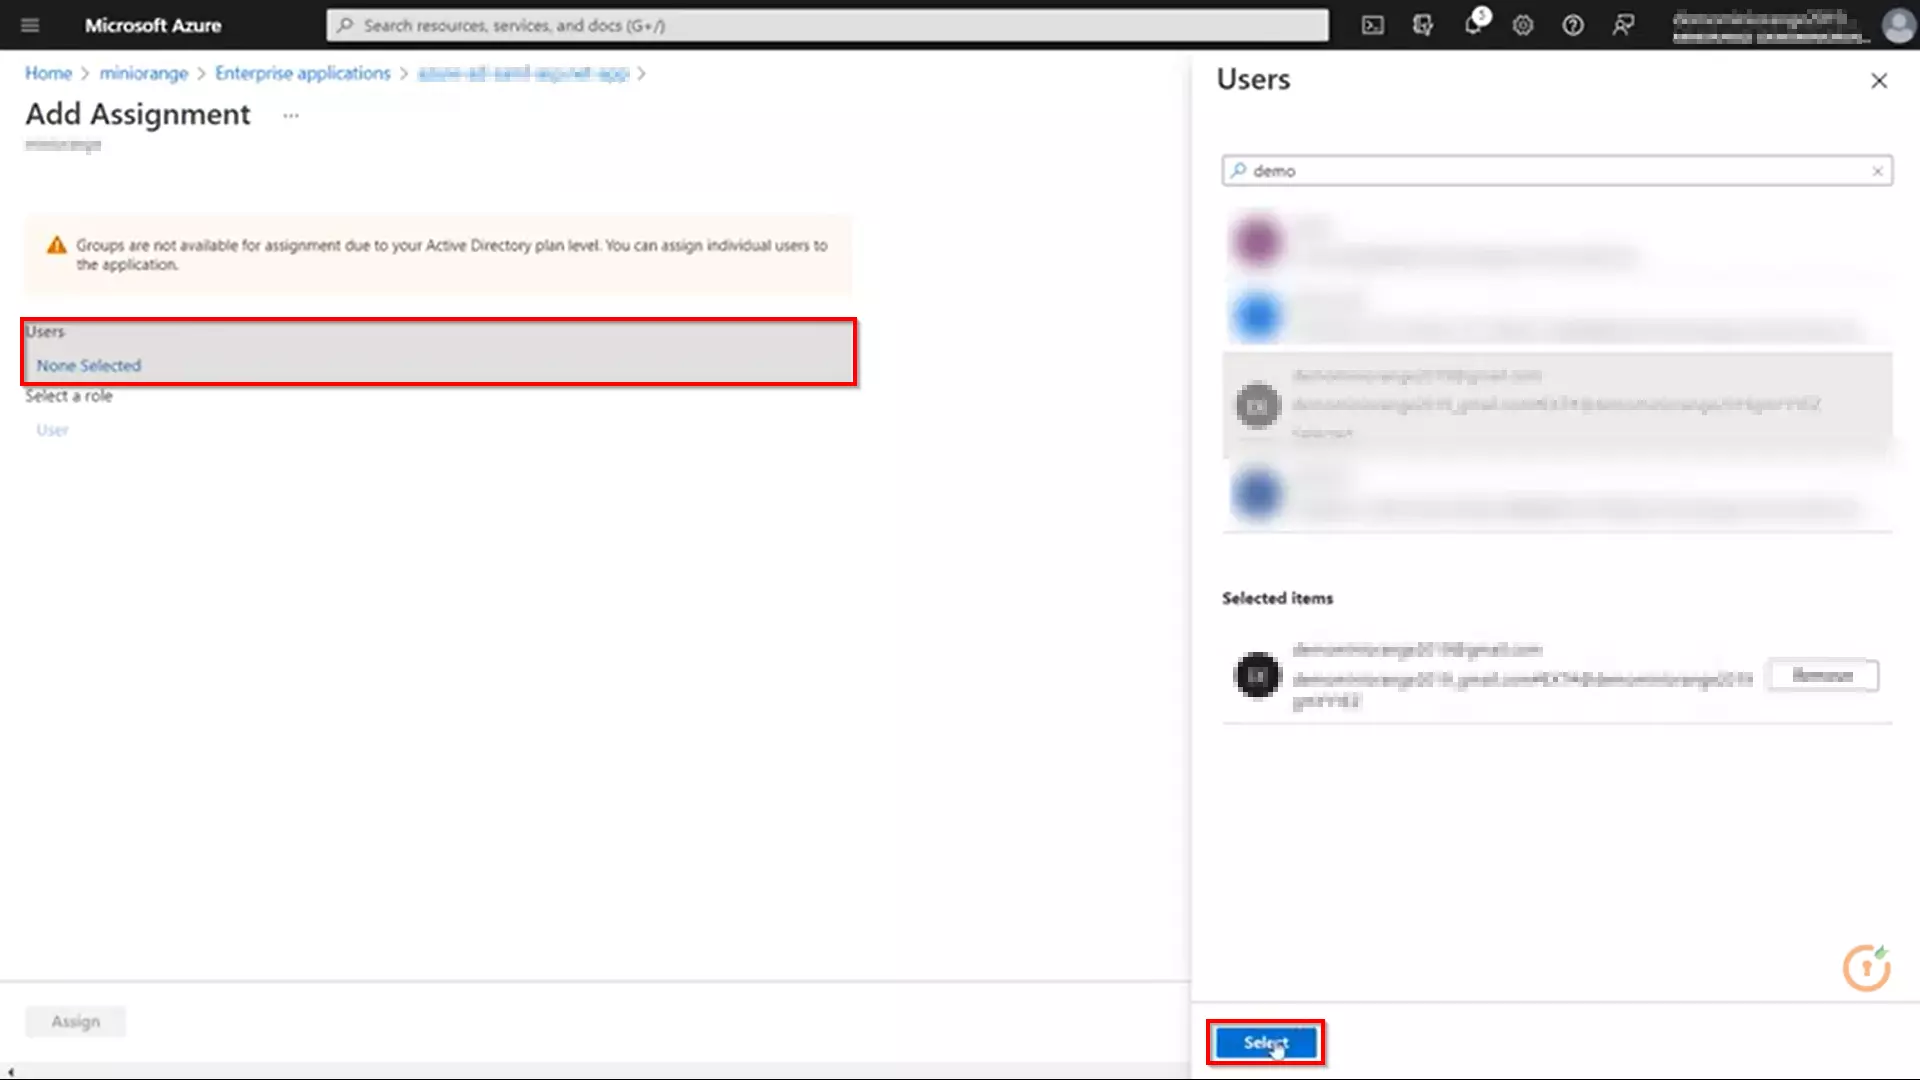
  • After clicking on Add user, Select Users and groups in the Add Assignment screen.
  • The next screen presents the option for selecting user or invite an external user. Select the appropriate user and click on the Select button.
  • Webflow Microsoft Entra ID: Microsoft Entra ID sso selecting user or invite an external user

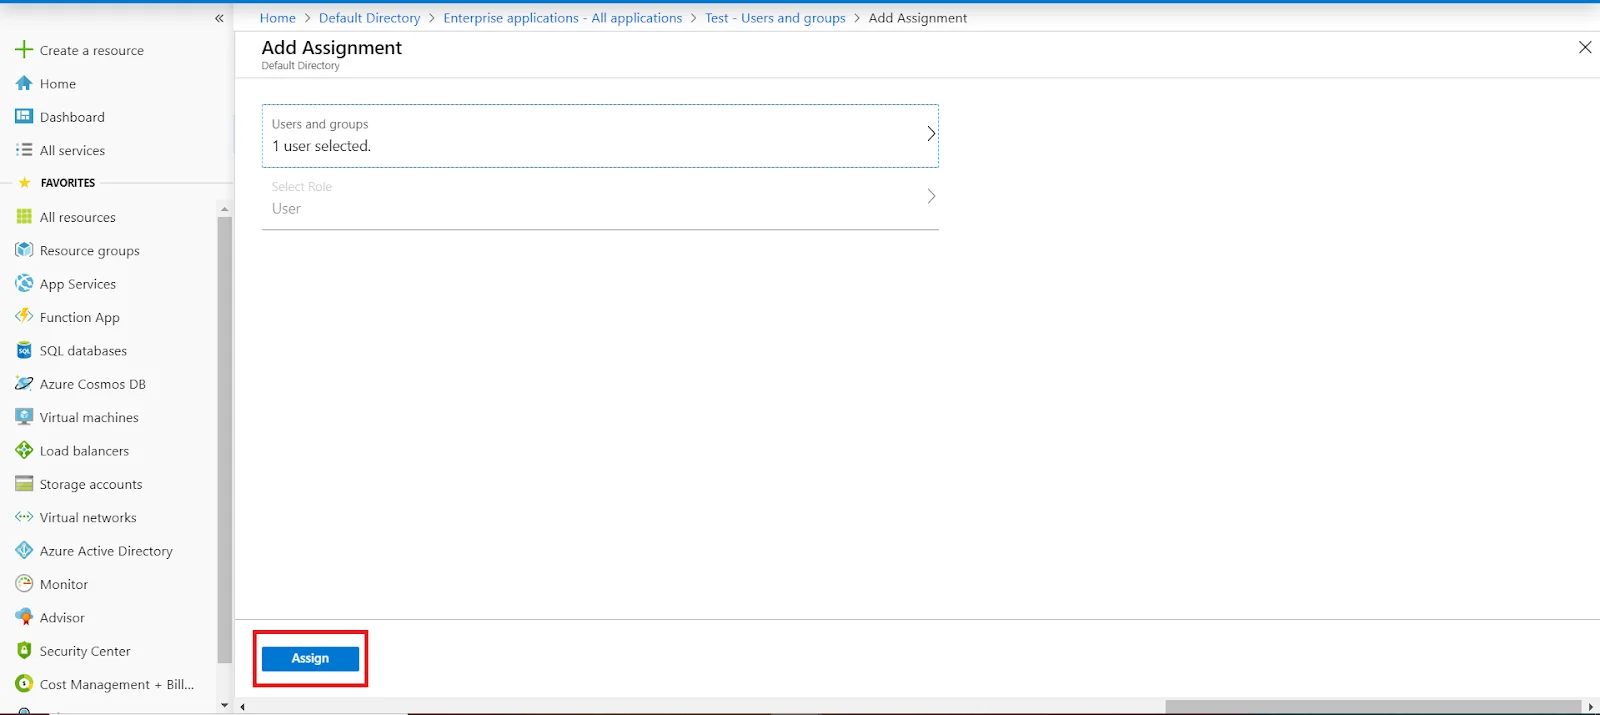
  • Here, you can also assign a role to this user under Select Role section. Finally, click on Assign button to assign that user or group to the SAML application.
  • Webflow Microsoft Entra ID: Microsoft Entra ID sso SAML application

3.c. Configure Microsoft Entra ID as Identity Provider (IDP) in miniOrange

  • Go to miniOrange Admin Console.
  • From the left navigation bar select Identity Providers.
  • Click on Add Identity Provider button.
  • Webflow Microsoft Entra ID SSO: Microsoft Entra ID Identity Provider

  • Select SAML. Click on Import IDP metadata.
  • Select SAML to configure Webflow as IDP

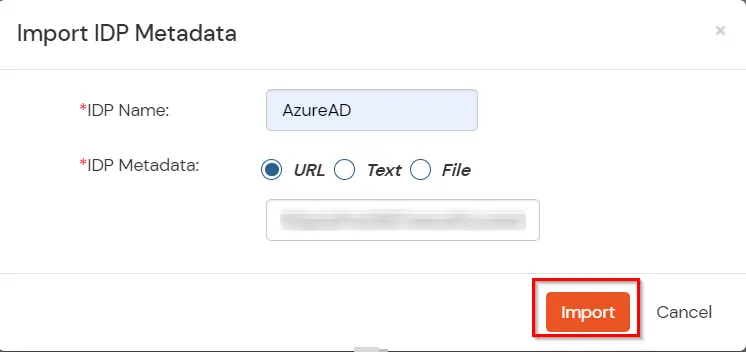
  • Choose appropriate IDP name. Browse for the file downloaded in step 1.a.
  • Click on Import.
  • Webflow Microsoft Entra ID SSO: Microsoft Entra ID Import

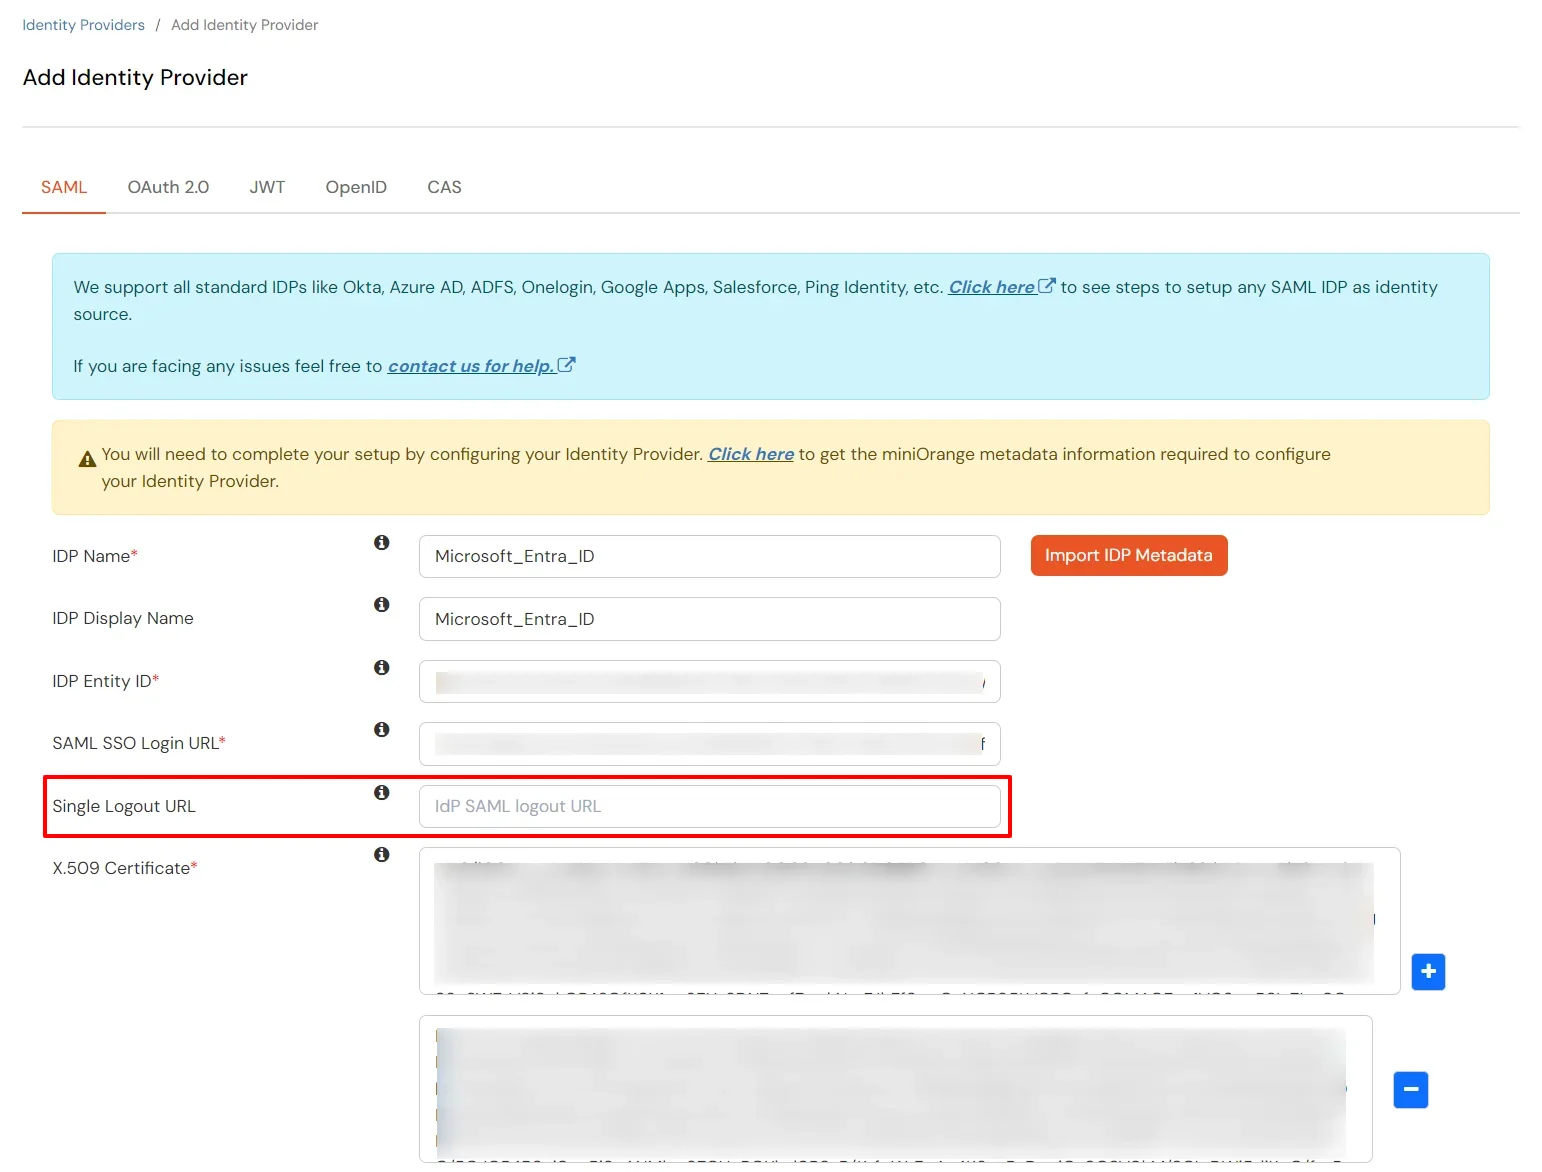
  • As shown below the, IDP Entity ID, SAML SSO Login URL and x.509 Certificate will be auto filled via the imported metadata file. You can also enter the Logout URL copied from Microsoft Entra ID in the Single Logout URL field.
  • Webflow Microsoft Entra ID SSO: SAML SSO Login URL and x.509 Certificate

  • Few other optional features that can be enabled are listed below:
  • Domain Mapping Enable to redirect domain specific user to a specific IDP
    Show IdP to Users Enable this option if you wish to show this IDP as a button on the login page. Eg : Login with Microsoft Entra ID.
    Send Configured Attributes Enable this option if you wish to send user attributes from the IDP to WebFlow while SSO.
  • Click on Save.

3.d. Test IDP Connection

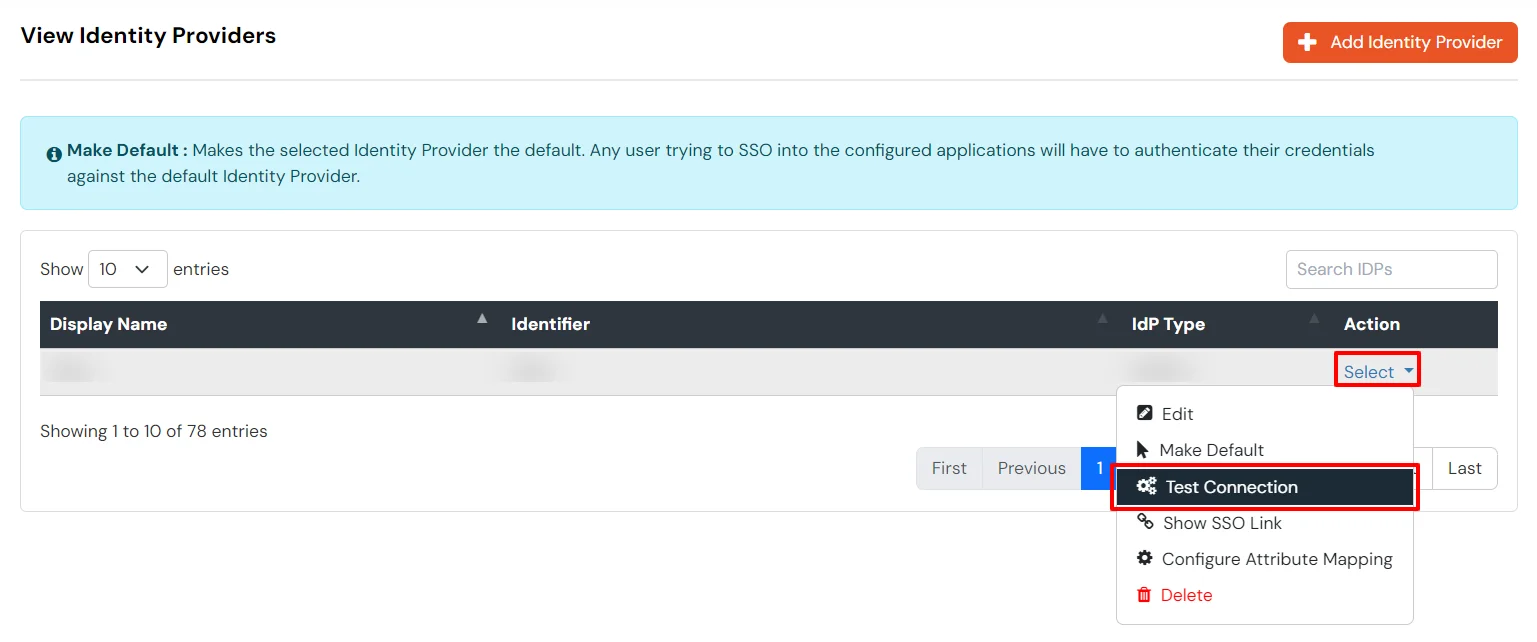
  • Go to Identity Providers tab.
  • Click on Select>>Test Connection option against the Identity Provider you configured.
  • Webflow Microsoft Entra ID SSO: Microsoft Entra ID IDP Test Connection

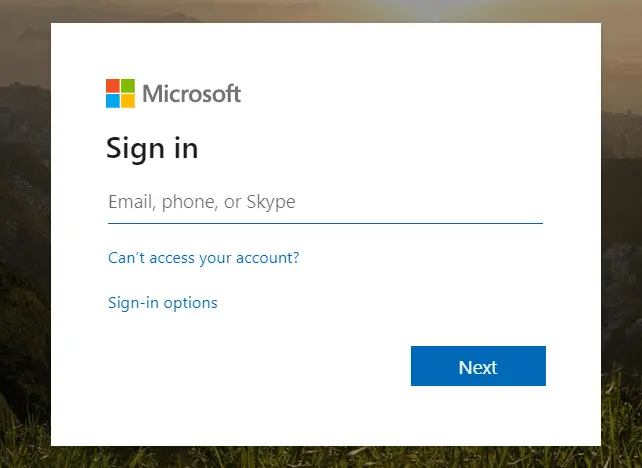
    Webflow Microsoft Entra ID SSO: Microsoft Entra ID login

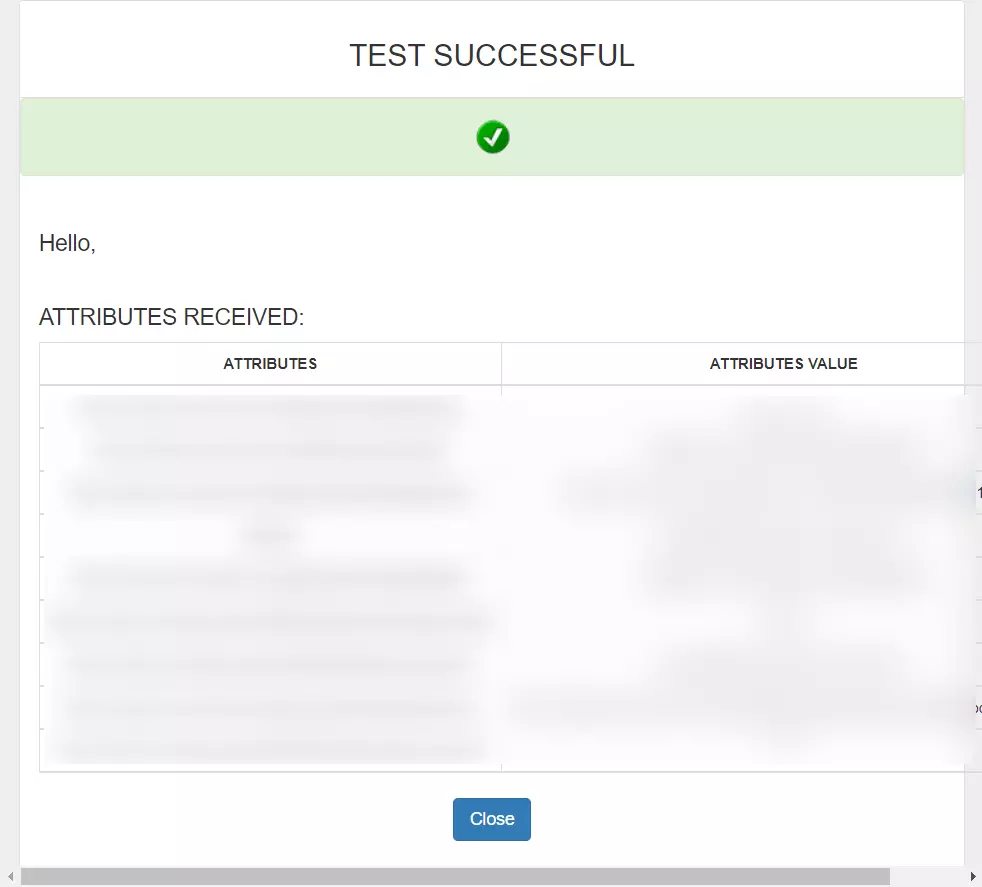
  • On entering valid Microsoft Entra ID credentials you will see a pop-up window which as shown in below screen.
  • Webflow Microsoft Entra ID SSO: Success Test Connection Microsoft Entra ID IDP

  • Hence your configuration of Microsoft Entra ID as IDP in miniOrange is successfully completed.

4. Test SSO Configuration

  • On accessing the Single sign-On URL, you will be asked for Microsoft Entra ID credentials.
  • Webflow Microsoft Entra ID SSO: Microsoft Entra ID login

  • On entering the valid credentials, you will be successfully logged into Webflow.
  • Webflow Single Sign-On (SSO): Webflow Login

External References

Frequently Asked Questions

Yes, our scripts are completely customizable and you can restrict page access based on memberships, groups, company . domain or any other custom attribute of your choice.

We handle this by adding the no script tags in our script file, this enables redirection of your users to a customizable page with instructions to enable javascript.

Want To Schedule A Demo?

Request a Demo


Our Other Identity & Access Management Products