Hello there!
Need Help? We are right here!
Need Help? We are right here!
Search Results:
×Single Sign-On (SSO) solution by miniOrange provides secure Single Sign-On access into
PHP website using a single set of login credentials. You can log into PHP website using miniOrange credentials or Azure AD credentials or any of your existing identity providers. With miniOrange SSO services, along with PHP website you can also login into other On-Premise and Cloud Applications using your existing Identity Providers/User Store (Azure Active Directory, Okta, Ping) credentials. Follow the given setup guide to integrate OAuth SSO for your PHP website account.
miniOrange provides user authentication from various external sources, which can be Directories (like ADFS, Microsoft Active Directory, OpenLDAP, AWS etc), Identity Providers (like Microsoft Entra ID, Okta, AWS), and many more. You can configure your existing directory/user store or add users in miniOrange.
WAMP: Download WAMP
Alternatively, any other web server setup compatible with PHP 8.1+.
                  /path/to/your-project/
                  ├── libs/
                  ├── assets/
                  ├── includes/
                  └── index.php
composer require miniorange/phpoauth
Note: Make sure you have Composer installed to execute this command. If not, refer to the installation guide. Or download it from here.
                  <?php
                require_once '/path/to/your-project/libs/vendor/autoload.php';
                ?>
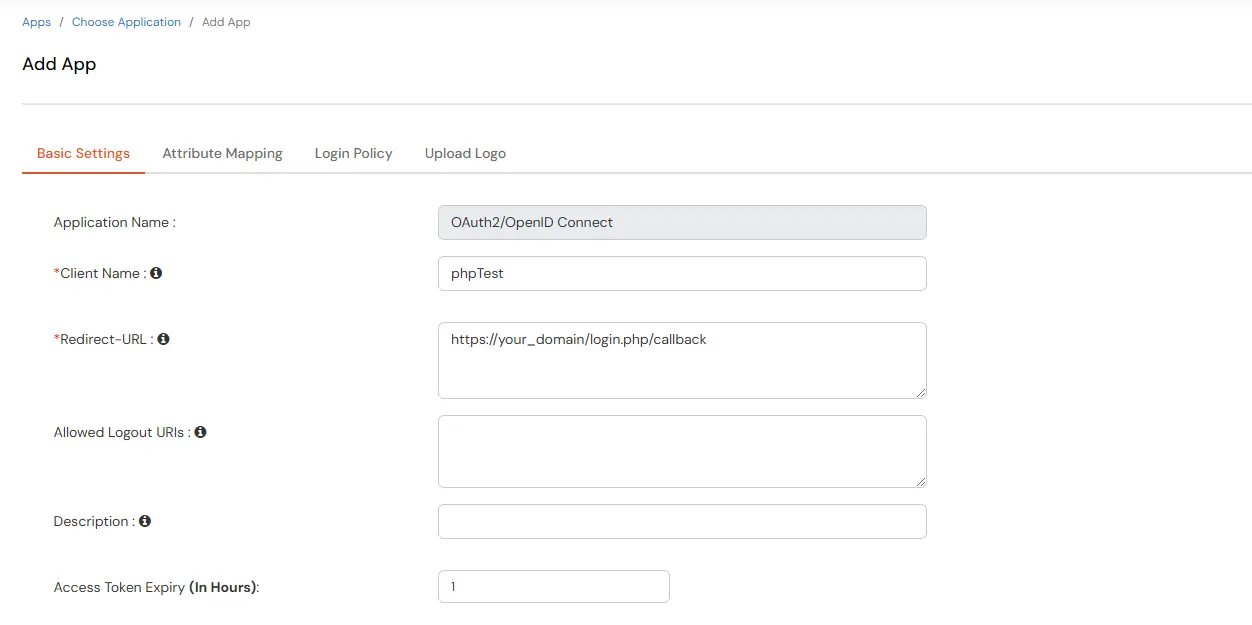
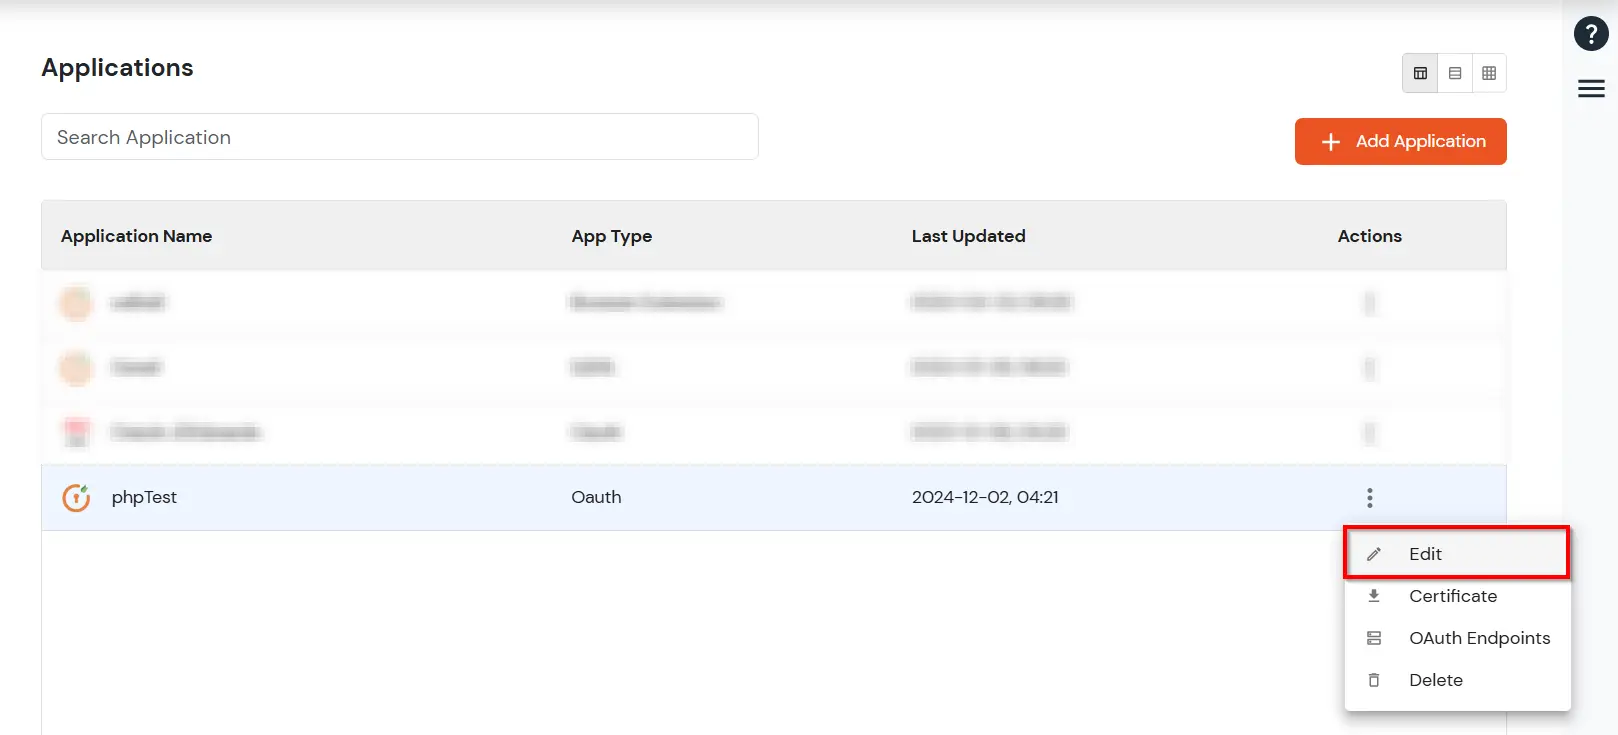
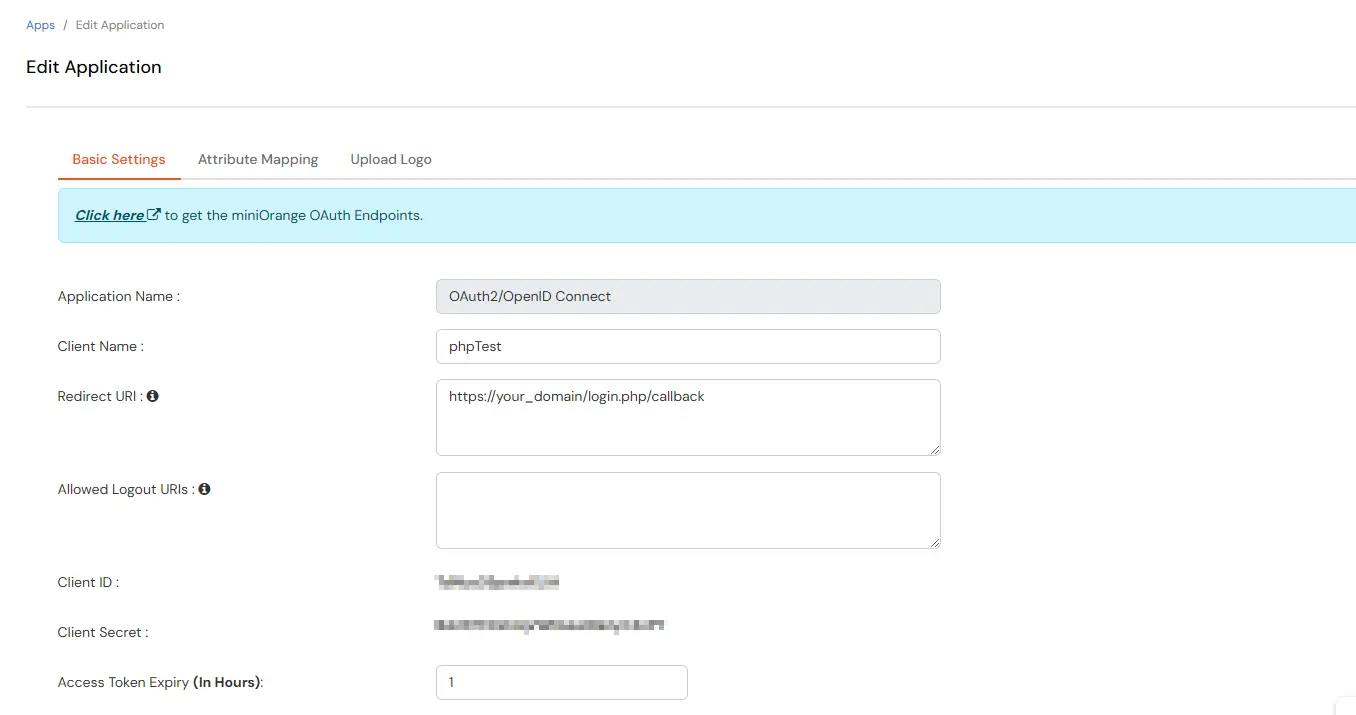
| Client Name: | Enter a name for your application (e.g., "TestApp") |
| Redirect URI: | Add the URL where users will be redirected, typically your login page followed by /callback. |
| Logout URI: | Add the URL where users will be redirected after logout (e.g., login.php). |
Note: Make sure you add /callback at the end of your redirect uri. It will look like this : “https://your_domain/login.php/callback”
Now, back in your php project, update the .env file in the phpoauth folder with the client credentials you copied earlier.
Find the .env file at: /path/to/your-project/lib/vendor/miniorange/phpoauth/.env
| CLIENT_ID: | <YOUR_CLIENT_ID> |
| CLIENT_SECRET: | <YOUR_CLIENT_SECRET> |
| BASE_URL: | https://<YOUR_DOMAIN>.xecurify.com/moas |
| REDIRECT_URI: | <YOUR_REDIRECT_URI> |
| LOGOUT_REDIRECT_URI: | <YOUR_LOGOUT_REDIRECT_URI> |
Note: Add all the below scripts in the same login page in given sequence.
                <?php
                require_once 'path/to/phpOAuth/vendor/autoload.php';

                // Import necessary classes from the phpOAuth library.
                use Miniorange\Phpoauth\{
                    Config\OAuthConfig,
                    Handlers\AuthorizationHandler,
                    Listeners\LoginListener,
                    Handlers\CallbackHandler
                };

                // Initialize OAuth configuration and authorization handler.
                try {
                    $config = new OAuthConfig();
                    $authHandler = new AuthorizationHandler($config);
                } catch (Exception $e) {
                    echo "Error : " . $e->getMessage();
                }
                ?>
                  <?php
                class MyLoginSuccessListener implements LoginListener {
                    public function onLoginSuccess($userInfo) {
                        // Store the user object in the session
                        // and Redirect the user to the dashboard or any other page based on your use case
                    }

                    public function onError($errorMessage) {
                        // Handle the error: display it on the page or redirect to an error page
                    }
                }
                ?>
                <?php
                $loginListener = new MyLoginSuccessListener();
                $fullUri = $_SERVER['REQUEST_URI'];  // Retrieve the full request URI

                // Create an instance of CallbackHandler with the configuration and login listener
                $myCallbackHandler = new CallbackHandler($config, $loginListener);

                // Handle the URI to process the OAuth callback
                $myCallbackHandler->handleUri($fullUri);
                ?>
                  <?php
                // Call the startAuthorization method when the button is clicked
                try {
                    $authHandler->startAuthorization();
                } catch (Exception $e) {
                    echo "Error: " . $e->getMessage();
                }
                ?>
                        <form method="post" action="">
                      <button type="submit" name="startAuth">Sign In with MiniOrange</button>
                      </form>
                      <?php
                        if (isset($_POST['startAuth'])) {
                            // Call the startAuthorization method when button is clicked
                            try {
                                $authHandler->startAuthorization();
                            } catch (Exception $e) {
                                echo "Error: " . $e->getMessage();
                            }
                        }
                        ?>
This setup ensures that when the user clicks the "Login with miniOrange" button, the authorization process begins.
Note: For checking the session, you need to pass the config object to isSessionActive function. If you are checking the session on a page other than index.php, you'll need to manage sharing the object across various pages. One way to achieve this is by serializing the object and storing it in the session.
You can check token validity by calling the isSessionActive method, which will verify if the tokens are still valid or expired. This check can be performed on each page load or during specific user activities at regular intervals.
                  <?php
                require_once "phpOAuth/vendor/autoload.php";
                use function Miniorange\Phpoauth\Handlers\isSessionActive;

                if (!isSessionActive($config)) {
                    echo "SESSION NOT FOUND PLEASE LOGIN";
                    // Redirect to session end page or call the logout function
                }
                ?>
Note: You need to pass the same config object from the login page to the logout function, so to be able to use the same object here you can serialize the config object and store it in session and retrieve it here and pass it to the logout function.
                  <?php
              require_once "phpOAuth/vendor/autoload.php";
              use function MiniOrange\Phpoauth\Handlers\logout;

              if (isset($_POST['logout'])) {
                  logout($config);
                  exit();
              }
              ?>
                      <form method="post" action="">
                    <button type="submit" name="logout">Logout</button>
                    </form>
Note: If you are testing or deploying the PHP connector in production mode, ensure secure communication by making the following changes:
                <?php
            // Optional: Disable SSL checks (only for development)
            curl_setopt($ch, CURLOPT_SSL_VERIFYHOST, false);
            curl_setopt($ch, CURLOPT_SSL_VERIFYPEER, false);
            ?>
These changes are necessary to enforce SSL verification in production environments, ensuring secure data transmission. Disable SSL checks only during development for testing purposes.
x
Your download should start now. If not, please email us at idpsupport@xecurify.com or contact us.