Hello there!

Need Help? We are right here!

miniOrange Email Support
success

Thanks for your Enquiry.

If you don't hear from us within 24 hours, please feel free to send a follow-up email to info@xecurify.com

Search Results:

×

Thinkific Single Sign-On (SSO)


Thinkific SSO solution by miniOrange helps you simplify everyday teaching and learning experience for students, teachers, and staff by providing a seamless Single Sign-On (SSO) solution. With miniOrange’s ready-made SSO solution, users can authenticate themselves using their existing credentials and log into Thinkific. Users just have to click on a link and based on the Identity Provider or User stored configured in miniOrange are redirected to the appropriate login page / Identity Provider for authentication. After successful authentication, miniOrange constructs the necessary token and automatically redirects the user to Thinkific.

Thinkific deconstructs this payload and either finds the user and signs them in, or if they don’t already have an account on your Thinkific site, creates an account and signs them in. Using Single Sign-On (SSO) for Thinkific or any education platform will allow students, teachers, and administrators to instantly log in to these resources, with just a single login to the dashboard.

Thinkific Single Sign-On (SSO)

Video Setup Guide


Connect with External Source of Users


miniOrange provides user authentication from various external sources, which can be Directories (like ADFS, Microsoft Active Directory, OpenLDAP, AWS etc), Identity Providers (like Microsoft Entra ID, Okta, AWS), and many more. You can configure your existing directory/user store or add users in miniOrange.


Prerequisites

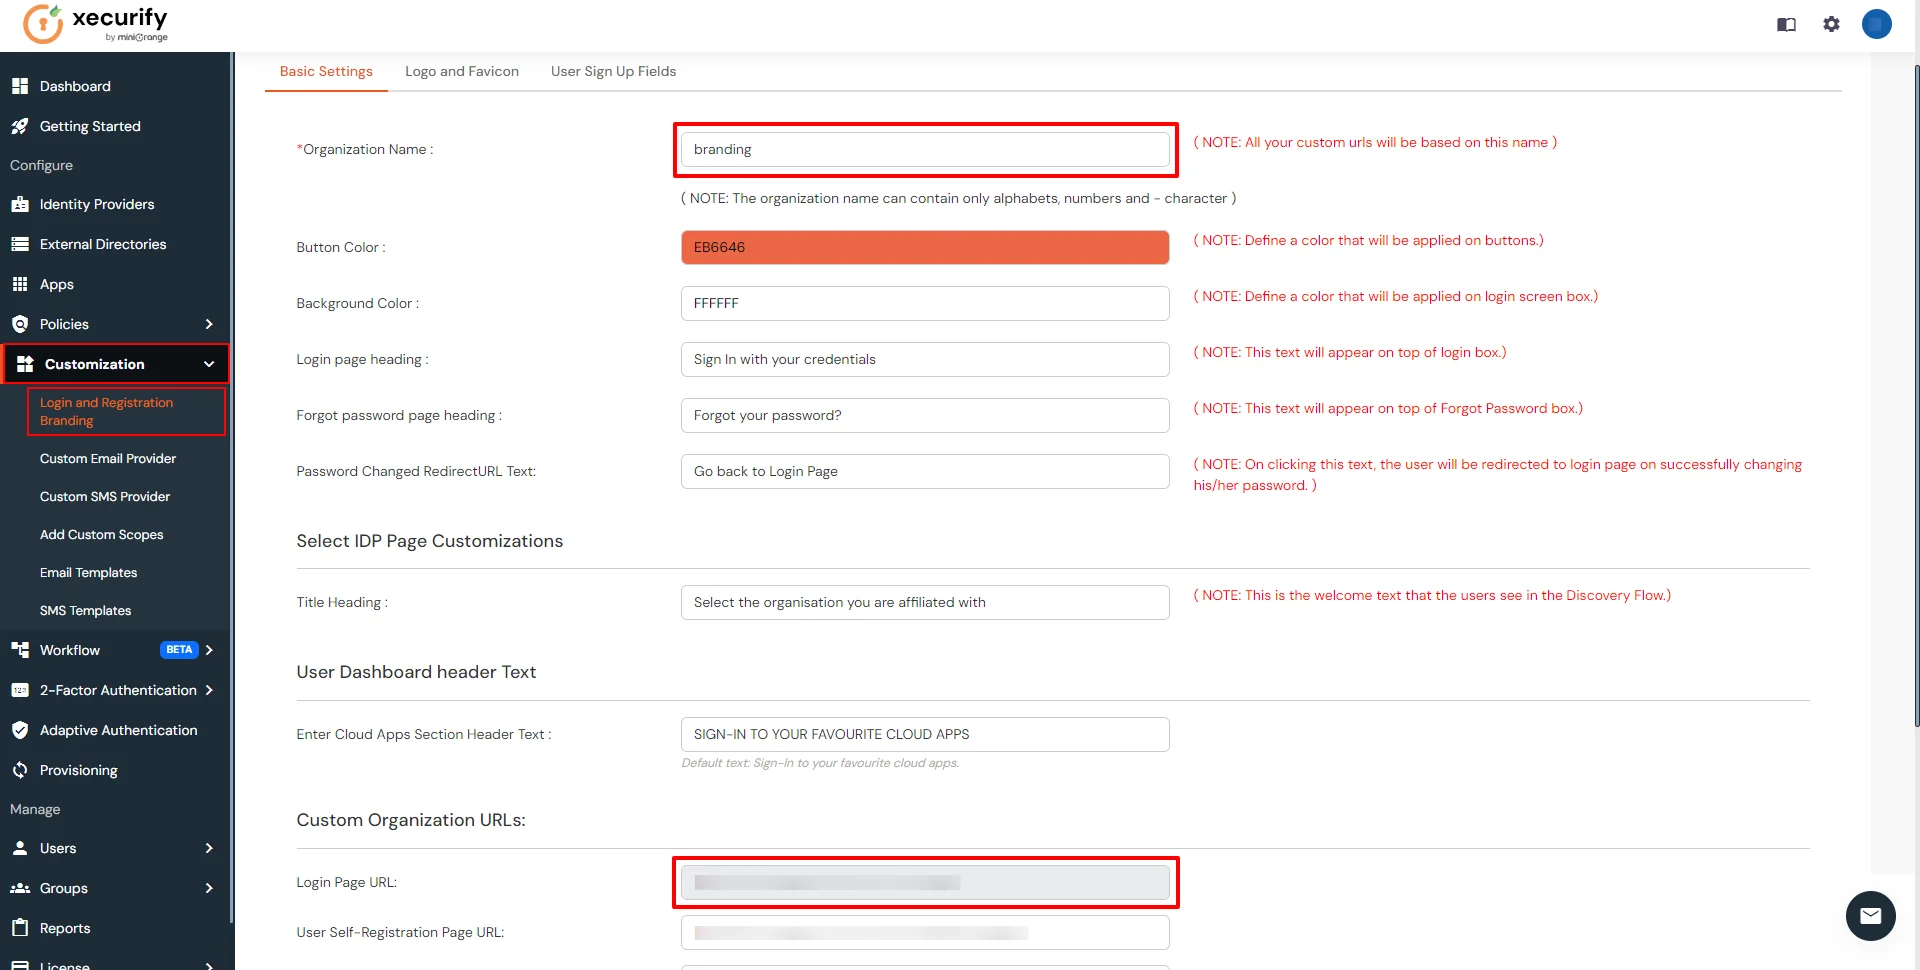
  • Login into miniOrange Admin Console.
  • Click on Customization in the left menu of the dashboard.
  • In Basic Settings, set your company domain in Organization Name textfield.
  • Click Save. Once that is set, the branded login URL would be of the format https://<company_domain>.xecurify.com/moas/login
  • 2FA Two-Factor authentication for  : setting up branding

    Obtain the following information from Thinkific.
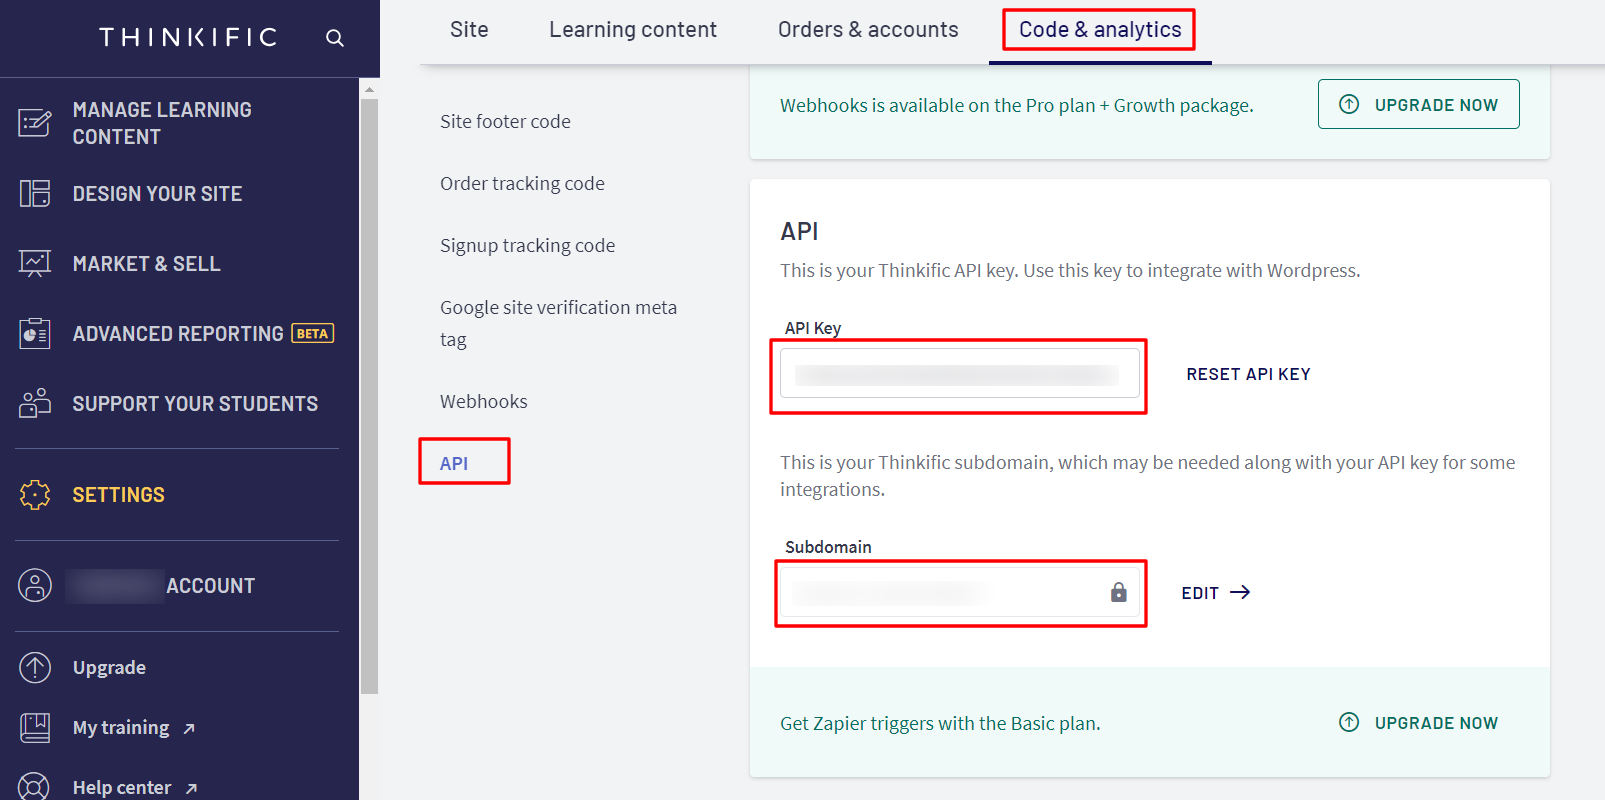
  • Login to your Thinkific, go to Settings. Click on Code & analytics.
  • Navigate to API.
  • Thinkific Single Sign-On (SSO): API and subdomain

  • You can find the API Key ( Shared Secret ) here.
  • Also, Obtain the Subdomain from here and replace the URL next.

Follow the Step-by-Step Guide given below for Thinkific Single Sign-On (SSO)

1. Configure Thinkific in miniOrange

  • Login to miniOrange Admin Console.
  • Go to Apps Click on Add Application button.
  • Thinkific Single Sign-On (SSO) add app

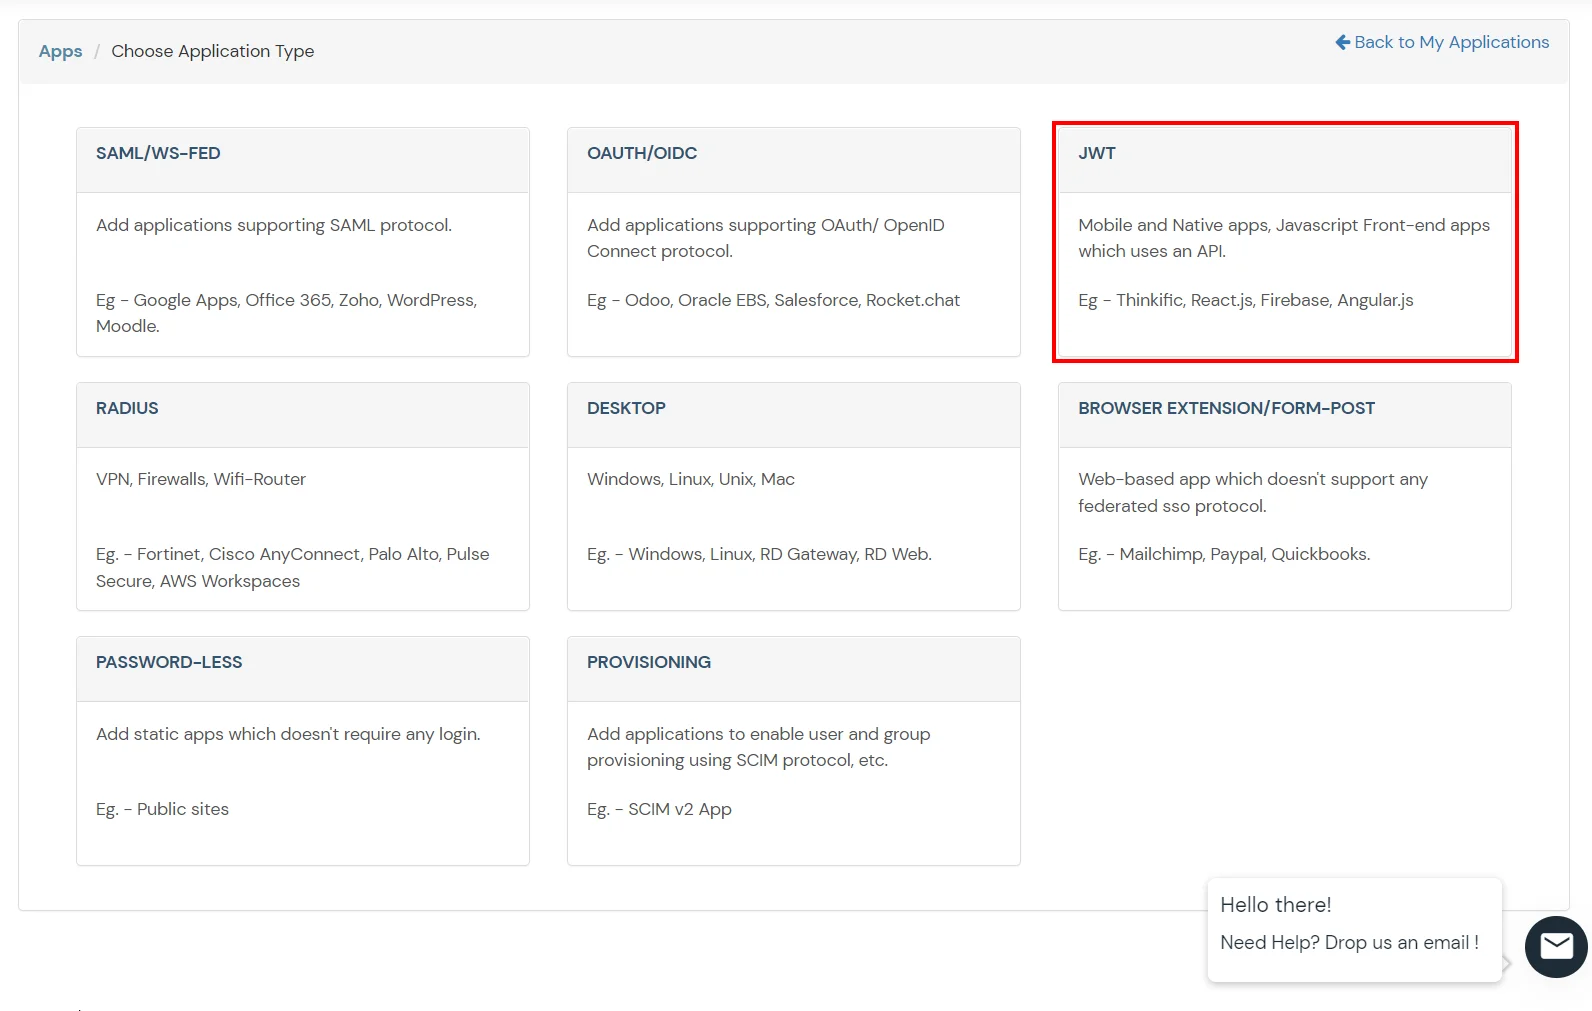
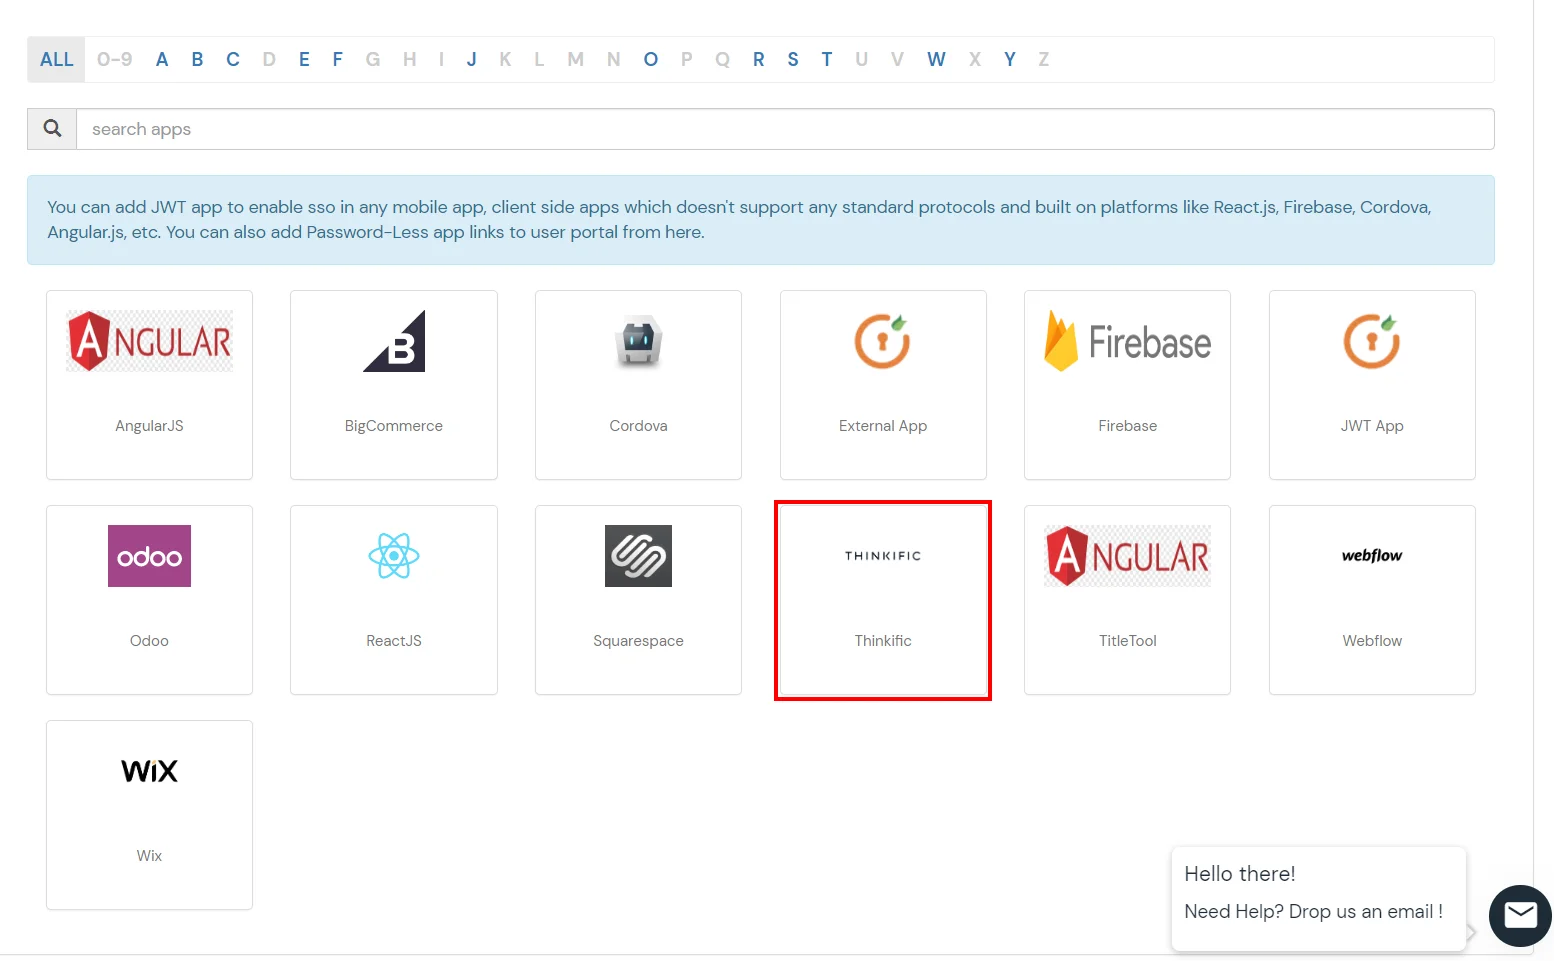
  • Select JWT App.Click on Thinkific.
  • Thinkific Single Sign-On (SSO): saml jwt app

    Thinkific Single Sign-On (SSO): saml jwt app

    Thinkific Single Sign-On (SSO): add jwt app

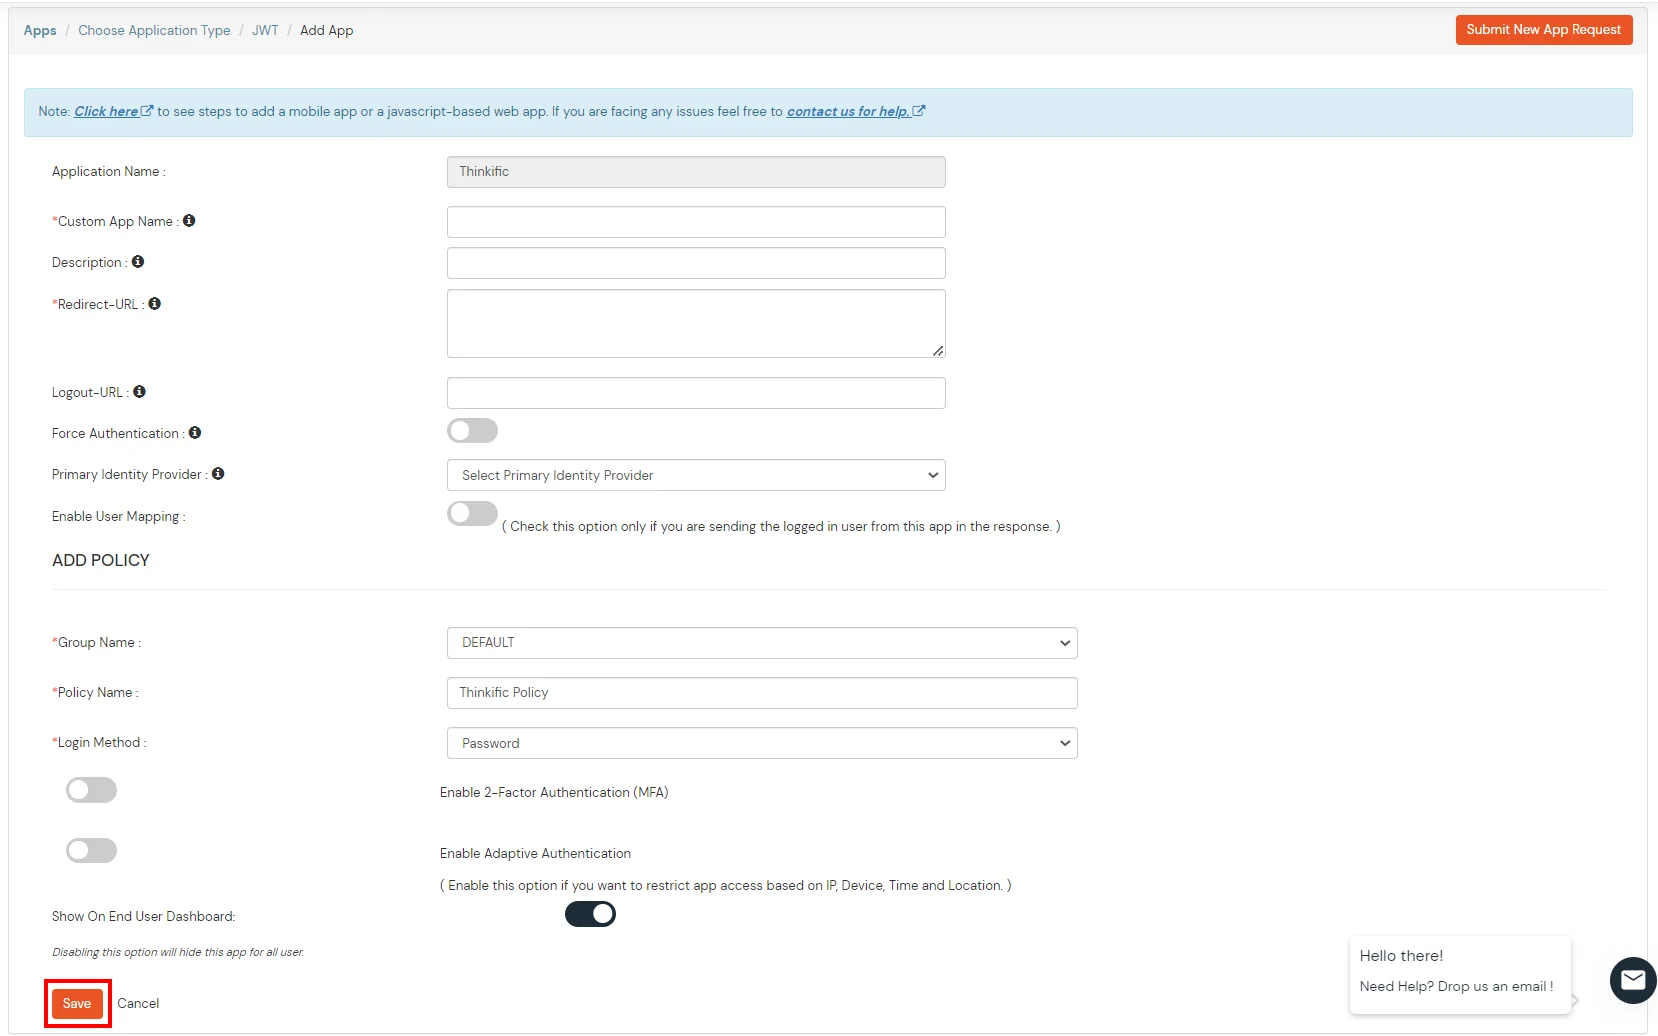
  • In Add Apps tab enter the values and click on Save.
    Custom Application Name Choose appropriate name according to your choice.
    Description Add appropriate description according to your choice.
    Redirect-URL https://{Subdomain}.thinkific.com/api/sso/v2/sso/jwt?jwt=
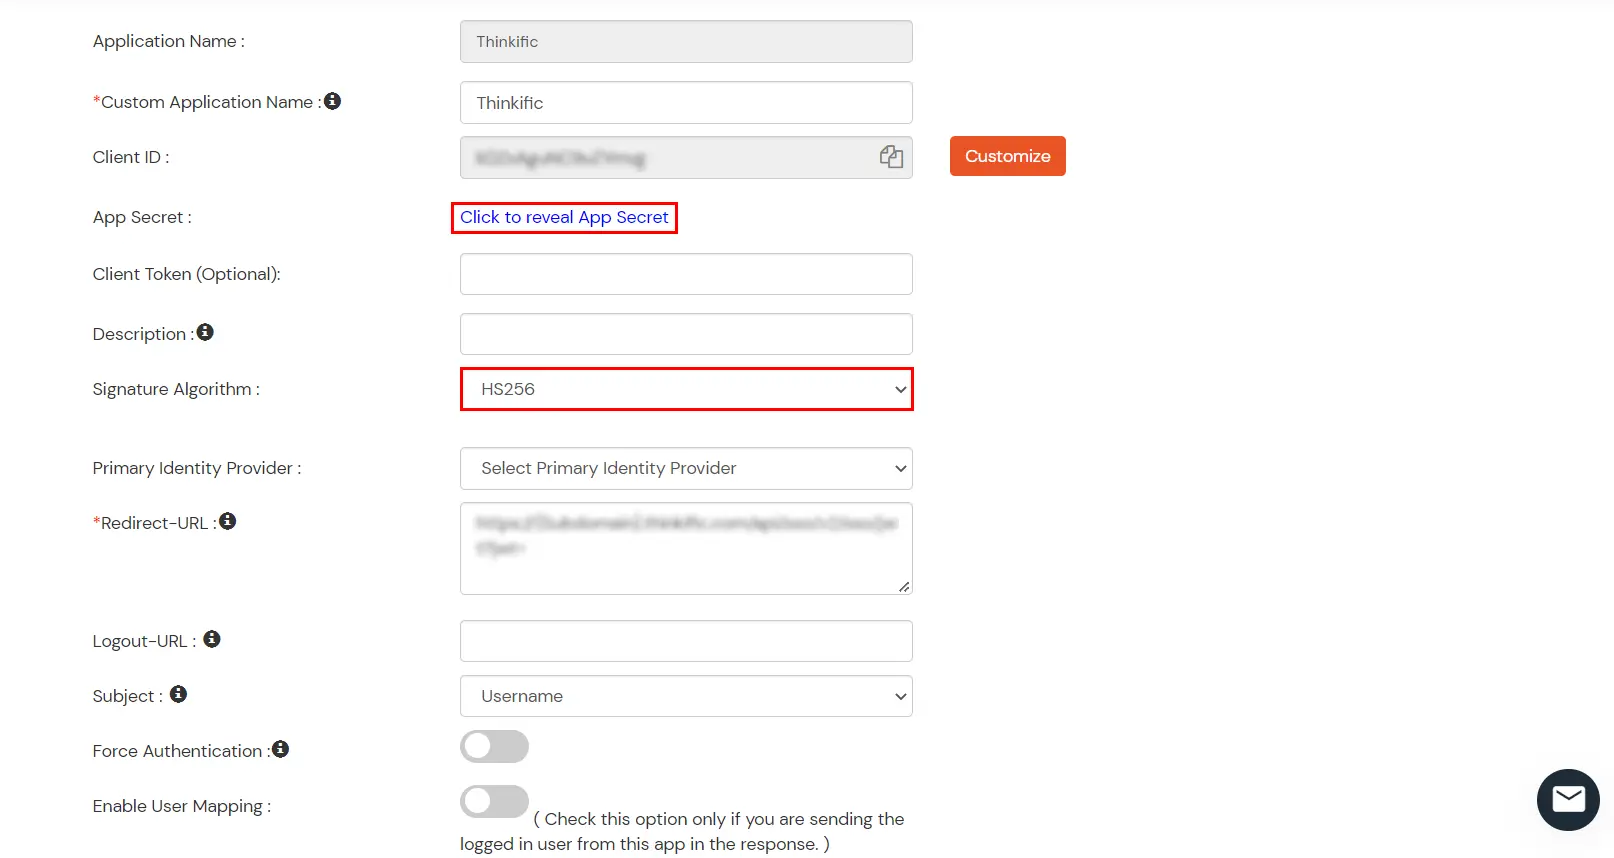
  • To configure App secret go to Edit against your configured app, Apps>>Select your app>>Edit
  • Thinkific Single Sign-On (SSO): edit-jwt-app

  • Select Click to reveal App Secret >> Customize. Now, put the API Key revcieved from Thinkific Dashboard.
  • For Signature Algorithm, choose HS256 from dropdown menu.
  • Thinkific Single Sign-On (SSO): edit-jwt-app

  • Click on Save
  • Thinkific Single Sign-On (SSO): edit-jwt-app

  • Now, You can access Thinkific Account Using IDP credentials through the Single-sign-on URL as shown in image above.

2. Configure Your User Directory

miniOrange provides user authentication from various external sources, which can be Directories (like ADFS, Microsoft Active Directory, Azure AD, OpenLDAP, Google, AWS Cognito etc), Identity Providers (like Okta, Shibboleth, Ping, OneLogin, KeyCloak), Databases (like MySQL, Maria DB, PostgreSQL) and many more. You can configure your existing directory/user store or add users in miniOrange.


  • Log in to miniOrange dashboard from the Admin Console.
  • Now, there are 3 ways to add users in miniOrange Identity Source:
    • 1.1 Create User in miniOrange

      • Click on Users >> Add User.
      • Thinkific Single Sign On (sso) add user in miniOrange

      • Here, fill the user details without the password and then click on the Create User button.
      • Thinkific Single Sign On (sso) add user details

      • Click on Onboarding Status tab. Check the email, with the registered e-mail id and select action Send Activation Mail with Password Reset Link from Select Action dropdown list and then click on Apply button.
      • Thinkific Single Sign On (sso) email action

      • Now, Open your email id. Open the mail you get from miniOrange and then click on the link to set your account password.
      • On the next screen, enter the password and confirm password and then click on the Reset Password button.
      • Thinkific Single Sign On (sso) reset user password
      • Now, you can log in into miniOrange account by entering your credentials.

      1.2 Bulk Upload Users in miniOrange via Uploading CSV File.

      • Navigate to Users >> User List. Click on Add User button.
      • Thinkific Single Sign On (sso) add user via bulk upload

      • In Bulk User Registration download sample csv format from our console and edit this csv file according to the instructions.
      • Thinkific Single Sign On (sso) download sample csv file

      • To bulk upload users, choose the file make sure it is in comma separated .csv file format then click on Upload.
      • Thinkific Single Sign On (sso) bulk upload user

      • After uploading the csv file successfully, you will see a success message with a link.
      • Click on that link you will see list of users to send activation mail. Select users to send activation mail and click on Send Activation Mail. An activation mail will be sent to the selected users.

      1.3 Self User Registration

      • miniOrange self user registration allows end users to register themselves using customized registration form. miniOrange admin users can customize the registration form by adding more custom fields according to their choice. Learn More

miniOrange integrates with various external user sources such as directories, identity providers, and etc.

  • Note: Once you configure the IDP, you need to Send first_name and last_name as configure attributes
  • Thinkific Single Sign-On (SSO): send-configured-attributes

Not able to find your IdP or Need help setting it up?


Contact us or email us at idpsupport@xecurify.com and we'll help you setting it up in no time.


3. Test SSO Configuration


Using SP Initiated Login

  • Login to your Thinkific account.
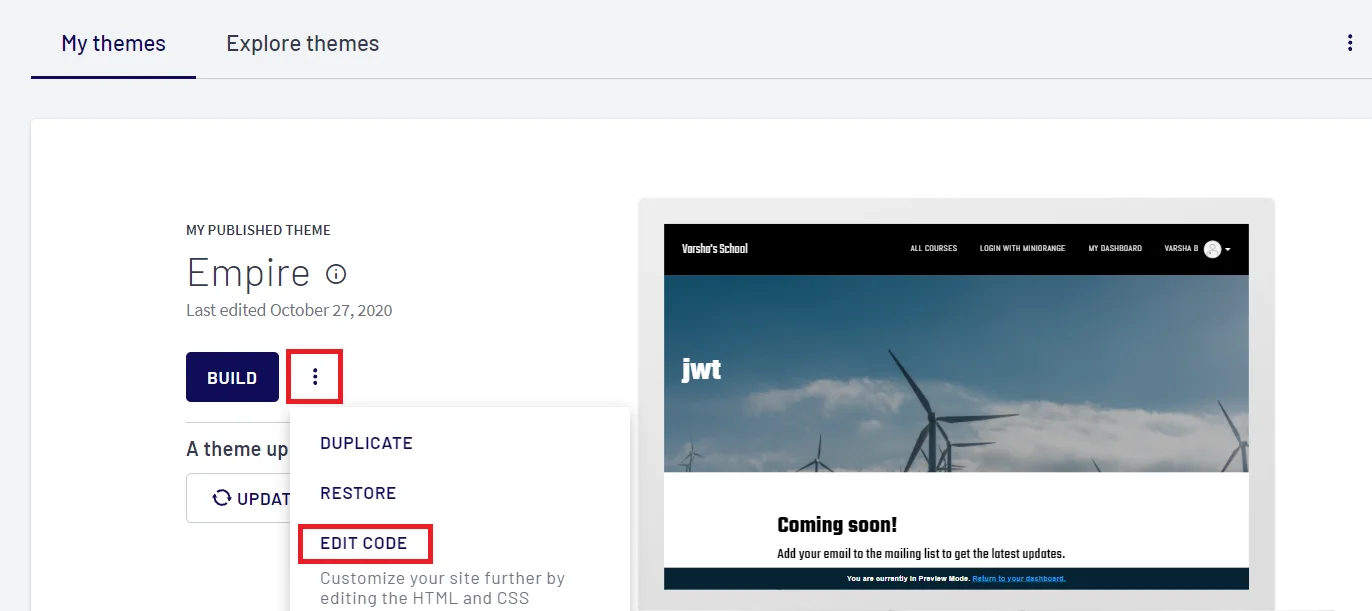
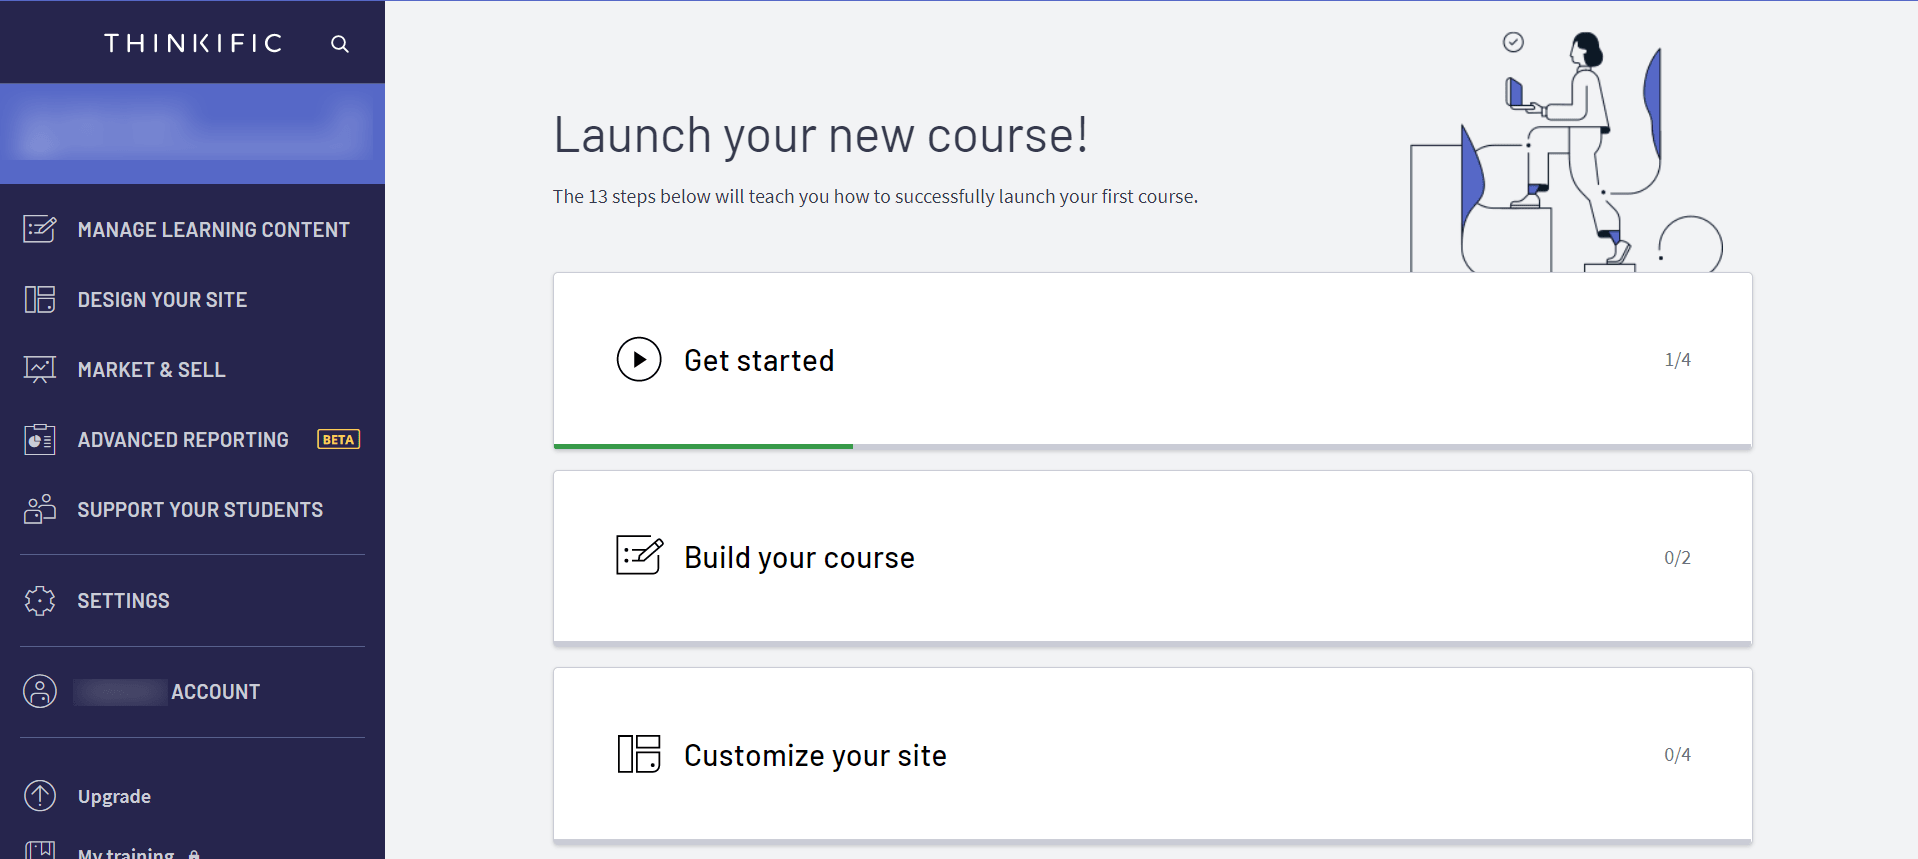
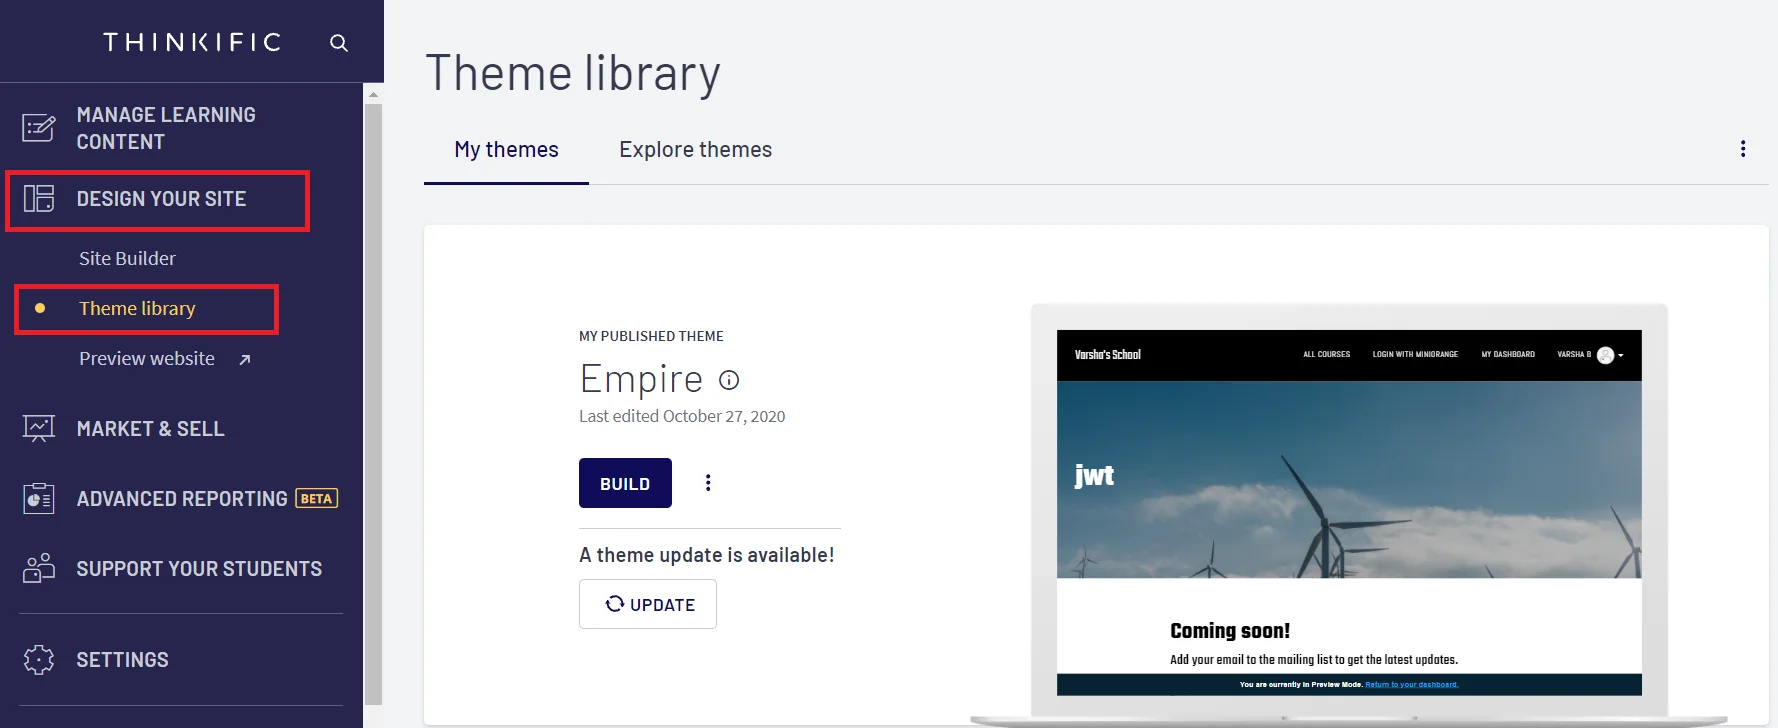
  • On the Dashboard, Click on Desgin your site-> Theme library option.
  • thinkific Single Sign-On (SSO)desgin site

  • Click on Three Dots as shown in the below image and select EDIT CODE option from dropdown.
  • thinkific Single Sign-On (SSO) edit-code

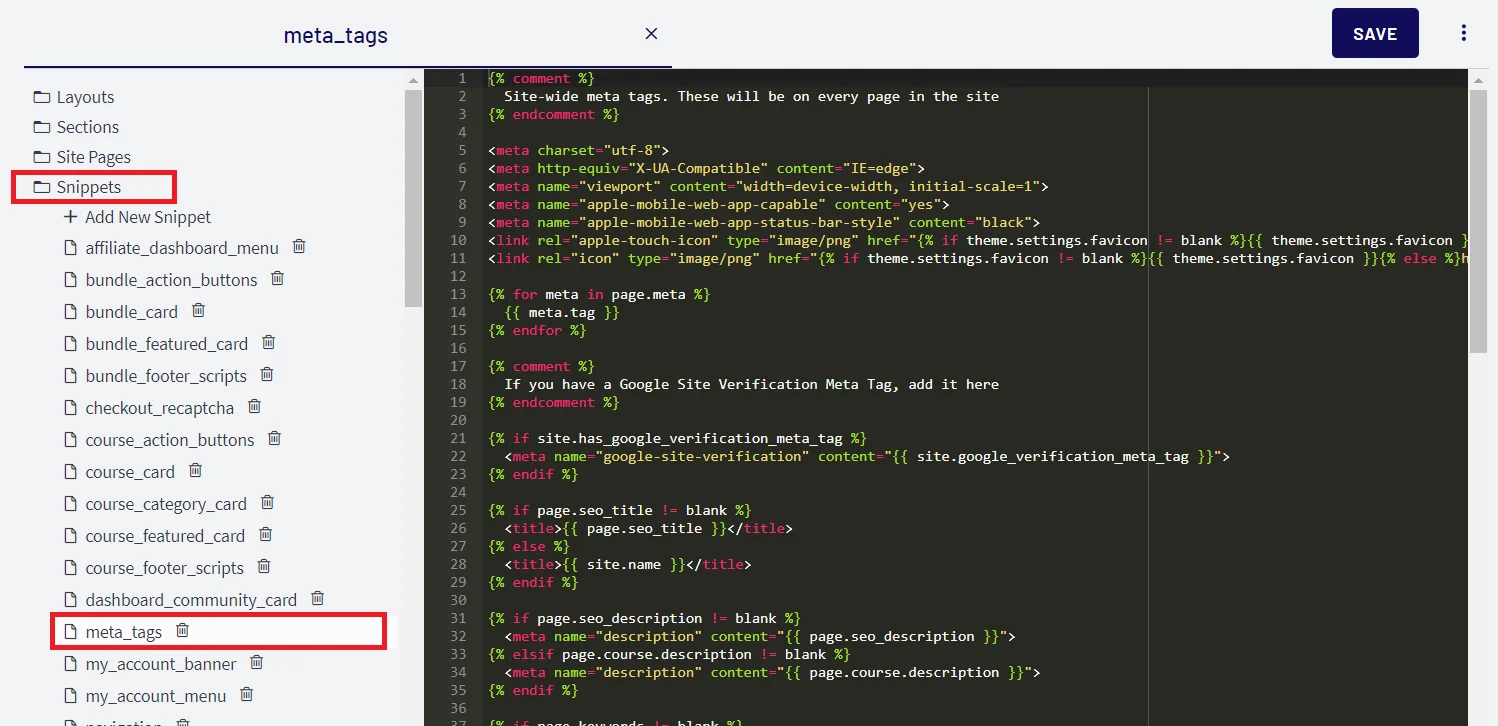
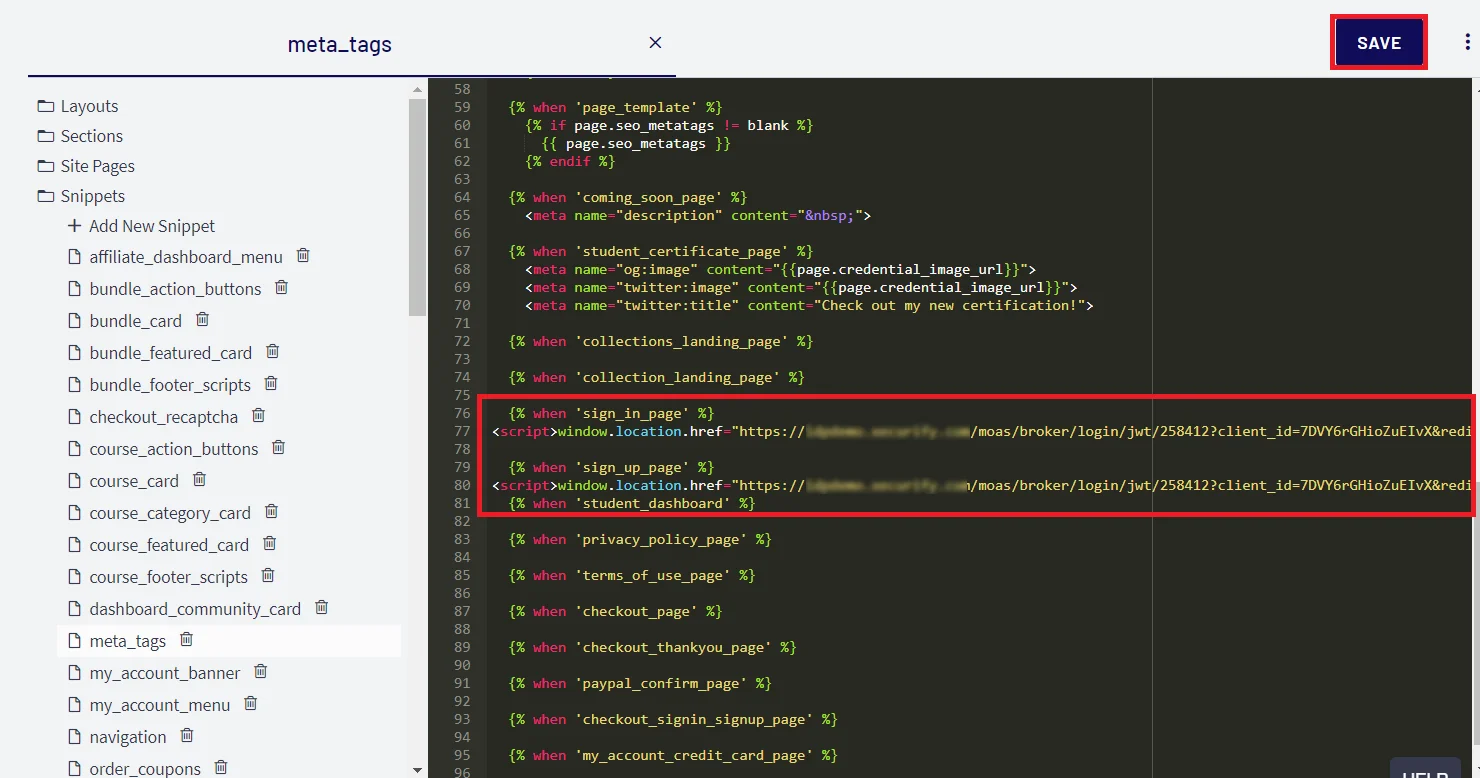
  • Now, click on the Snippets link and search for meta_tag option and click on it.
  • thinkific Single Sign-On (SSO) snippets

  • Add Single Sign-On URL and Single Logout URL in the below format. You will get this url from Step 1. Click on Save button.
  • <script>window.location.href="Your Single Sign-On URL"</script>

    <script>window.location.href="Your Single Logout URL"</script>
    thinkific Single Sign-On (SSO) login

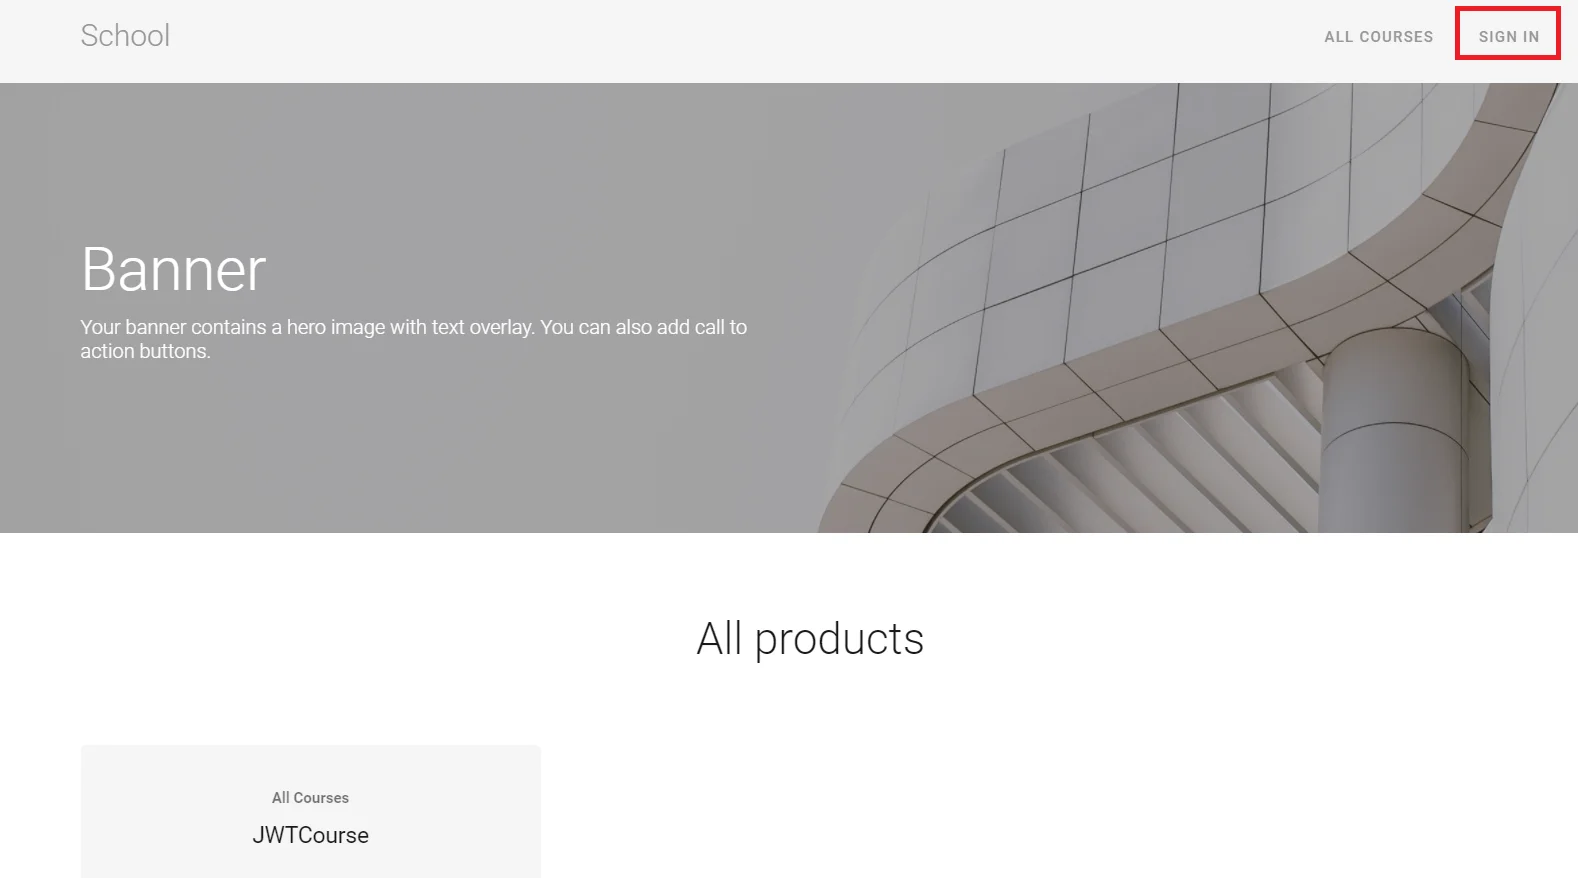
  • Go to your Thinkific URL, click on SIGN IN button which will redirect you to miniOrange IdP Sign On Page.
  • Thinkific Single Sign-On (SSO): miniOrange Login

    Thinkific Single Sign-On (SSO): miniOrange Login

  • Enter your miniOrange login credential and click on Login. You will be automatically logged in to your Thinkific account.
  • Thinkific Single Sign-On (SSO): Thinkific Login

Using IDP Initiated Login

  • Log into miniOrange IdP using your credentials.
  • On the End User-Dashboard, click on the Thinkific application configured, to test the SSO flow.
  • Thinkific Single Sign-On (SSO): verify configuration

  • You will be successfully logged into Thinkific.
  • Thinkific Single Sign-On (SSO): Thinkific Login

Using SP Initiated Login

  • Login to your Thinkific account.
  • On the Dashboard, Click on Desgin your site-> Theme library option.
  • thinkific Single Sign-On (SSO)desgin site

  • Click on Three Dots as shown in the below image and select EDIT CODE option from dropdown.
  • thinkific Single Sign-On (SSO) edit-code

  • Now, click on the Snippets link and search for meta_tag option and click on it.
  • thinkific Single Sign-On (SSO) snippets

  • Add Single Sign-On URL in the below format as shown in the image, (you will get this url from step 1) and click on Save button.
  • thinkific Single Sign-On (SSO) url

    thinkific Single Sign-On (SSO) login

  • Go to your Thinkific URL, click on SIGN IN button which will redirect you to miniOrange IdP Sign On Page.
  • Thinkific Single Sign-On (SSO): miniOrange Login

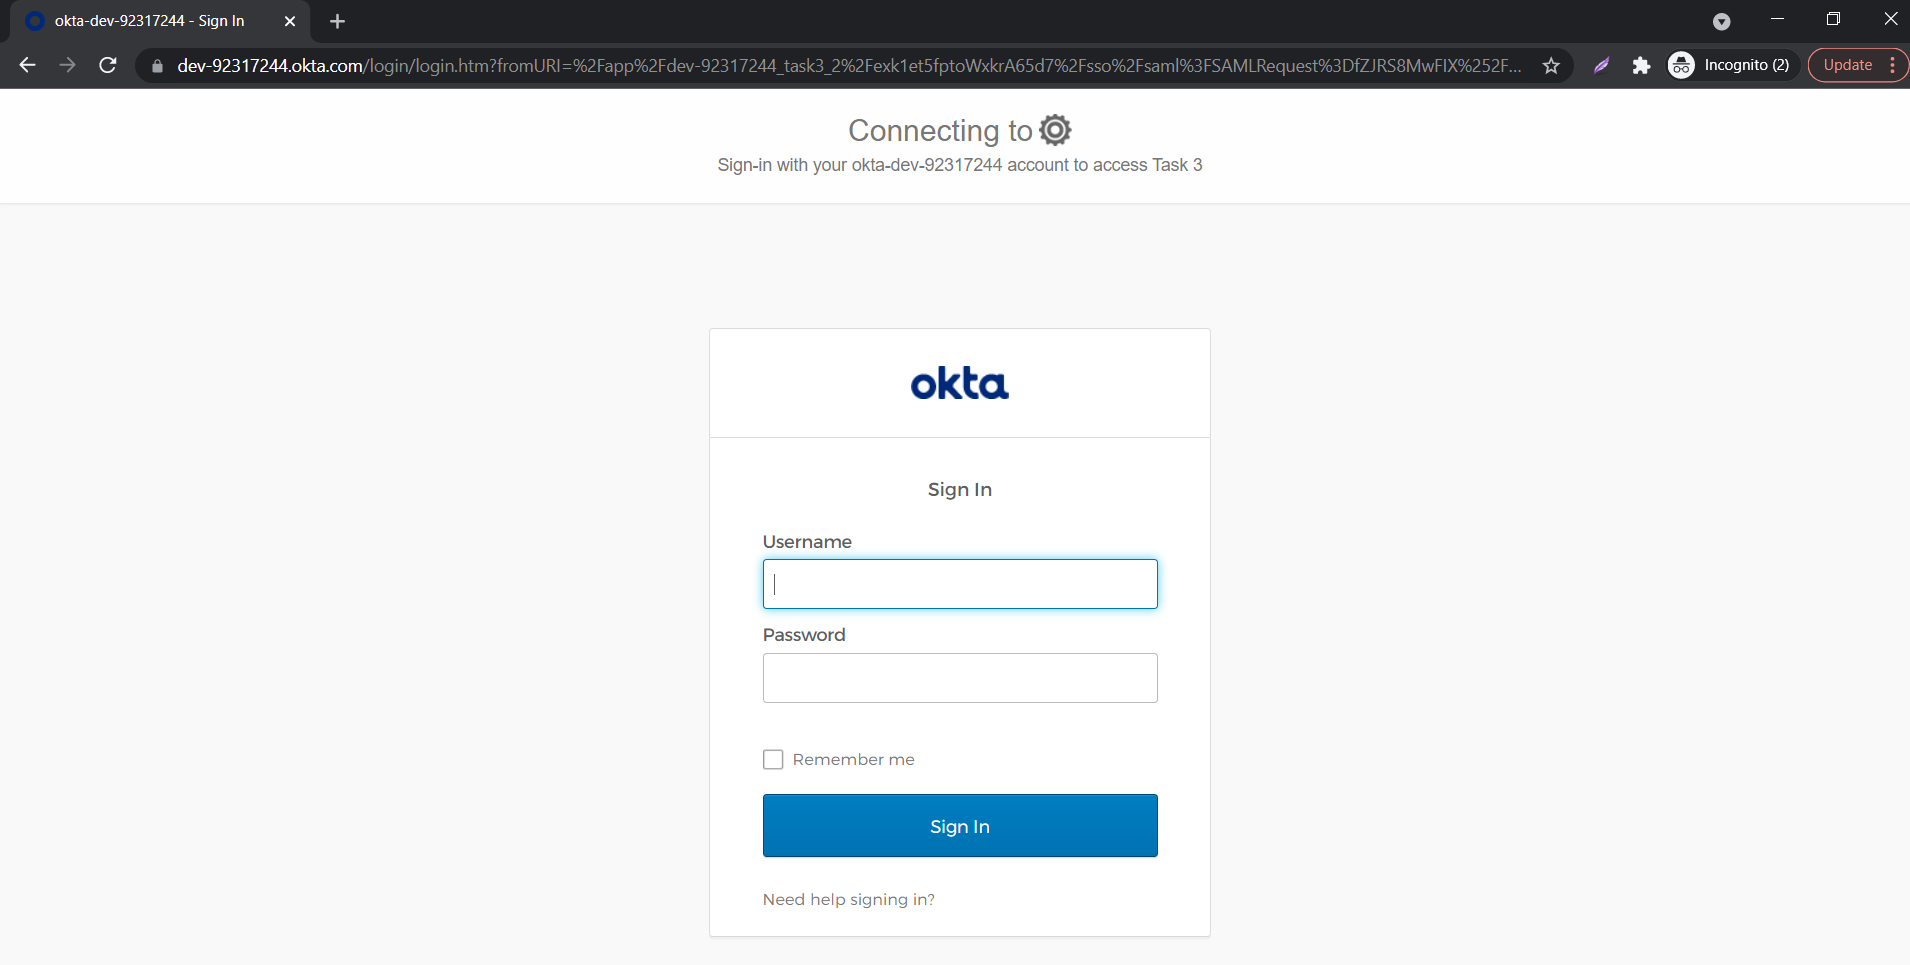
  • On accessing the Single sign-On URL as mentioned in the second step, you will be asked to enter your Okta credentials.
  • Thinkific Single Sign-On (SSO): miniOrange Login

  • On entering the valid credentials, you will be successfully logged into Thinkific.
  • Thinkific Single Sign-On (SSO): Thinkific Login

Using IDP Initiated Login

  • Log into Okta using your credentials.
  • Click on Admin to access the Admin Console, then click on Applications.
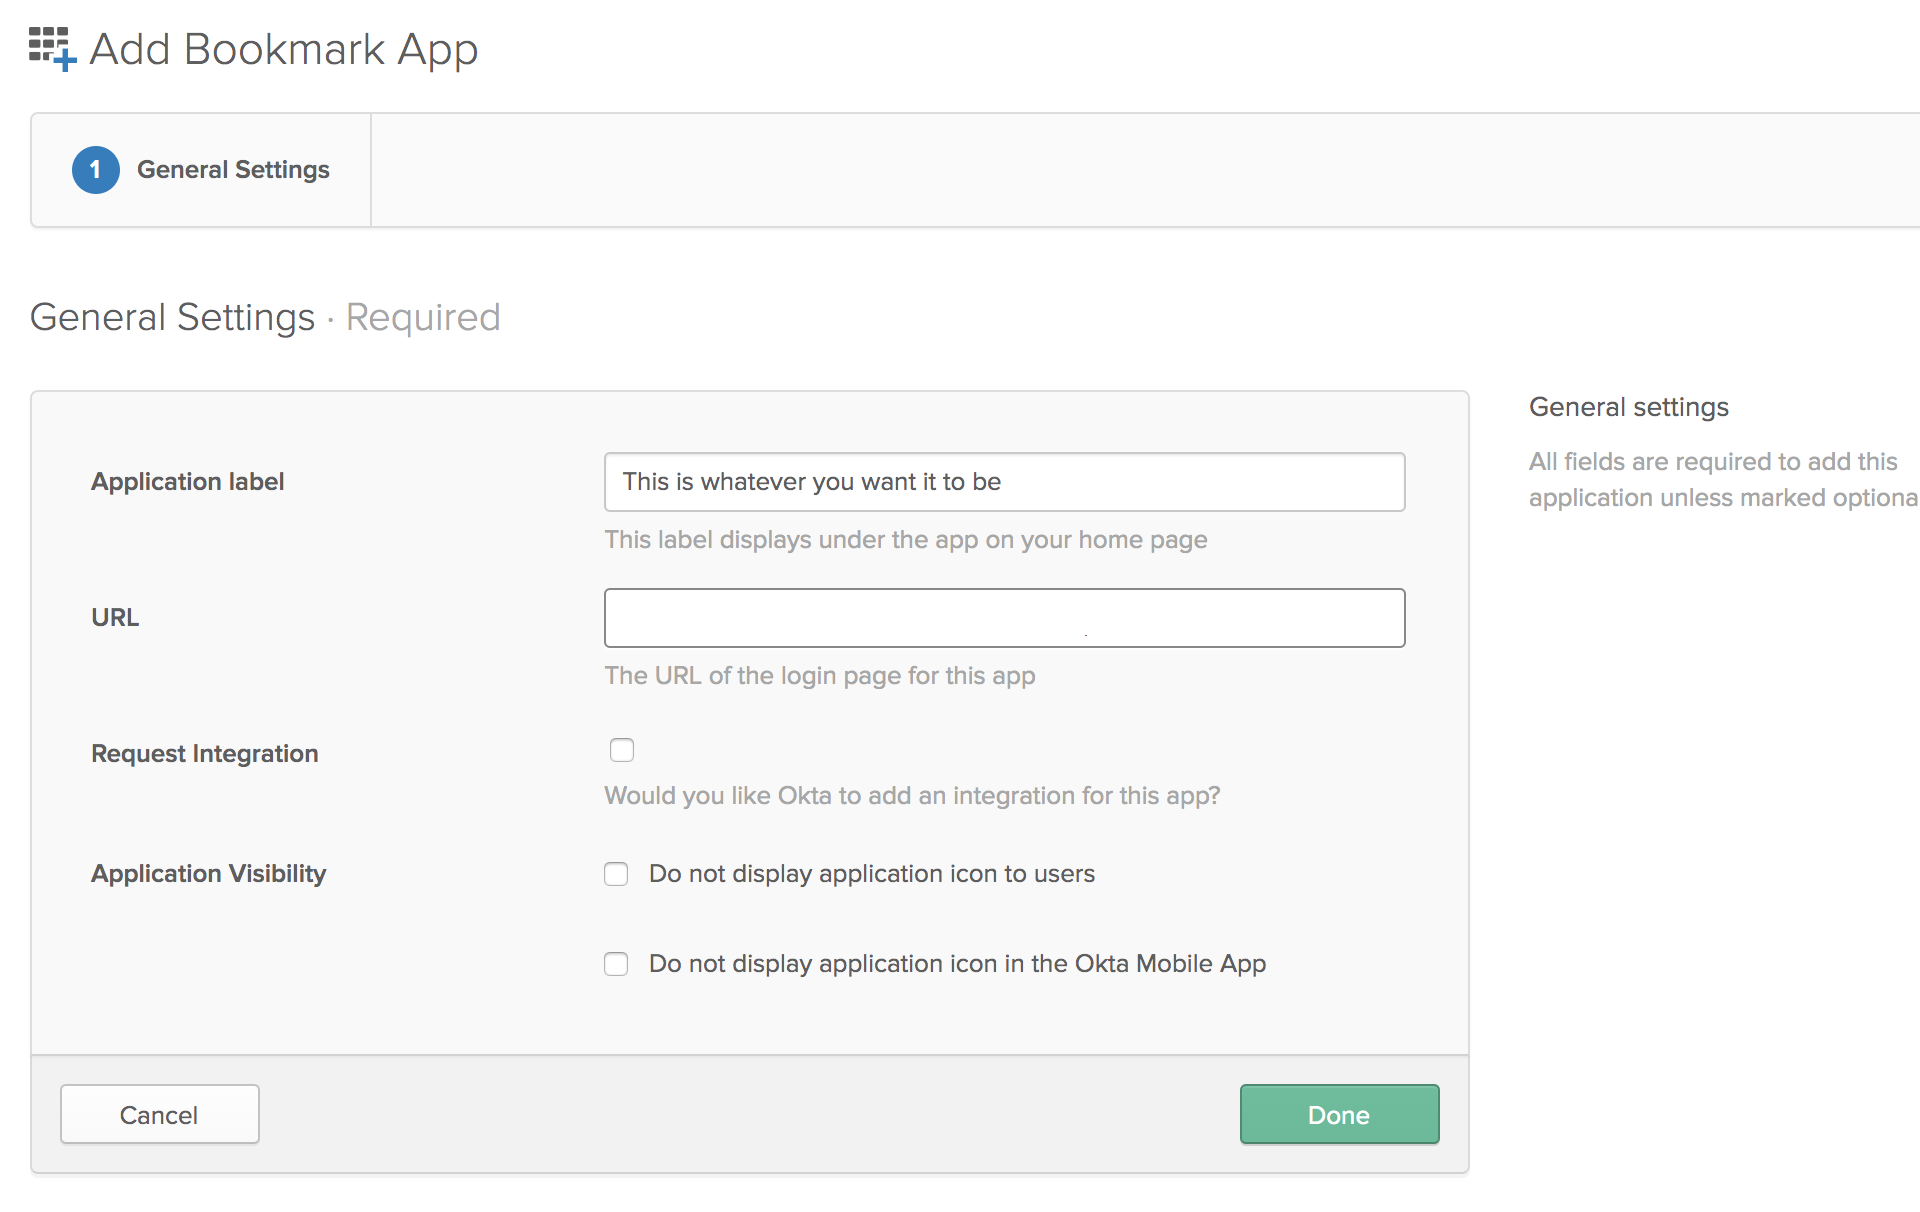
  • Click on Add Application and search for "Bookmark App", and Click Add in the left pane.
  • Choose an app name of your choice which will be the display name.
  • In the URL section, enter the SSO URL that is given in the JWT app.
  • Thinkific Single Sign-On (SSO): Thinkific add bookmark app

  • Click on Save.
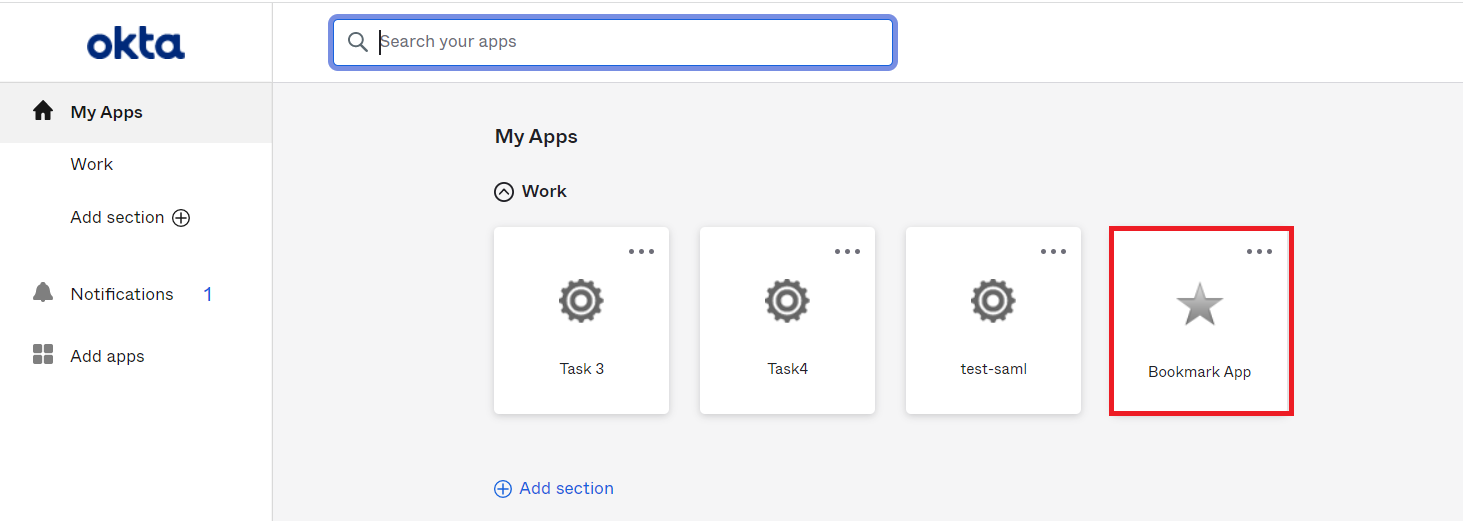
  • On the End User-Dashboard, click on the Thinkific bookmark application configured, to test the SSO flow.
  • Thinkific Single Sign-On (SSO): verify configuration

  • You will be successfully logged into Thinkific.
  • Thinkific Single Sign-On (SSO): Thinkific Login


External References

Frequently Asked Questions

No. API access is available for Pro+Growth or the above plans on Thinkific.

Yes, this is possible. To access this feature you need to be on Pro+Growth or above plans on Thinkific.

miniOrange SSO solution can be used with any Thinkific account. SSO is possible with all Thinkific plans: Free/ Growth /Plus / Premier.

Want To Schedule A Demo?

Request a Demo


Our Other Identity & Access Management Products