Hello there!

Need Help? We are right here!

Support Icon
miniOrange Email Support
success

Thanks for your Enquiry. Our team will soon reach out to you.

If you don't hear from us within 24 hours, please feel free to send a follow-up email to info@xecurify.com

Search Results:

×

Configure MFA Methods for Admin


Why you need to configure Two Factor Authentication (2FA) for Admin?

When you are considering authentication, admin is the first person which needs to be authenticated. The reason behind is admin handles multiple user data. So along with admin(Self) users security is also dependant upon the admin only. The basic traditional authentication method (username and password) doesn't match the fast paced vulnerabilities going on in the cyber world. So to protect admin systems from such type of vulnerabilities miniOrange helps you to set additional authentication method which will add an extra layer of security while login to your admin system. This is done by configuring two-factor authentication(2FA) method.

You can set 2FA methods differently for admin and users. By configuring 2FA for admin, admin system will head up with higher security. miniOrange helps you to integrate 2FA for your admin system easily with 15+ 2FA methods. You can choose from any of the methods (KBA,OTP over SMS/email,Google authenticator,YubiKey,Push notifications,SMS and Email Links etc) and secure your admin system. Given below is the guide to setup two-factor authentication for admin with multiple demonstrations.
Setup 2FA for admin

  • Log in to the miniOrange Admin Console.
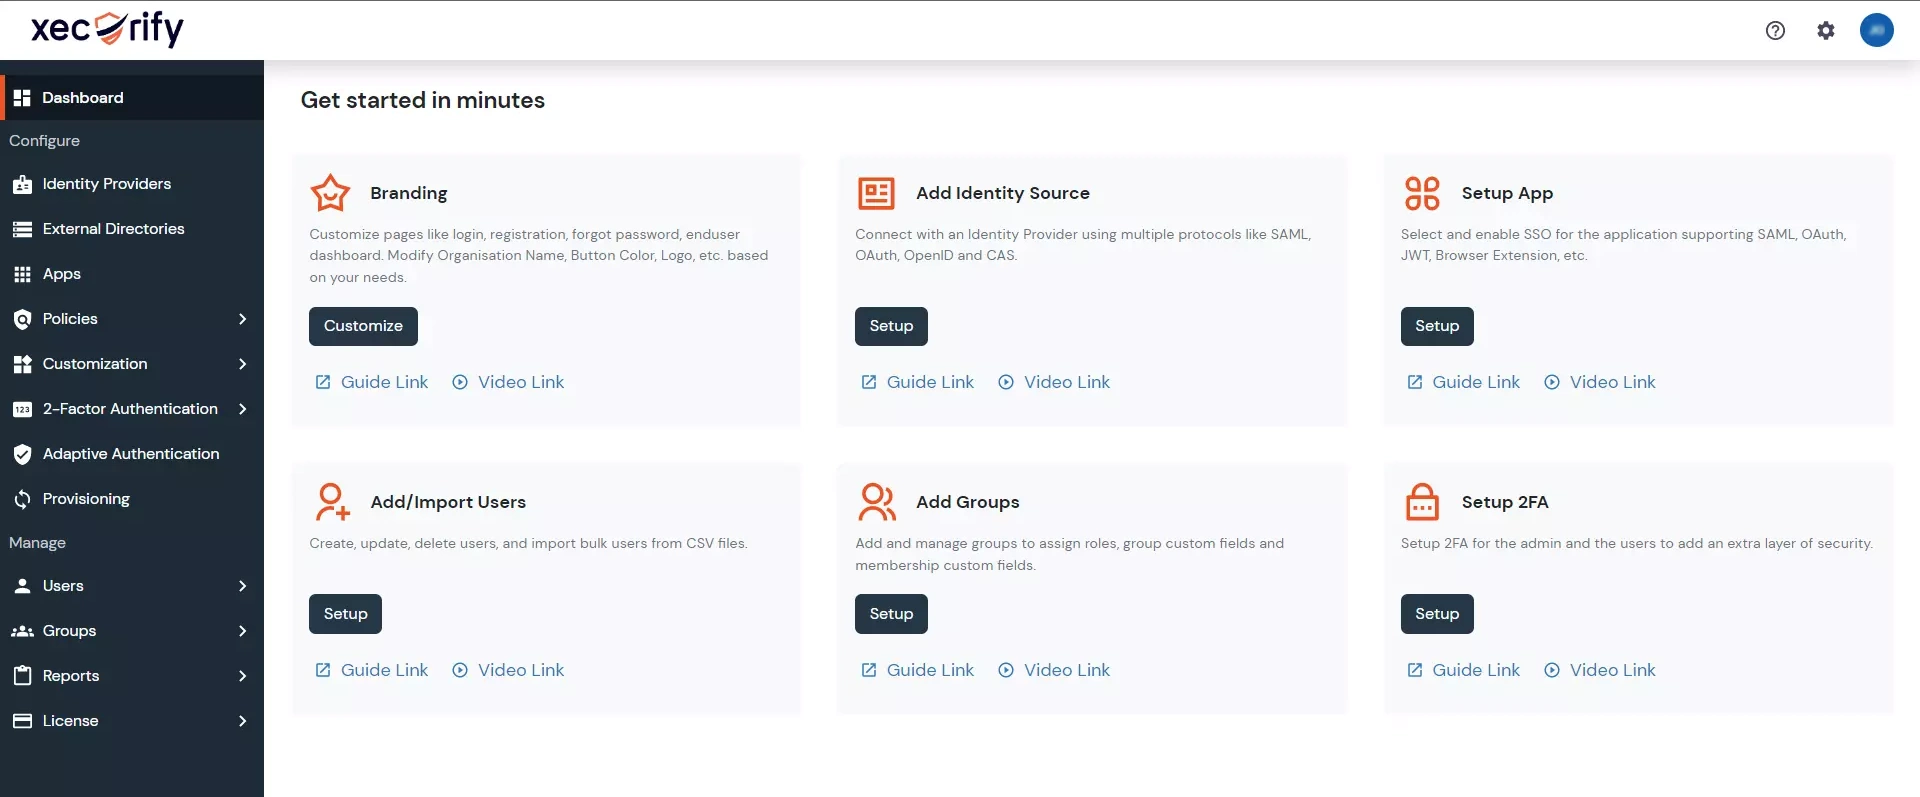
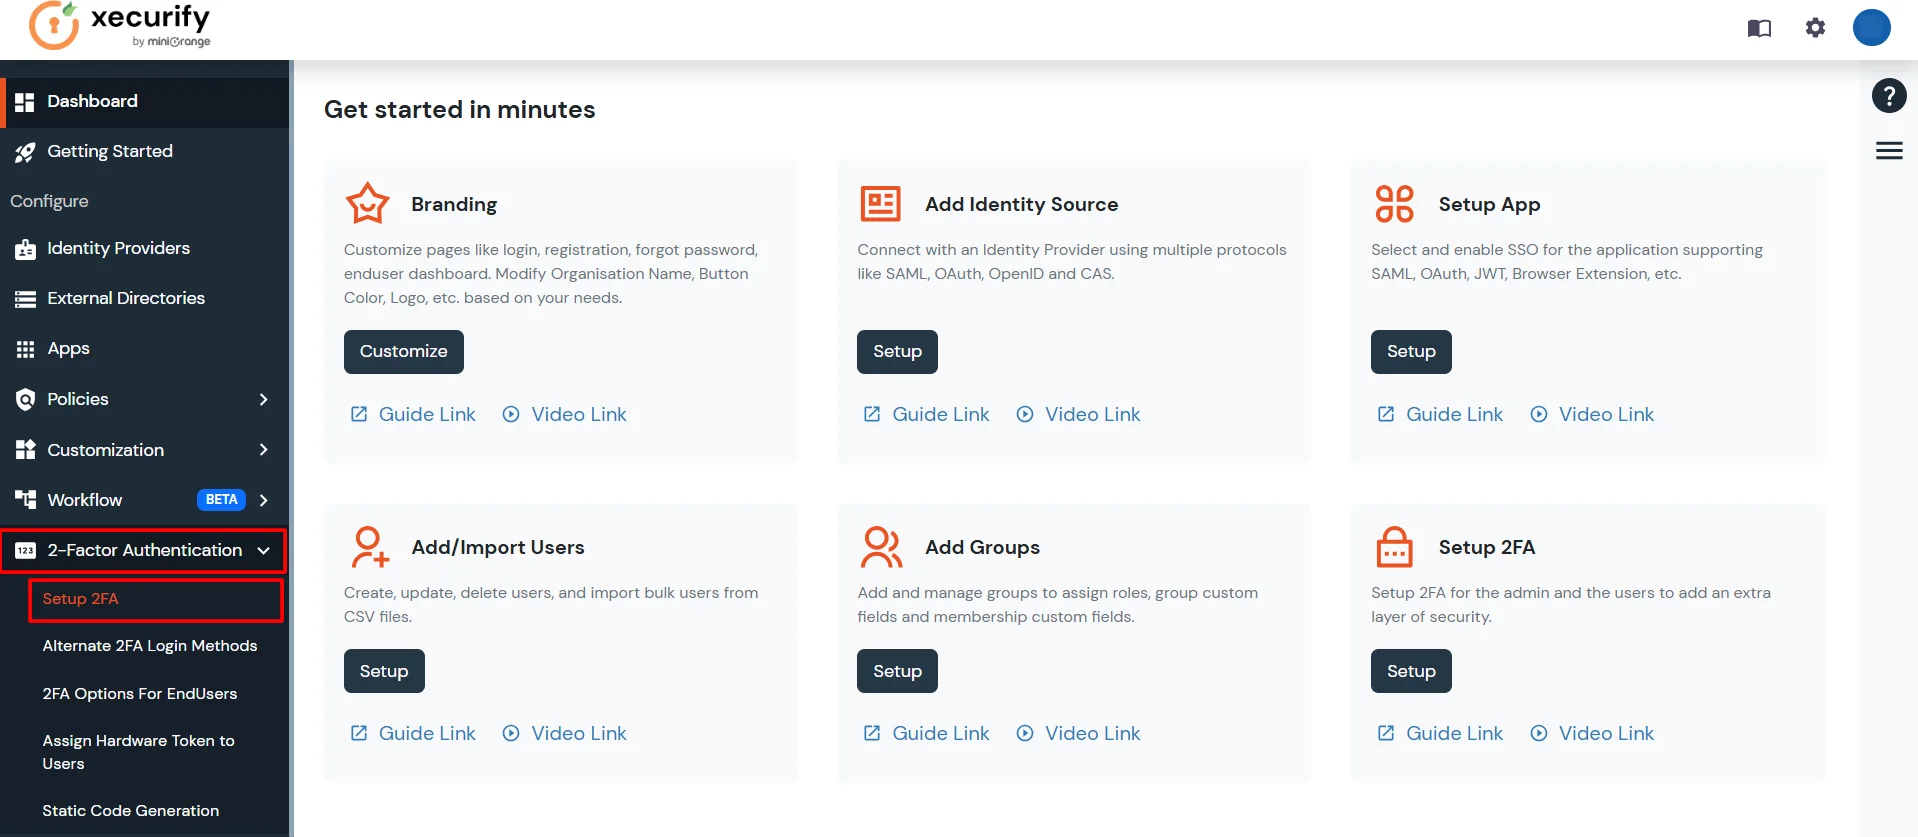
  • From your admin dashboard in the left navigation bar, select 2-Factor Authentication, and click on Setup 2FA.
  • Select Two-Factor Authentication(2fa)

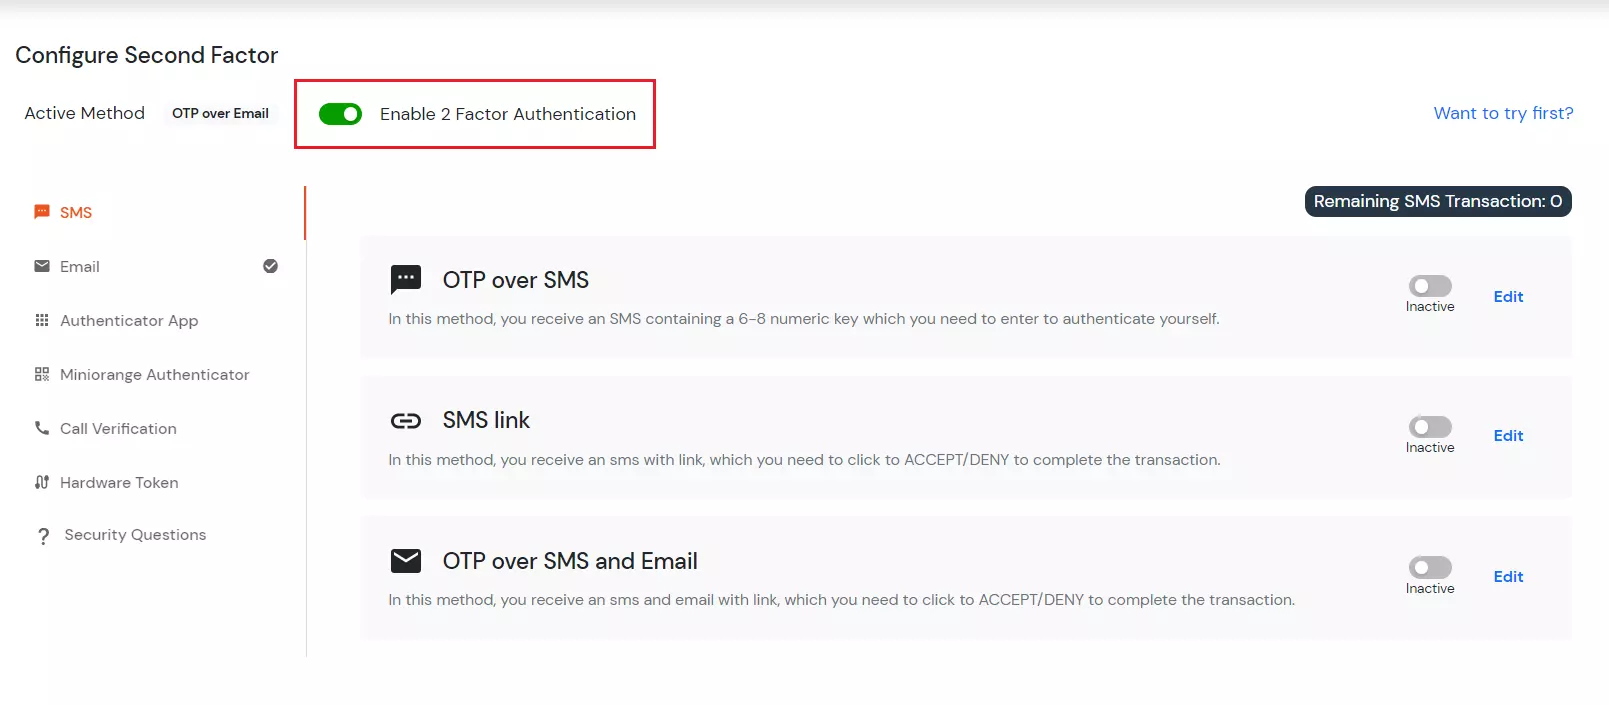
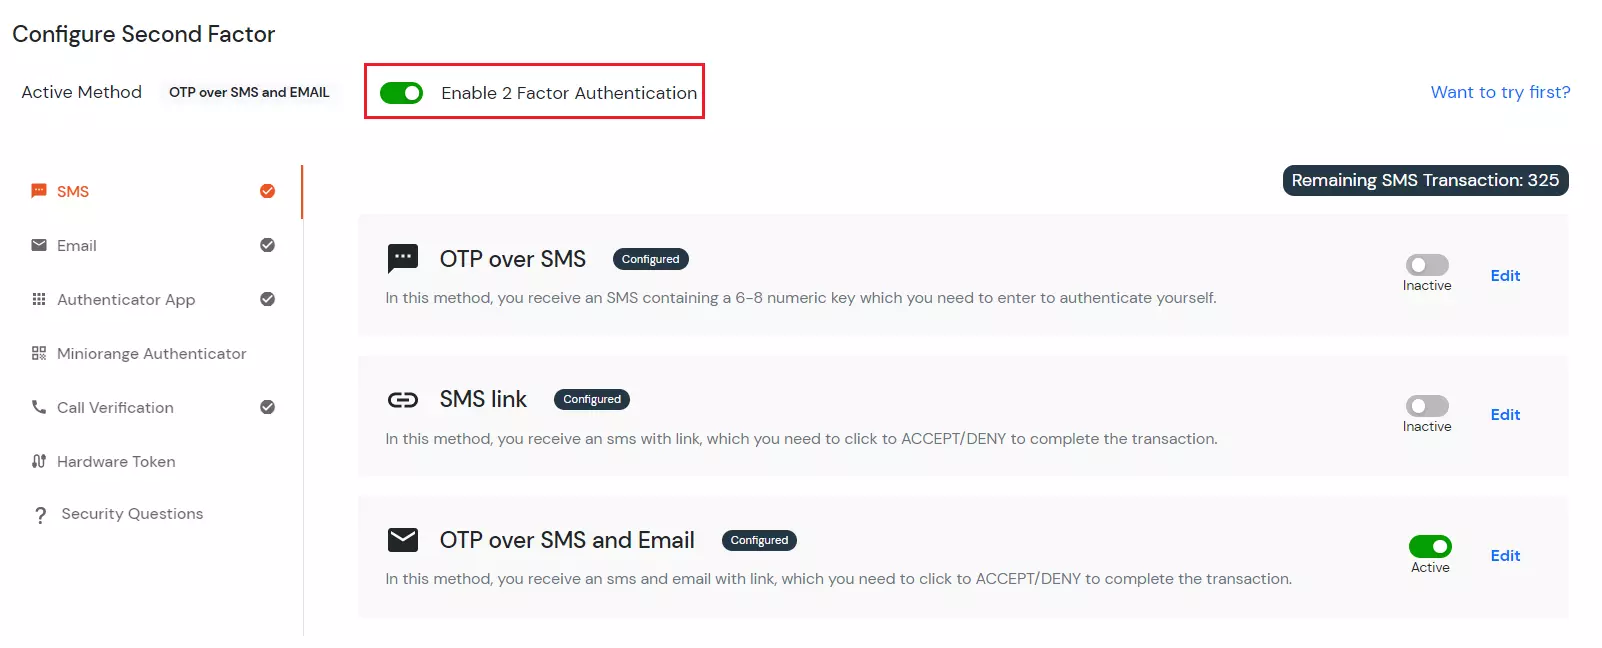
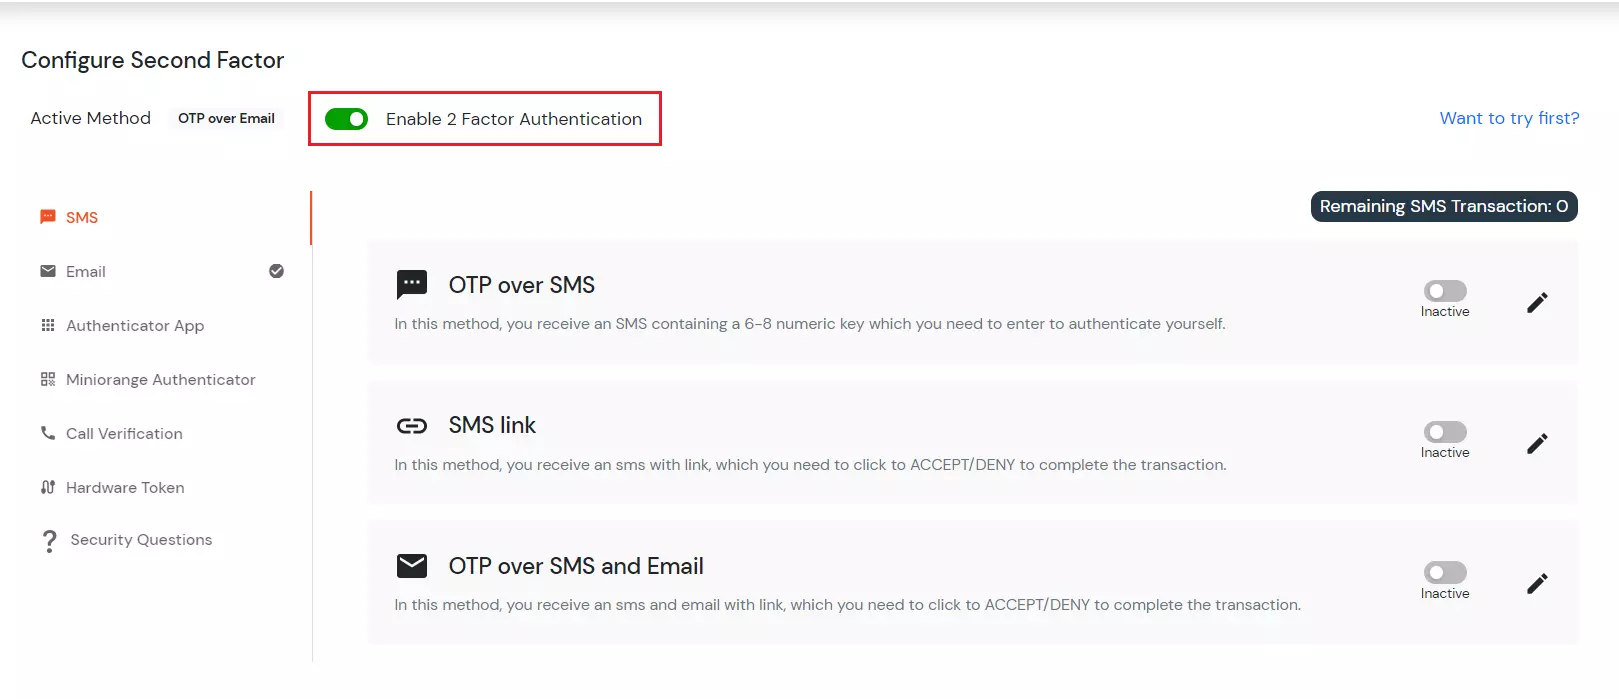
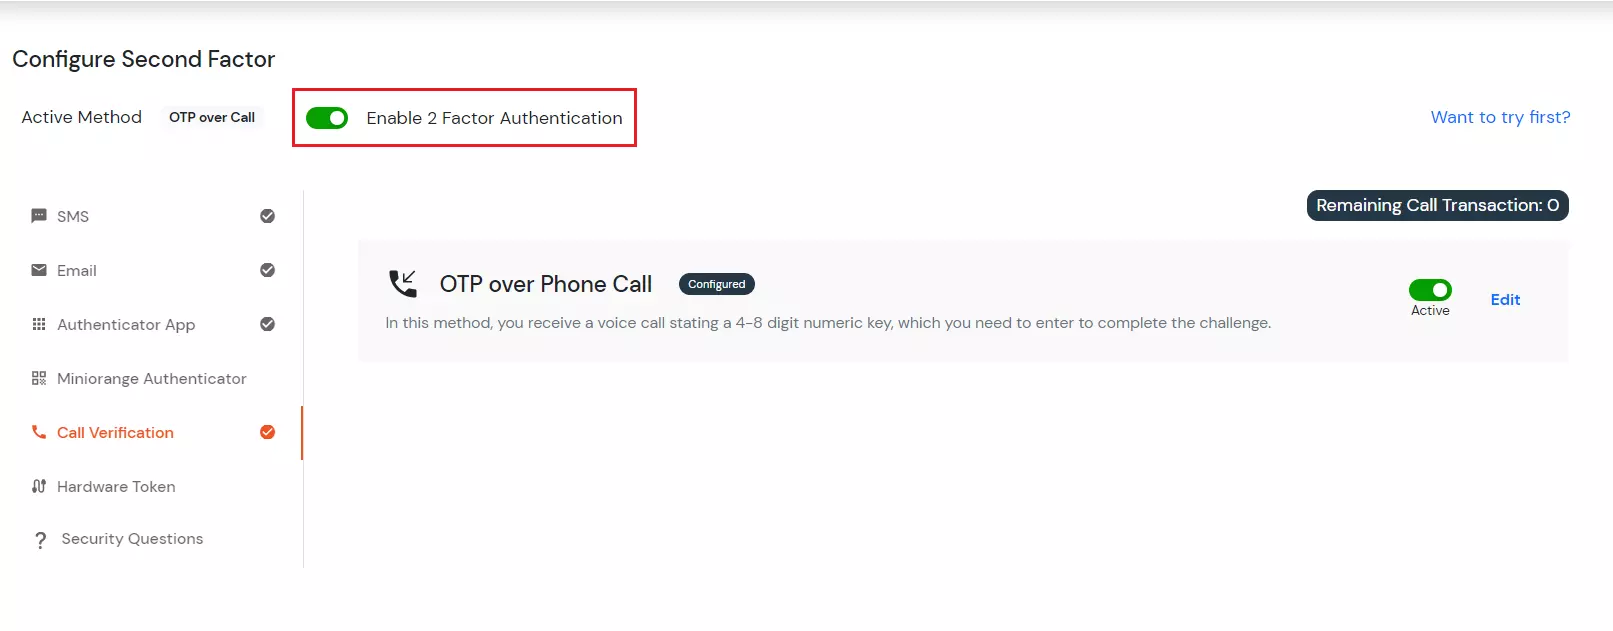
  • Toggle Enable second factor as shown below.
  • Different 2fa methods for admin

  • Select one method that you would like to set or change as 2FA.
  • As you will select the option you can customize settings according to your way.

1. SMS and Phone Callback

A. OTP over SMS Method

    In this 2FA method, User receives an OTP over SMS containing a 6-8 numeric key. You need to follow the given steps to enable it in your admin dashboard for end users security.
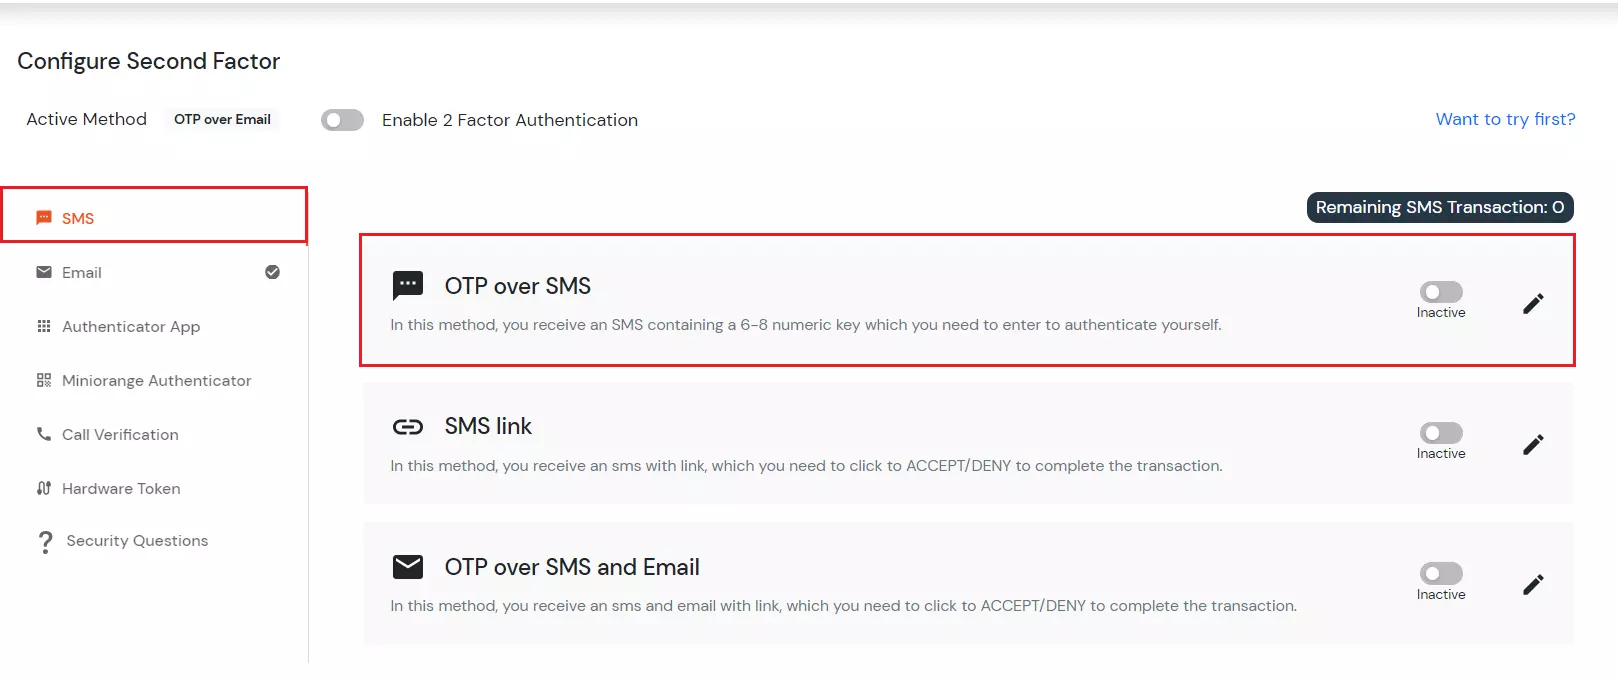
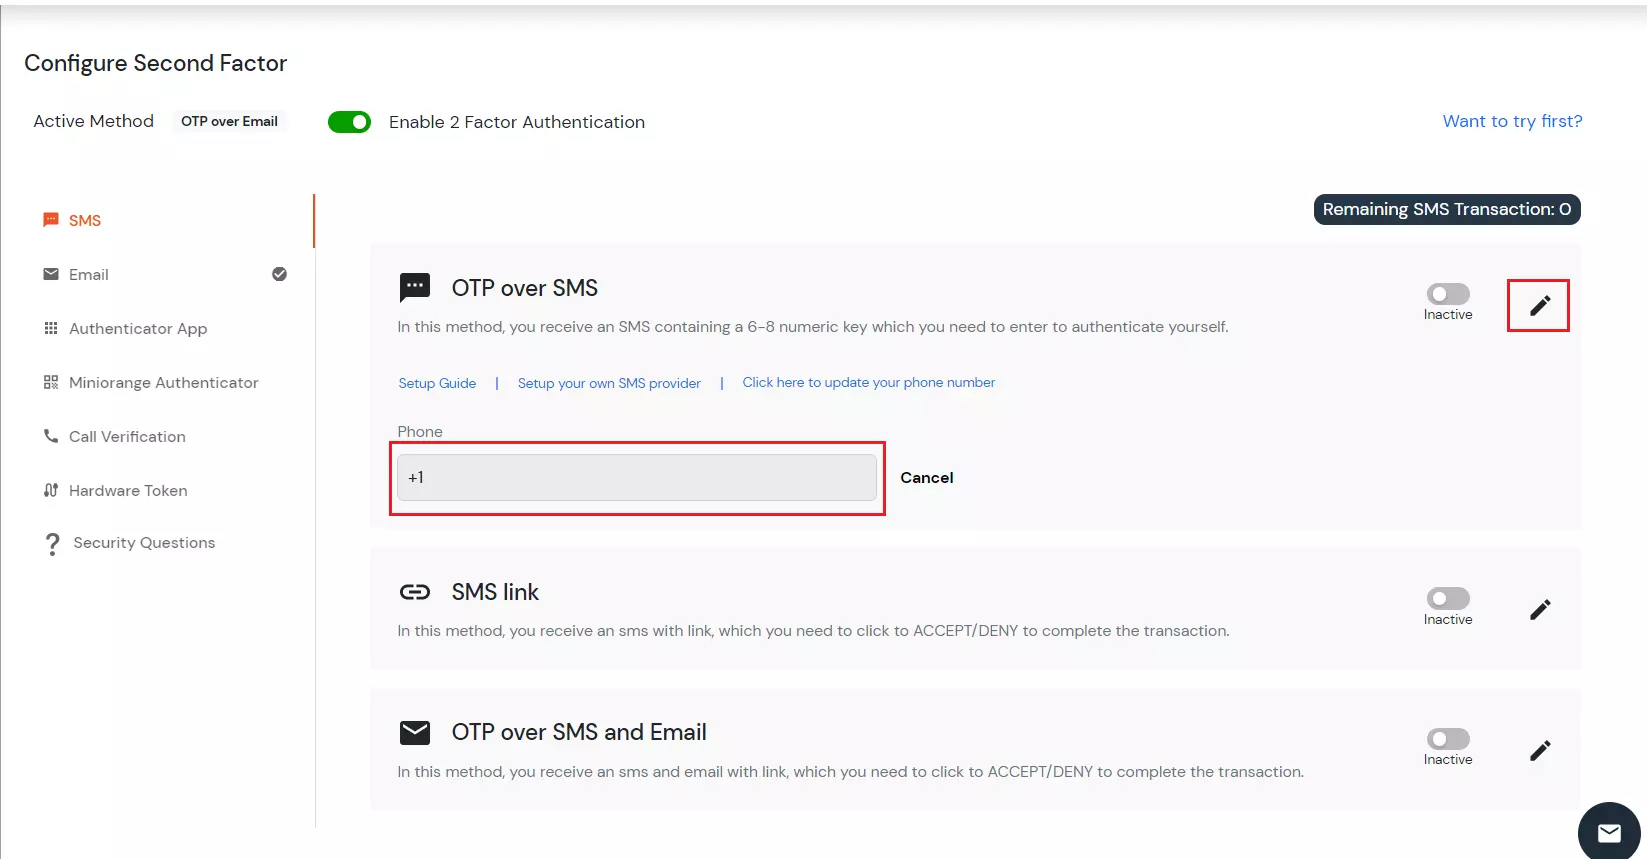
  • Click on OTP over SMS in the SMS to configure this method.
  • select OTP over SMS method for admin

  • Click on the Edit option.
  • Now add your mobile number on which you want to receive the OTP.
  • Then click on save.
  • configure OTP over SMS 2FA method

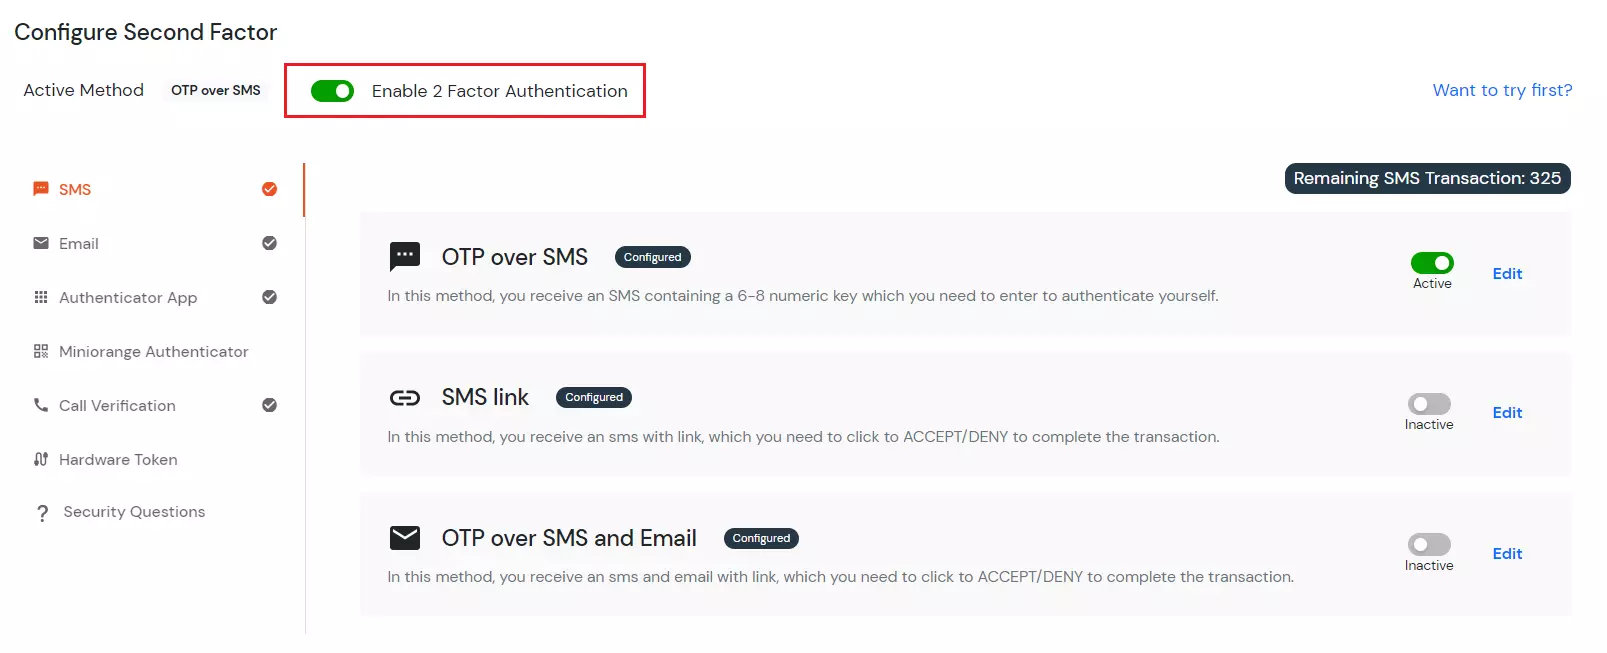
  • Now Enable second factor toggle if not done before as shown below.
  • Enter mobile number to receive OTP via call

  • As you can see, the Active method at the top will specify OTP over SMS.
  • To verify the second factor sign out and sign in again.
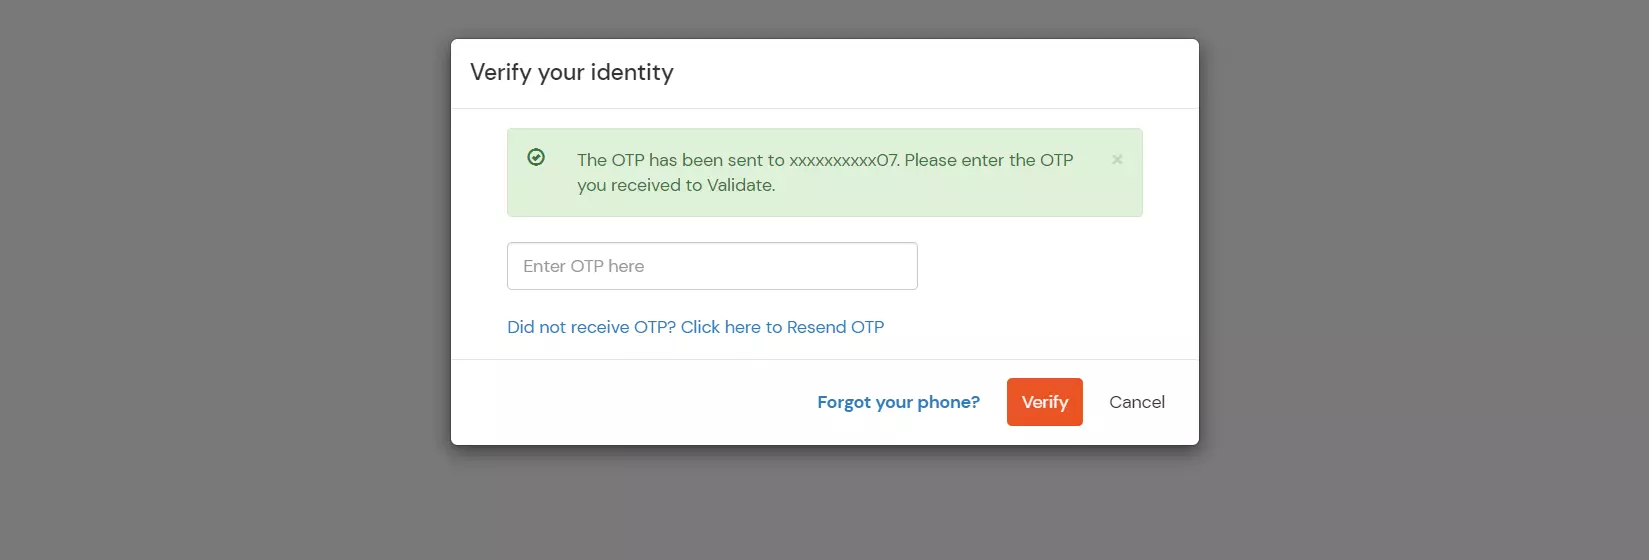
  • It will ask you Username and password. After that it is redirected to below page:
  • Enter the OTP received on the phone and click on verify.
  • verify your identity

  • If you are redirected to your dashboard, you have successfully configured OTP over SMS as your 2FA method.

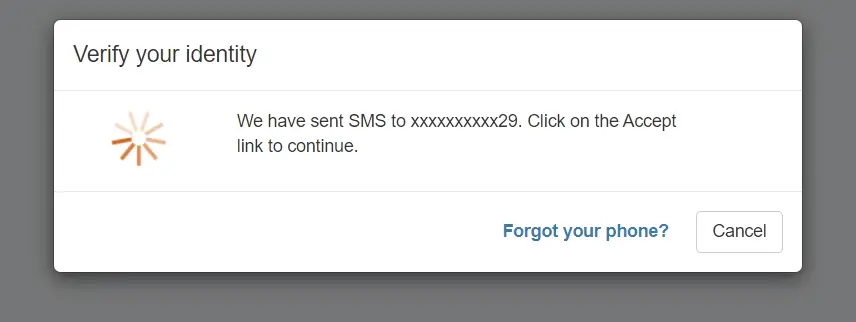
    In this 2FA method, User is sent a message with accept or deny link.
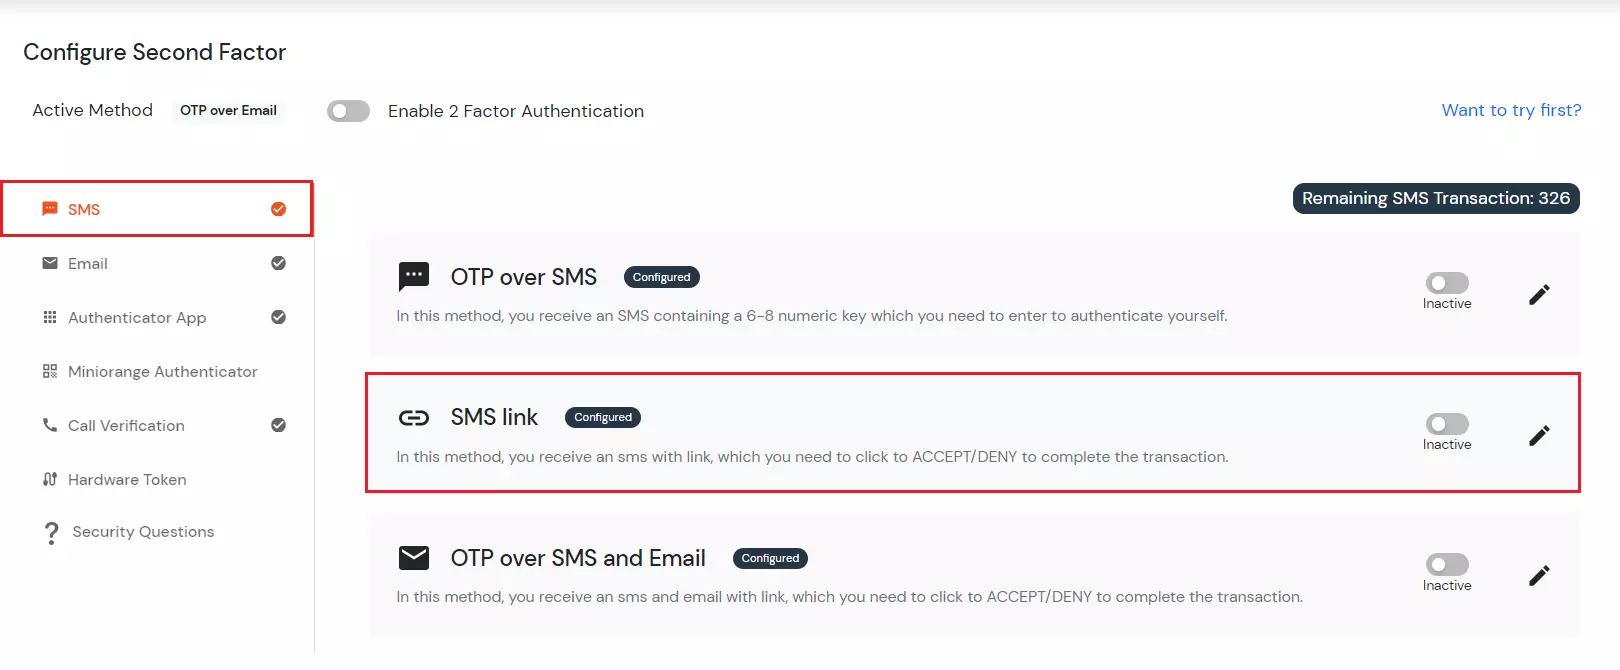
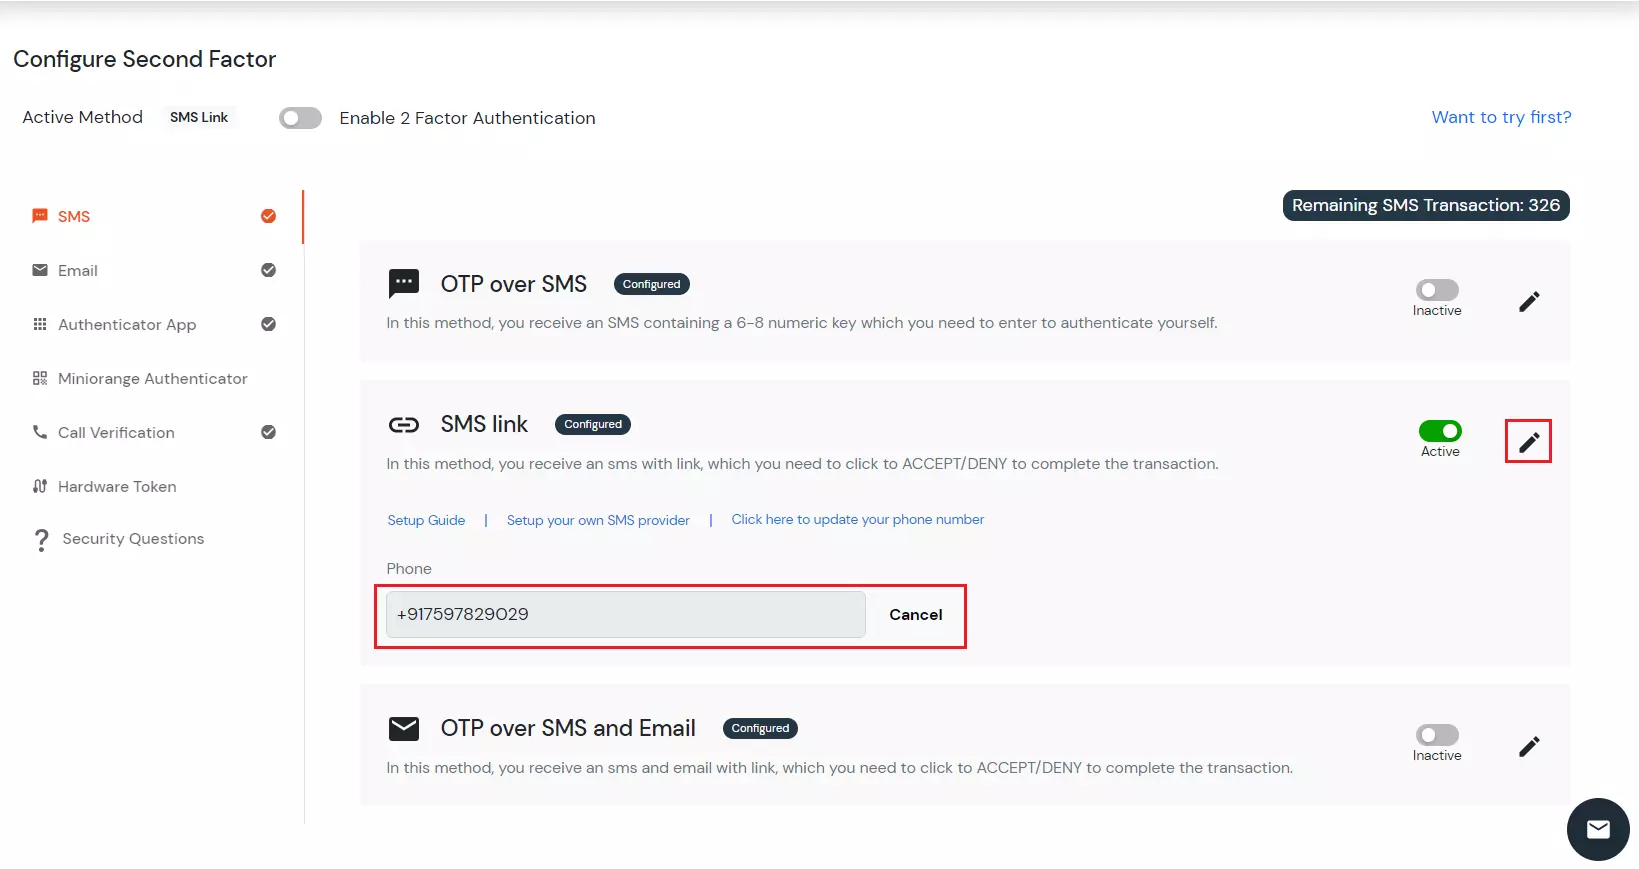
  • Click on SMS link in the SMS section tab to implement this method and click on Edit.
  • select sms link method

  • Add phone number in the Phone field to get accept or deny link.
  • Then click on save.
  • edit sms link

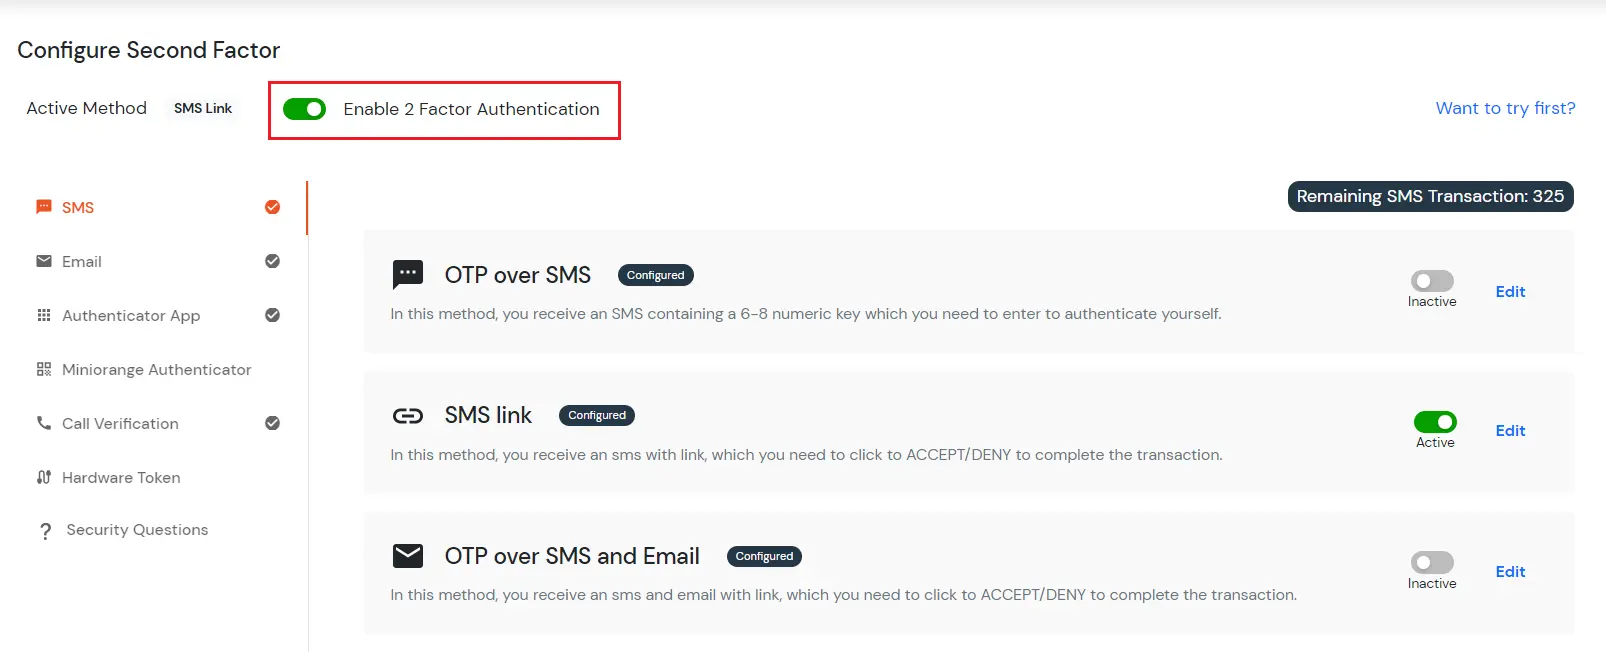
  • Now Enable second factor toggle if not done before as shown below.
  • Enter mobile number to receive OTP via call

  • As you can see, the Active method at the top will specify SMS link.
  • To verify the second factor sign out and sign in again.
  • It will ask you Username and password. After that it is redirected to below page:
  • Prove your identity as an admin

  • Click on Accept or Deny link that you have received on your phone.
  • On clicking on accept link you will be able see your dashboard which means you have successfully configured SMS Link method.

C. Phone verification

    In "Phone Verification" 2FA method, User receives a call telling a 4-8 digit numeric key which user need to enter to authenticate and use services which are granted to him.
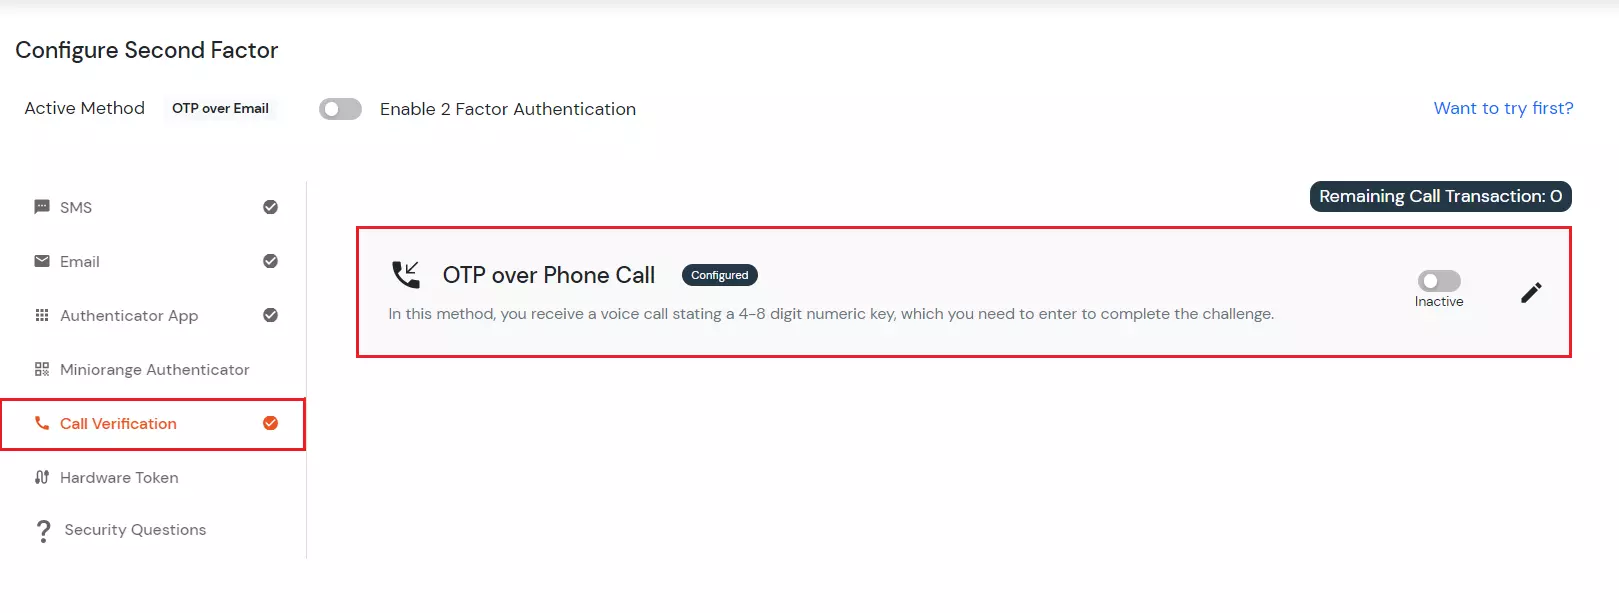
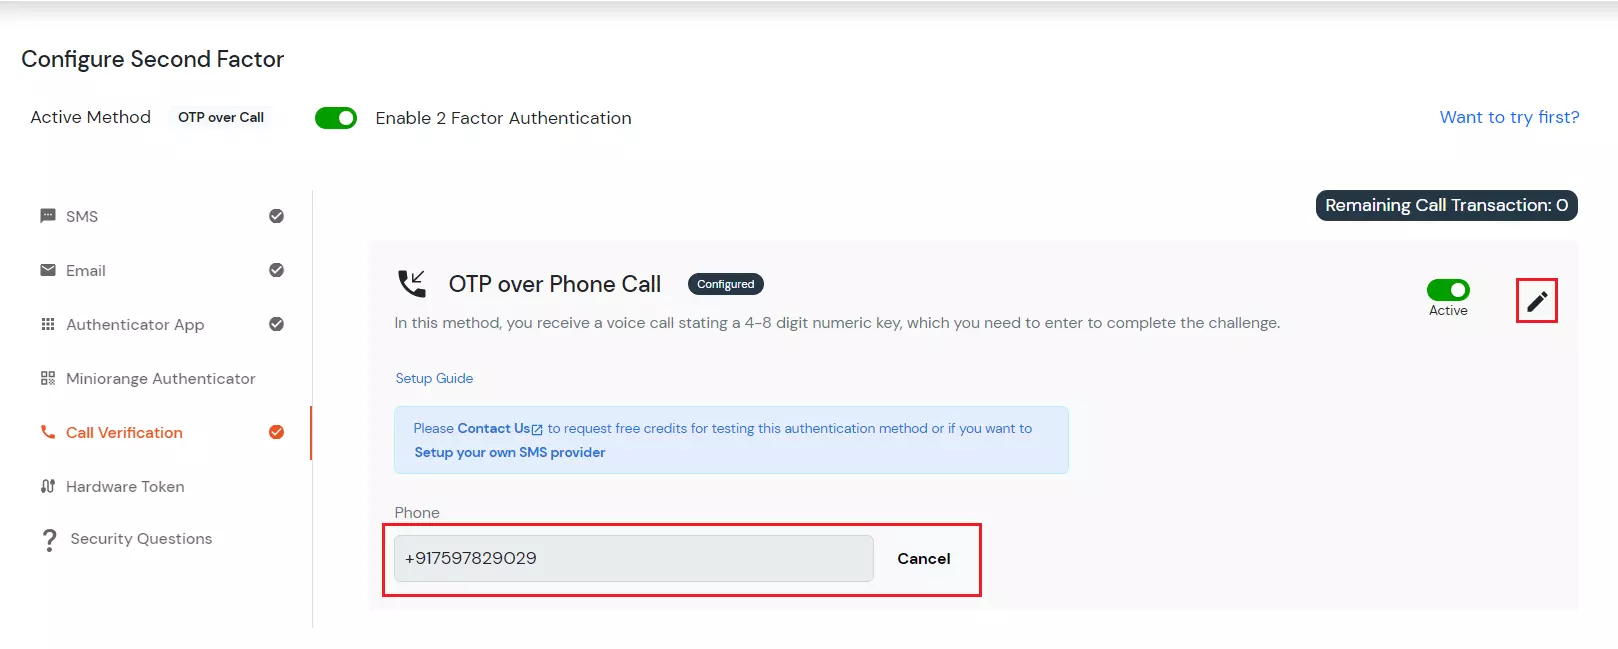
  • Click on Phone verification in the Call Verification tab to configure this method. Click on Edit.
  • Select Phone Verification 2FA method for admin system

  • Now add your mobile number on which you want to receive the OTP via call.
  • Click on save.
  • Select Phone Verification 2FA method for admin system

  • You can see the message "Your configurations have been saved successfully" in green.
  • As you can see, the Active method at the top will specify OTP over phone call.
  • Now Enable second factor toggle if not done before as shown below.
  • Enter mobile number to receive OTP via call

  • To verify the second factor sign out and sign in again.
  • It will ask you Username and password. After that it is redirected to 2-Factor Authentication Page
  • Now you will receive OTP via Phone call. Enter the OTP and click on Verify button.
  • If you are redirected to your dashboard it means you have successfully configured Phone Verification 2FA method.

2. Authenticator Apps

D. Google Authenticator

    In this method, User needs to enter 6 digits passcode generated by Google Authenticator app.

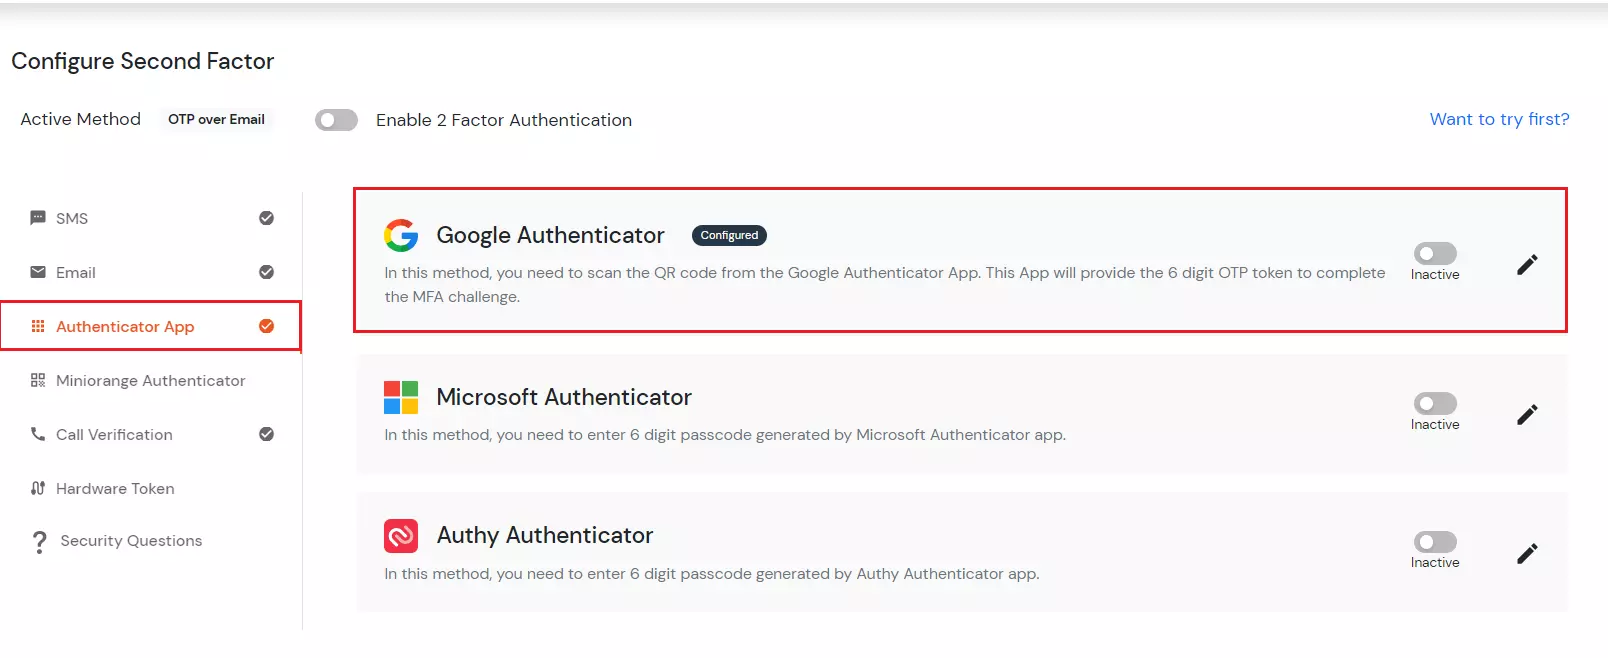
  • Select GOOGLE AUTHENTICATOR from the Authentication Apps section to configure this method.
  • select GOOGLE AUTHENTICATOR method

  • Click on Edit.
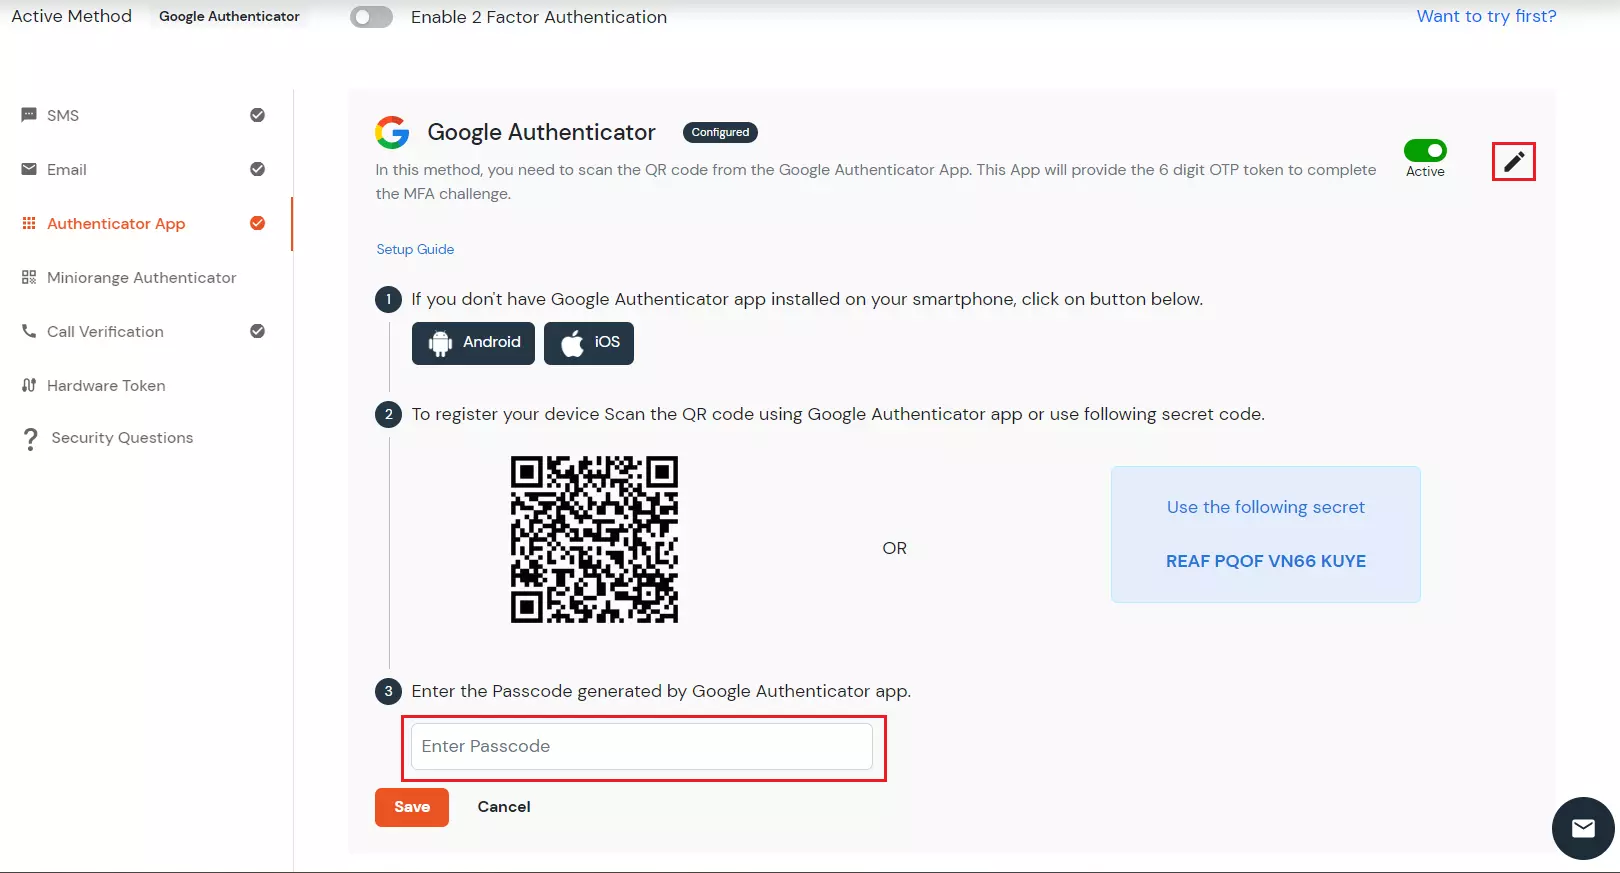
  • For the installation of this method, you need to install the Google authenticator app from app store.
  • After installation of google authenticator app, register to device by scanning the QR code in the app.
  • Enter the Passcode generated by Google Authenticator app. Then click on save.
  • select GOOGLE AUTHENTICATOR method

  • In the above method the reconfigure tab is turned green that means it is now active.
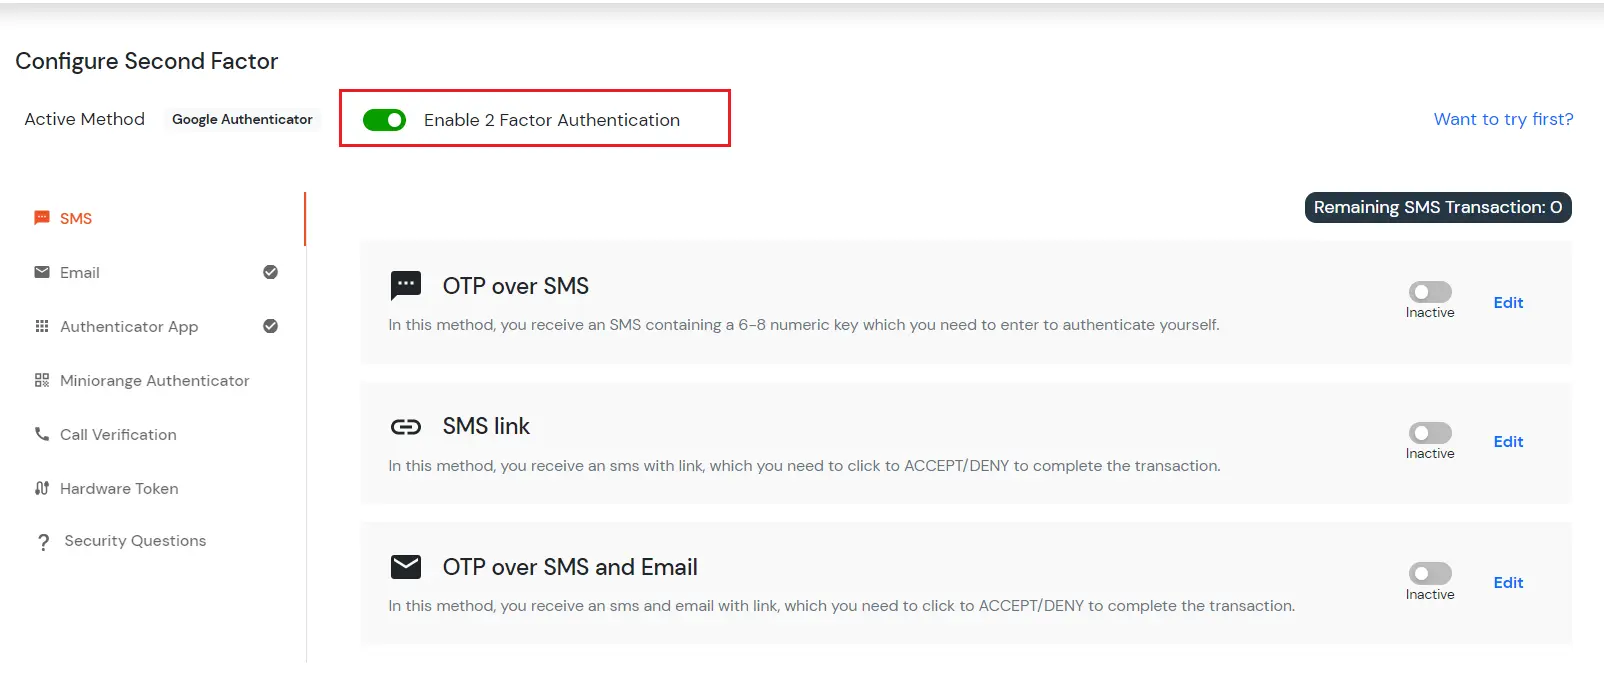
  • Next step is to Enable second factor if not done before.
  • enable 2-factor authentication for admin

  • To verify the second factor sign out and sign in again.
  • Here you need to enter 6 digits code from your google authenticator app.
  • And then click on verify.
  • Click on verify to get 2FA done

  • If you are redirected to your dashboard it means you have successfully configured GOOGLE AUTHENTICATOR 2FA method.
  • Google Authentication done successfully

E. Microsoft Authenticator

    In this method, User needs to enter 6 digits passcode generated by Microsoft Authenticator app.

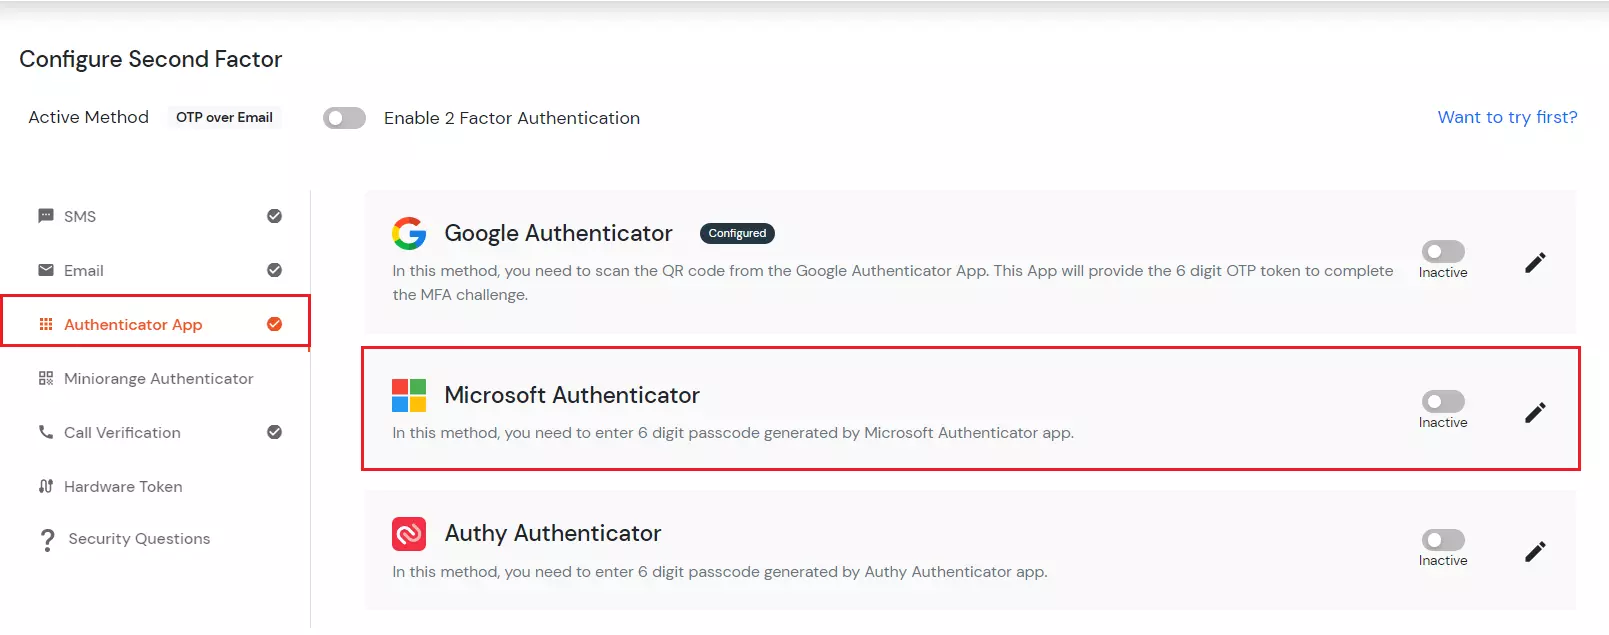
  • Click on Microsoft Authenticator from the Authentication Apps tab to configure this method.
  • select Microsoft AUTHENTICATOR 2FA method

  • For the configuration, you first need to install the Microsoft authenticator app from app store.
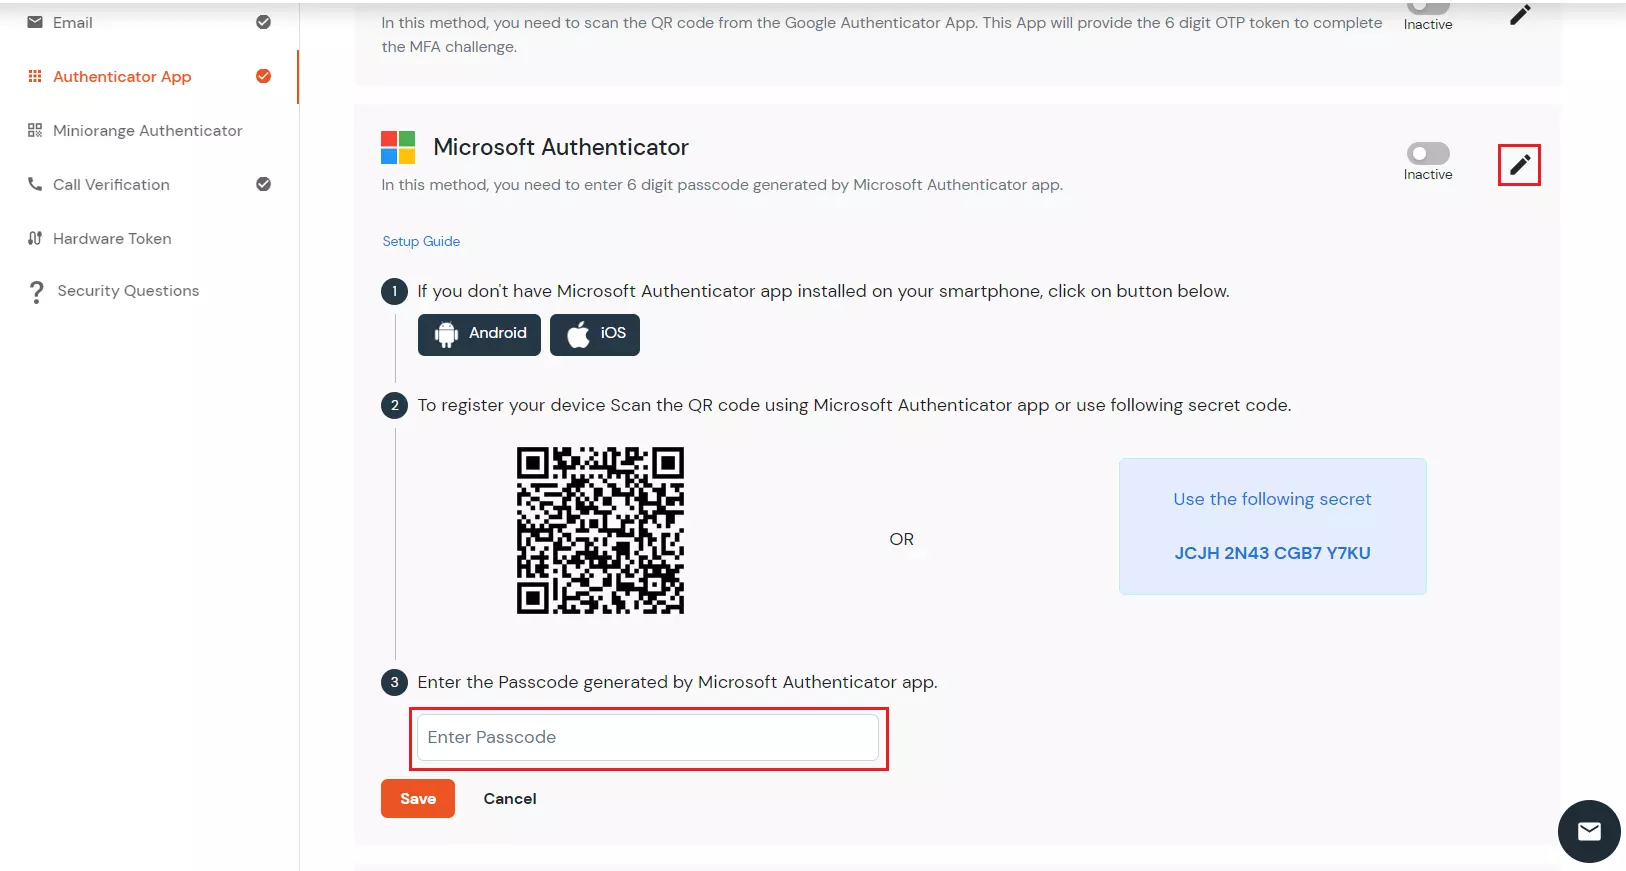
  • After installing application it will ask you to Add account. Select the type of your account (Google, Personal account)
  • select Microsoft AUTHENTICATOR 2FA method

  • Register your device by scanning the QR code in the Microsoft Authenticator app.
    (If you don't want to scan QR code you can enter Secret Key manually).
  • Once you register your device, your app will start showing One-time Password code(code varies in every 30 seconds).
  • Enter One-time Password code and click on Save button.
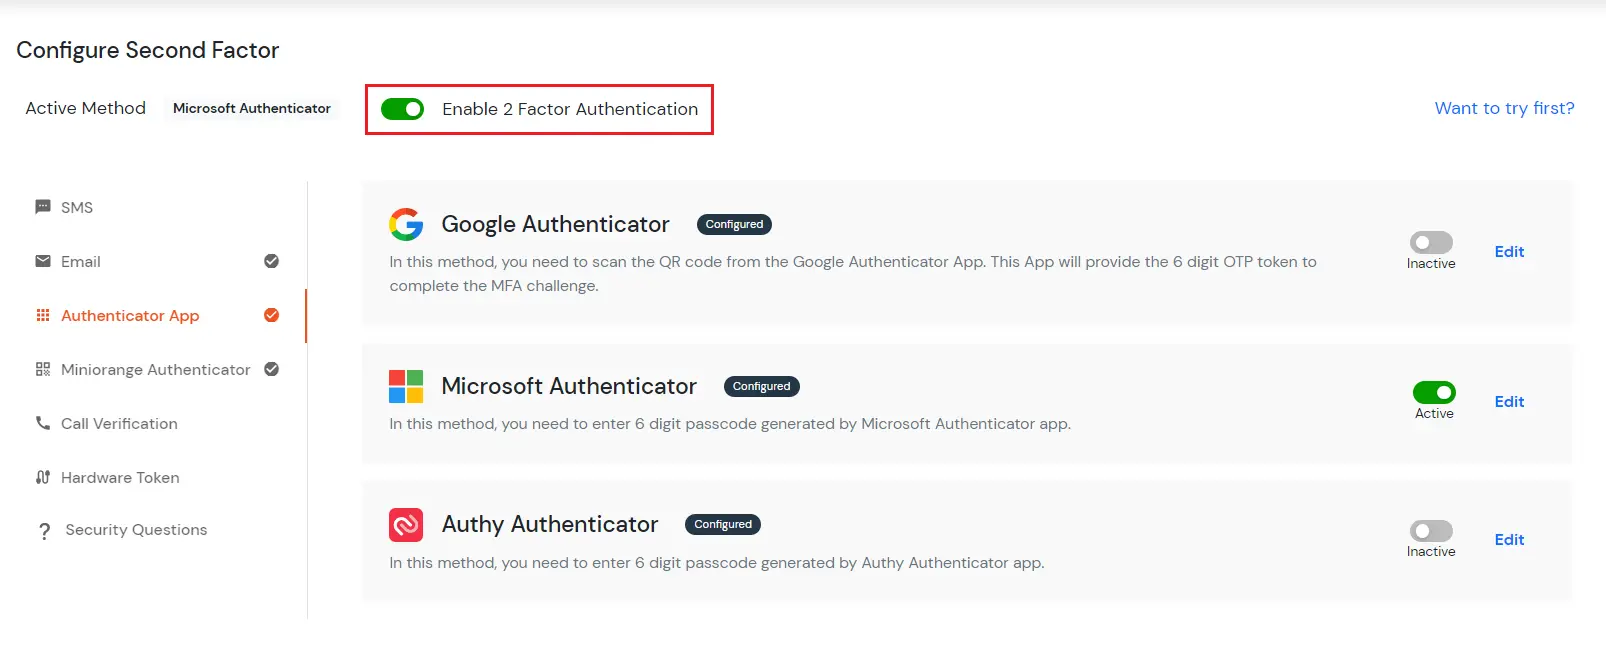
  • You can see the message "Your configurations have been saved successfully" in green.
  • Now Enable second factor toggle if not done before.
  • 2FA Configuration Done

  • To verify the second factor sign out and sign in again.
  • It will ask you Username and password. After that it is redirected to 2-Factor Authentication Page
  • Here you need to enter 6 digits code from your Microsoft authenticator app.
  • And then click on verify.
  • Enter OTP generated from Microsoft Authenticator

  • If you are redirected to your dashboard it means you have successfully configured Microsoft Authenticator 2FA method.
  • Microsoft 2FA authentication for admin done successfully

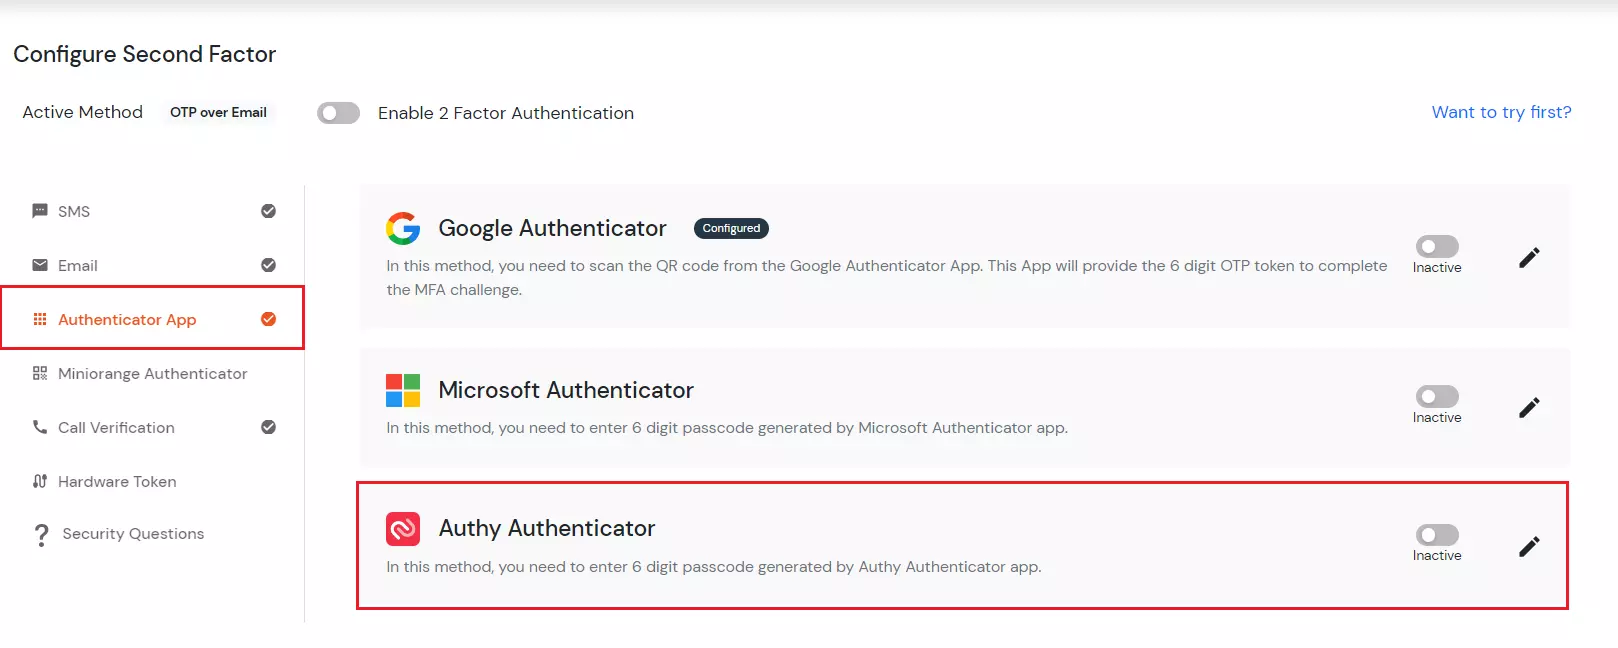
F. Authy Authenticator

    In this method, User needs to enter 6 digits passcode generated by Authy Authenticator app.

  • Click on Authy Authenticator from the Authentication Apps tab to configure this method. Select Edit.
  • select Authy AUTHENTICATOR 2FA method

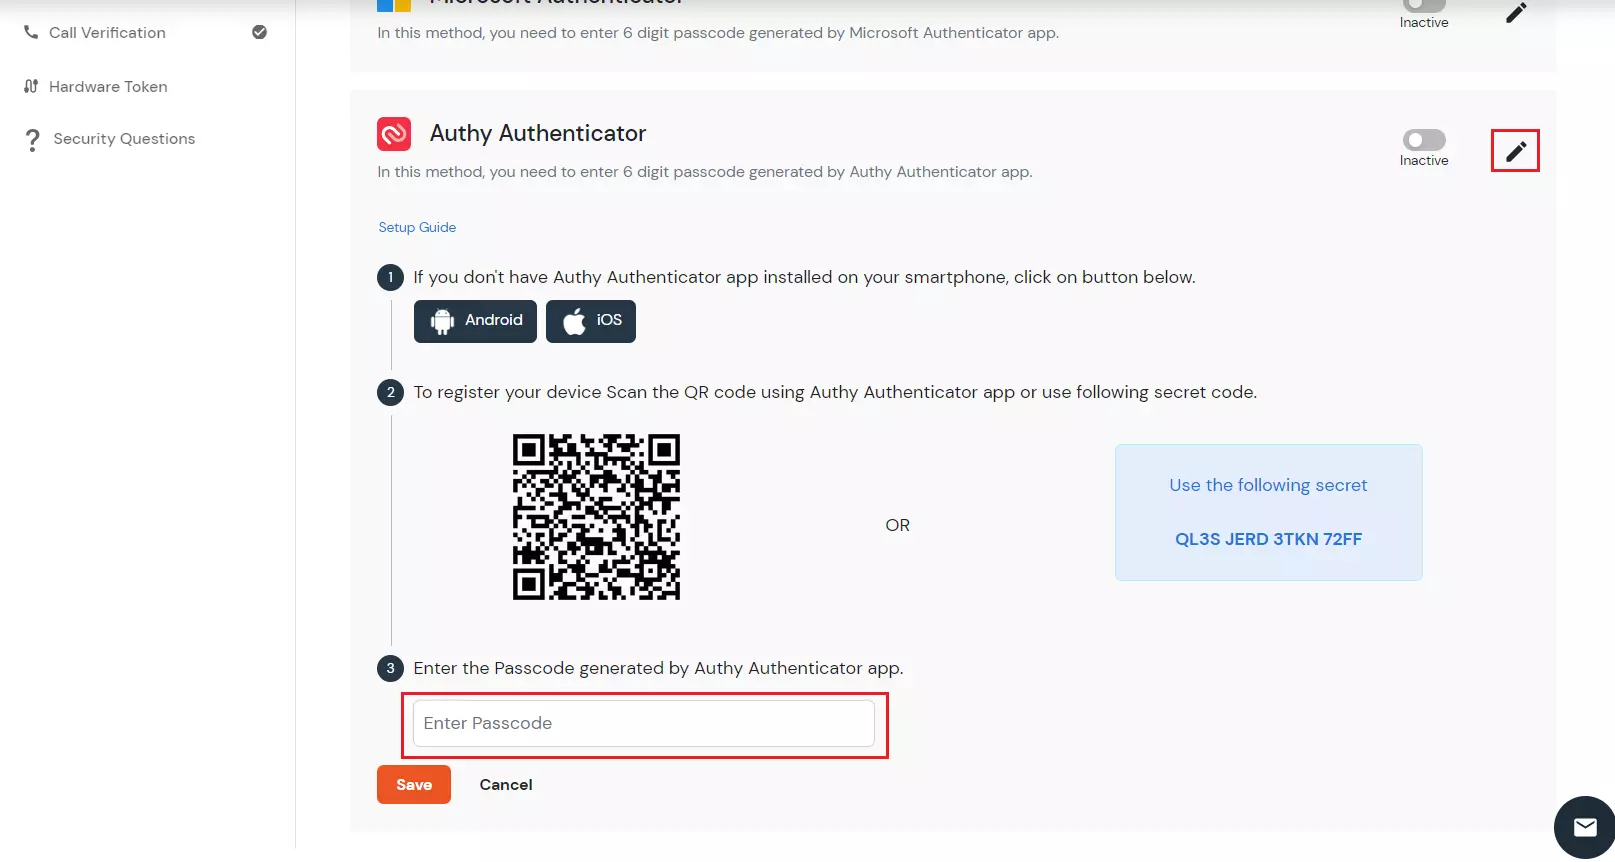
  • For the configuration, you first need to install the Authy authenticator app by clicking on the link in step 1.
  • Register your device by scanning the QR code in the Authy Authenticator app.
  • Once you register your device, your app will start showing One-time Password code.
  • Enter One-time Password code and click on Save button.
  • Select Authy AUTHENTICATOR 2FA method

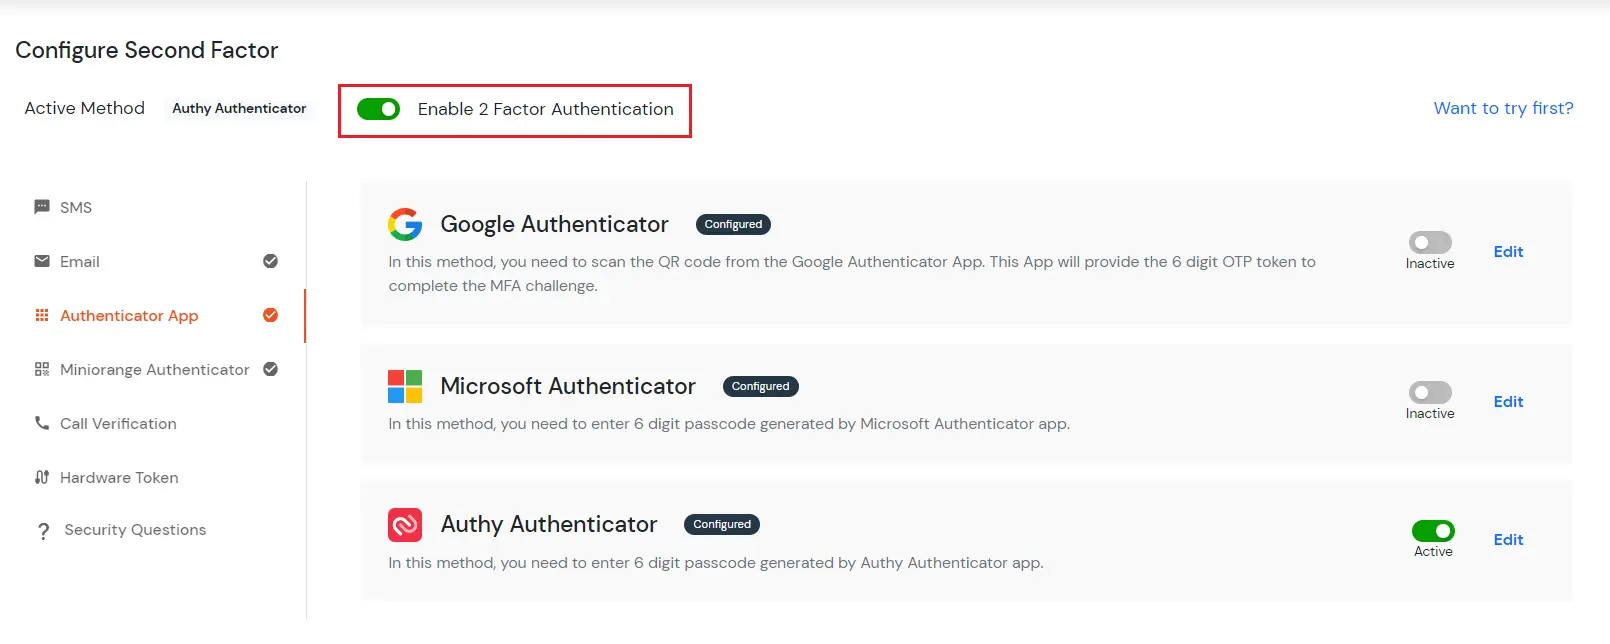
  • You can see the message "Your configurations have been saved successfully" in green.
  • Now Enable second factor toggle if not done before.
  • 2FA Configuration Done

  • To verify the second factor sign out and sign in again.
  • It will ask you Username and password. After that it is redirected to 2-Factor Authentication Page
  • Here you need to enter 6 digits code from your Authy authenticator app.
  • And then click on verify.
  • Enter OTP generated from Microsoft Authenticator

  • If you are redirected to your dashboard it means you have successfully configured Authy Authenticator 2FA method.
  • Microsoft 2FA authentication for admin done successfully

3. miniOrange Authenticator

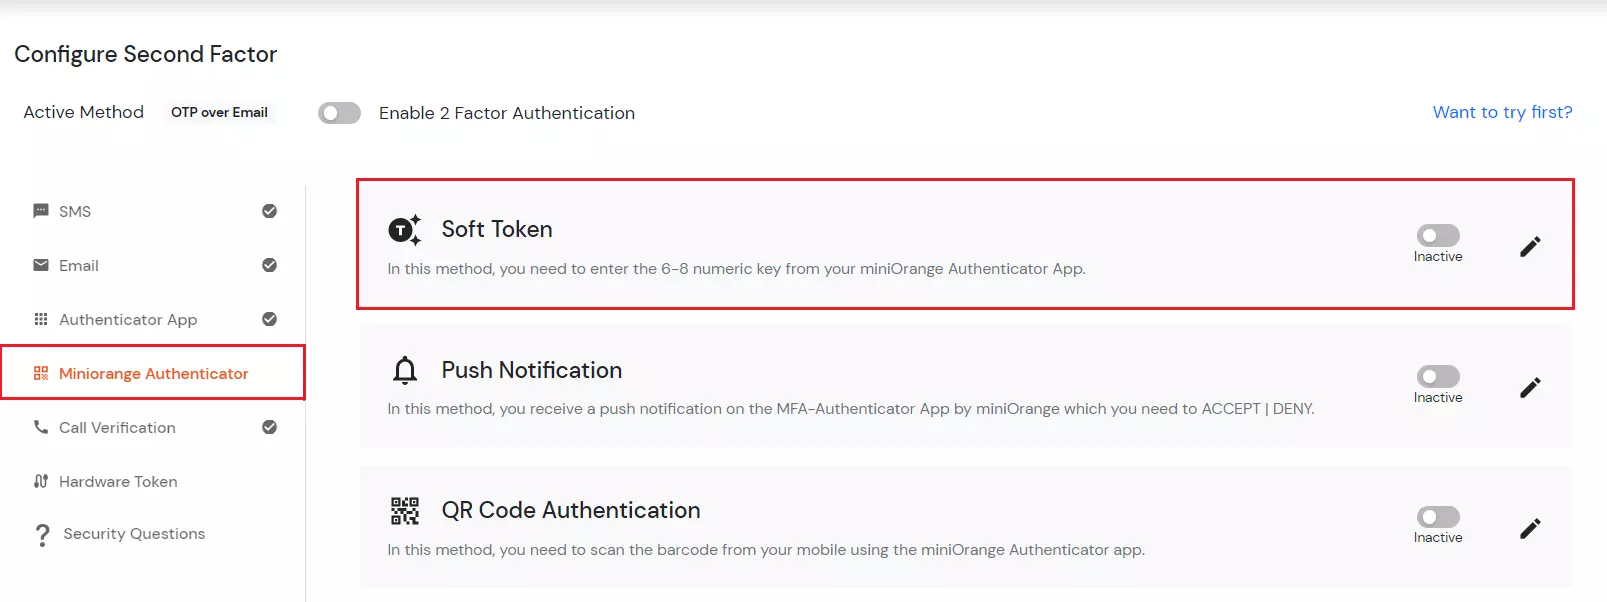
G. Soft Token method

    A Soft Token is a piece of a two factor authentication security used to authorize the end user. In this method, User needs to enter the 6-8 numeric key from his mobile.

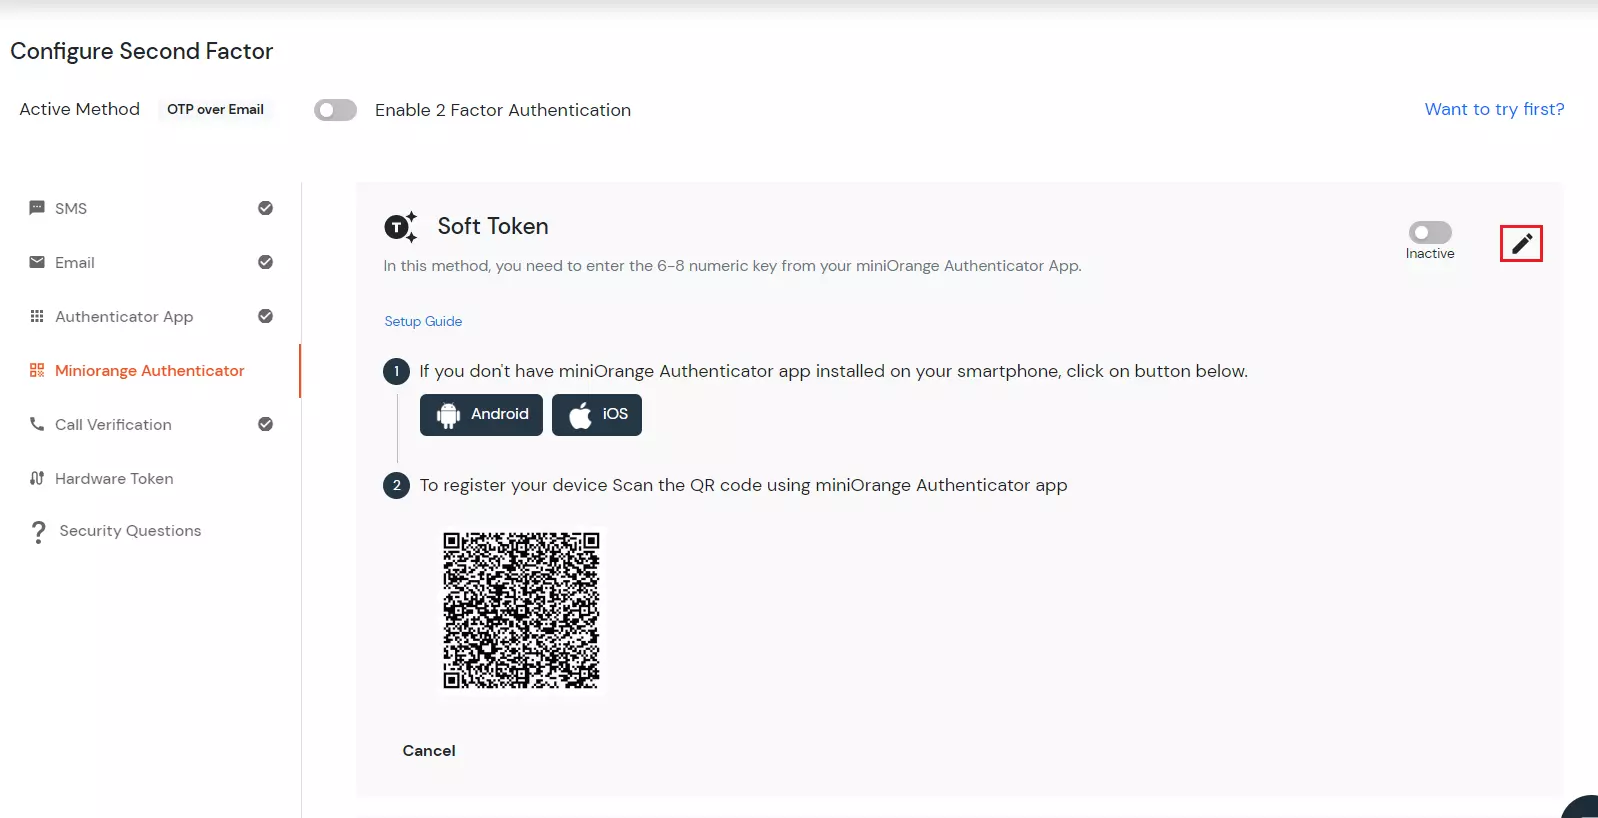
  • Click on Soft Token in the miniOrange Authenticator tab to configure this method. Click on Edit.
  • select SOFT TOKEN 2FA method

  • To set this method you need miniOrange Authenticator app installed on your smartphone. The link for the same is give in step 1.
  • After installation of the app you need to scan the QR code of register your device.
  • Then click on save.
  • scan QRcode to activate 2FA method

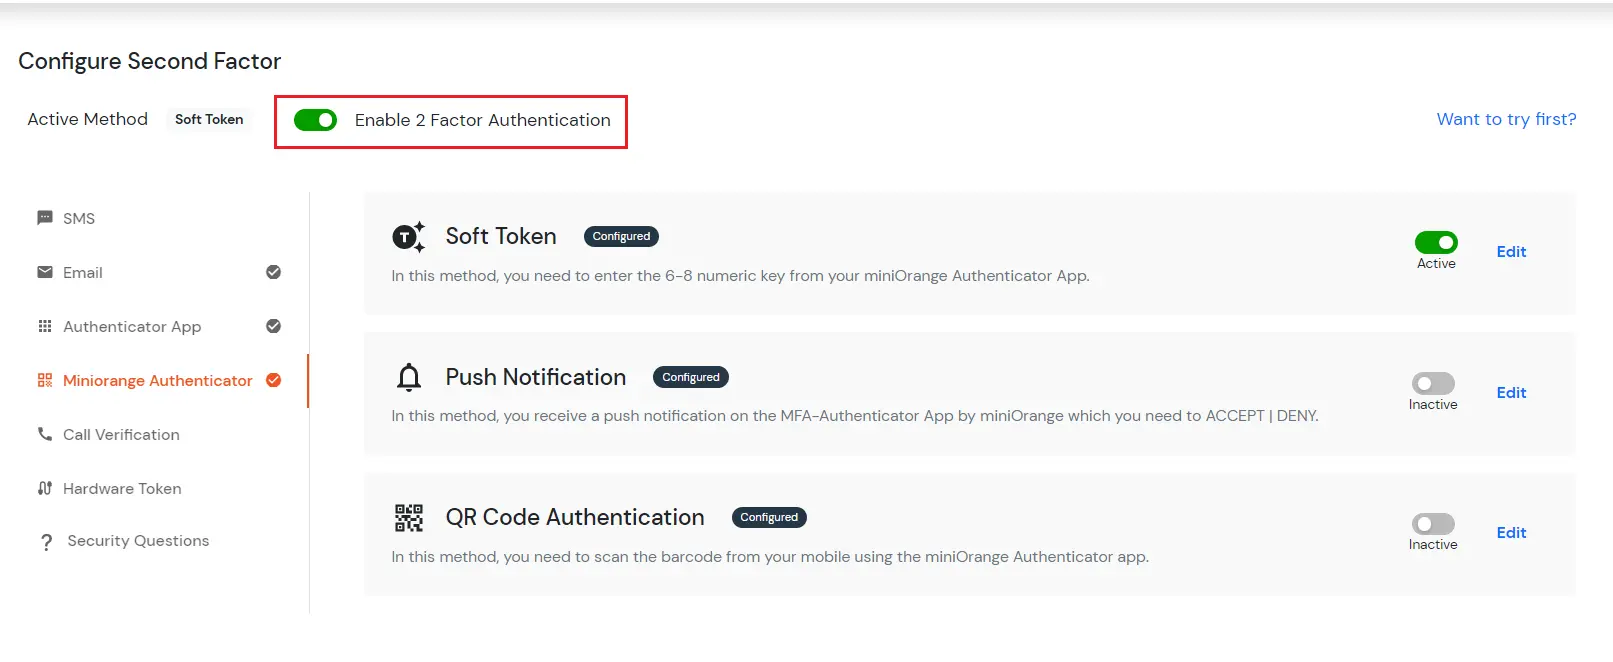
  • In the above method the reconfigure tab is turned green that means it is now active.
  • Next step is to Enable second factor if not done before.
  • enable 2fa for admin

  • To verify the second factor sign out and sign in again.
  • It will ask you Username and password. After that it is redirected to below page:
  • Here you need to enter the 6 digits code generated in your registered miniOrange Authenticator app.
  • Then click on verify.
  • verify your identity

  • If you are redirected to your dashboard, you have successfully configured SOFT TOKEN 2FA method.
  • Soft token 2FA method successfully

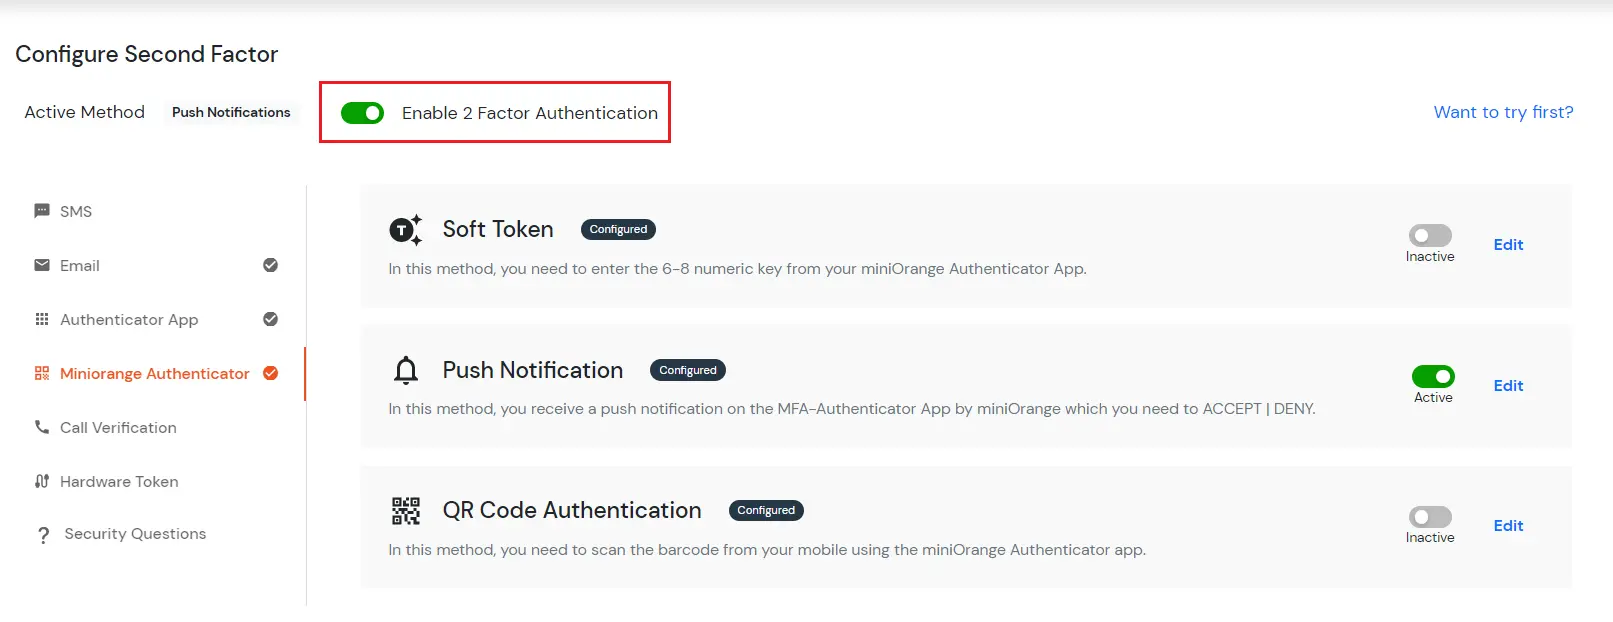
H. PUSH Notifications method

    The process of PUSH Notifications works as, the user receives a push notifications on his mobile which he needs to ACCEPT | DENY.

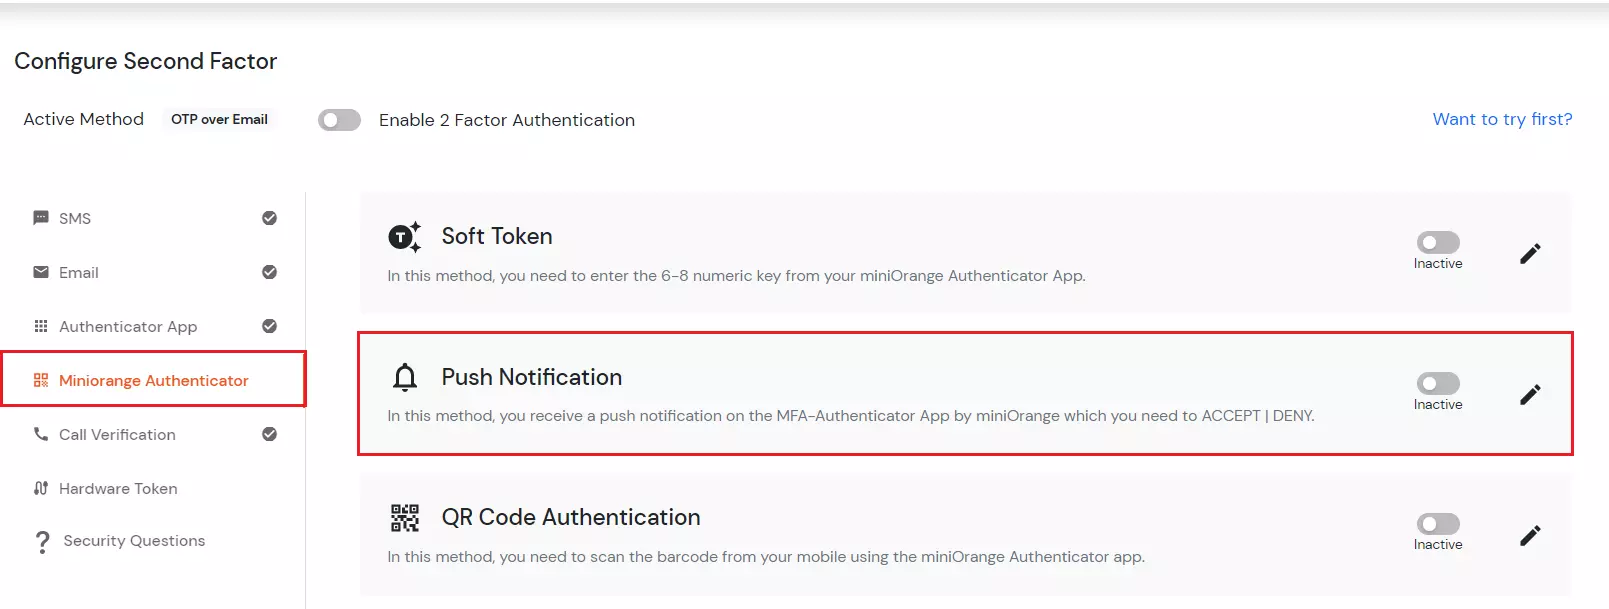
  • Select the PUSH NOTIFICATIONS option in the miniOrange Authenticator tab to enable this method. Click on Edit.
  • select PUSH NOTIFICATION 2FA method

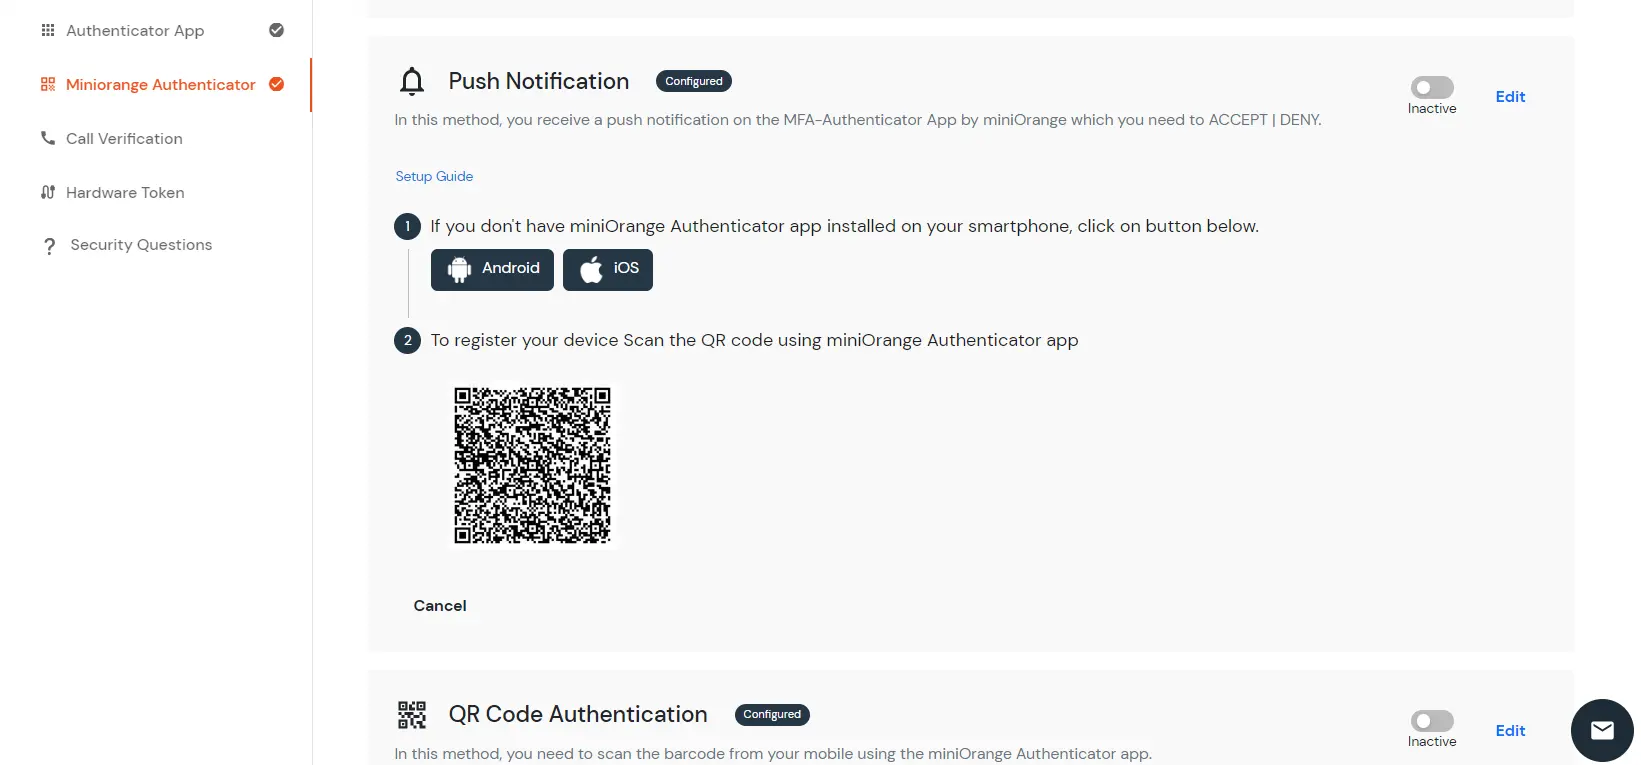
  • To set this method you need miniOrange Authenticator app installed on your smartphone. The link for the same is give in step 1. in above page.
  • Here you will see 3 different method to install.
  • Choose any of your choice.
  • link to download authenticator app

  • After installation of the app you need to scan the QR code of register your device.
  • Then click on save.
  • Next step is to Enable second factor if not done before.
  • enable 2fa for admin

  • To verify the second factor sign out and sign in again.
  • It will ask you Username and password. After that it is redirected to below page:
  • verify your identity as an admin

  • You will receive a push notification on the configured phone.
  • Click on Accept/Deny button to verify.
  • When you click on accept and if redirected to your dashboard it means you have successfully configured PUSH NOTIFICATIONS method.
  • miniorange dashboard

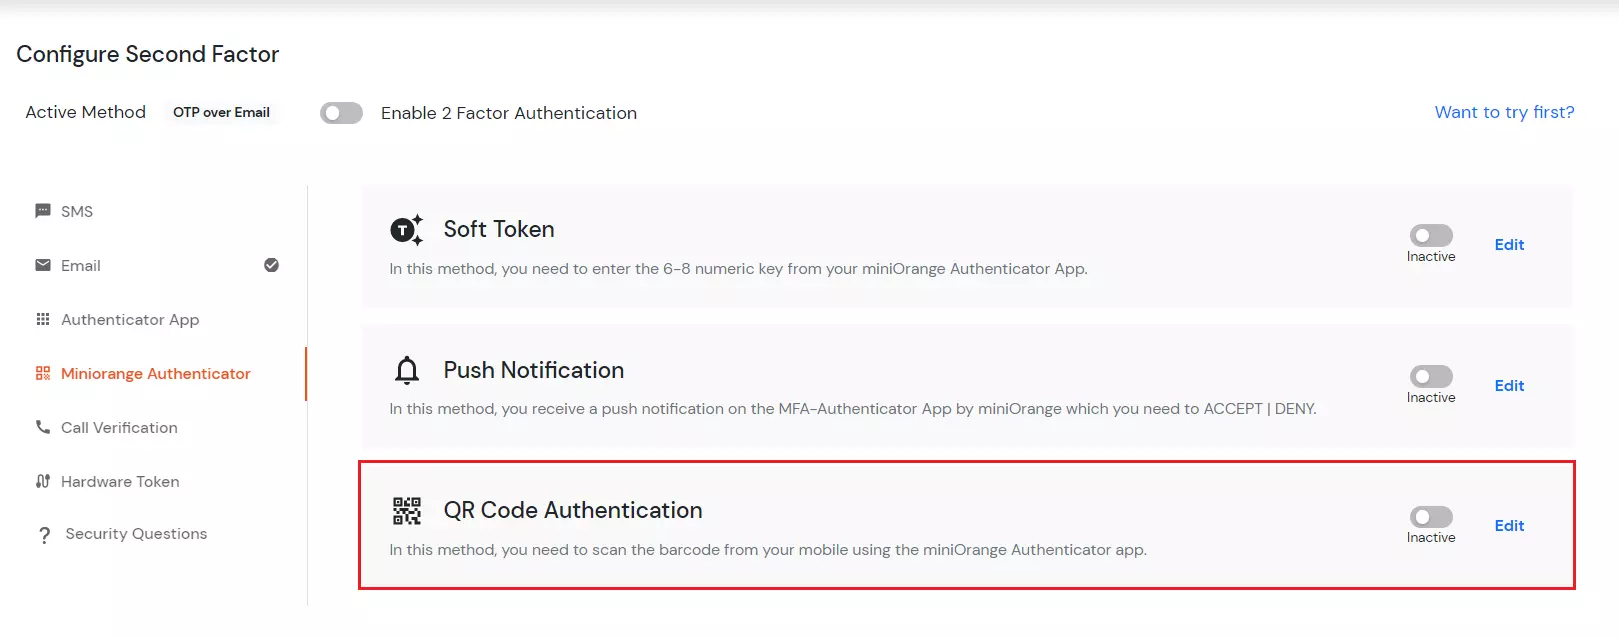
I. QR Code Authentication

    The process of QR Code Authentication works such as, a user needs to scan the barcode from his mobile using the miniOrange Authenticator app to proceed.

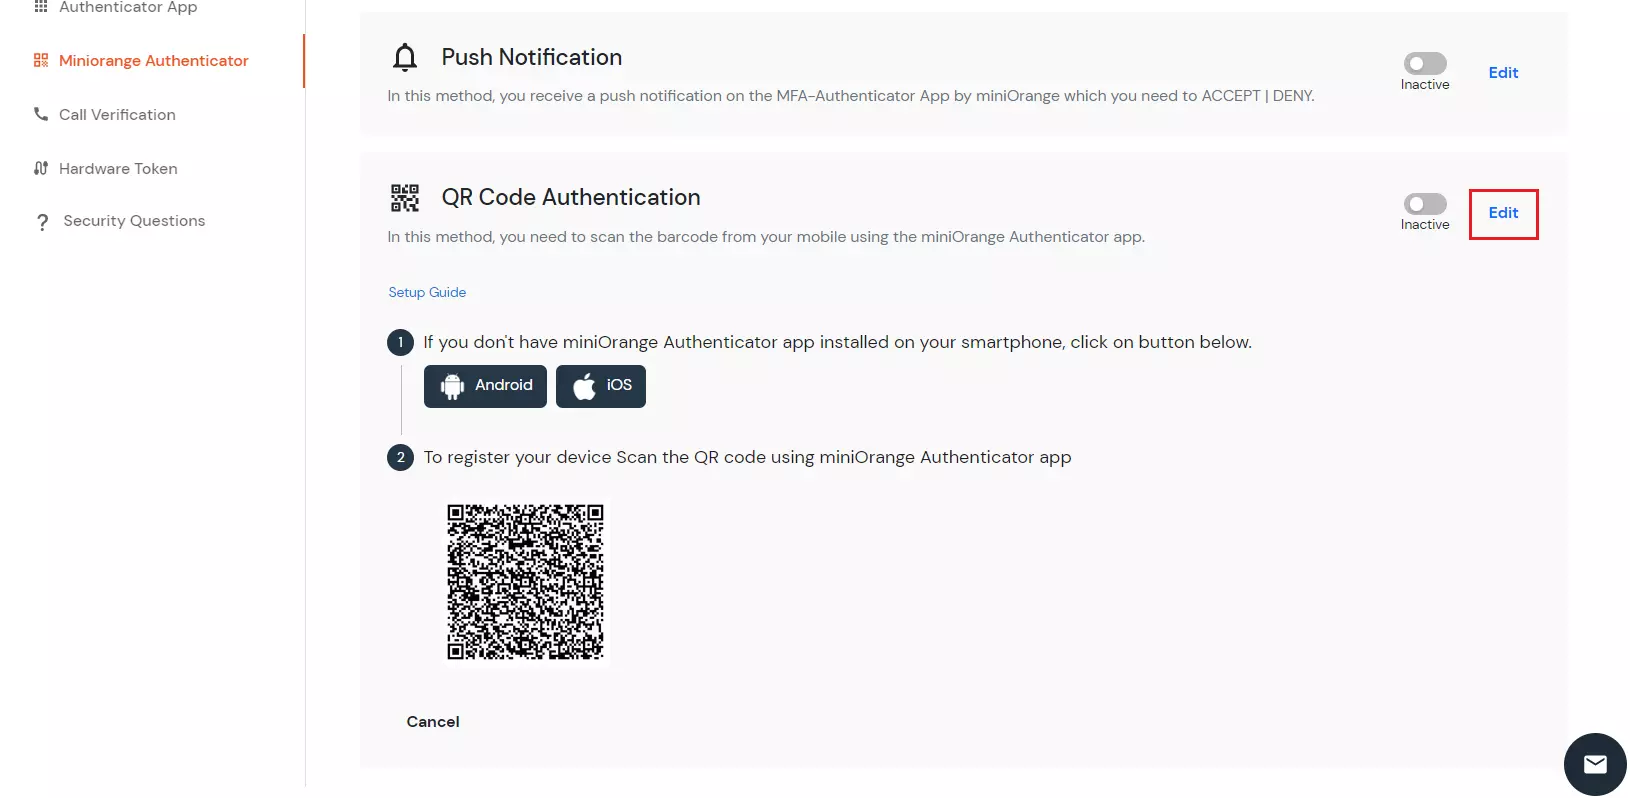
  • Select the QR Code Authentication in the miniOrange Authenticator tab to activate this method. Click on Edit.
  • select MOBILE AUTHENTICATION

  • To set this method you need miniOrange Authenticator app installed on your smartphone. The link for the same is given in step 1.
  • Here you will see 3 different method to install.
  • Choose any of your choice.
  • Link to download miniOrange authenticator app

  • After installation of the app you need to scan the QR code of register your device.
  • Then click on save.
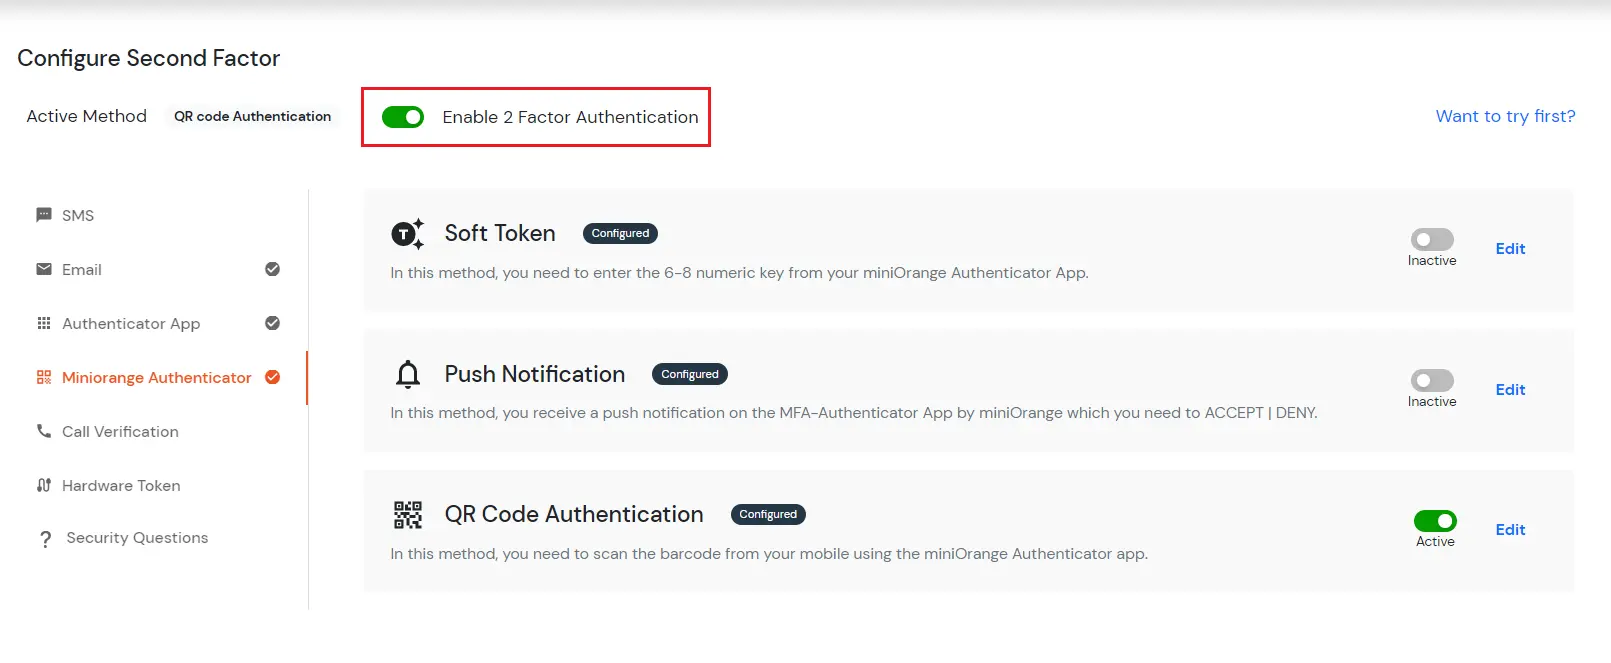
  • Next step is to Enable second factor if not done before.
  • enable 2fa for admin
  • To verify the second factor sign out and sign in again.
  • It will ask you Username and password. After that it is redirected to below page:
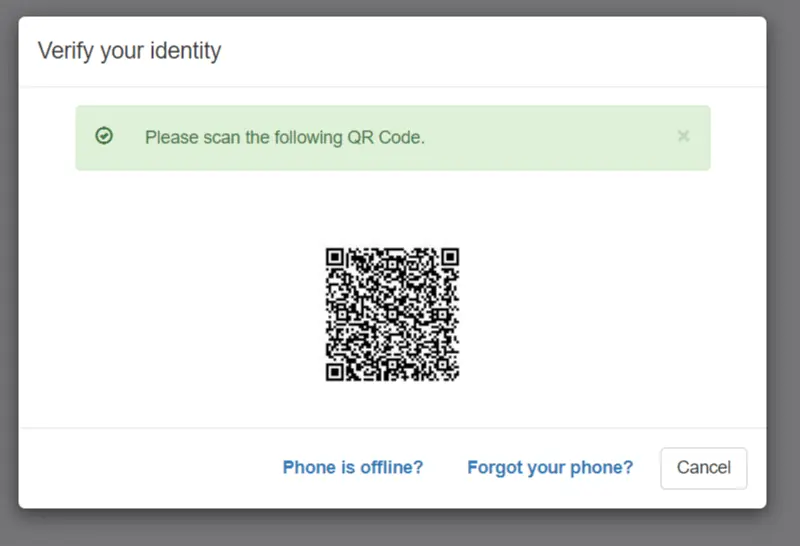
  • verify your identity

  • Scan the QR Code to test this authentication method in miniOrange Authenticator app.
  • If you are redirected to your dashboard, you have successfully configured MOBILE AUTHENTICATION 2FA method.
  • 2FA login done successfully

4. Email Method

J. OTP Over EMAIL method

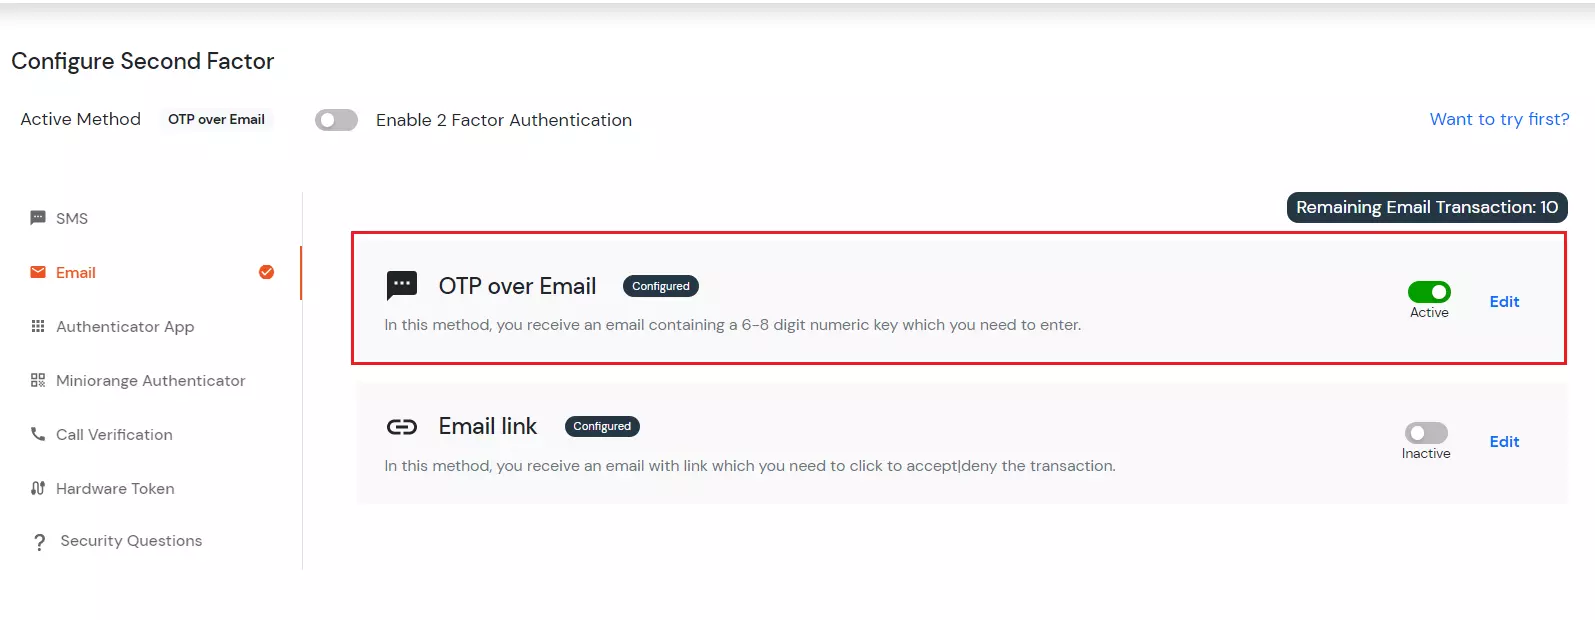
    In "OTP Over Email" 2FA method, User receives an email containing a 6-8 digit numeric key which he needs to enter to use services which are granted to him.
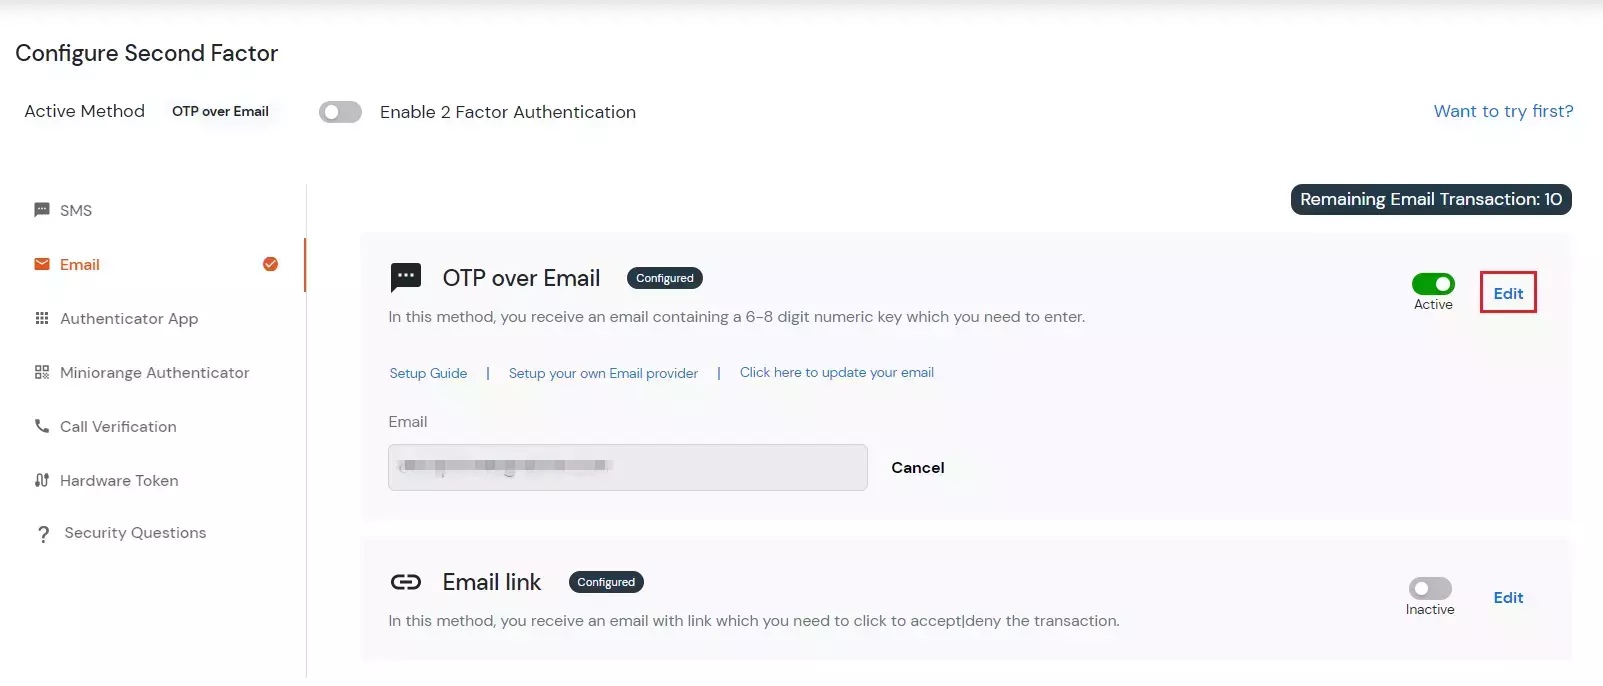
  • Select OTP OVER EMAIL in the Email tab to enable this method. Click on Edit.
  • select OTP OVER EMAIL

  • Here you just have to click on Save since the Email Id specified is the one you have registered from. Click on Save.
  • configure OTP OVER EMAIL

  • Next step is to Enable second factor if not done before.
  • enable 2fa for admin authentication

  • To verify the second factor sign out and sign in again.
  • It will ask you Username and password. After that it is redirected to below page:
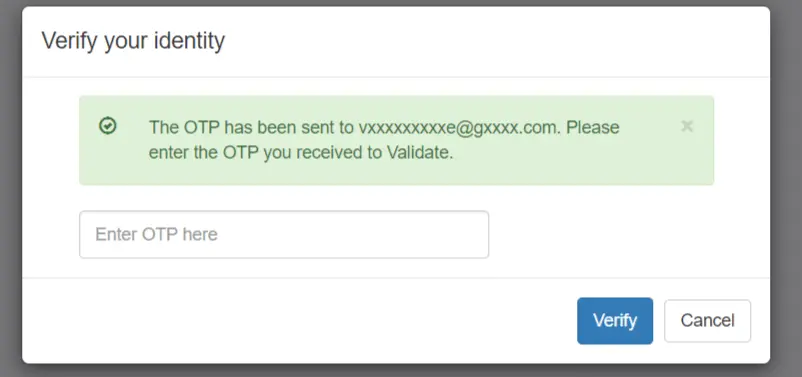
  • verify your identity

  • Enter the OTP received on the email address specified and click on Verify OTP.
  • When you click on verify and if redirected to your dashboard it means you have successfully configured OTP over Email method.
  • miniOrange dashboard

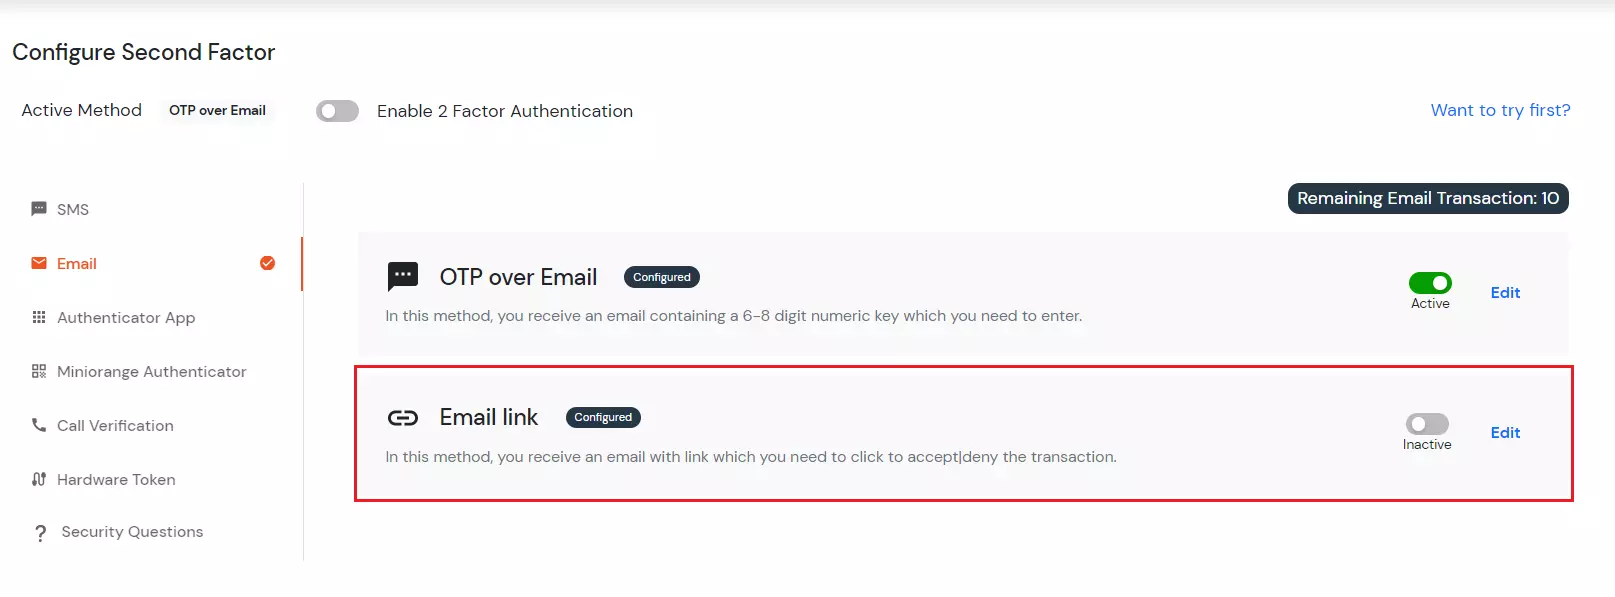
    In the "Email Link" 2FA method, User receives an email with a link which he needs to click to accept|deny the transaction.

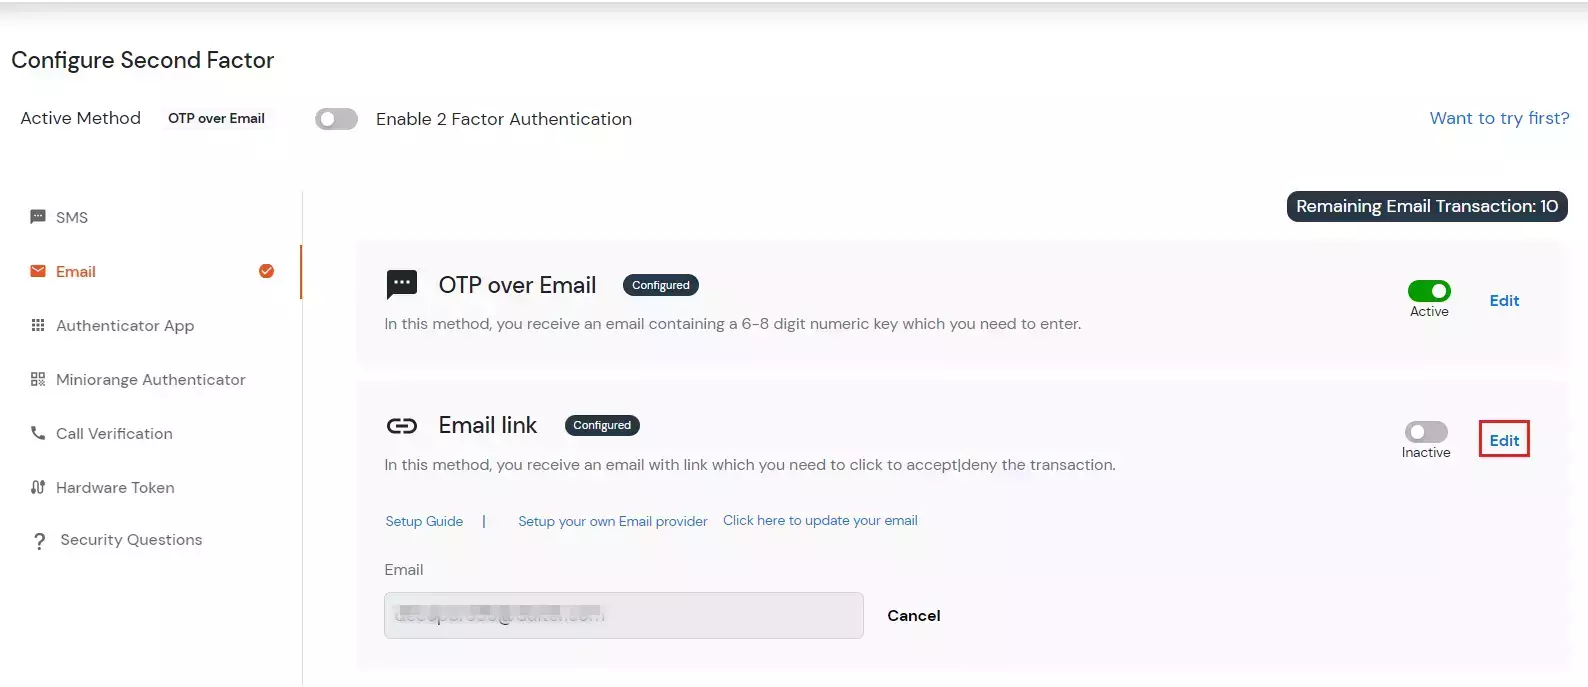
  • Select Email Link in the Email tab to activate this method. Click on Edit.
  • select Email link 2FA method

  • Here you just have to click on Save since the Email Id specified is the one you have registered from.
  • Then click on save.
  • configure  EMAIL link 2FA for admin

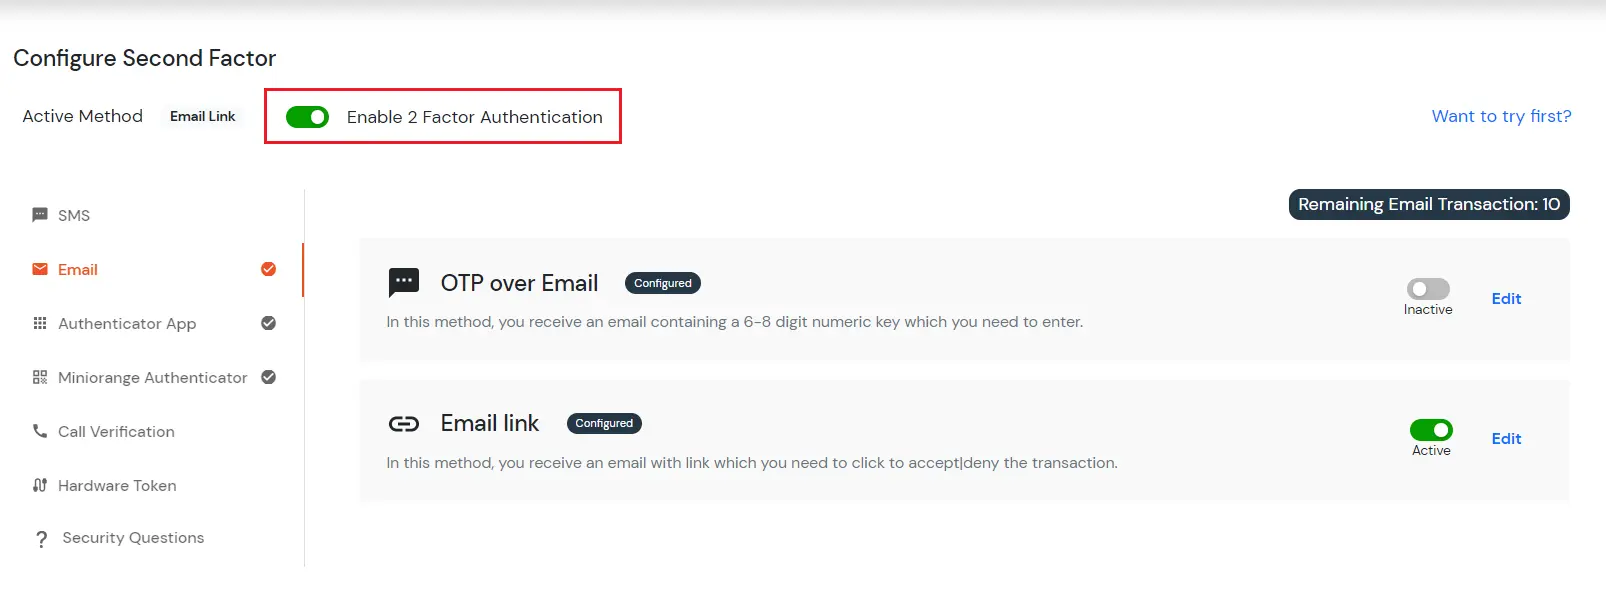
  • Next step is to Enable second factor if not done before.
  • enable 2-factor authentication for admin

  • To verify the second factor sign out and sign in again.
  • It will ask you Username and password. After that it is redirected to below page:
  • Prove your identity as an admin

  • You will receive an Email on the Email specified in above with Accept or Deny link.
  • When you click on accept link and if redirected to your dashboard it means you have successfully configured EMAIL Link.
  • Authentication done successfully

L. OTP over SMS and EMAIL

    In "OTP Over SMS and Email" 2FA method, User receives 6-8 digit numeric key OTP via EMAIL and SMS both. User need to enter this numeric OTP to use services which are granted to him.
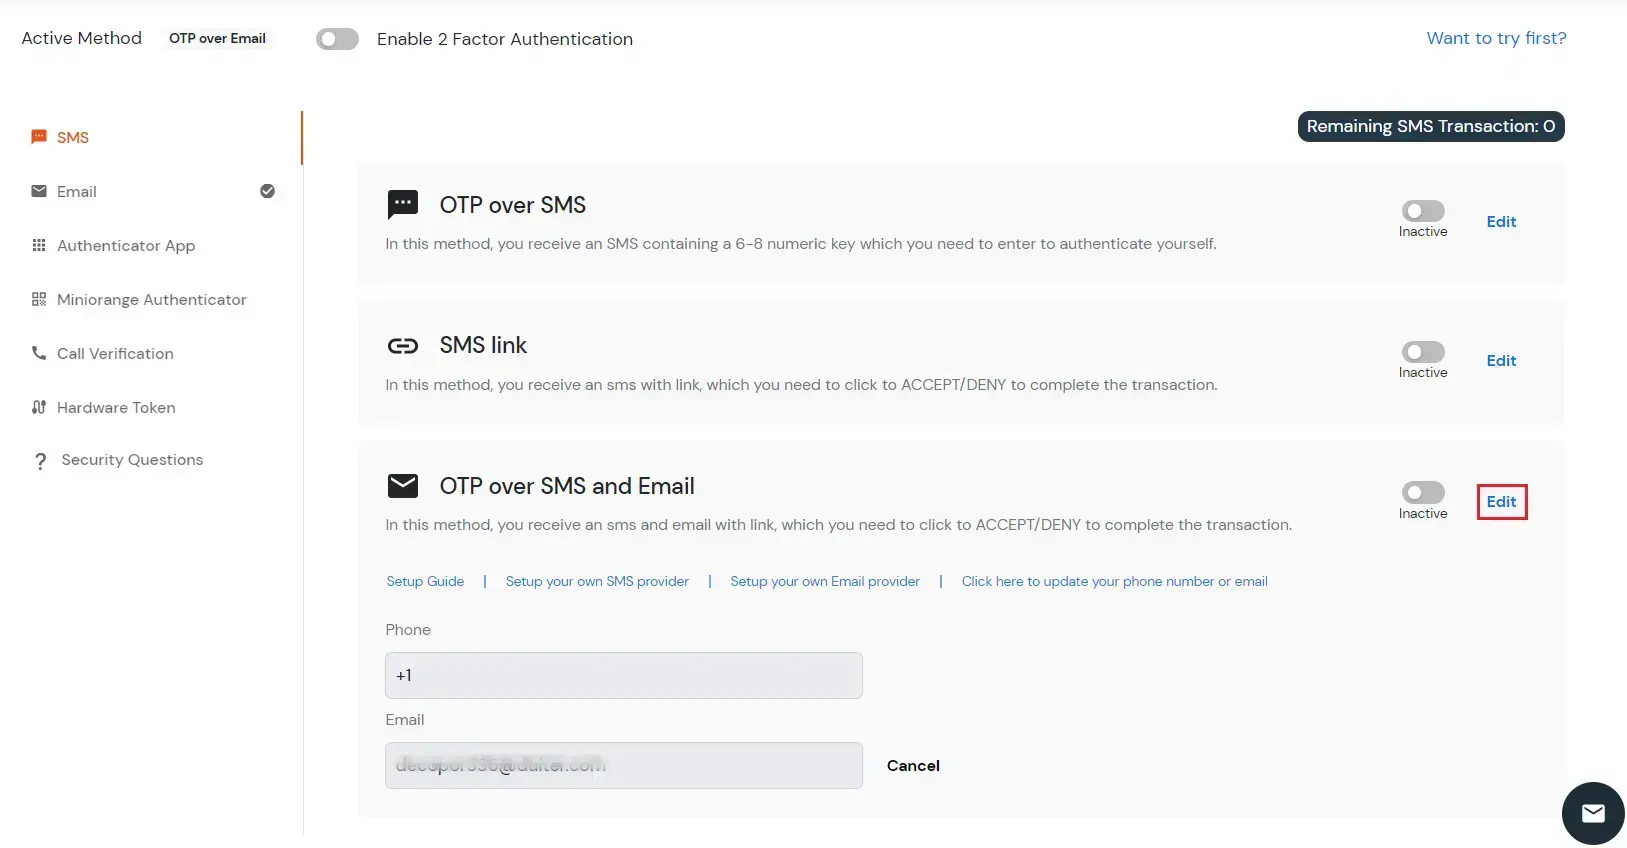
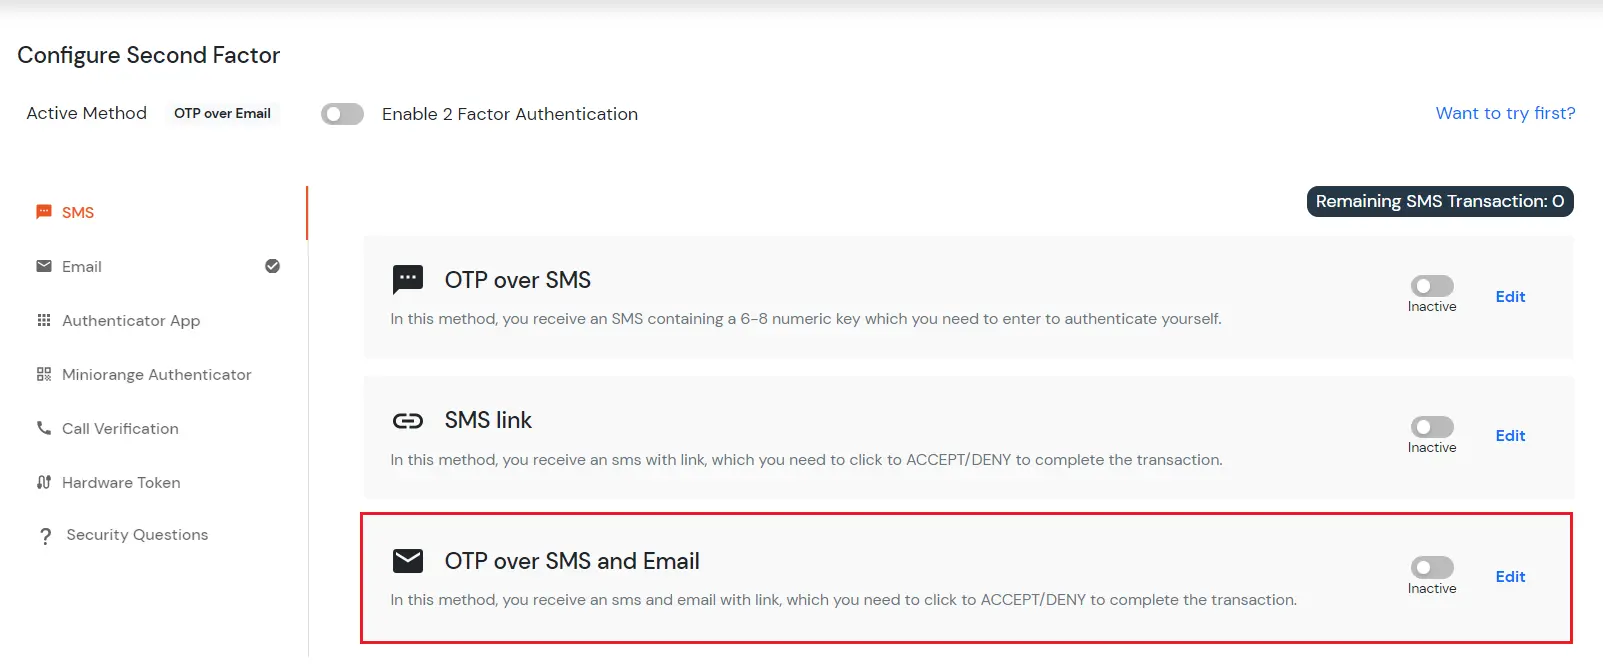
  • Click on OTP over SMS and EMAIL in Configure 2FA tab to configure this method.
  • Select otp over email and sms 2FA method

  • Now add your mobile number and email on which you want to receive the OTP.
  • Then click on save.
  • Add your mobile number and email for OTP

  • You can see the message "Your configurations have been saved successfully" in green.
  • Now Enable second factor toggle if not done before and click on save.
  • Enable two-factor authentication

  • To verify the second factor sign out and sign in again.
  • It will ask you Username and password. After that it is redirected to 2-Factor Authentication Page.
  • Now you will receive OTP via both SMS and EMAIL. Enter the OTP received and click on Verify button.
  • Enter OTP and verify admin authentication

  • If you are redirected to your dashboard it means you have successfully configured OTP over SMS and EMAIL 2FA method.
  • 2FA for admin configuration done

5. Hardware Token

M. YubiKey hardware Token

    "YubiKey Token" is a 2fa verification method, in which a user needs to connect a USB into his computer which generates token in the form of an alphabetic key. This process works with the combination of an OTP & hardware tokens.
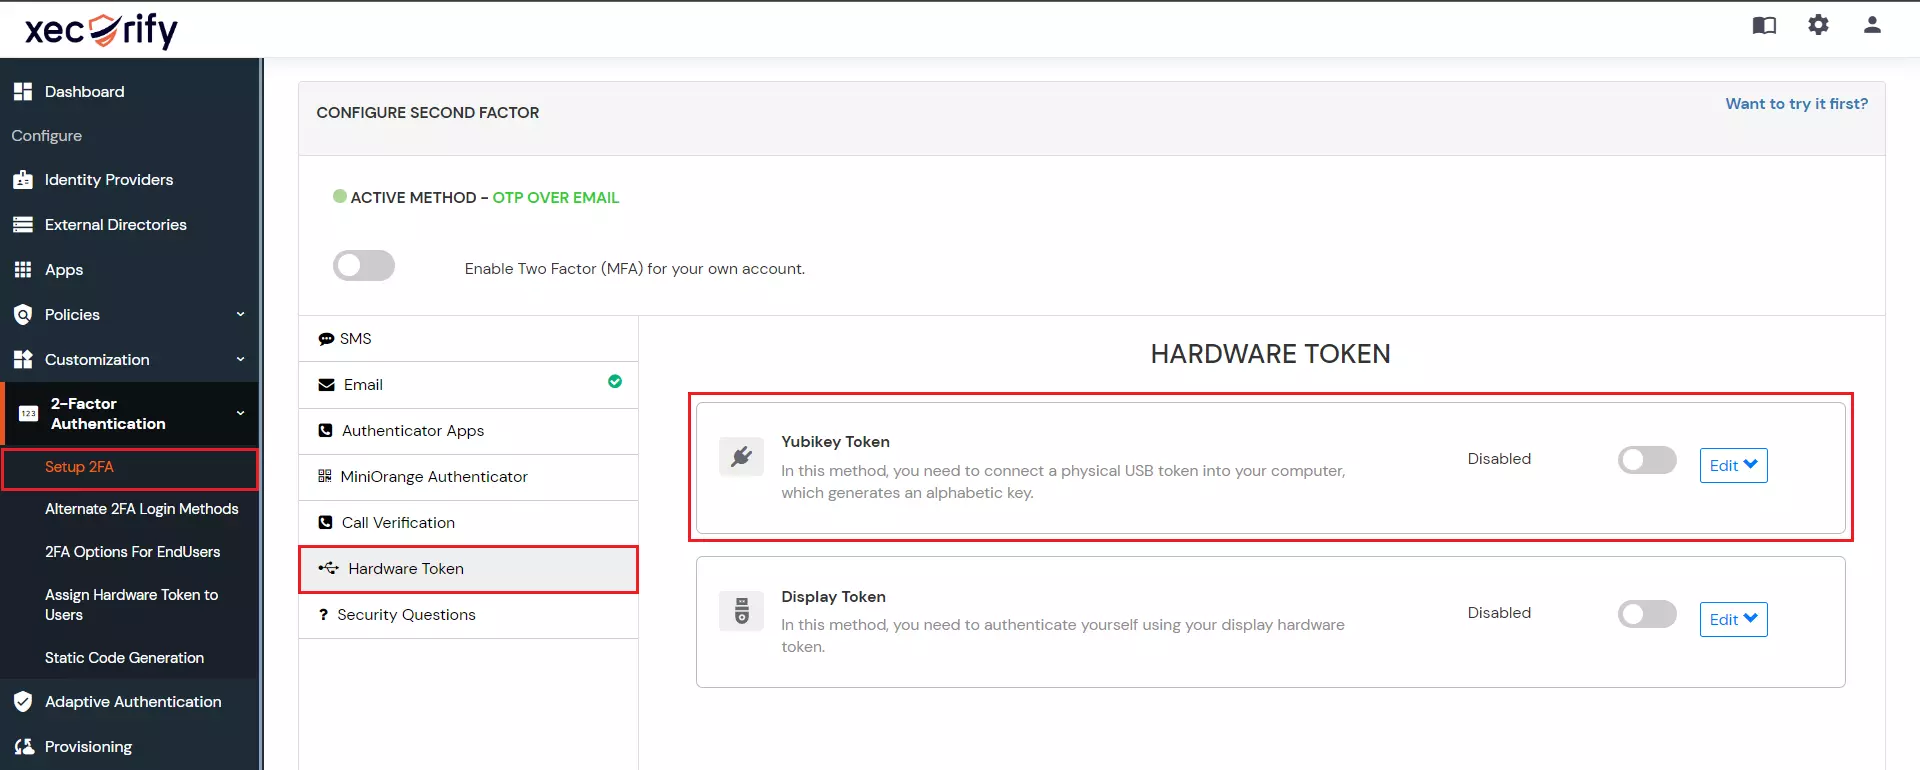
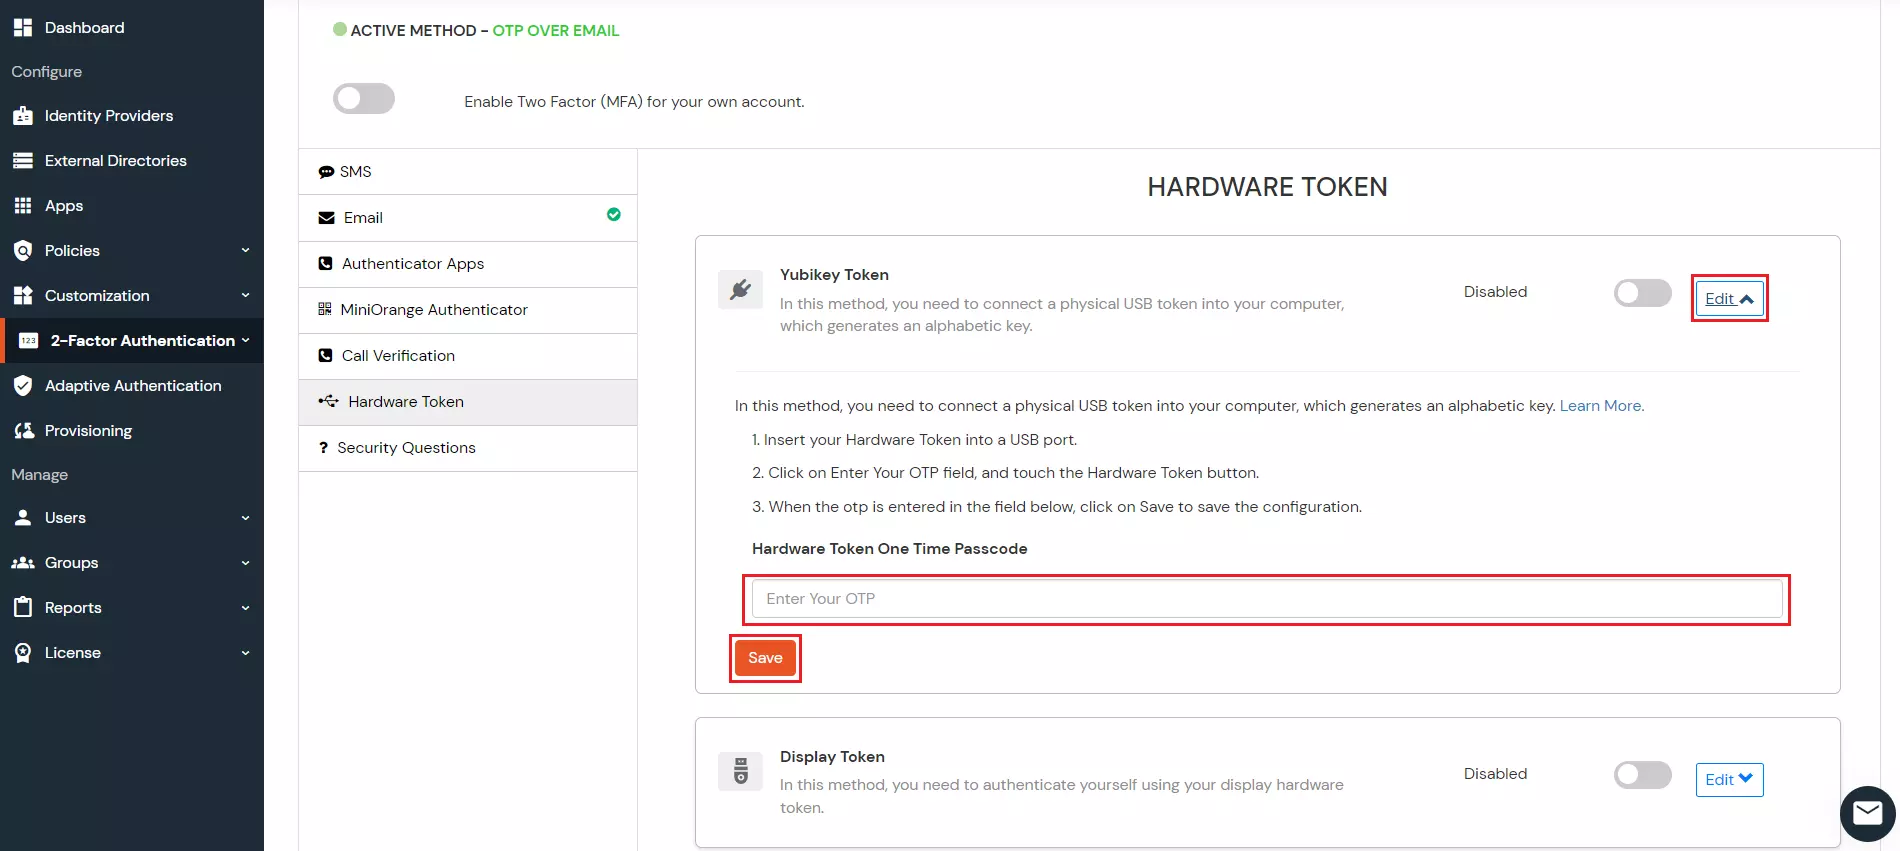
  • Select YubiKey Token in the Hardware Token tab to enable this method. Click on Edit.
  • select YubiKey Hardware Token 2FA method for admin

  • Firstly, you need to connect the YubiKey hardware through the USB port.
  • Click on the Enter OTP tab.
  • configure YubiKey Hardware Token

  • Now hold the hardware, otp will be automatically added in this field.
  • And you would be redirected to the configure 2FA field.
  • Next step is to Enable second factor if not done before.
  • To verify the second factor sign out and sign in again.
  • It will ask you Username and password. After that it is redirected to below page:
  • verify your identity as an admin to system

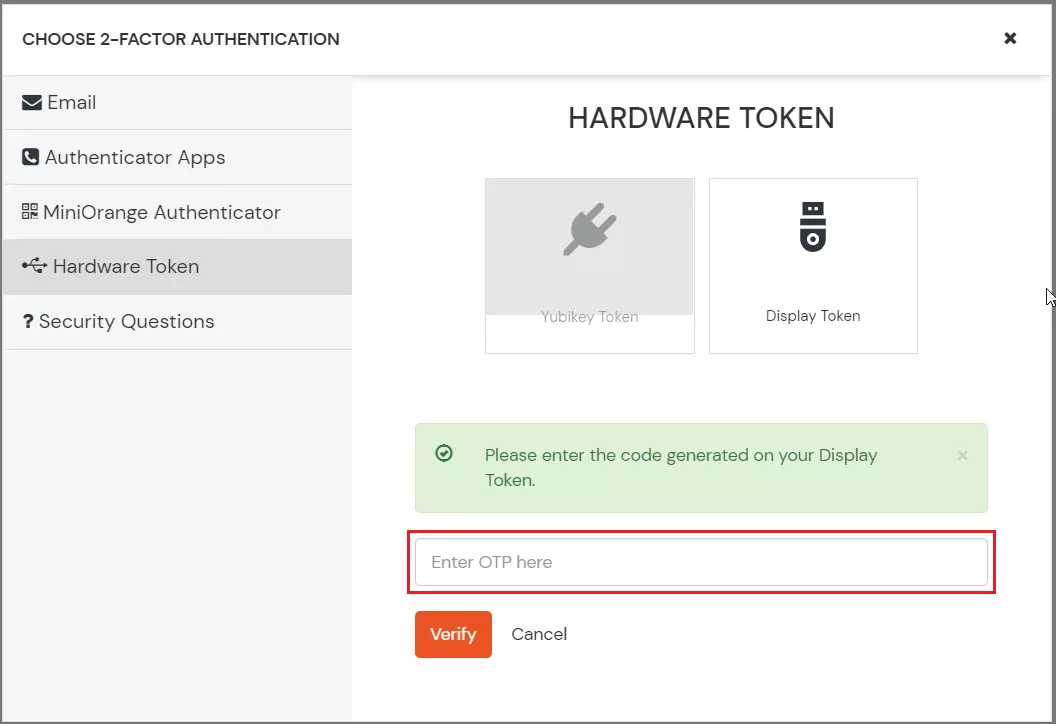
  • Here you need to select the Enter OTP field.
  • Select OTP field

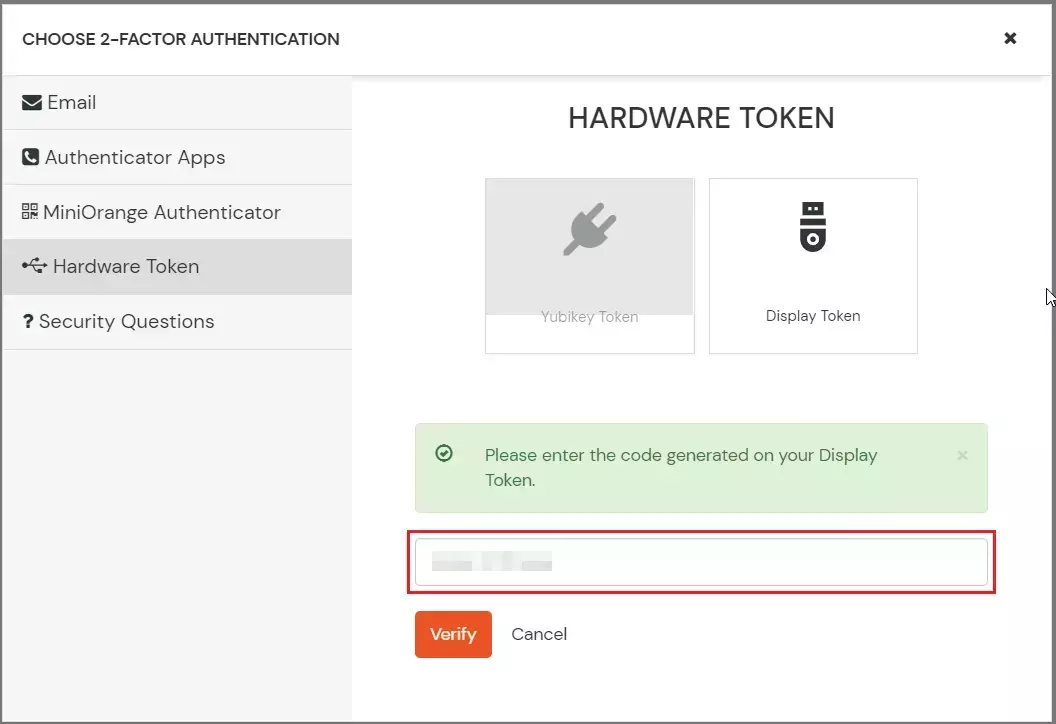
  • Press the Hardware token to get the key automatically.
  • Press hardware token to get key

  • If redirected to your dashboard it means you have successfully configured YubiKey Hardware Token 2FA method.

N. Display hardware Token

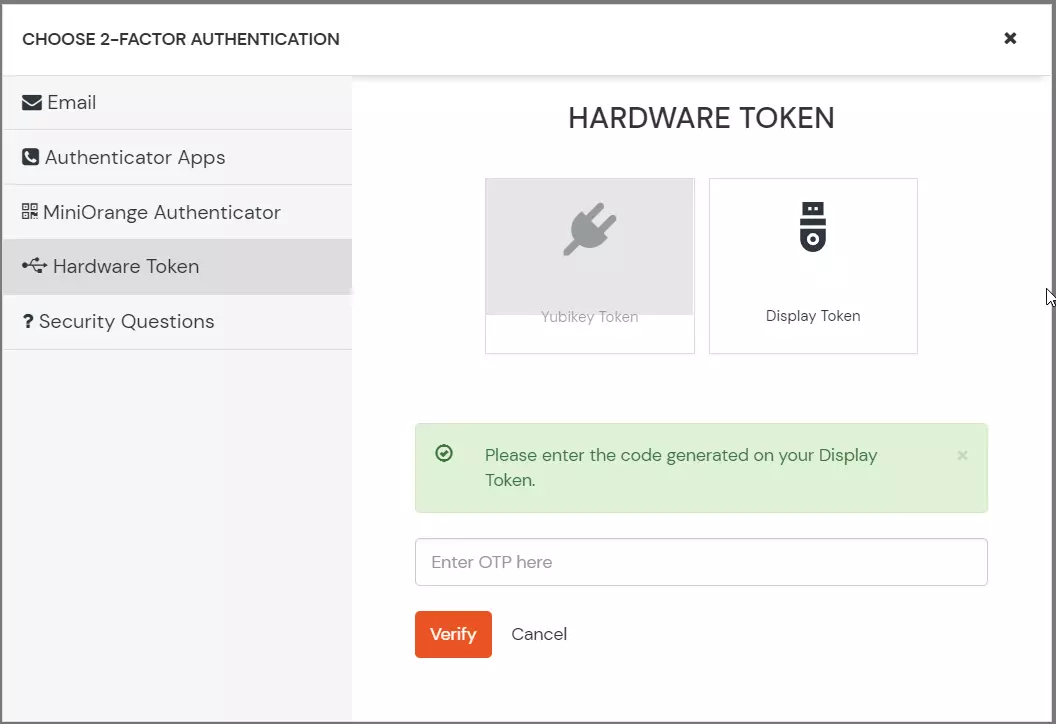
    "Display Hardware Token" is a 2fa verification method, in which a user needs to connect a USB into his computer which generates token in the form of a Numeric key. You need to assign a hardware token to users before enabling this 2FA method.
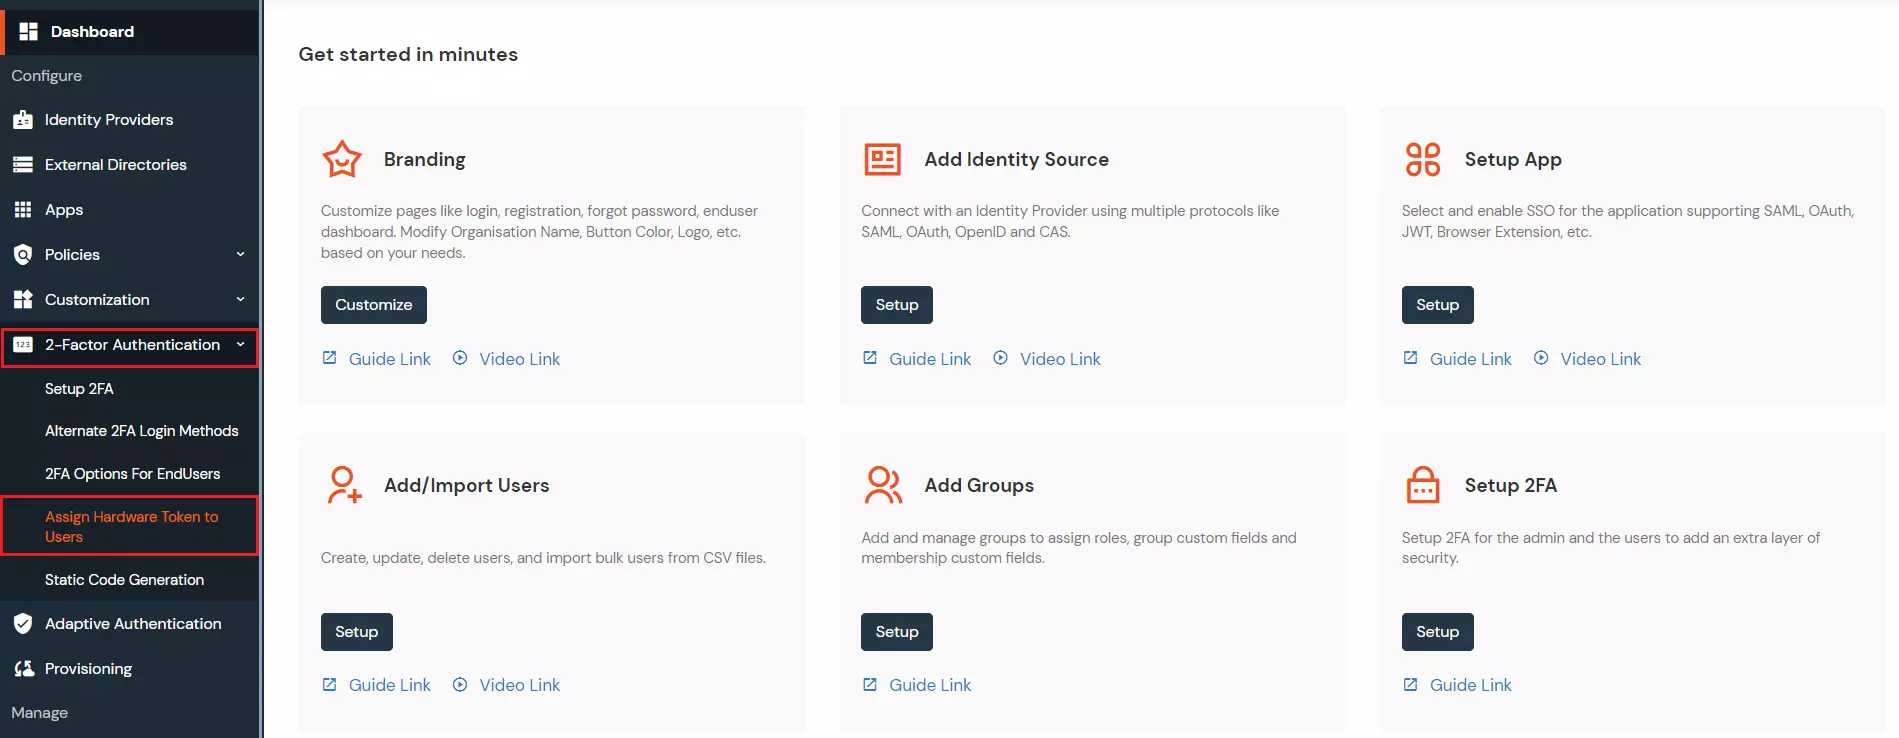
  • Navigate to 2-Factor Authentication > Assign Hardware Token to Users
  • 2FA Assign Hardware

  • Click on Assign Tokens
  • Assign Tokens

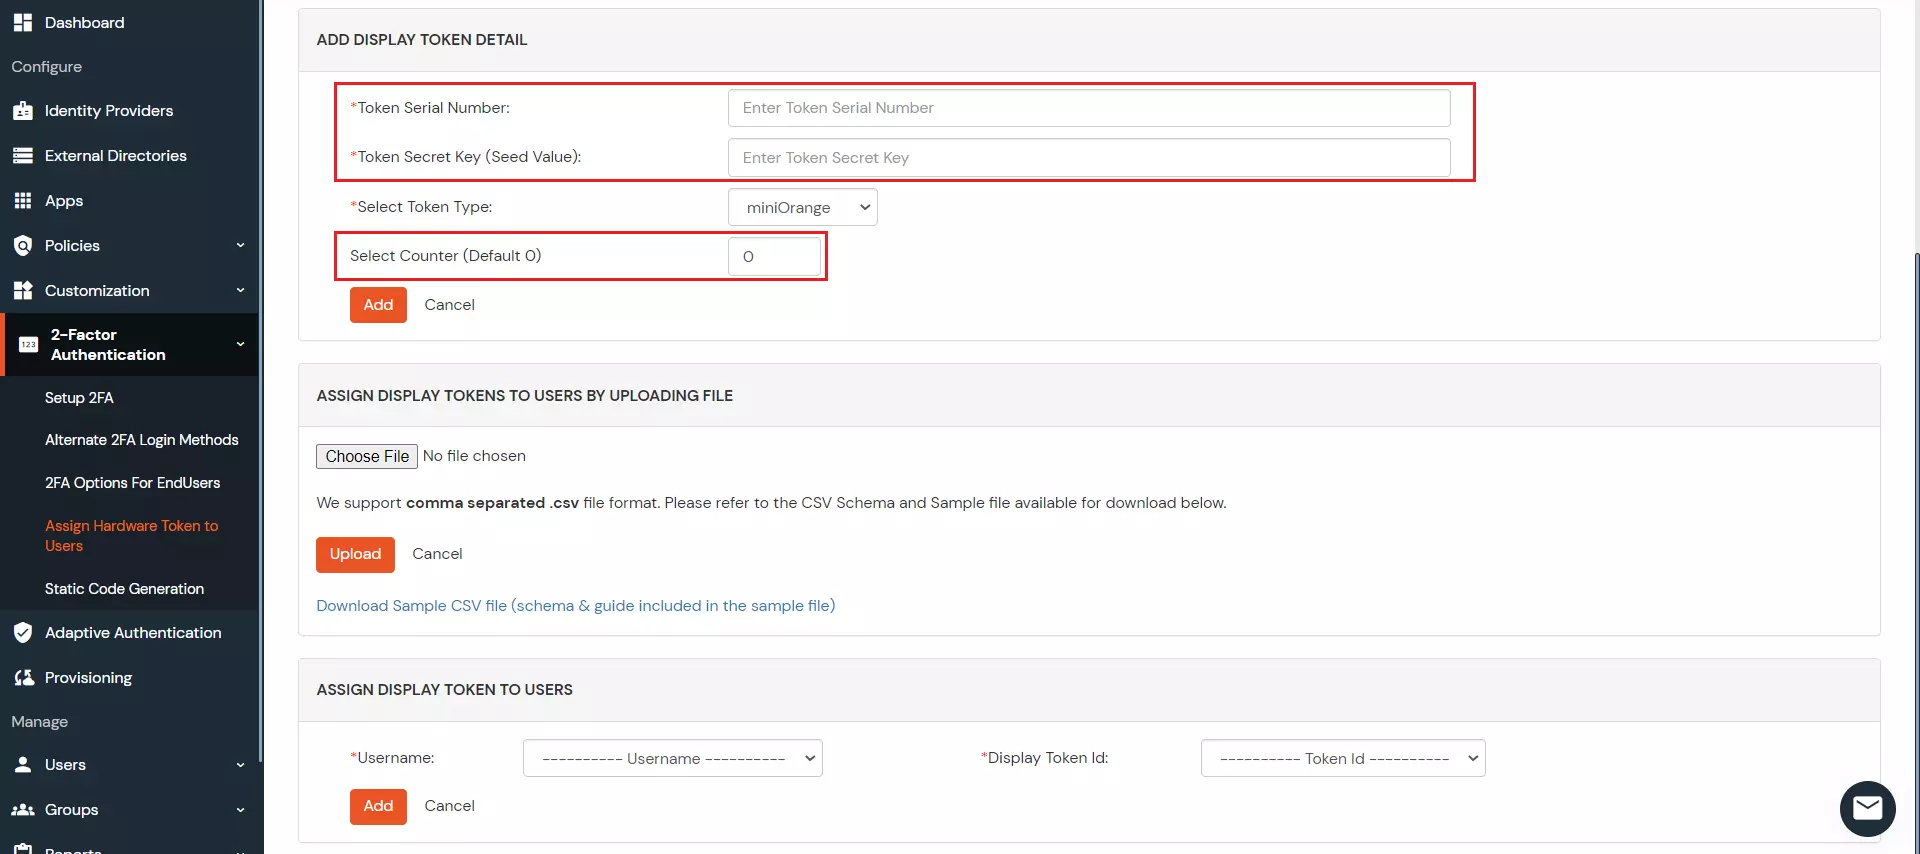
  • Add the Token Serial Number and Token Secret key. Set the Select Counter as either 30s or 60s.
  • Add token details

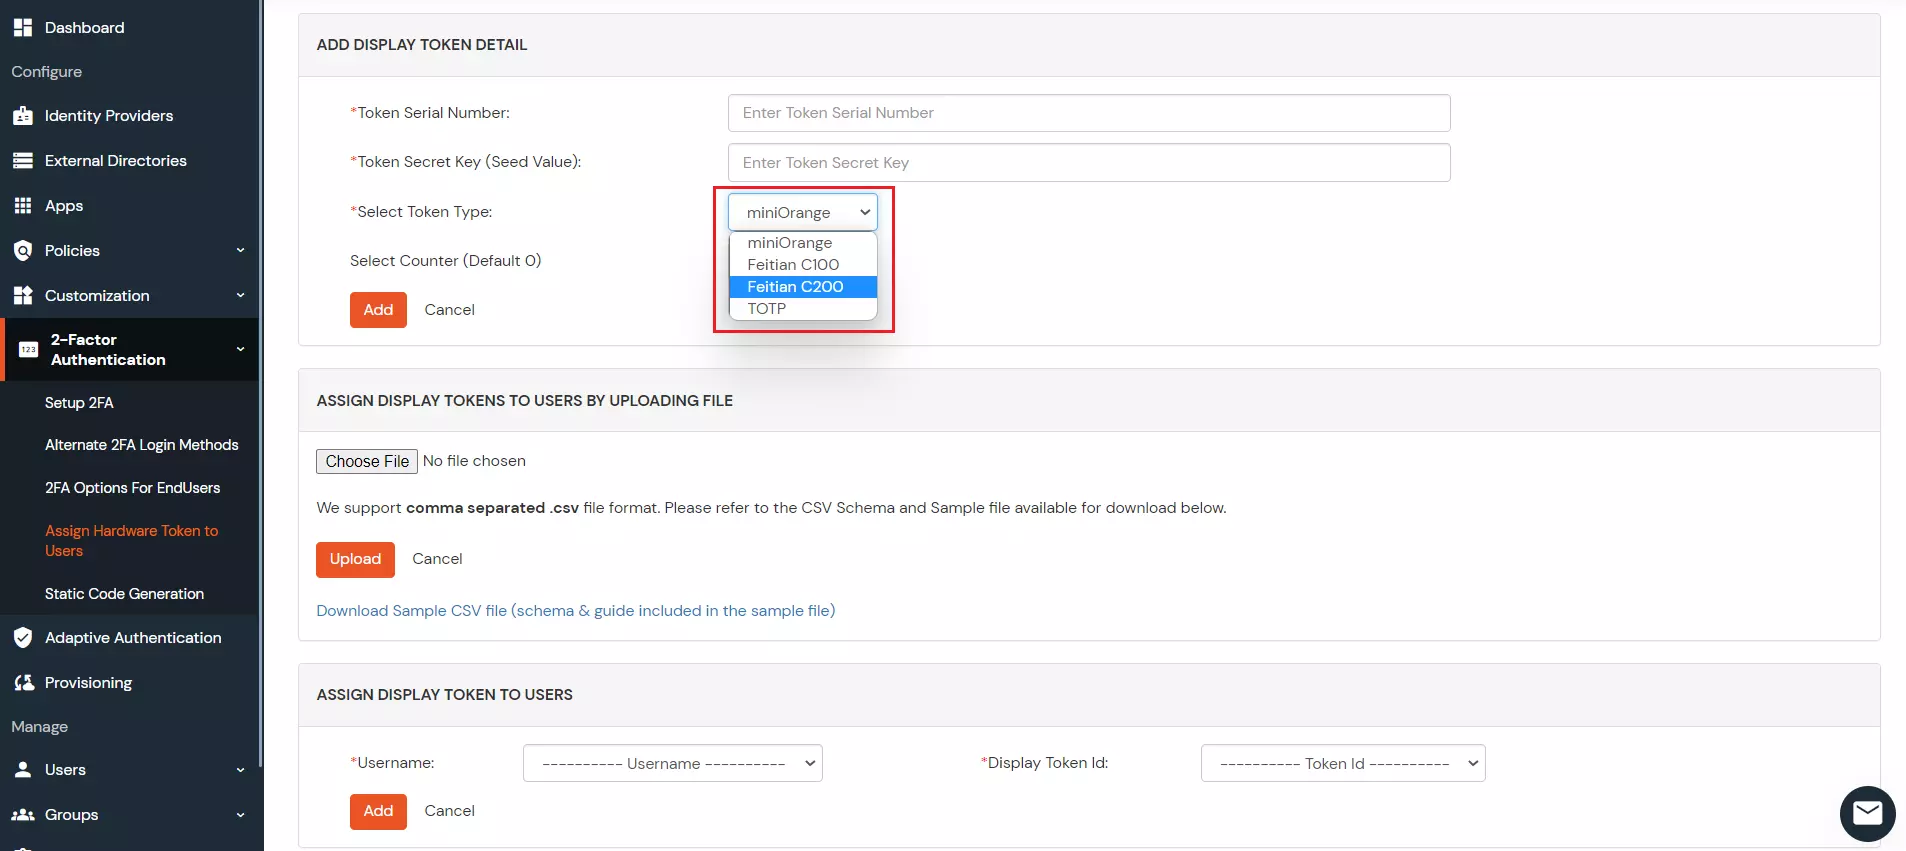
  • Click on the dropdown menu to select the Select Token Type
  • Select Token type

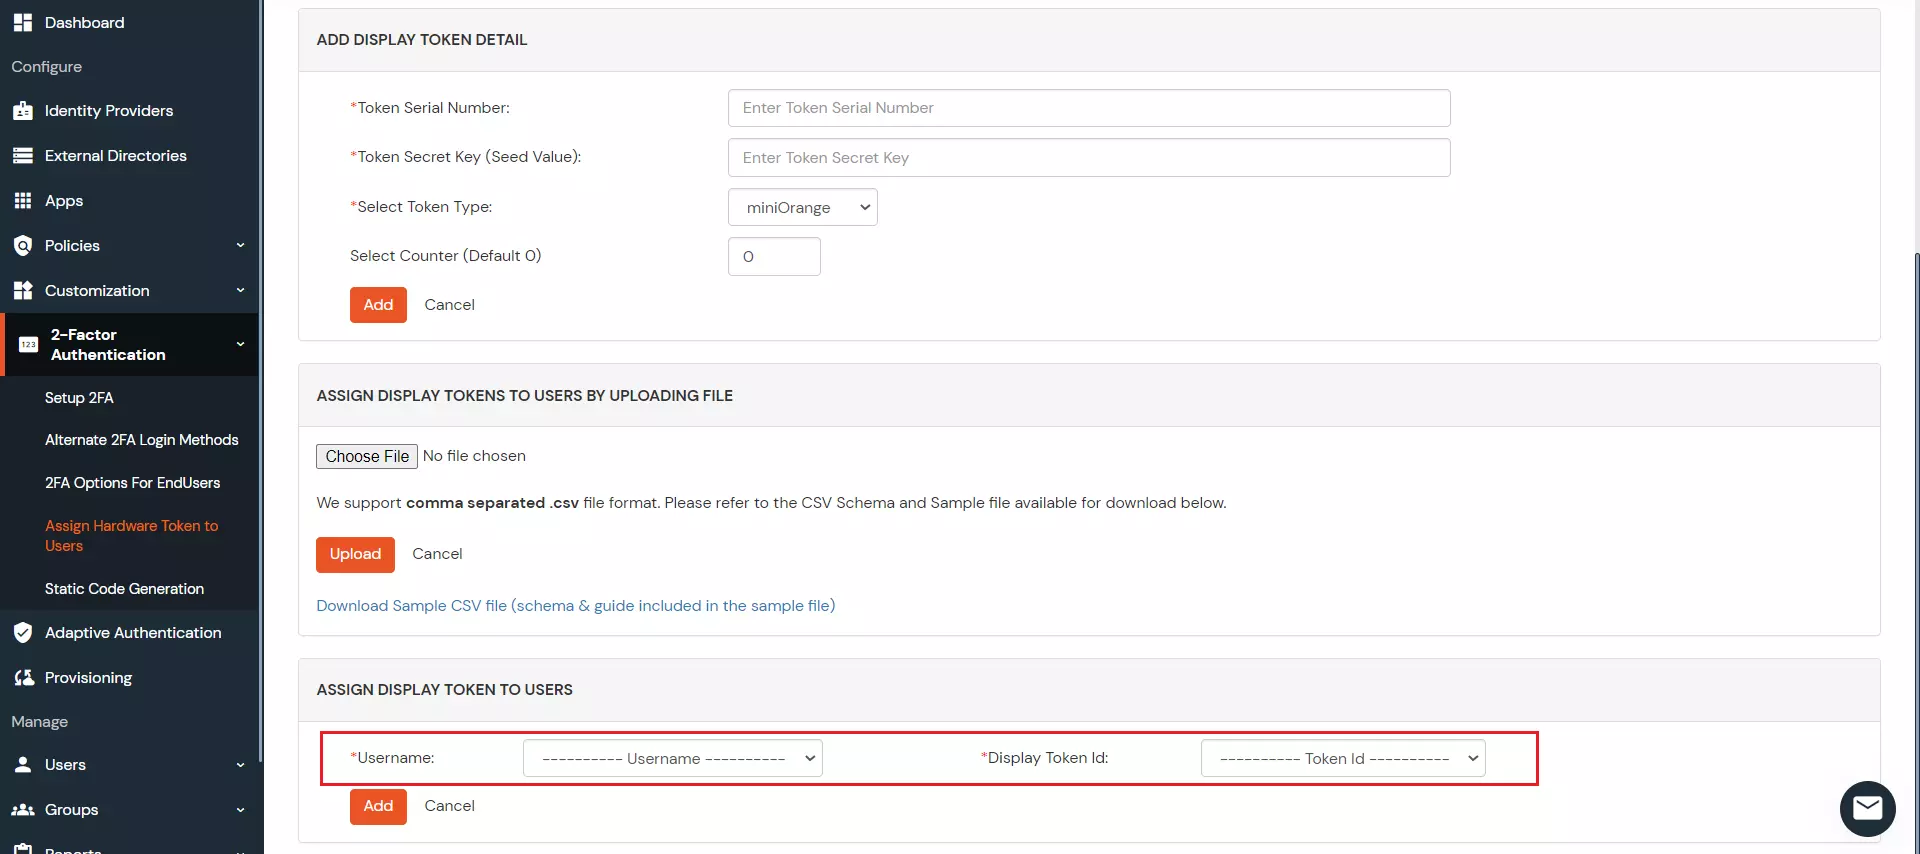
  • Select the Username and their respective Token Id
  • Display token to users

6. Security Questions

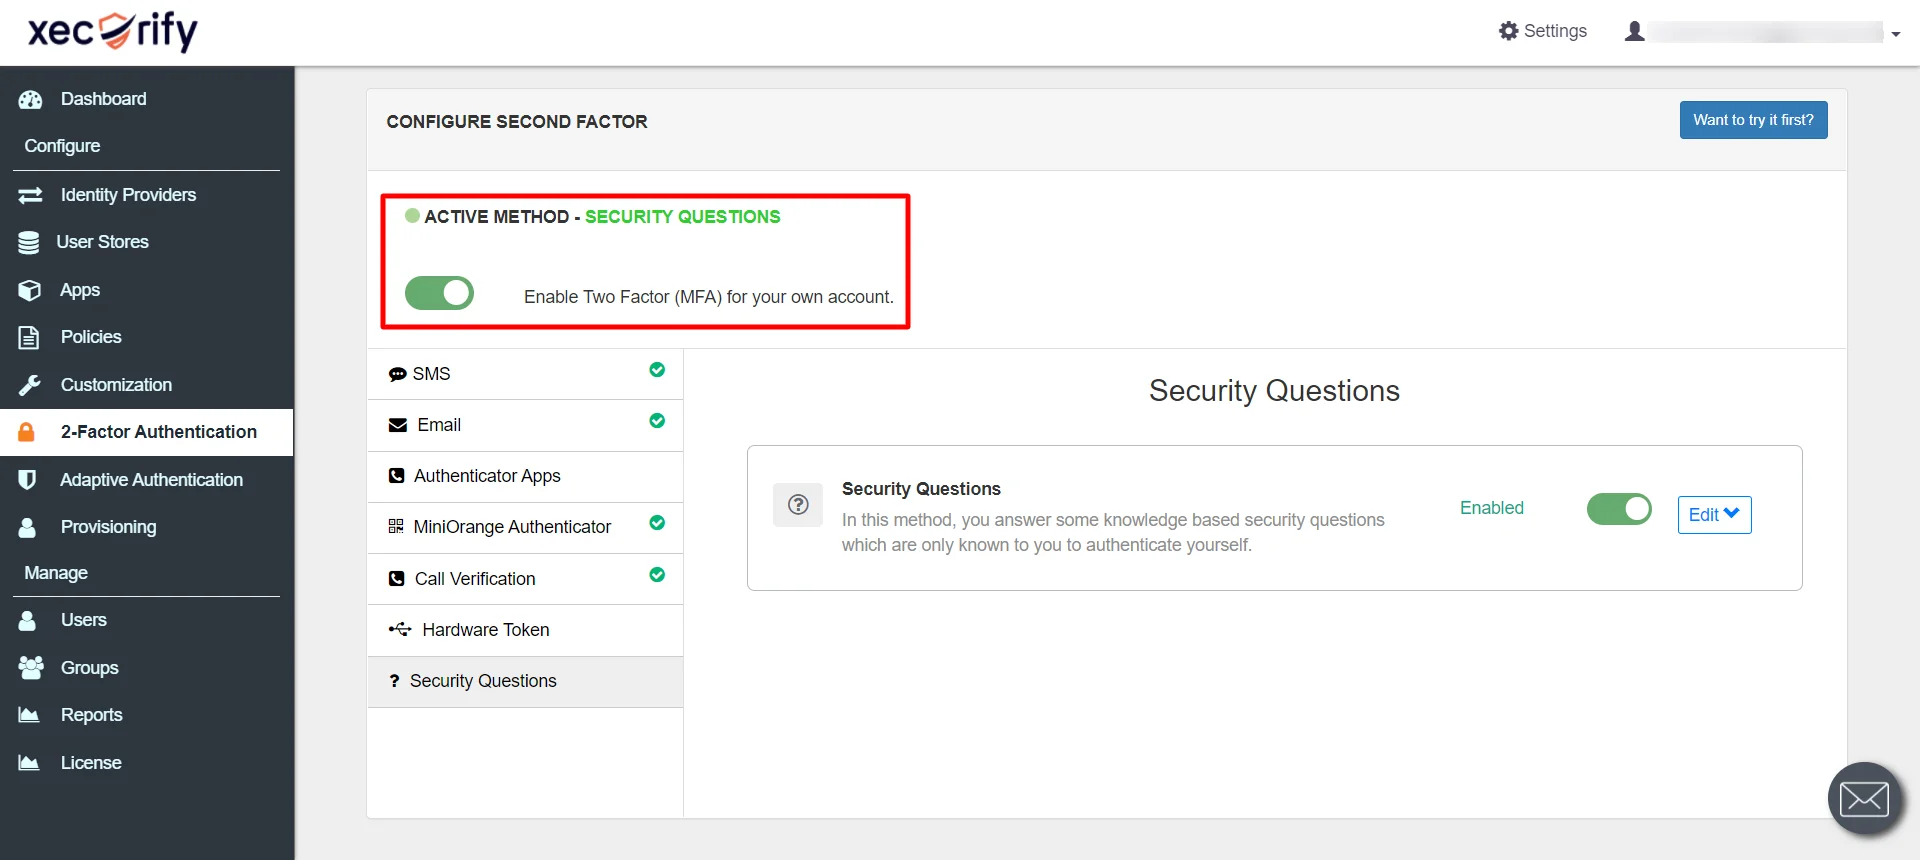
In this 2FA-method, user answers some knowledge-based security questions and customize one question which are only known to him to authenticate himself.
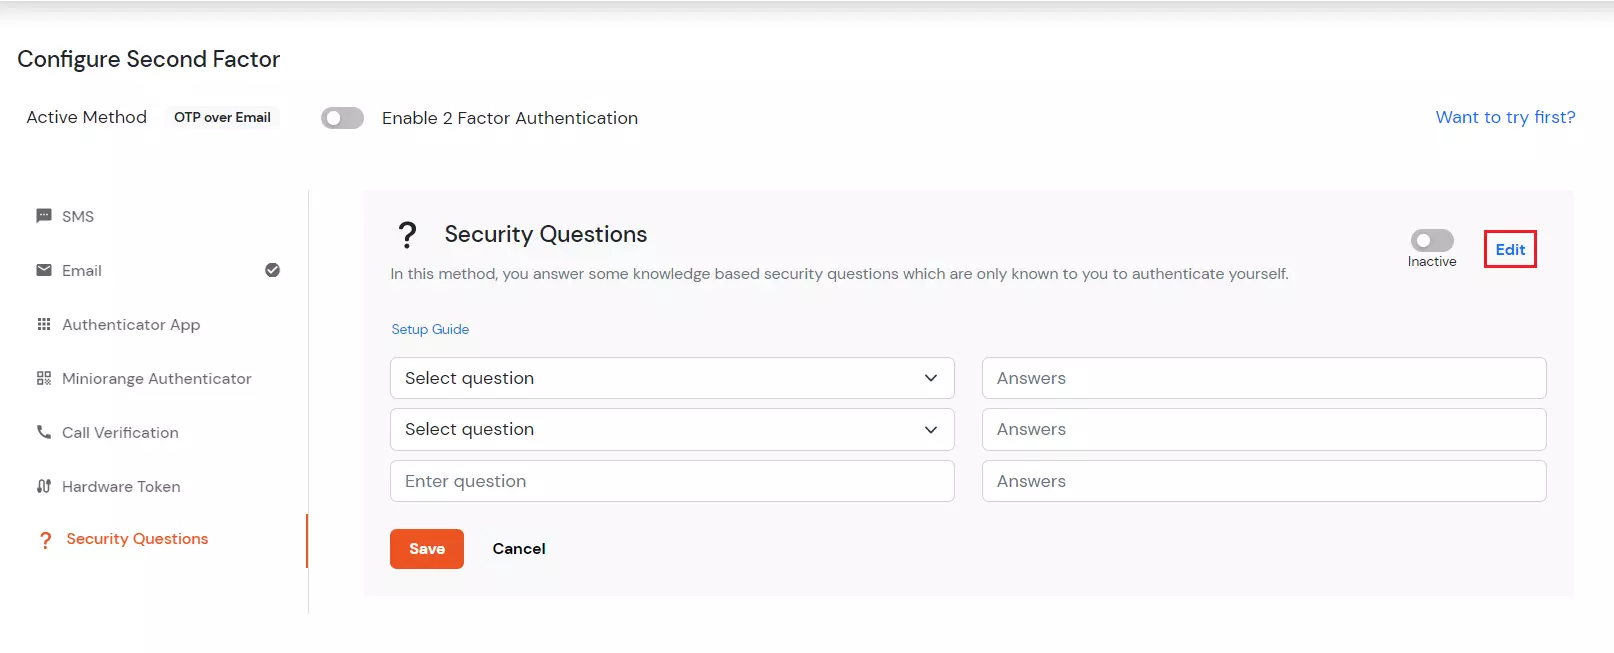
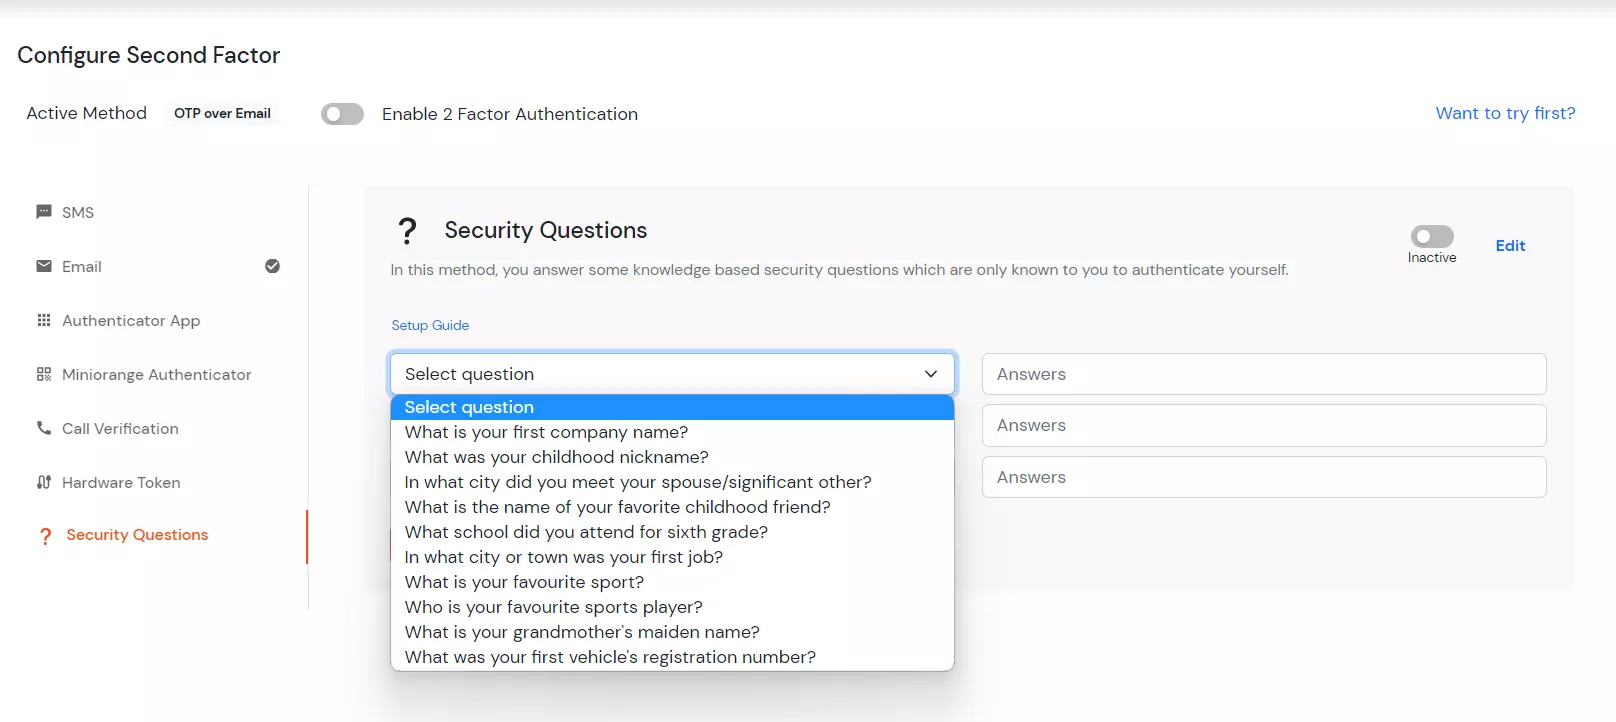
  • Select the Security Questions section, click on Edit.
  • Configure KBA method for admin

    select KBA as your 2FA method

  • Here you need to select 2 questions and answer them. And write the customized question and answer it.
  • Click on save.
  • Enable the second factor checkbox if not enabled already.
  • enable 2fa for admin

  • To confirm whether the 2FA is been activated, sign out and sign in again.
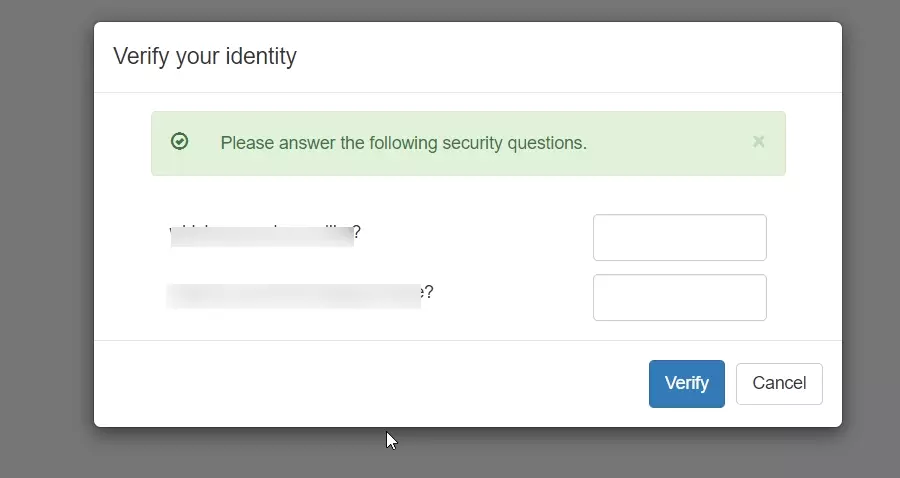
  • After entering your username and password you will be redirected to the below page:
  • Verify your identity as an admin

  • Answer your KBA question and click on verify.
  • You will see the admin(your) dashboard.
  • KBA method for admin successfully configured

  • In this way you have successfully configured KBA as your 2FA method.
  • Similarly you can configure other methods also.

7. FIDO2 (Biometric)

In this method, the users need to use built-in authentication methods (Windows Hello, inbuilt figerprint, Biometrics (Face ID or fingerprint)), Hardware security Token (eg. Yubikey FIDO2 Token) for 2FA verification.
[Note (Only for on-premise): You will have to set up SSL for your IDP deployment prior to using this MFA method.]
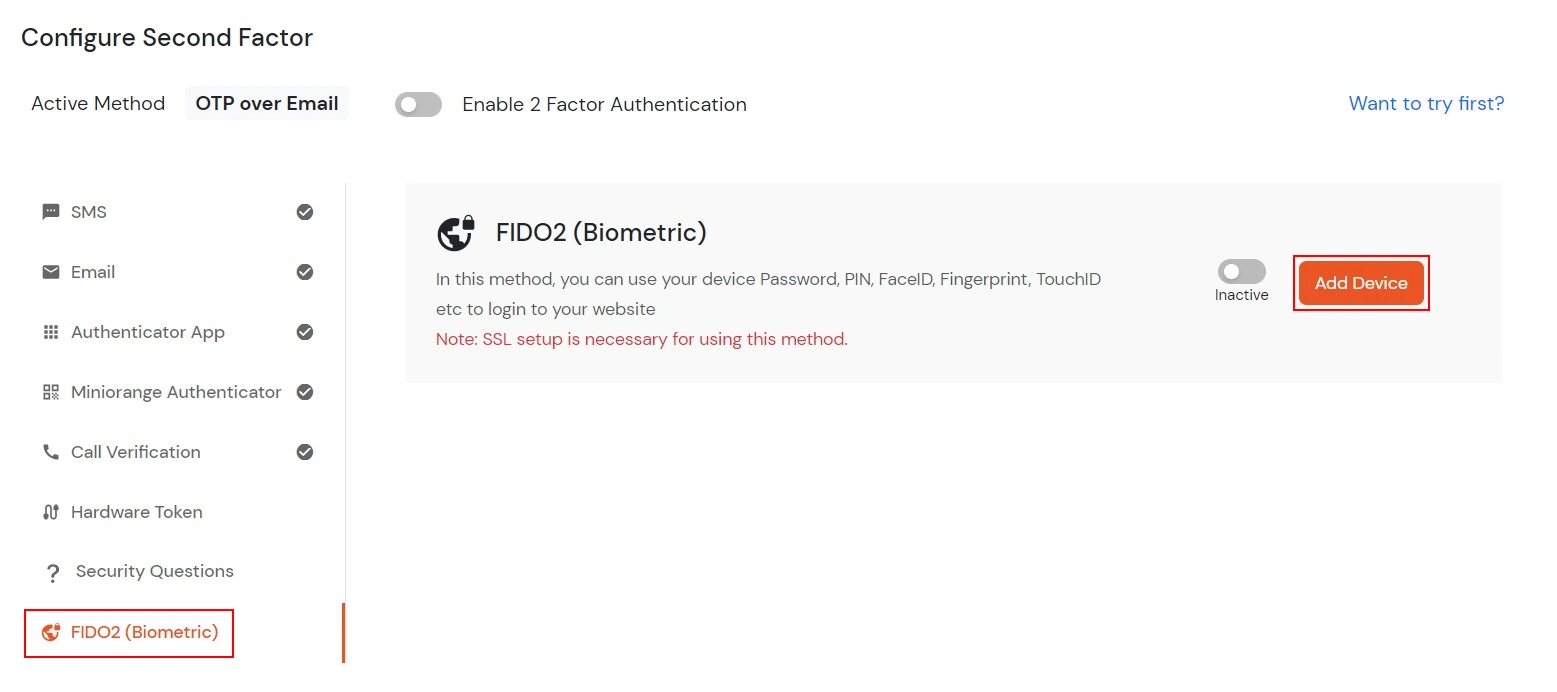
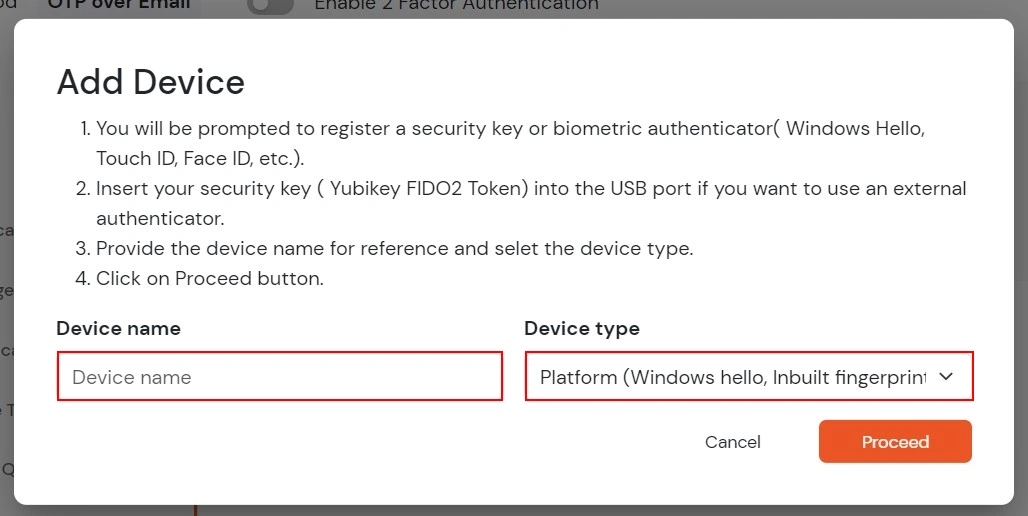
  • Select FIDO2 (Biometric) section, click on Add Device.
  • FIDO 2 method

  • Enter any relevant Device Name of your choice.
  • Select the Device Type which you want to register.
  • Click on Proceed.
  • Add device

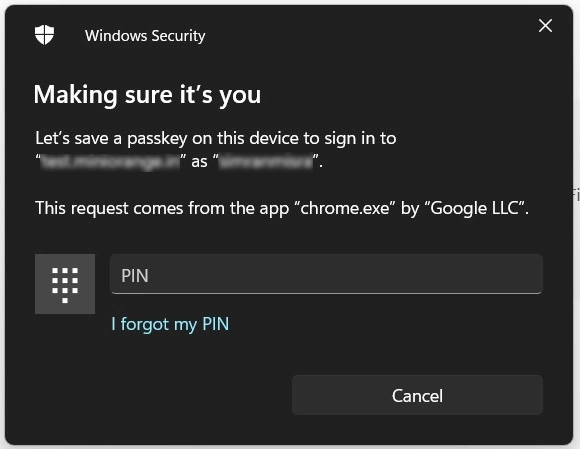
  • You will be prompted for the PIN/Touch ID/Password/Face ID depending on the type of device you are registering.
  • Windows security

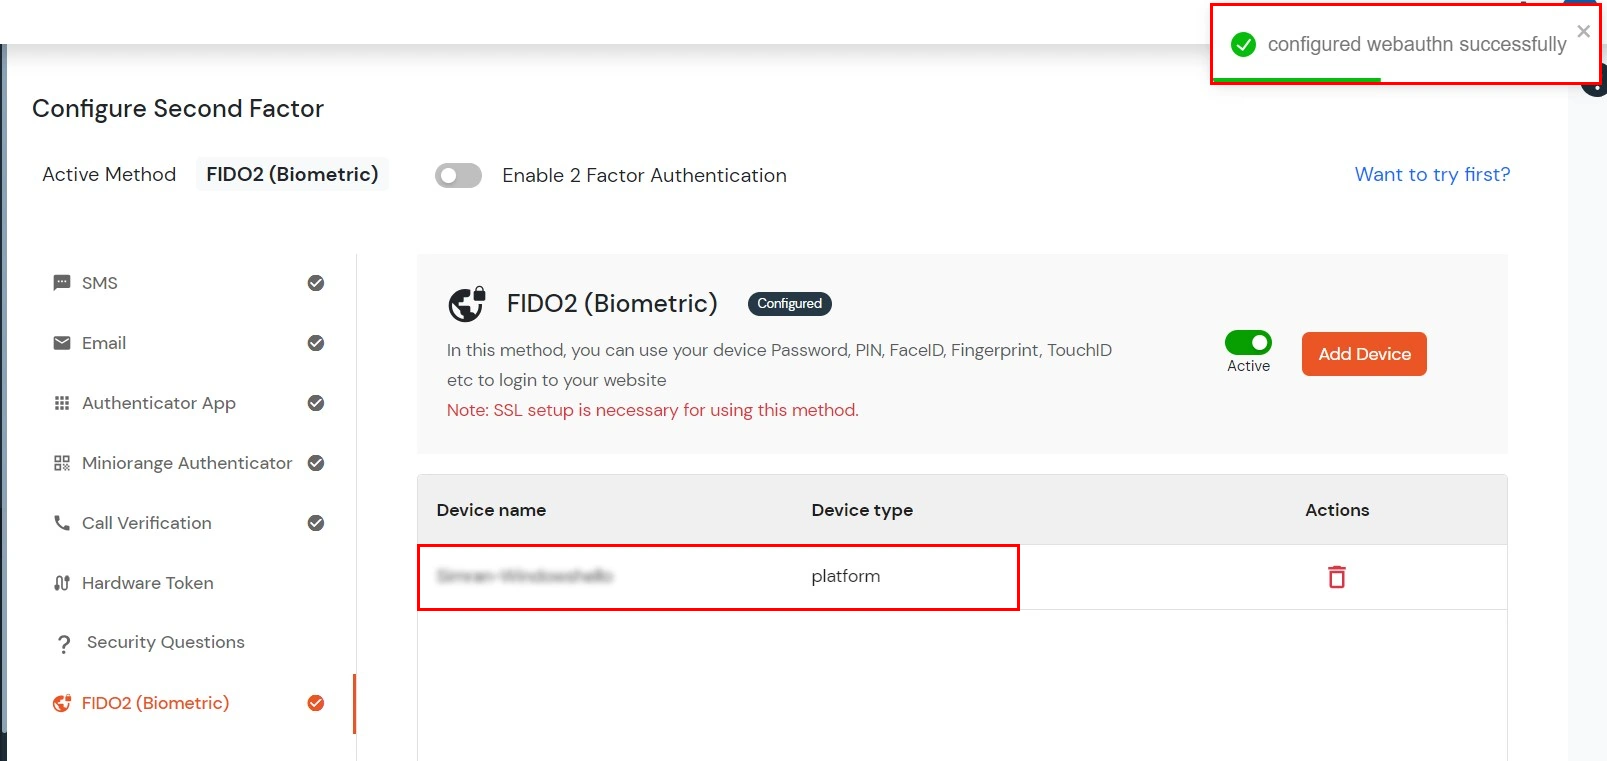
  • Once you enter the correct PIN/Touch ID/Password/Face ID, the device will be registered and you can see the message "Configured webauthn successfully" in green. You will also see your device registered below.
  • WebAuthen configured

  • Next step is to Enable 2 factor Authentication if not done before.
  • Enable 2fa

  • To verify the second factor, sign out and sign in again.
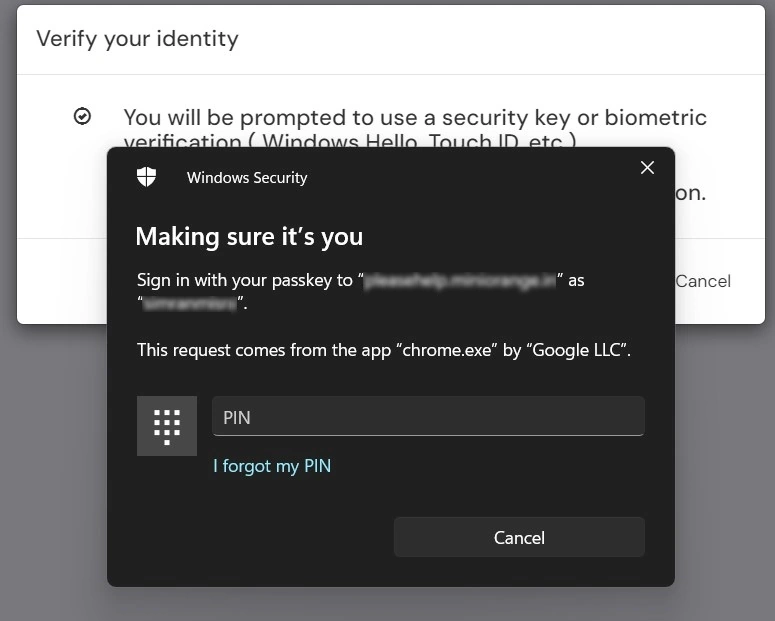
  • It will ask you for the Username and password. After that, you will be prompted to verify the second factor using your registered device.
  • Verify second factor authentication

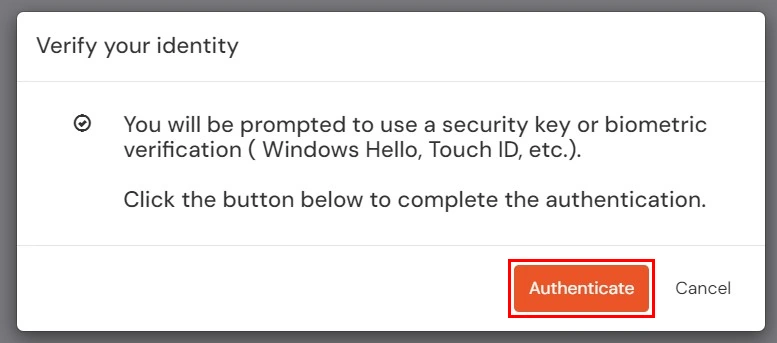
  • In case you do not receive any prompt or close the prompt by mistake, you can click on Authenticate to open the prompt again.
  • Authenticate

  • Enter your PIN/Touch ID/Password/Face ID for the registered device.
  • After this, if you are redirected to your dashboard, it means you have successfully configured the FIDO2 (Biometric) method.
  • miniOrange Dashboard