Hello there!

Need Help? We are right here!

miniOrange Email Support
success

Thanks for your Enquiry.

If you don't hear from us within 24 hours, please feel free to send a follow-up email to info@xecurify.com

Search Results:

×
SSL Setup for miniOrange PAM


  1. Create a directory and change the directory.
    Run:
    1. openssl genrsa -des3 -out {key_name}.key 4096
    2. Enter pass phrase and verify pass phrase.
    3. Privileged Access Management Admin Handbook: Create directory/change the directory to following the below command

  2. Generate Certificate Signing Request(CSR).
    Run:
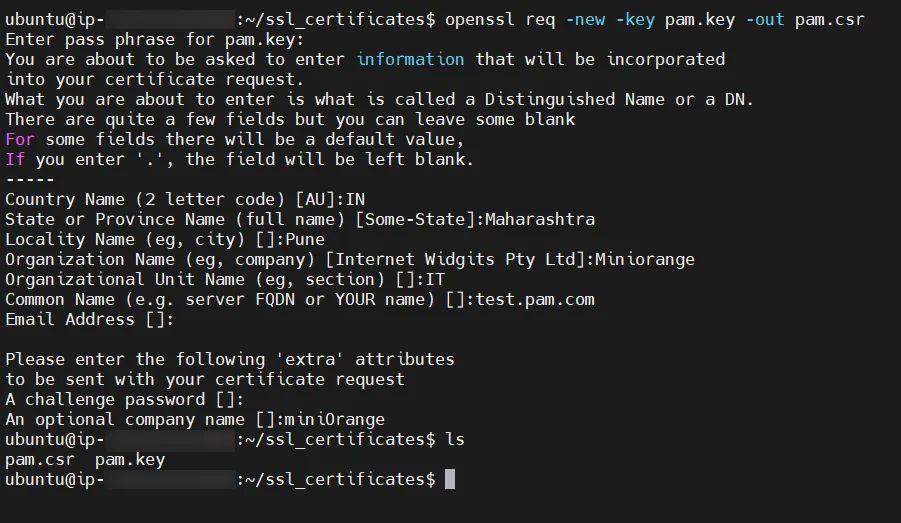
    1. openssl req -new -key {key_name}.key -out {key_name}.csr
    2. Enter the all required information to generate (CSR)
    3. Privileged Access Management Admin Handbook: Run the below command to Generate Certificate Signing Request (CSR)

  3. Now our {key_name}.key is password protected. If we use this file in our nginx every time our server starts or restarts we have to provide the password to our key and we do not want to do that so we are going to remove the password from our {key_name}.key file.
    Run:
    1. Make a copy of {key_name}.key file
      cp {key_name}.key {key_name}.key.pw
    2. Run: openssl rsa -in {key_name}.key.pw -out {key_name}.key
    3. Now {key_name}.key is password free.
    4. Privileged Access Management Admin Handbook: Our <key_name>.key is password protected

  4. Now we can give generated CSR to a certificate authority which would give us a valid signed key.
  5. But In this document, we will self-signed it.
    Run:
    1. openssl x509 -req -in {key_name}.csr -signkey
      {key_name}.key -out {key_name}.crt
    2. Privileged Access Management Admin Handbook: Following the below command to self signed it

  6. Create a directory at /etc/nginx/ssl
    Run:
    1. Copy certificates in the directory.
    2. Run: sudo cp {key_name}.crt /etc/nginx/ssl
      sudo cp {key_name}.key /etc/nginx/ssl
  7. Edit /etc/nginx/site-available/default
    Run:
    1. sudo vim /etc/nginx/site-available/default
    2. Delete all the content of the default file and paste the below content.
    3. server { listen 80 default_server; listen [::]:80 default_server; server_name _; client_max_body_size 100M; listen 443 ssl; server_name test.pam.com; ssl_certificate /etc/nginx/ssl/pam.crt; ssl_certificate_key /etc/nginx/ssl/pam.key; ssl_session_timeout 5m; ssl_protocols TLSv1 TLSv1.1 TLSv1.2 TLSv1.3; ssl_ciphers HIGH:!aNULL:!MD5; location / { root /var/www/html; index index.html; try_files $uri /index.html; } location /apps { rewrite ^/apps(.*) $1 break; proxy_pass http://unix:/run/mopam.sock; proxy_http_version 1.1;proxy_set_header Upgrade $http_upgrade; proxy_set_header Connection "upgrade"; proxy_set_header Host $host; proxy_set_header X-Forwarded-For $proxy_add_x_forwarded_for; proxy_set_header X-Forwarded-Proto $scheme; } location /openid { proxy_pass http://unix:/run/oauth2client.sock; proxy_set_header Host $host; proxy_set_header X-Forwarded-For $proxy_add_x_forwarded_for; proxy_set_header X-Forwarded-Proto $scheme; } location /audits { proxy_pass http://unix:/run/audits.sock; proxy_set_header Host $host; proxy_set_header X-Forwarded-For $proxy_add_x_forwarded_for; proxy_set_header X-Forwarded-Proto $scheme; } location /apps/static/ { alias /home/ubuntu/pam/mopam/static/; } location /apps/media/ { alias /home/ubuntu/pam/mopam/media/; } location /openid/static/ { alias /home/ubuntu/pam/oauth2client/static/; } location /audits/static/ { alias /home/ubuntu/pam/audits/static/; } }

Now restart nginx using sudo systemctl restart nginx.service